
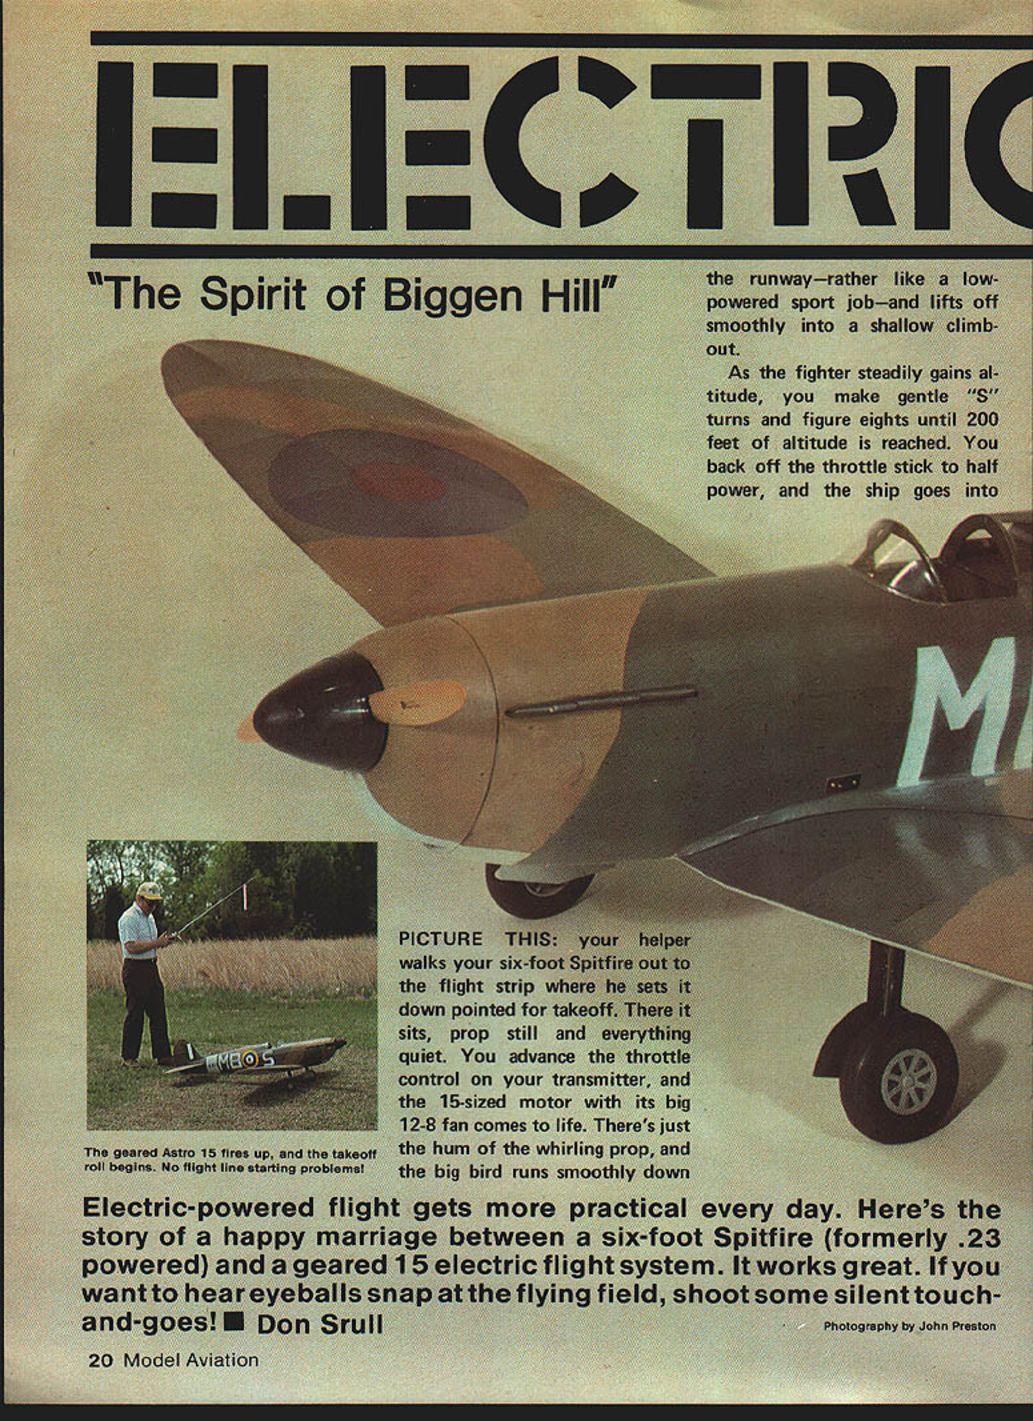
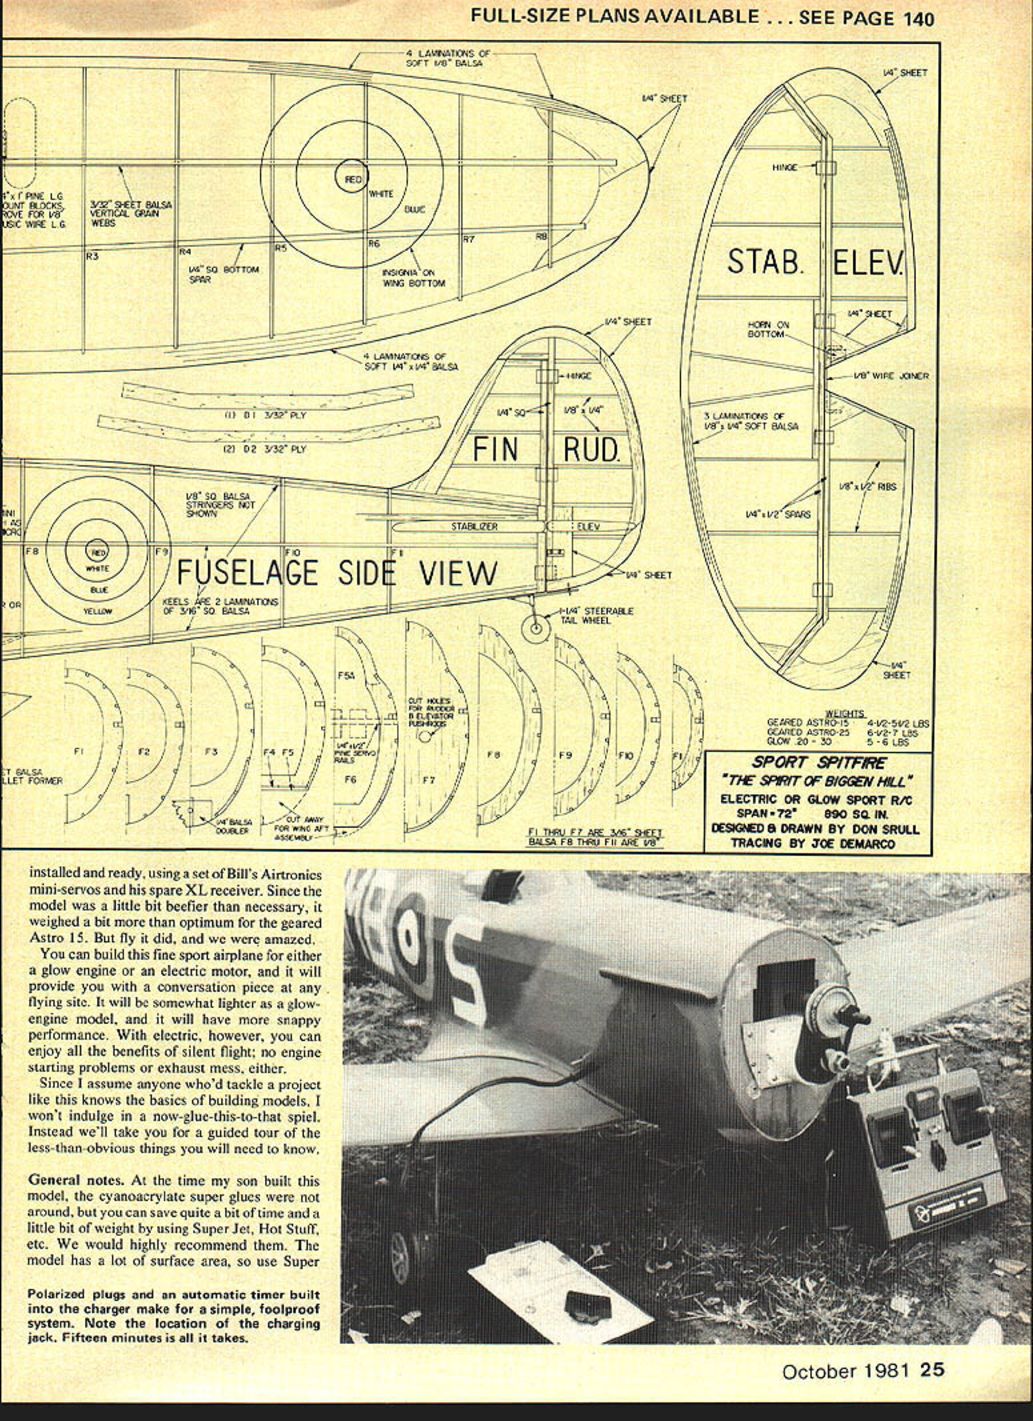
Electric Spitfire: "The Spirit of Biggin Hill"
By Don Srull
PICTURE THIS: your helper walks your six-foot Spitfire out to the flight strip where he sets it down pointed for takeoff. There it sits, prop still and everything quiet. You advance the throttle control on your transmitter, and the geared 15-sized motor with its big 12-8 fan comes to life. There's just the hum of the whirling prop, and the big bird runs smoothly down the runway—rather like a low-powered sport job—and lifts off smoothly into a shallow climbout.
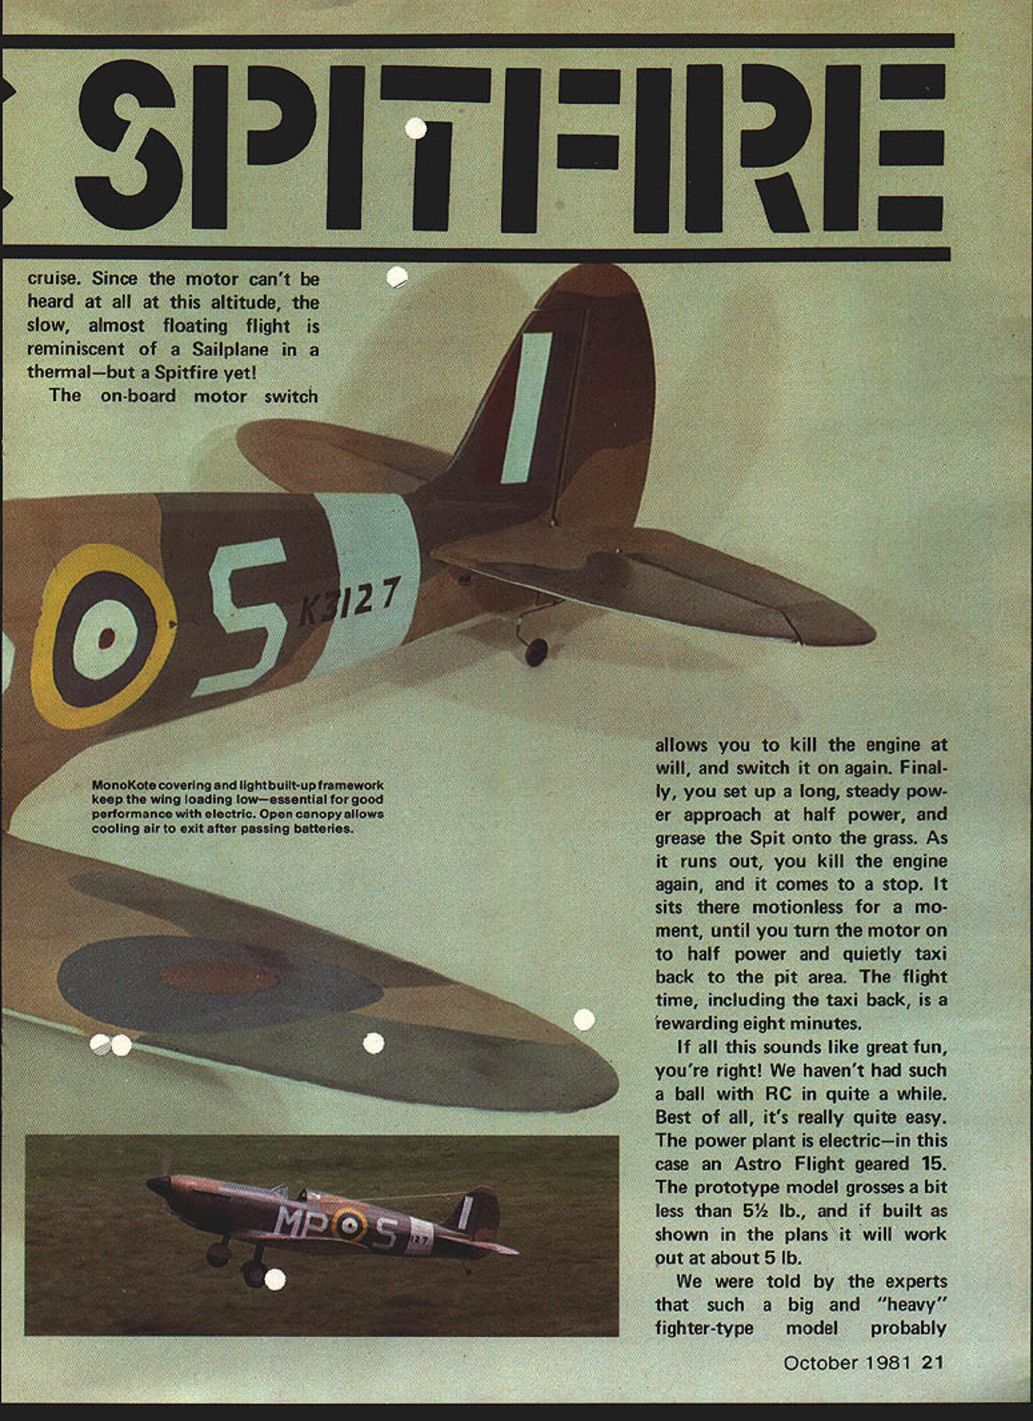
As the fighter steadily gains altitude, you make gentle "S" turns and figure eights until 200 feet is reached. You back off the throttle stick to half power, and the ship goes into cruise. Since the motor can't be heard at that altitude, the slow, almost floating flight is reminiscent of a sailplane in a thermal—but a Spitfire yet! The on-board motor switch allows you to kill the engine at will and switch it on again. Finally, you set up a long, steady power approach at half power, and grease the Spit onto the grass. As it runs out, you kill the engine again, and it comes to a stop. It sits motionless for a moment, until you turn the motor on to half power and quietly taxi back to the pit area. The flight time, including taxi back, is a rewarding eight minutes.
If all this sounds like great fun, you're right! We haven't had such a ball with RC in quite a while. Best of all, it's really quite easy. The power plant is electric—in this case an Astro Flight geared 15. The prototype model grosses a bit less than 5½ lb., and if built as shown in the plans it will work out at about 5 lb.
We were told by the experts that such a big and "heavy" fighter-type model probably would not fly on the Astro 15, and if it did, it would fly like a truck. Well, you can't compare this Spitfire to a glow-powered Falcon or Kadet, but electric power is an entirely different ball game.
After the first five or six minutes of airtime with such a graceful bird, we guarantee you'll feel a new kind of modeling thrill—different from any you've experienced before. Spectators and fellow fliers will stop to look; just watch their faces as you cut off power at altitude, glide in dead stick, then turn on power at the last moment and go around. One spectator (who was unmoved by other sights on this busy Sunday) walked over and knelt for a close look at the Spit after seeing it fly. He said under his breath, "The Spirit of Biggin Hill." Perhaps he had flown the real one from Biggin Hill during the Battle of Britain.
There's something of a story behind this model. Back in 1973, after my son Mark had learned to fly simple sport RC models, he wanted to build a Spitfire—a big Spitfire. The usual heavy RC scale models of this type would have been beyond his capability to build and fly. A very light, simple version seemed appropriate, so I drew one, borrowing heavily from an Earl Stahl rubber-powered Spitfire that had been published in Model Airplane News years ago. Clean lines and ample wing area make the Spitfire an ideal subject for electric scale WWII. It also gives fine performance with glow power.
Years ago in Model Airplane News, it was basically a six-foot, gas-powered "ghost ship" employing rubber-modeling and free-flight techniques. Power was a .23 glow engine; using three channels for control, it had a respectable amount of speed and could cruise on two-thirds power. It would float in for landings, and touch-and-goes were a cinch. After a couple of years of use, it was hung up in a remote corner of the basement.
Enter Bill Winter, who has a fascination with unique and off-beat modeling things. Every time Bill visited our shop, he'd wander over to that dark corner and gaze for minutes at the Spitfire. Then one night he arrived with his new geared Astro Flight 15 system which he was going to use (and still plans to use) in Astro's six-foot Porterfield kit. The geared 15 is a fascinating gadget and Bill was anxious to test it out in a model. In a rash moment I said, "Why don't we try the electric system in the Spitfire?"
For months we discussed the possibilities. Would it fly? How would it fly? Would it take off from the ground? There was only one way to find out, so the next time Bill appeared I had it installed and ready, using a set of Bill's Airtronics mini-servos and his spare XL receiver. Since the model was a little bit beefier than necessary, it weighed a bit more than optimum for the geared Astro 15. But fly it did, and we were amazed.
You can build this fine sport airplane for either a glow engine or an electric motor, and it will provide you with a conversation piece at any flying site. It will be somewhat lighter as a glow-engine model, and it will have more snappy performance. With electric, however, you can enjoy all the benefits of silent flight: no engine starting problems or exhaust mess, either.
Since I assume anyone who'd tackle a project like this knows the basics of building models, I won't indulge in a now-glue-this-to-that spiel. Instead we'll take you for a guided tour of the less-than-obvious things you will need to know.
General notes
At the time my son built this model, cyanoacrylate super glues were not around, but you can save quite a bit of time and a little weight by using Super Jet, Hot Stuff, etc. We highly recommend them. The model has a lot of surface area, so use Super MonoKote or some other lightweight covering material for minimum weight. Super MonoKote also has the correct matte colors for a scale-like finish. Be aware that a typical fabric covering and paint job could add so much weight as to render the ship unflyable on the Astro 15. With a glow engine or the Astro 25, the extra weight would not be so critical.
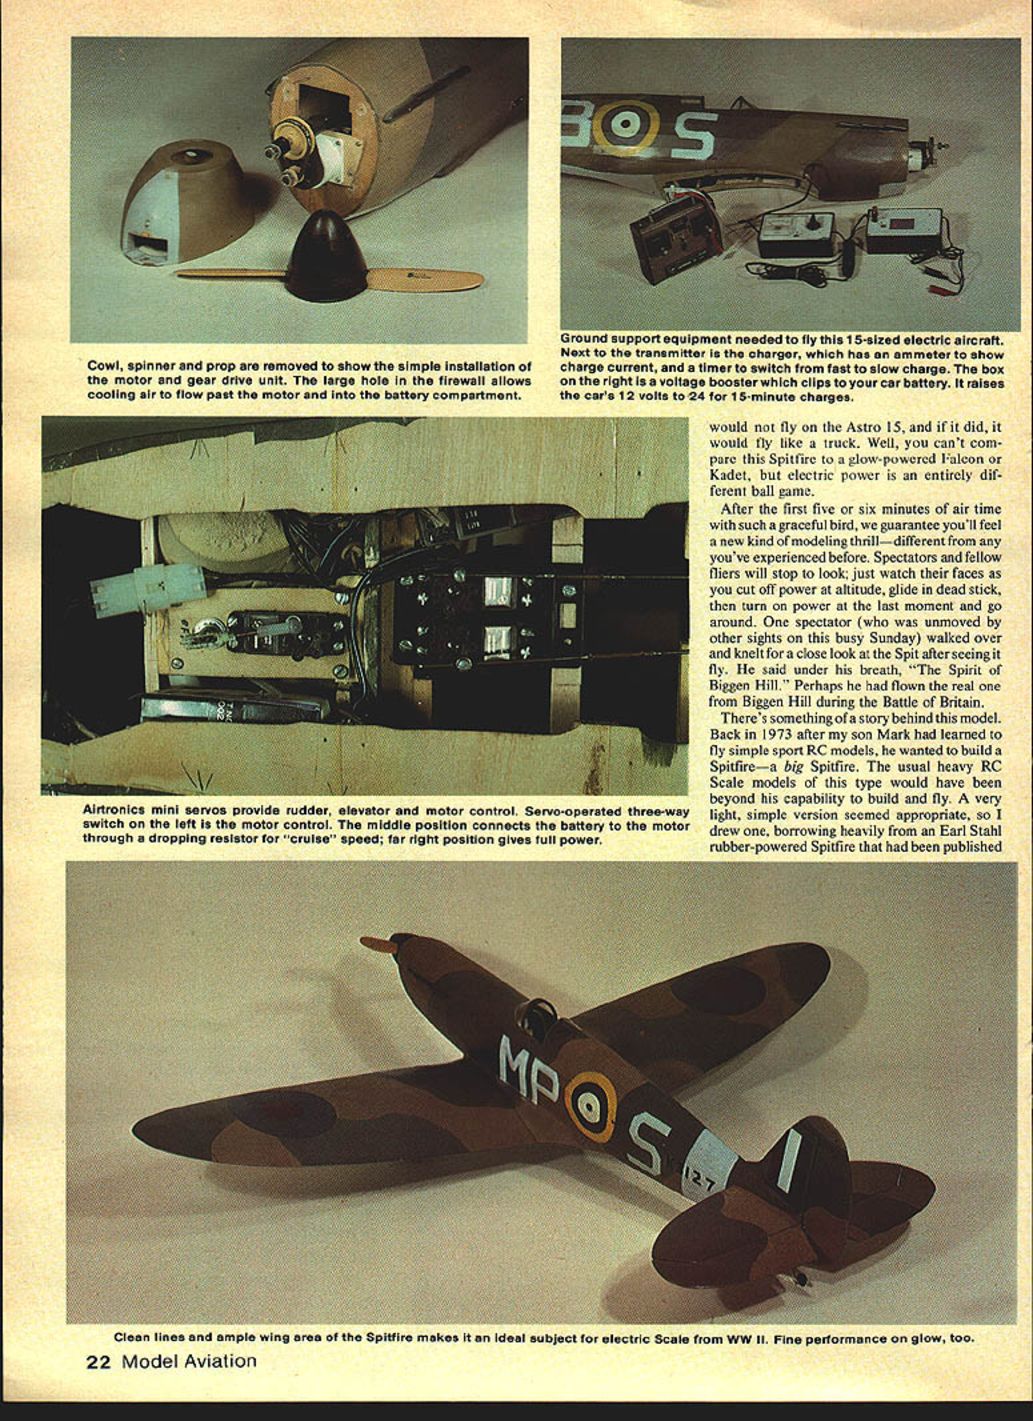
Polarized plugs and an automatic timer built into the charger make for a simple, foolproof charging system. Note the location of the charging jack. Fifteen minutes is all it takes for a charge with the charging rig we used: the charger has an ammeter to show charge current, a timer switch (fast–slow charge), and a voltage booster with clips to a car battery to raise the car's 12 volts to 24 for 15-minute charges.
Use mini servos to provide rudder, elevator, and motor control. A servo-operated three-way switch is an effective motor control: the middle position connects the battery to the motor through a dropping resistor for cruise speed; the far-right position gives full power. We used an inexpensive three-position switch from Astro Flight (it comes with the appropriate resistor) which provides high, cruise, and off motor control. It is operated by the motor control servo.
There are some special requirements to look out for if you are going electric:
- The system should have a fuse, even if you have a shut-off operated by RC. Without a fuse, a snagged prop on a botched takeoff or landing could damage the motor or batteries before you get the motor turned off.
- Use a motor cut-off or speed control.
- Provide adequate cooling airflow for motor and batteries; follow the plans. On this model the cooling air is taken in through openings in the firewall and exhausted through the open cockpit. The batteries in our ship never get very hot—you can hold a finger on them at the end of a flight.
- It's very important to find and use the right prop with electric power. Use the size the instructions recommend as a start, but experiment to find the optimum prop for your particular model. In general, the pitch required is rather high; at least 8 in. in the case of the Spitfire. The belt drive means the unit puts out about half the normal rpm but twice the torque compared to an ungeared motor, so you can use a large-diameter, high-pitch prop. On a 12-6 we found the Spit wouldn't take off, but on a 12-8 it came alive. A 13-8 should give even better performance.
- We had not tried the geared Astro Flight 25 at the time of writing, but it should provide a terrific increase in performance. Gross weight would increase about a pound, but the much greater power of the 25 should fire up the Spitfire and perhaps even yield modest aerobatic capabilities.
We highly recommend the book The Silent Revolution published by Astro Flight. It contains everything you need to know about systems, sizes, and weights of planes suitable for electric power. We gambled somewhat on this Spitfire, because it was almost one pound heavier than the recommended gross. (The version shown on the plans should save 1/2 lb. or more compared to our prototype.) The Spit's generous wing area, however, yielded a wing loading that was in the ballpark recommended by authorities like Boucher, Poling, and Kopski—all of whom, incidentally, held crossed fingers until the first test flight.
Construction notes
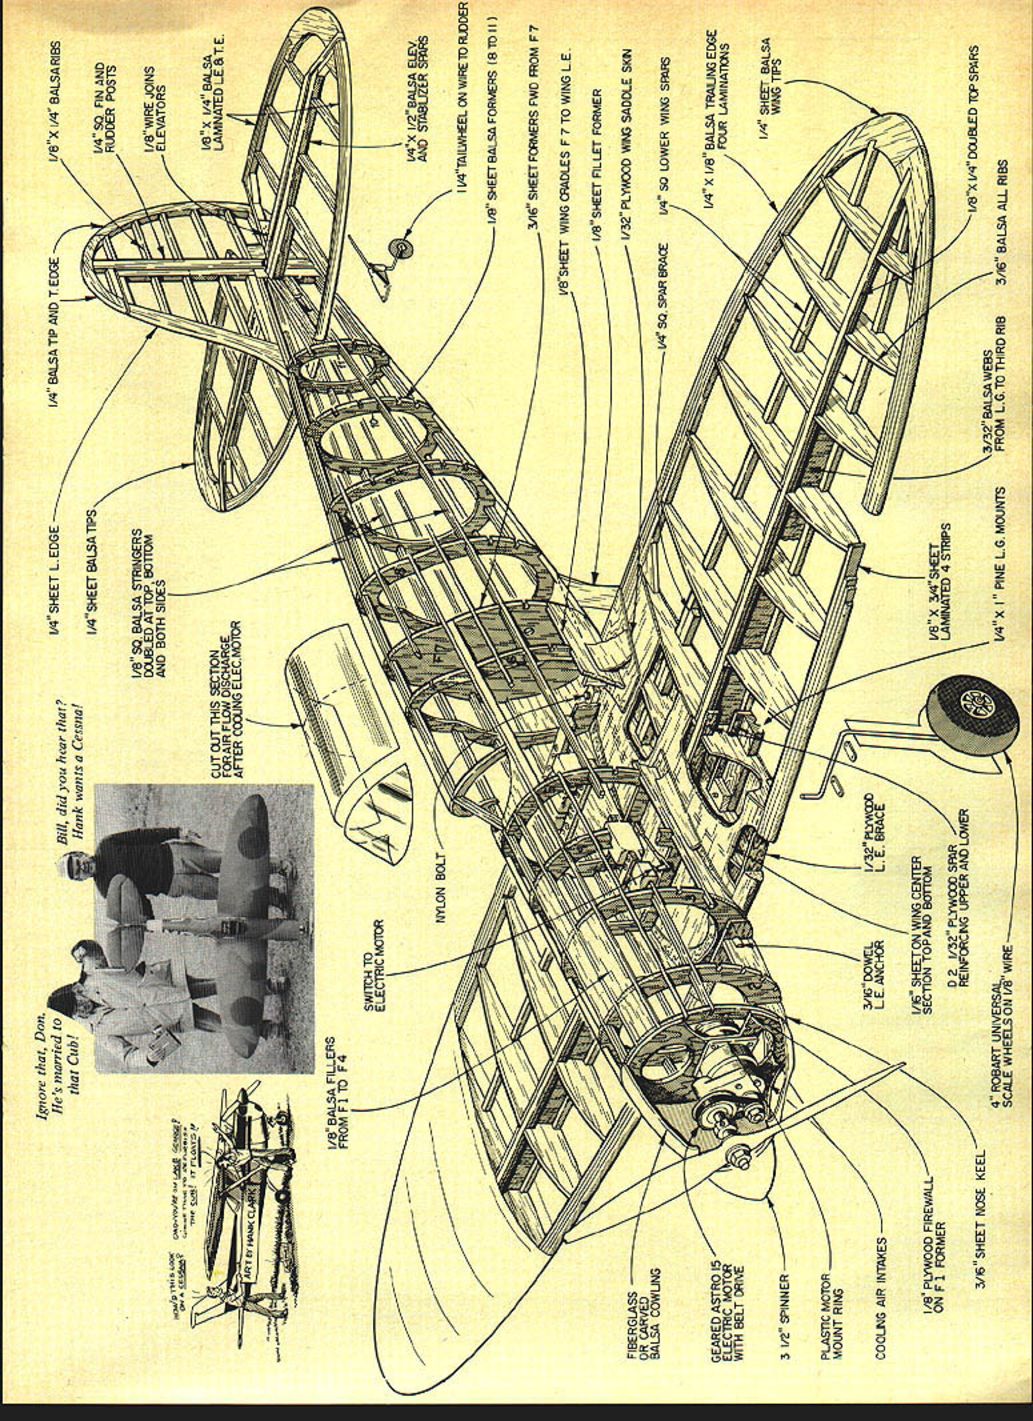
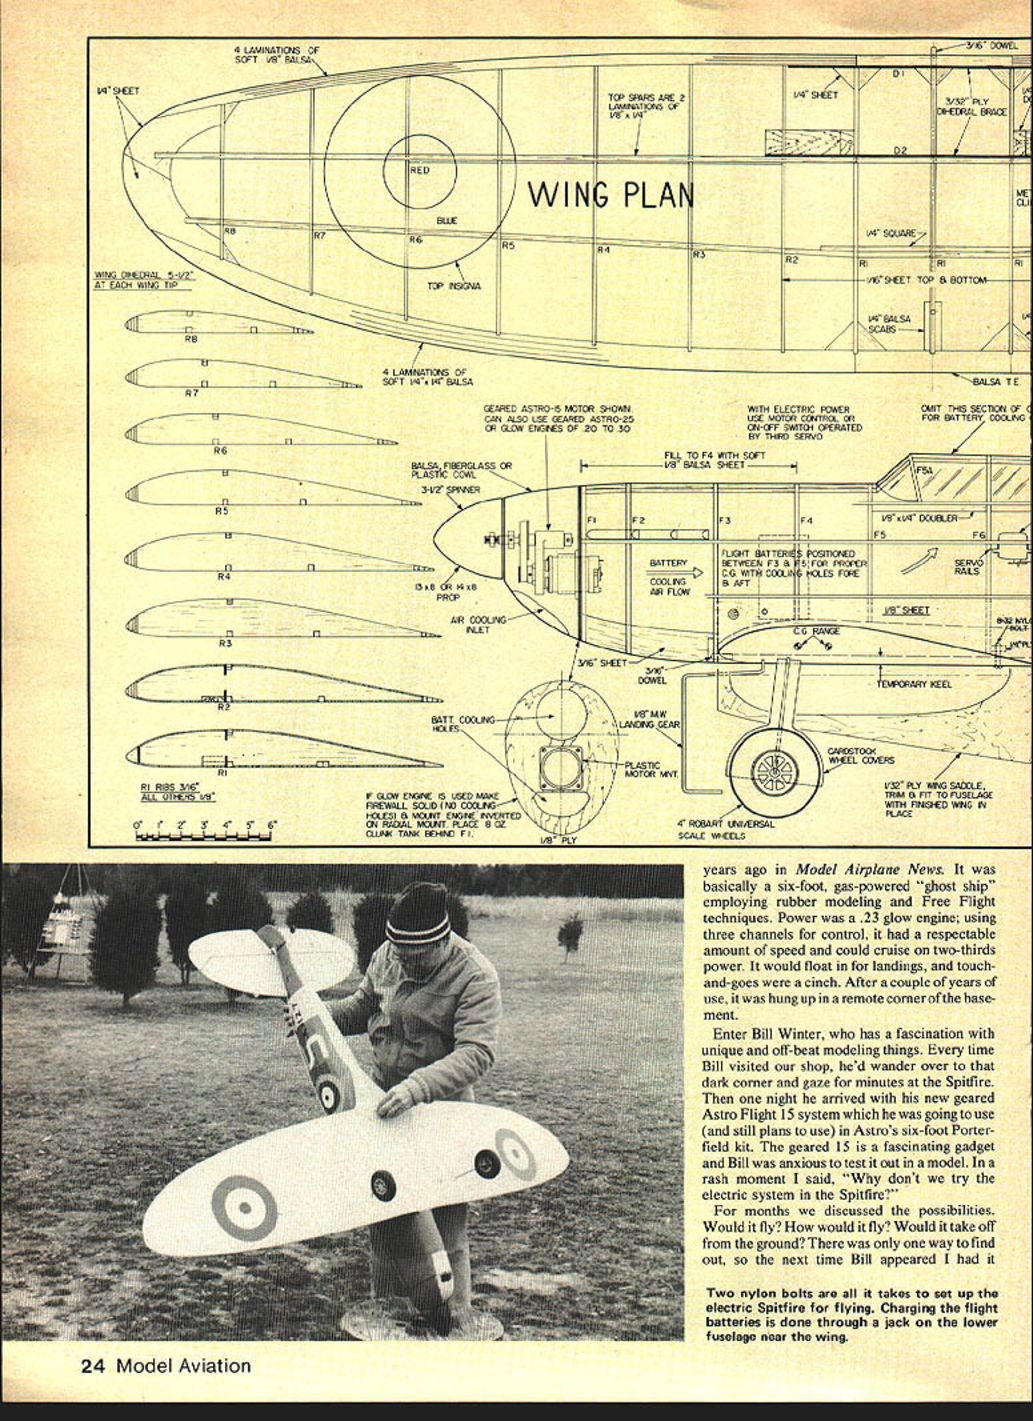
Use lightweight balsa throughout except as noted. The fuselage is built by the "half shell" method. The top and bottom keel pieces are laminated on the plans from two pieces of 3/16" square balsa strip. Bulkheads are added next. Note that the side keels are also laminated from two pieces of 3/16" square balsa.
For all laminating, first dampen the wood with water, then use white glue or Titebond, thinned 50/50 with water, to cement the pieces together. You can also add 1/8" square stringers on the half shell while it is on the plan.
Remove the completed side from the board and complete the other side. Glue on the 1/8" plywood firewall, making sure it is squared up accurately to the fuselage. Fill in the nose section between stringers with light, soft 3/16" sheet balsa. The wing saddle and fillets will be completed after the wing has been built.
Wing and tail: the leading and trailing edges of the wing and stab are laminated from soft balsa strip. Moisten the strips and join with thinned white glue as with the fuselage keels. Bend the stack of strips into shape right over the plan. The wing is built one-half at a time, pinned over the full-size ribs positioned on the plan. Use small nails or brads to hold them in place while they dry. Since the bends are gentle, the laminations will form quite easily.
After adding the ribs to the wing, add the upper 1/4" square spar. This spar is laminated from two strips of 3/16" x 1/4" balsa. Although the wing is assembled flat on the bench, the top spar does bend downward toward the tips. Wet both pieces with water; place one lamination in the rib notches, then glue the top lamination to it. Be sure to install the 3/32" vertical-grain spar webs as shown on the plans, as they add considerable strength to the wing.
The tail surfaces are built up from 1/4" strip balsa and 1/4" sheet balsa tip segments.
After adding dihedral to the wing and sheeting the center section with 1/16" sheet balsa, return to the fuselage to complete the wing saddle. Glue the 1/32" ply wing rest to the fuselage with the wing in place to provide the proper shape. Trim the fuselage sheeting as necessary to get a good wing-to-saddle fit. Finally, add a heavy paper or 1/16" balsa sheet wing fillet between the fuselage and the ply saddle. Don't use the usual epoxy putty or resin and microballoons for the fillets—these materials are too heavy.
Covering and finishing
Since we are trying to make everything as light as possible, the best way to go is Super MonoKote or a similar lightweight covering. The bottom of the wing, tail, and fuselage is covered with flat dove gray, while the top of the plane is covered in flat olive drab. The upper surfaces are camouflaged with a coat of flat tan or light earth enamel or epoxy.
Suitable paints include:
- Pactra Military Flats (spray can)
- RS Perfect Paint
- K&B
- Hobbycraft
Before spraying, wipe the surface of the MonoKote with thinner or acetone to remove any trace of grease or oil. After the camouflage pattern has been painted, mask and spray the roundels and numbers. Do not use standard masking tape for the markings; when you remove the tape, adjacent colors will probably be lifted off. I made stencils from newspaper: wet the paper, slide the wet stencil in place, and spray. Simple, and it worked fine.
Miscellaneous
All structural details are standard and called out on the plan, such as the landing gear mounting blocks, the wing hold-on dowel, and the nylon bolt. The nose cowl can be built up from balsa blocks and sheet as was ours, or you can make a fiberglass one (keep it light), or vacuum-form one out of sheet plastic. Light cardboard landing gear covers attached to the landing gear legs with silicone glue add the final touch, and you are ready to fly.
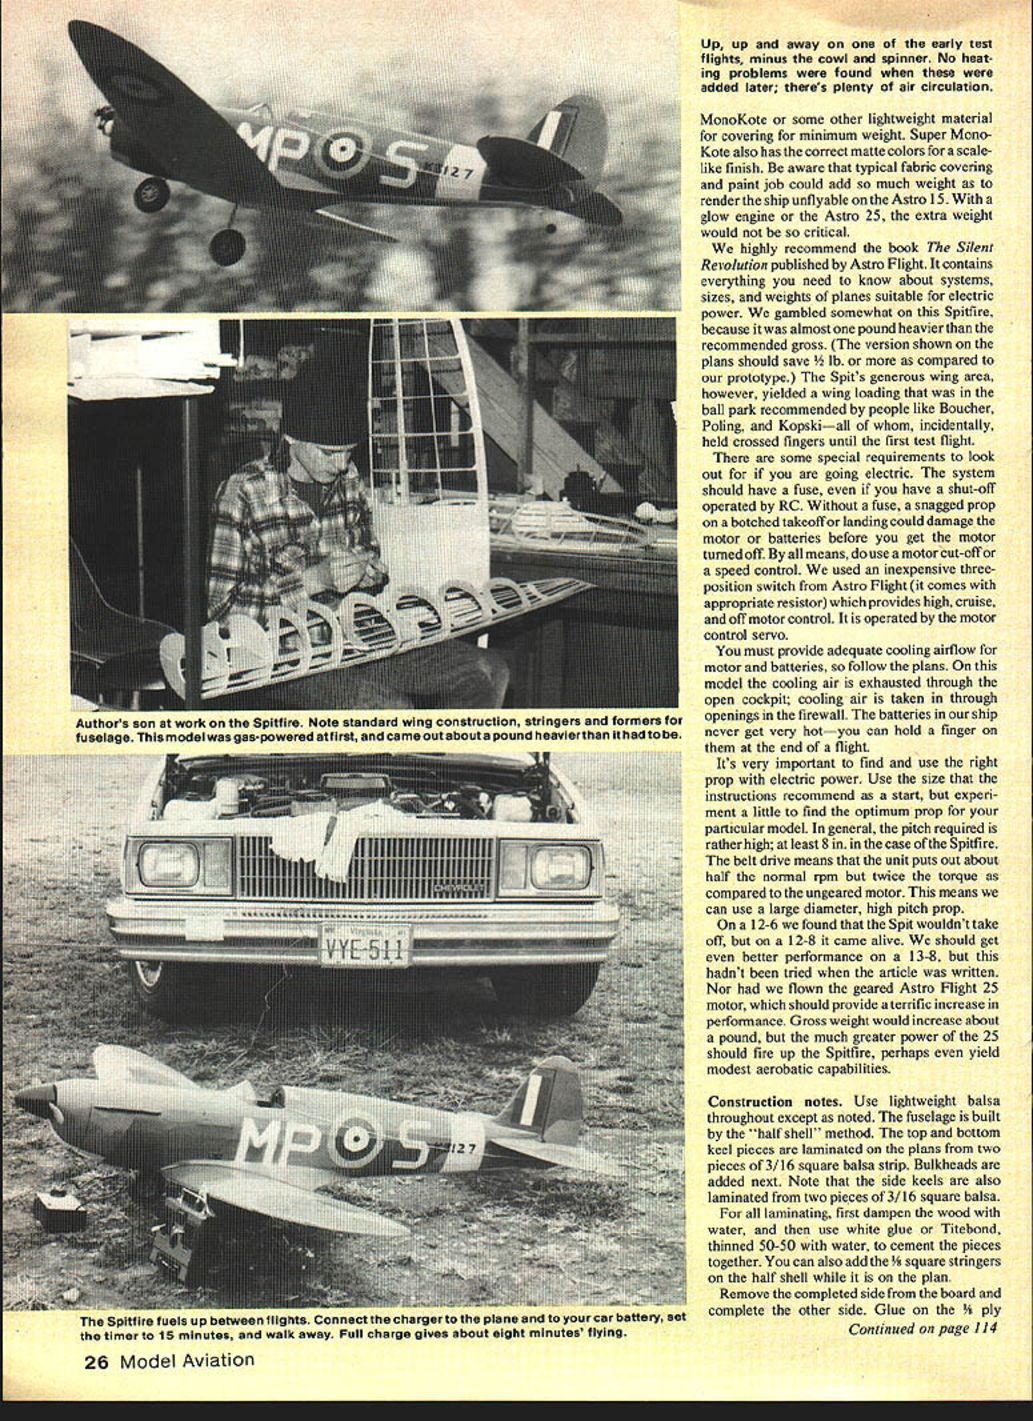
Cowl, spinner, and prop removed show the simple installation—motor and gear-drive unit. A large hole in the firewall allows cooling air to flow past the motor and battery compartment. Up, up and away on one of the early test flights, minus the cowl and spinner. No heating problems were found when these were added later; there's plenty of air circulation.
Flying Notes
Before flying, make sure the CG is in the right place and the wing has no warps. With a wing that big, you don't want the slightest warp. Reheating the covering and twisting the offending surface is a simple cure.
It is advisable to make some fast taxi tests before flight. It will help you get the feel of the plane before the first takeoff. Begin the taxi run holding up elevator to prevent a nose-over as the throttle is opened. As soon as some speed is built up, relax to neutral. The plane may fly off by itself, or it may require a slight bit of up elevator to help rotation.
For good duration with the Astro 15, don't indulge in steep turns or altitude-losing maneuvers. Gentle, wide turns will retain altitude and give you maximum flight time. For taxiing to position or back to the pits, the on-off switch is used as necessary, and it is very effective. We have our motor servo set up so that full power is forward, halfway back gives cruise power, and full back on the stick shuts off power.
Flying
The Spitfire is a beautiful experience. It's a unique mixture of scale, soaring, RC, and free flight all in one. Don't look for the usual gas-model performance, though. If you wish to tear up the skies, you are better off with the usual noisy and greasy bombs. (I'm not knocking that kind of flying, mind you, since much of my RC fun fits that category.)
This lightly loaded scale electric stuff is a new and refreshing change of pace. But don't forget this ship also does a nice relaxed job of sport flying with a glow engine, if scale realism and something like scale speed are appreciated. In either case, the sport Spit on a calm summer evening is something to behold. If you can build light, you'll love it.
Transcribed from original scans by AI. Minor OCR errors may remain.

