
Embryo-omatic
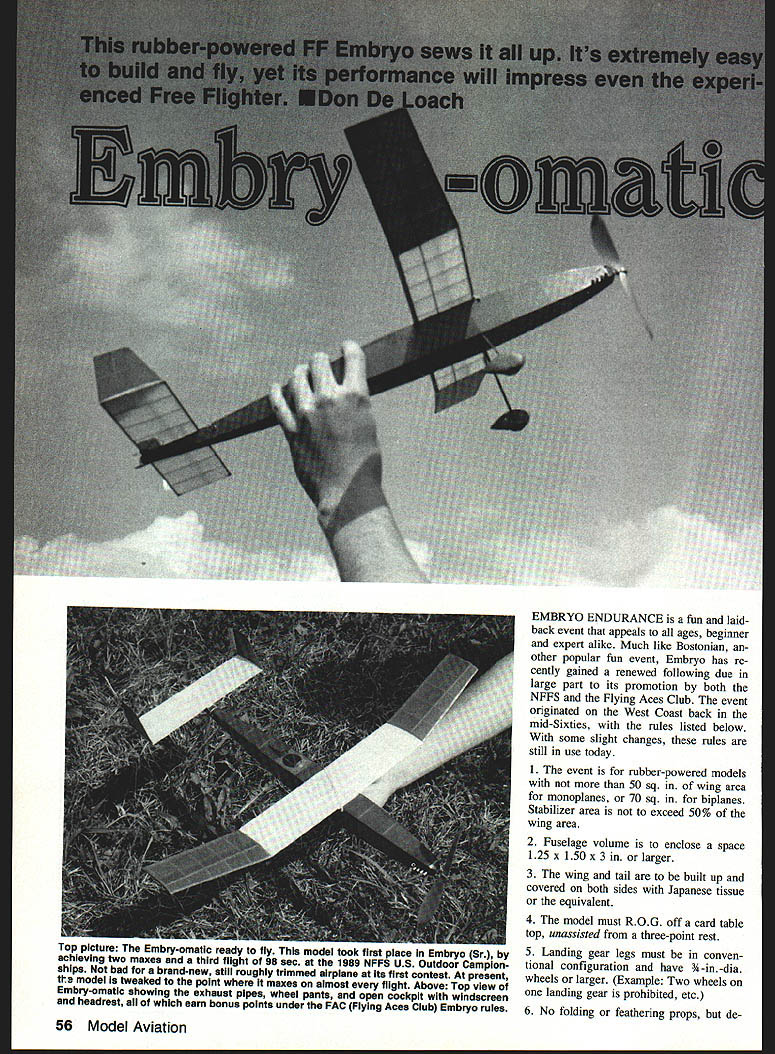
This rubber-powered FF Embryo sews it all up. It's extremely easy to build and fly, yet its performance will impress even the experienced Free Flighter. — Don De Loach
EMBRYO ENDURANCE is a fun and laid-back event that appeals to all ages, beginner and expert alike. Much like Bostonian, another popular fun event, Embryo has recently gained a renewed following due in large part to its promotion by both the NFFS and the Flying Aces Club. The event originated on the West Coast back in the mid-Sixties, with the rules listed below. With some slight changes, these rules are still in use today.
- The event is for rubber-powered models with not more than 50 sq. in. of wing area for monoplanes, or 70 sq. in. for biplanes. Stabilizer area is not to exceed 50% of the wing area.
- Fuselage volume is to enclose a space 1.25 x 1.50 x 3 in. or larger.
- The wing and tail are to be built up and covered on both sides with Japanese tissue or the equivalent.
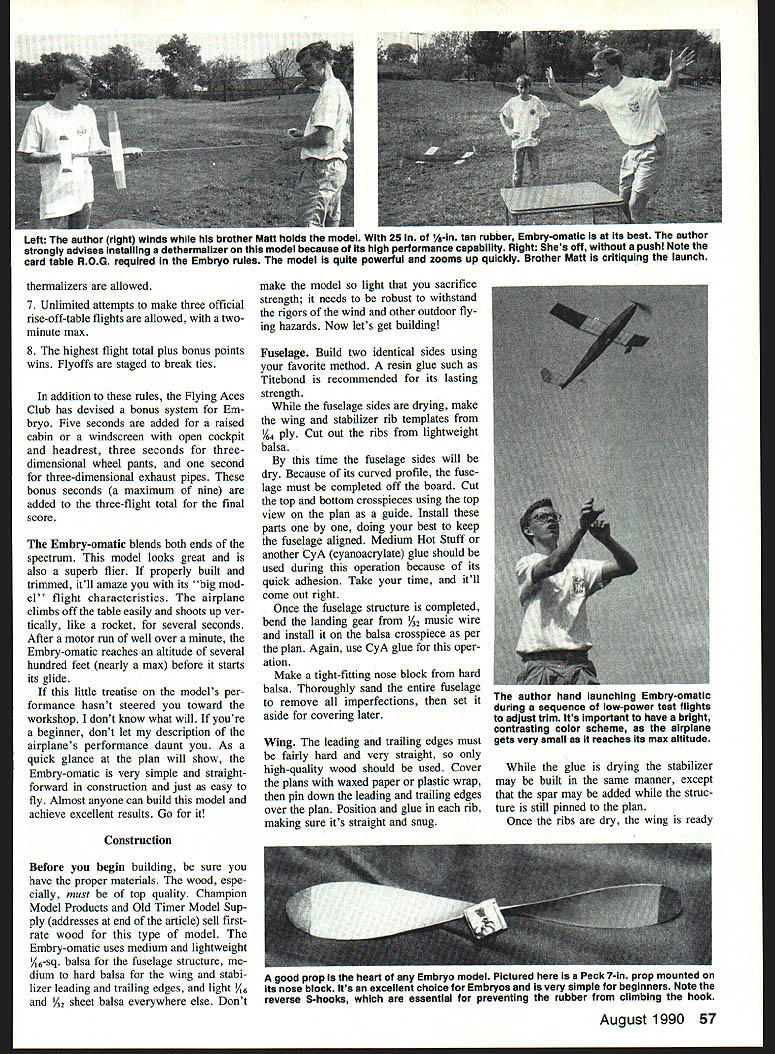
- The model must R.O.G. off a card table top, unassisted, from a three-point rest.
- Landing gear legs must be in conventional configuration and have 3/4-in.-dia. wheels or larger. (Example: Two wheels on one landing gear is prohibited.)
- No folding or feathering props. Dethermalizers allowed.
- Unlimited attempts are allowed to make three official rise-off-table flights; two-minute max.
- Highest flight total plus bonus points wins. Flyoffs are staged to break ties.
In addition, the Flying Aces Club has devised a bonus system for Embryo: five seconds added for a raised cabin or a windscreen with open cockpit and headrest; three seconds for three-dimensional wheel pants; one second for three-dimensional exhaust pipes. A maximum of nine bonus seconds may be added to the three-flight total final score.
Embryo-omatic blends both ends of the spectrum. The model looks great and is also a superb flier. Properly built and trimmed, it'll amaze with its big-model flight characteristics. The airplane climbs off the table easily and shoots up vertically like a rocket for several seconds. After the motor run—well over a minute—Embryo-omatic reaches altitude of several hundred feet, nearly the maximum, before it starts its glide. Don't let the description of the airplane's performance daunt you if you're a beginner. A quick glance at the plan will show Embryo-omatic is very simple, straightforward construction—just easy to fly. Almost anyone can build the model and achieve excellent results.
Construction
Before you begin building, be sure you have proper materials; wood especially must be top quality. Champion Model Products and Old Timer Model Supply (addresses at the end of the article) sell first-rate wood. The Embryo-omatic uses medium-weight 4–6 lb balsa for the fuselage structure; medium-hard balsa for wing and stabilizer leading and trailing edges; light 1/32" sheet balsa everywhere else. Don't make the model light at the sacrifice of strength — it needs to be robust to withstand the rigors of wind and other outdoor flying hazards.
Fuselage
Build two identical sides using your favorite method. Resin glue such as Titebond is recommended for its lasting strength. While the fuselage sides are drying, make wing and stabilizer rib templates from 1/64" ply. Cut out ribs from lightweight balsa in time for the fuselage sides to dry.
Because of its curved profile, the fuselage must be completed off the board. Cut top and bottom crosspieces using the top-view plan as a guide. Install parts one at a time, doing your best to keep the fuselage aligned. Medium "Hot Stuff" or another CyA (cyanoacrylate) glue should be used during this operation because of its quick adhesion. Take your time; it'll come out right.
Once the fuselage structure is completed, bend the landing gear from .042" music wire and install the balsa crosspiece per plan. Use CyA glue for this operation. Make a tight-fitting nose block from hard balsa. Thoroughly sand the entire fuselage to remove imperfections and set aside for covering later.
Wing
The leading and trailing edges must be fairly hard, very straight, high-quality stock. Cover the plans with waxed paper or plastic wrap, pin down the leading and trailing edges over the plan, and position and glue in each rib, making sure each is straight and snug.
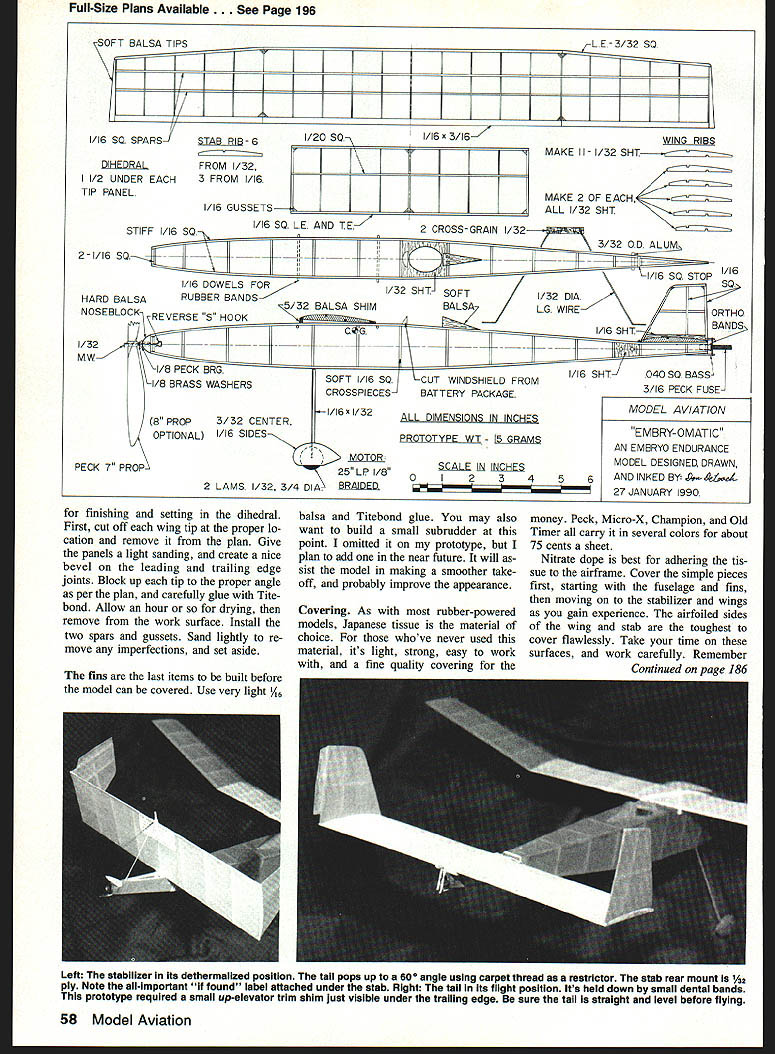
While the glue is drying, the stabilizer may be built in the same manner, except that the spar may be added while the structure is still pinned to the plan. Once the ribs are dry, the wing is ready for finishing and setting the dihedral. First, cut off each wing tip at the proper location and remove it from the plan. Give the panels a light sanding, and create a nice bevel on the leading and trailing edge joints. Block up each tip to the proper angle as per the plan, and carefully glue with Titebond. Allow an hour or so for drying, then remove from the work surface. Install the two spars and gussets. Sand lightly to remove any imperfections, and set aside.
The fins are the last items to be built before the model can be covered. Use very light 1/16" balsa and Titebond glue. You may also want to build a small subrudder at this point. The subrudder will assist the model in making a smoother takeoff and probably improve the appearance.
Covering
Japanese tissue is the material of choice for rubber-powered models. It is light, strong, easy to work with, and well suited for this model. Pecky, Micro-X, Champion, and Old Timer all carry it in several colors.
Nitrate dope is best for adhering the tissue to the airframe. Cover the simple pieces first, starting with the fuselage and fins, then moving on to the stabilizer and wings as you gain experience. The airfoiled sides of the wing and stab are the toughest to cover flawlessly. Take your time on these surfaces, and work carefully. Remember that the grain of the tissue must run lengthwise on each structure being covered.
With all parts covered, shrink the tissue tight by moistening it. Start with the fuselage — thoroughly moisten the covering with water or alcohol. Don't worry about getting it too wet; the structure won't warp. Set the fuselage aside to dry.
The wing and empennage must be handled more carefully; they will warp easily if over-wetted. If you have an airbrush, mist the surfaces lightly with a very small amount of water or alcohol. Without an airbrush, lightly sprinkle from your fingertips. If warps do occur, they can be steamed out over a teakettle before any dope is applied.
Once the tissue is properly shrunk and all warps are removed, the surfaces can be doped with a 50/50 mixture of dope and thinner, well plasticized with castor oil or "TCP" (tri-cresyl phosphate; four drops per ounce of dope/thinner).
Assembly
Glue a 5/32" balsa shim under the wing leading edge for correct incidence, as shown on the plan. The wing is rubber-banded (#10 rubber bands) in place rather than glued on; you may glue it if you prefer, but a pop-off wing helps on inevitable rough landings.
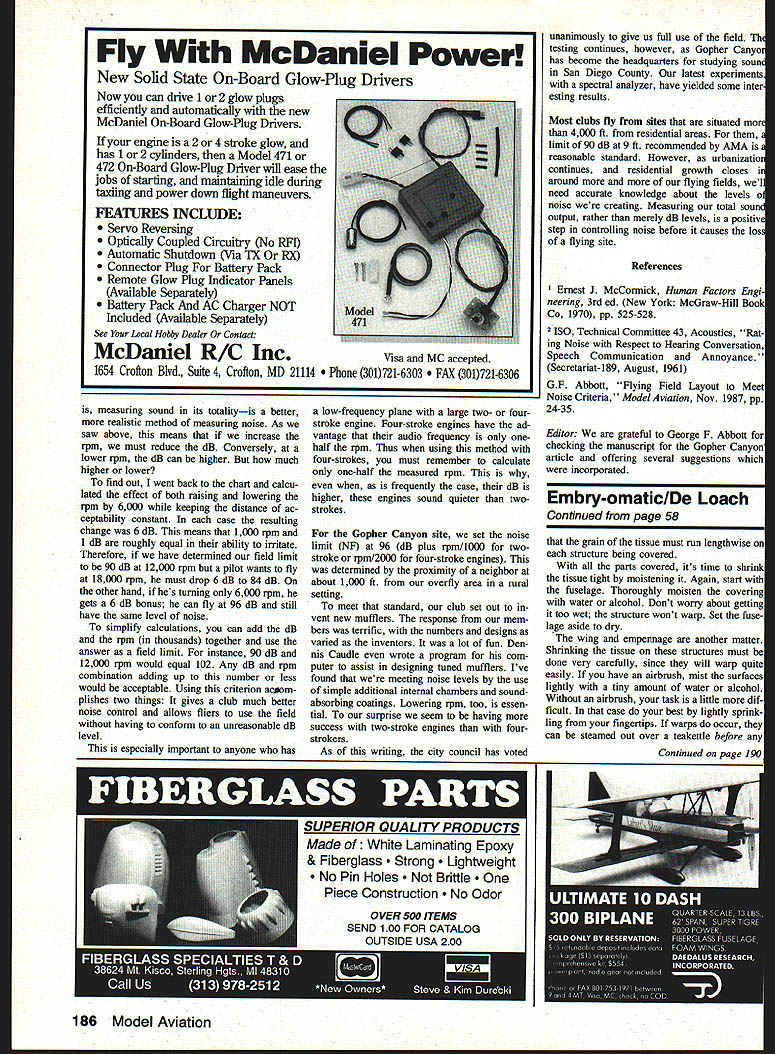
The DT (dethermalizer) is optional but strongly recommended. This model has enough performance potential to go out of sight, and a DT also allows you to adjust decalage with small shims under the trailing edge of the stabilizer.
Before fitting the stabilizer to the fuselage, glue the rudders and subrudder (if used) in place.
Embellishing the model with wheel pants (make sure the wheels rotate freely inside), cockpit details (windscreen and headrest), and exhaust pipes (made from aluminum tubing and CyA'd in place) greatly improves appearance and can earn you bonus points. The exhaust pipes are not shown on the plans, but their exact placement is unimportant.
Bend a shaft for a 7-inch Peck gray plastic prop, using a reverse S-hook made from 1/32" music wire.
Flying
Start with the motor you'll most likely use. Use a 25-in. loop of 1/8-in. rubber, as noted on the plan. Install the motor, and balance the model at the CG location marked on the plan. Add clay to the nose until balance is achieved.
Test-glide the model over soft grass during the calm of early morning or evening. Adjust the stabilizer with shims until the airplane settles into a nice, floating glide. Induce a gentle right or left glide turn by adjusting the rudder accordingly.
When all is well, wind in about a hundred or so turns for your first powered flight. Gradually work your way up to more turns, making adjustments as necessary. You may need to add a little downthrust as power builds up and trim in right or left thrust so the model will circle under power. Try both directions; one will work better than the other.
With the new FAI Model Supply rubber, it's possible to crank in 2,500 turns, yielding a motor run of a minute and a half or more. With that kind of power, don't forget to light the DT fuse!
Any questions about Embryo-omatic may be addressed to the author at: Don De Loach, 3428 Bryn Mawr, Dallas, TX 75225.
Suppliers
- Peck-Polymers, P.O. Box 2498, La Mesa, CA 92041 (props, glue)
- Old Timer Model Supply, P.O. Box 7334, Van Nuys, CA 91409 (tissue, wood, wire, props)
- Champion Model Products, 880 Cameron Court, La Verne, CA 91750 (wood, tissue, DT fuse, rubber bands)
- FAI Model Supply, P.O. Box 3957, Torrance, CA 90510 (rubber)
- Bob Wilder, 2010 Boston, Irving, TX 75061 (20:1 winder)
Join NFFS today!
Transcribed from original scans by AI. Minor OCR errors may remain.

