
ENGINE TECHNIQUE
Don Jehlik
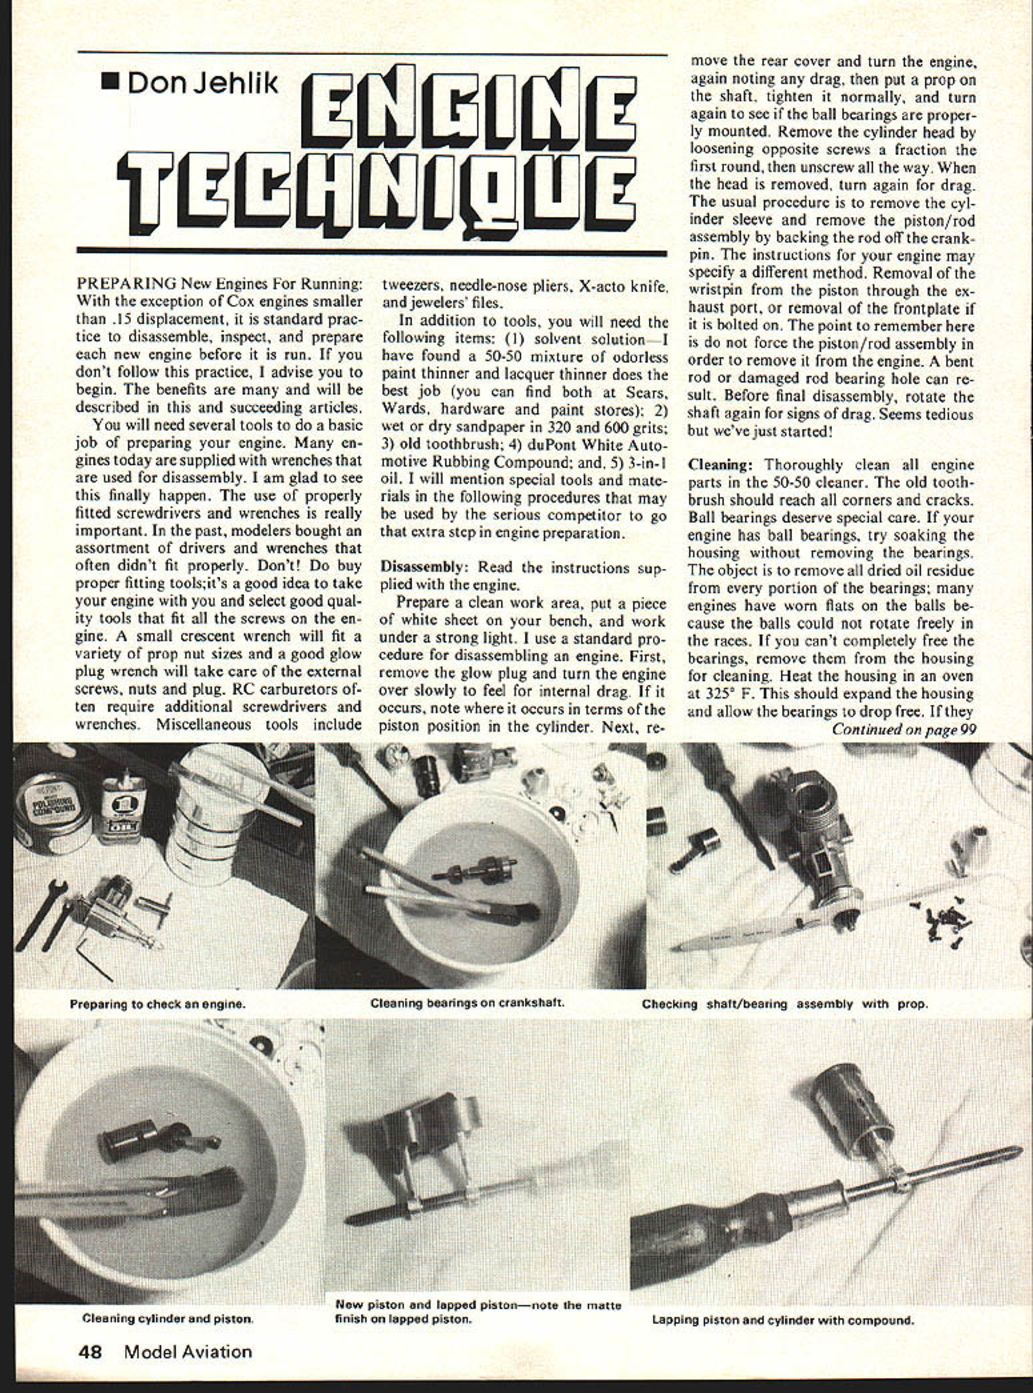
PREPARING New Engines For Running:
With the exception of Cox engines smaller than .15 displacement, it is standard practice to disassemble, inspect, and prepare each new engine before it is run. If you don't follow this practice, I advise you to begin. The benefits are many and will be described in this and succeeding articles.
You will need several tools to do a basic job of preparing your engine. Many engines today are supplied with wrenches that are used for disassembly. I am glad to see this finally happen. The use of properly fitted screwdrivers and wrenches is really important. In the past, modelers bought an assortment of drivers and wrenches that often didn't fit properly. Don't! Do buy proper fitting tools; it's a good idea to take your engine with you and select good quality tools that fit all the screws on the engine. A small crescent wrench will fit a variety of prop nut sizes and a good glow plug wrench will take care of the external screws, nuts and plug. RC carburetors often require additional screwdrivers and wrenches. Miscellaneous tools include tweezers, needle-nose pliers, X-acto knife, and jewelers' files.
In addition to tools, you will need the following items:
- solvent solution — I have found a 50-50 mixture of odorless paint thinner and lacquer thinner does the best job (you can find both at Sears, Wards, hardware and paint stores);
- wet or dry sandpaper in 320 and 600 grits;
- old toothbrush;
- DuPont White Automotive Rubbing Compound; and,
- 3-in-1 oil.
I will mention special tools and materials in the following procedures that may be used by the serious competitor to go that extra step in engine preparation.
Disassembly:
Read the instructions supplied with the engine.
Prepare a clean work area, put a piece of white sheet on your bench, and work under a strong light. I use a standard procedure for disassembling an engine. First, remove the glow plug and turn the engine over slowly to feel for internal drag. If it occurs, note where it occurs in terms of the piston position in the cylinder. Next, remove the rear cover and turn the engine again, noting any drag, then put a prop on the shaft, tighten it normally, and turn again to see if the ball bearings are properly mounted. Remove the cylinder head by loosening opposite screws a fraction the first round, then unscrew all the way. When the head is removed, turn again for drag. The usual procedure is to remove the cylinder sleeve and remove the piston/rod assembly by backing the rod off the crankpin. The instructions for your engine may specify a different method. Removal of the wristpin from the piston through the exhaust port, or removal of the frontplate if it is bolted on. The point to remember here is do not force the piston/rod assembly in order to remove it from the engine. A bent rod or damaged rod bearing hole can result. Before final disassembly, rotate the shaft again for signs of drag. Seems tedious but we've just started!
Cleaning:
Thoroughly clean all engine parts in the 50-50 cleaner. The old toothbrush should reach all corners and cracks. Ball bearings deserve special care. If your engine has ball bearings, try soaking the housing without removing the bearings. The object is to remove all dried oil residue from every portion of the bearings; many engines have worn flats on the balls because the balls could not rotate freely in the races. If you can't completely free the bearings, remove them from the housing for cleaning. Heat the housing in an oven at 325° F. This should expand the housing and allow the bearings to drop free. If they don't come free, use a wood dowel to gently force them from the hot housing. Then complete the cleaning process until each bearing spins freely. Remember, be meticulous and clean every part perfectly.
Inspection and Preparation: Reassemble the engine as follows. Do not oil the parts. The residue from the odorless paint thinner is a light oil and will protect parts during the following checks.
1) Reinstall the crankshaft in front housing, tighten prop and turn carefully. If the shaft does not turn perfectly free, there are several possible problems.
a) Shaft housing is too tight, or has a flaw in the bore, usually a dent or bump in the surface from handling during manufacture. Here's where to use the DuPont white rubbing compound. Remove the ball bearings, put a light coating of compound on the shaft, insert it in the housing and turn it, by hand, with an electric drill or in a drill press. Thoroughly clean and examine the housing to see where the compound has polished the high spot. If the spot is evident, continue the compound until the housing bore has a uniformly matte finish.
b) Ball bearings may not be properly seated resulting in improper dimensional relationship between bearings and crankshaft. First test is to tighten, then spin the prop. You may find that the shaft doesn't rotate freely! Grasp the prop and push and pull on the shaft. If bearings are properly installed, you should feel a small amount of back and forth play, approximately .003". If you don't get it, heat the housing and be sure (1) the rear bearing outer race is fully forward in the housing, and (2) with shaft in rear bearing (pushed forward), slide front bearing on shaft to rearmost position in heated housing. This should do the trick. Spin prop when housing is still hot and, after it has cooled, to be certain of proper seating.
c) If the shaft is bent, it will usually show up as a wobble when the prop is turned slowly. Replace or rework the shaft as necessary.
2) Reinstall the crankcase and check the alignment of the crankpin and connecting rod. Tighten all screws evenly and recheck for end play and free rotation.
3) Install the piston and sleeve assembly, then tighten the head and again check for smooth rotation. If any binding is evident, disassemble and recheck alignment and bearing seating.
Final preparation: Lapping the piston to the sleeve will improve compression and smoothness. Use a fine lapping compound and a light, even pressure. After lapping, thoroughly clean all traces of compound from piston, sleeve and ports.
Fuel and glow plugs: Use a good quality fuel and a properly gapped glow plug. A hot plug will improve starting and throttle response. When testing on the bench, run the engine at varying throttle settings to be sure the carburetion is correct and that no overheating occurs.
Break-in: Run the engine at a rich setting for the initial break-in period, gradually leaning the mixture as the engine warms and the rings seat. Monitor bearing and shaft temperatures; excessive heat indicates a problem that must be remedied before flight.
With careful disassembly, cleaning, inspection and reassembly you will find your engine more reliable, smoother running and longer lived. sure it spins freely both ways.
c) Could be a bad bearing, usually noted because it "clicks" when rotated. Be sure the bearing is clean before deciding to replace it.
Connecting Rod: The basic check to make is to be sure the hole in the bottom end is chamfered on both ends. Sometimes, rods will rub forward against the crankshaft, and the bushing hole in the rod will interfere with the small radius ground between the crankpin and crankdisc. The chamfer should establish clearance at this intersection.
Piston/Sleeve: There are three basic types: lapped, lapped ABC, and ringed piston. Each is treated differently, although the basic goal is the same; a round sleeve bore with little or no taper above the exhaust port, matched to a round piston (or ring) that has adequate clearance before running. I have observed that engines run "tight" when new, place stress on connecting rods, bearings, wristpin/piston fits, etc. That results in reduced maximum performance when broken in. I don't mean you can't run in an engine without prior fitting, provided undue stress is not placed on operating parts during the process. This procedure ensures a stress-free break-in.
Lapped Piston: Regardless of whether the clean piston will pass freely through the sleeve, use the duPont rubbing compound! Smear a light coating on the piston and sleeve and lap the piston using the connecting rod to move the piston in the sleeve. If, or when, the piston laps smoothly and without drag throughout the bore, clean thoroughly and examine the sleeve carefully under a bright light for shiny spots. They usually occur around port areas, sometimes below the ports where the sleeve has warped. Continue lapping, cleaning, and examining until the sleeve has a uniformly matte-finished bore. Then clean all parts very carefully with solvent and toothbrush, until you can wipe each surface with a white cotton sheet and come clean.
Lapped ABC: The procedure is essentially the same as above. I believe the proper piston/sleeve clearance is essential before running. My experience indicates that a too-tight fit will result in the harder piston pushing the brass sleeve, and deforming it as necessary to achieve a running fit. I have been unable to extract maximum performance when this happens. It's difficult to determine the exact clearance required prior to running; so lap free and run the engine carefully and briefly. Remove the head and carefully examine the chrome surface in the sleeve. If you observe extra shiny areas, especially at the top of the stroke, the fit is still tight. Extra lapping, or special procedures, such as honing or machine lapping, can be used to correct the problem.
Ringed Piston: The piston ring is of utmost importance. It must be absolutely round, have a small gap (if possible), and remain round when installed in the piston. These conditions are the exception rather than the rule. The basic problem is to establish a perfectly round, paralleled bore in the sleeve. Since you don't have a piston to lap with, you can take a chance on having a true sleeve, or make a lap. If you can't, a machine shop can machine a bar of brass or aluminum to a bare slip fit in the sleeve. Given a true sleeve, smear a light coat of compound in the sleeve, place the ring(s) between two piston skirts or similar tight fitting cylinders, and lap the rings in the sleeve. Lap a little at first and clean. Then examine the ring rubbing surface for even polish. Lap until even. This is truly more important than a small ring gap. A round ring will develop more power regardless of gap size. The final test is to push a ring into the sleeve squarely, and to hold it up to a light and look for signs of light between the ring and sleeve. No light, round ring. Install the ring in the piston carefully.
Cylinder Sleeve: I've always put a dab of compound under the lip of the sleeve and rotated it in the crankcase to be sure the lower surface of the sleeve lip matched the mating surface on the top of the case.
Cylinder Head: Same as above. A dab of compound to mate both surfaces regardless of gasket, which may be supplied with the engine. Be careful not to lap the head bore surface in the sleeve. A tight fit between head and sleeve is essential.
Back Cover: Lap the back cover to the rear mating surface of the case.
Cleaning and Assembly: Recheck all parts to be sure they are absolutely clean. Oil lightly with 3-in-1 oil and assemble the engine. Tighten opposite screws a little at a time, and turn the crankshaft after each part is installed to be sure. When you finally put the glow plug in and flip the prop, you will know the difference. The engine will be loose and compression seal will surprise you.
Final Examination: Wipe all external surfaces clean and look for signs of oil leaking past sealing surfaces. If everything is okay, store the engine in a plastic bag until you are ready to run it on the test stand.
Conclusion: Development of the basic skills in preparing an engine to run is essential. This discussion is intended to get those modelers started who don't already prepare engines. You will enjoy acquiring the skills needed to understand seemingly small details that have a substantial effect on engine performance.
Next month, we'll run that engine on a test stand!
Don Jehlik, 438A Schwever Dr., Star Route 1, Hawthorne, NV 89415.
Transcribed from original scans by AI. Minor OCR errors may remain.

