
Don Jehlik
Engine Technique
BENCH RUNNING ENGINES: Last month I reviewed the basic procedures to use in preparing new engines to run. Now let's take that engine and run it!
I've gone out to the field to run engines and found I've forgotten something I've needed to do the test. Here's my checklist of items:
- Test stand, large and small tank, tubing, props (test, flight duplicate, flight), fuel(s), fill bulb or pump, plugs, glasses.
- Also, good battery with leads, tachometer, stopwatch, 3-in-1 oil, tools, rags, notebook and pencil, ear protectors. And engine.
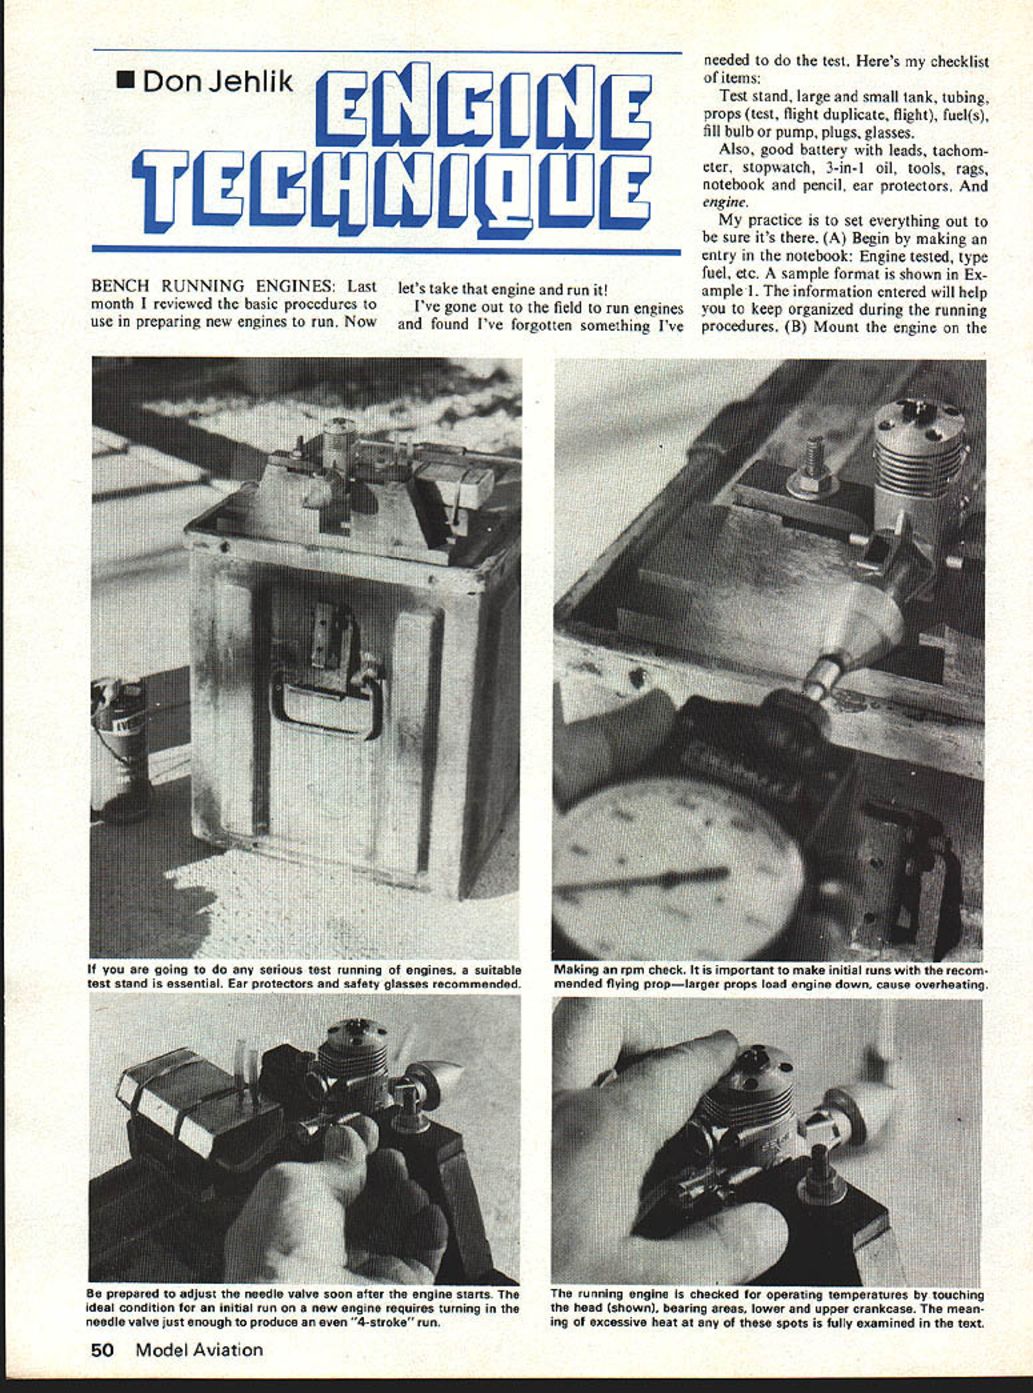
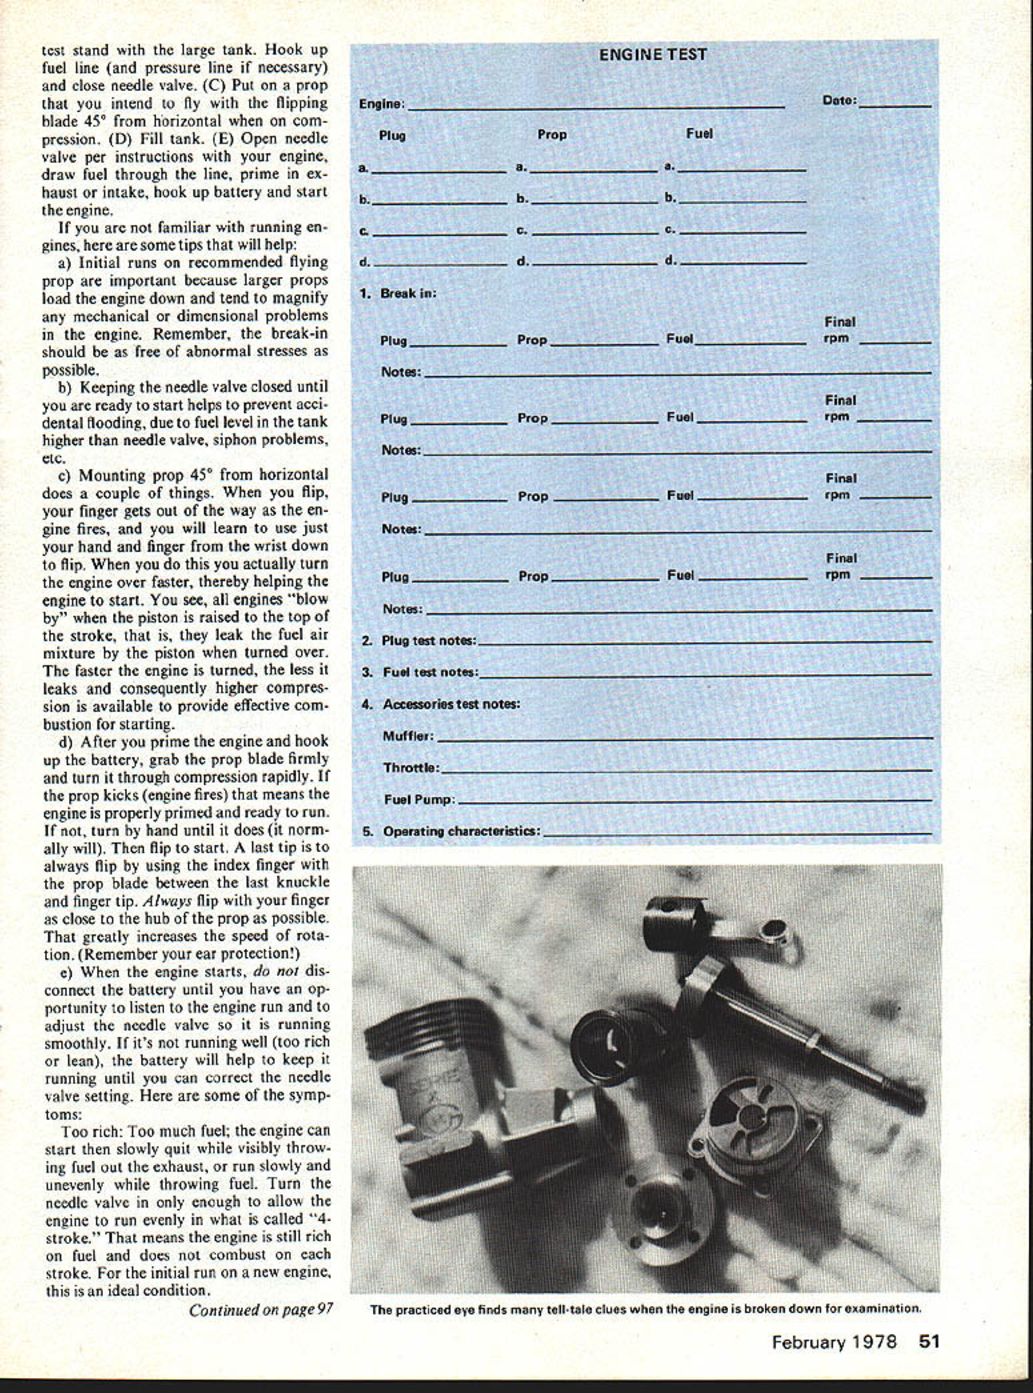
My practice is to set everything out to be sure it's there. (A) Begin by making an entry in the notebook: Engine tested, type, fuel, etc. A sample format is shown in Example 1. The information entered will help you to keep organized during the running procedures. (B) Mount the engine on the test stand. test stand with the large tank. Hook up fuel line (and pressure line if necessary) and close needle valve. (C) Put on a prop that you intend to fly with the flipping blade 45° from horizontal when on compression. (D) Fill tank. (E) Open needle valve per instructions with your engine, draw fuel through the line, prime in exhaust or intake, hook up battery and start the engine.
If you are not familiar with running engines, here are some tips that will help:
a) Initial runs on recommended flying prop are important because larger props load the engine down and tend to magnify any mechanical or dimensional problems in the engine. Remember, the break-in should be as free of abnormal stresses as possible.
b) Keeping the needle valve closed until you are ready to start helps to prevent accidental flooding, due to fuel level in the tank higher than needle valve, siphon problems, etc.
c) Mounting prop 45° from horizontal does a couple of things. When you flip, your finger gets out of the way as the engine fires, and you will learn to use just your hand and finger from the wrist down to flip. When you do this you actually turn the engine over faster, thereby helping the engine to start. You see, all engines "blow by" when the piston is raised to the top of the stroke, that is, they leak the fuel-air mixture by the piston when turned over. The faster the engine is turned, the less it leaks and consequently higher compression is available to provide effective combustion for starting.
d) After you prime the engine and hook up the battery, grab the prop blade firmly and turn it through compression rapidly. If the prop kicks (engine fires) that means the engine is properly primed and ready to run. If not, turn by hand until it does (it normally will). Then flip to start. A last tip is to always flip by using the index finger with the prop blade between the last knuckle and finger tip. Always flip with your finger as close to the hub of the prop as possible. That greatly increases the speed of rotation. (Remember your ear protection.)
e) When the engine starts, do not disconnect the battery until you have an opportunity to listen to the engine run and to adjust the needle valve so it is running smoothly. If it's not running well (too rich or lean), the battery will help to keep it running until you can correct the needle valve setting. Here are some of the symptoms:
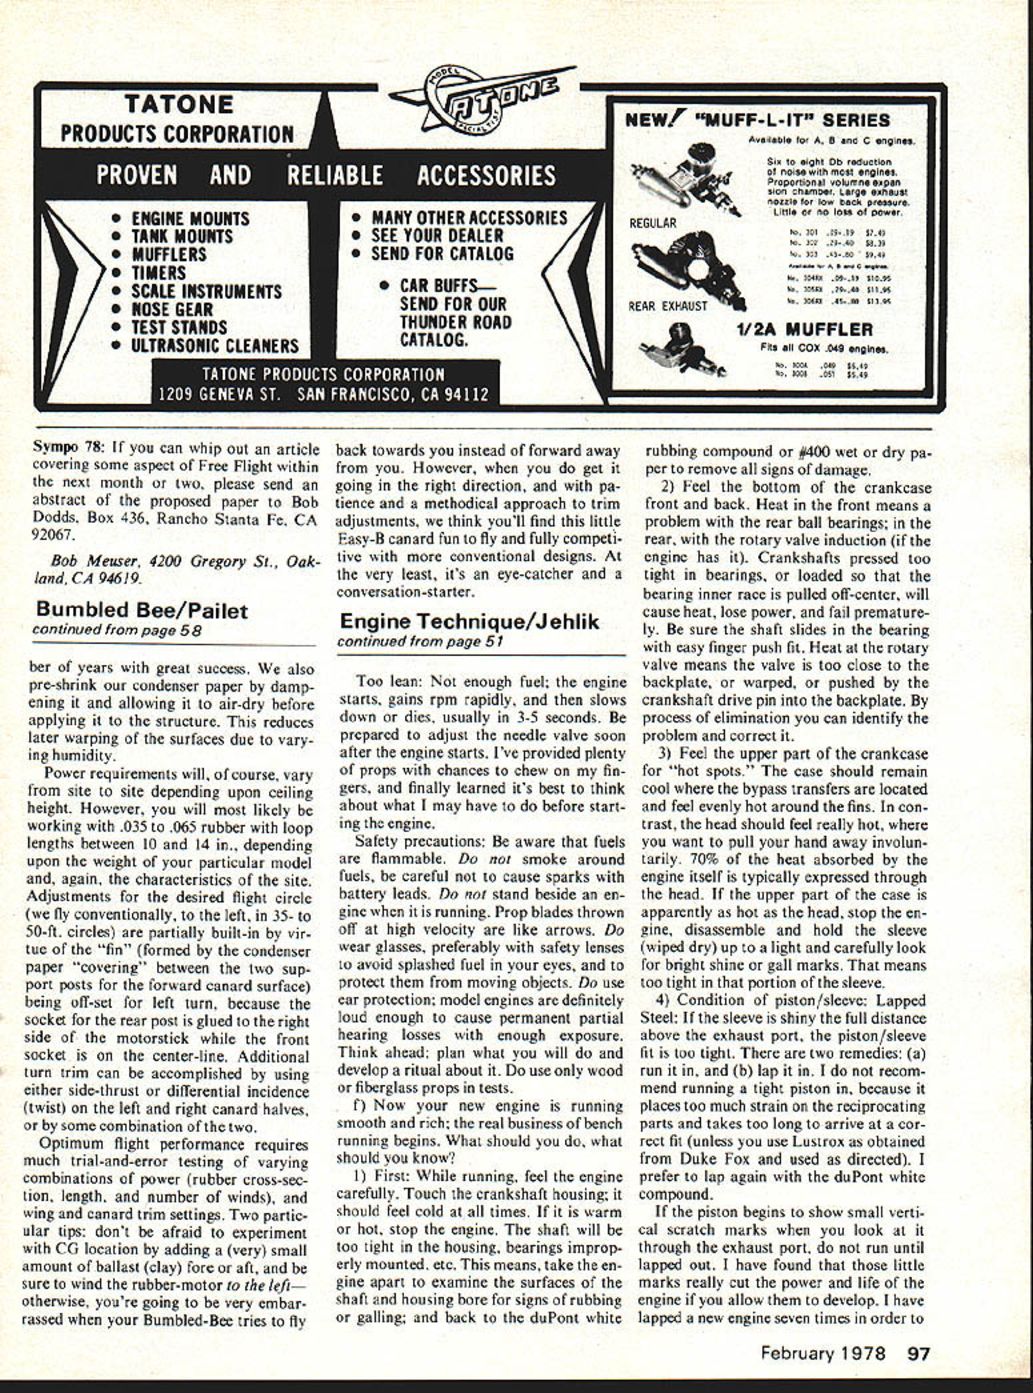
Too rich: Too much fuel; the engine can start then slowly quit while visibly throwing fuel out the exhaust, or run slowly and unevenly while throwing fuel. Turn the needle valve in only enough to allow the engine to run evenly in what is called "4-stroke." That means the engine is still rich on fuel and does not combust on each stroke. For the initial run on a new engine, this is an ideal condition.
Engine Technique/Jehlik continued from page 51
Too lean: Not enough fuel; the engine starts, gains rpm rapidly, and then slows down or dies, usually in 3-5 seconds. Be prepared to adjust the needle valve soon after the engine starts. I've provided plenty of props with chances to chew on my fingers, and finally learned it's best to think about what I may have to do before starting the engine.
Safety precautions: Be aware that fuels are flammable. Do not smoke around fuels, be careful not to cause sparks with battery leads. Do not stand beside an engine when it is running. Prop blades thrown off at high velocity are like arrows. Do wear glasses, preferably with safety lenses to avoid splashed fuel in your eyes, and to protect them from moving objects. Do use ear protection; model engines are definitely loud enough to cause permanent partial hearing losses with enough exposure. Think ahead; plan what you will do and develop a ritual about it. Do use only wood or fiberglass props in tests.
f) Now your new engine is running smooth and rich; the real business of bench running begins. What should you do, what should you know?
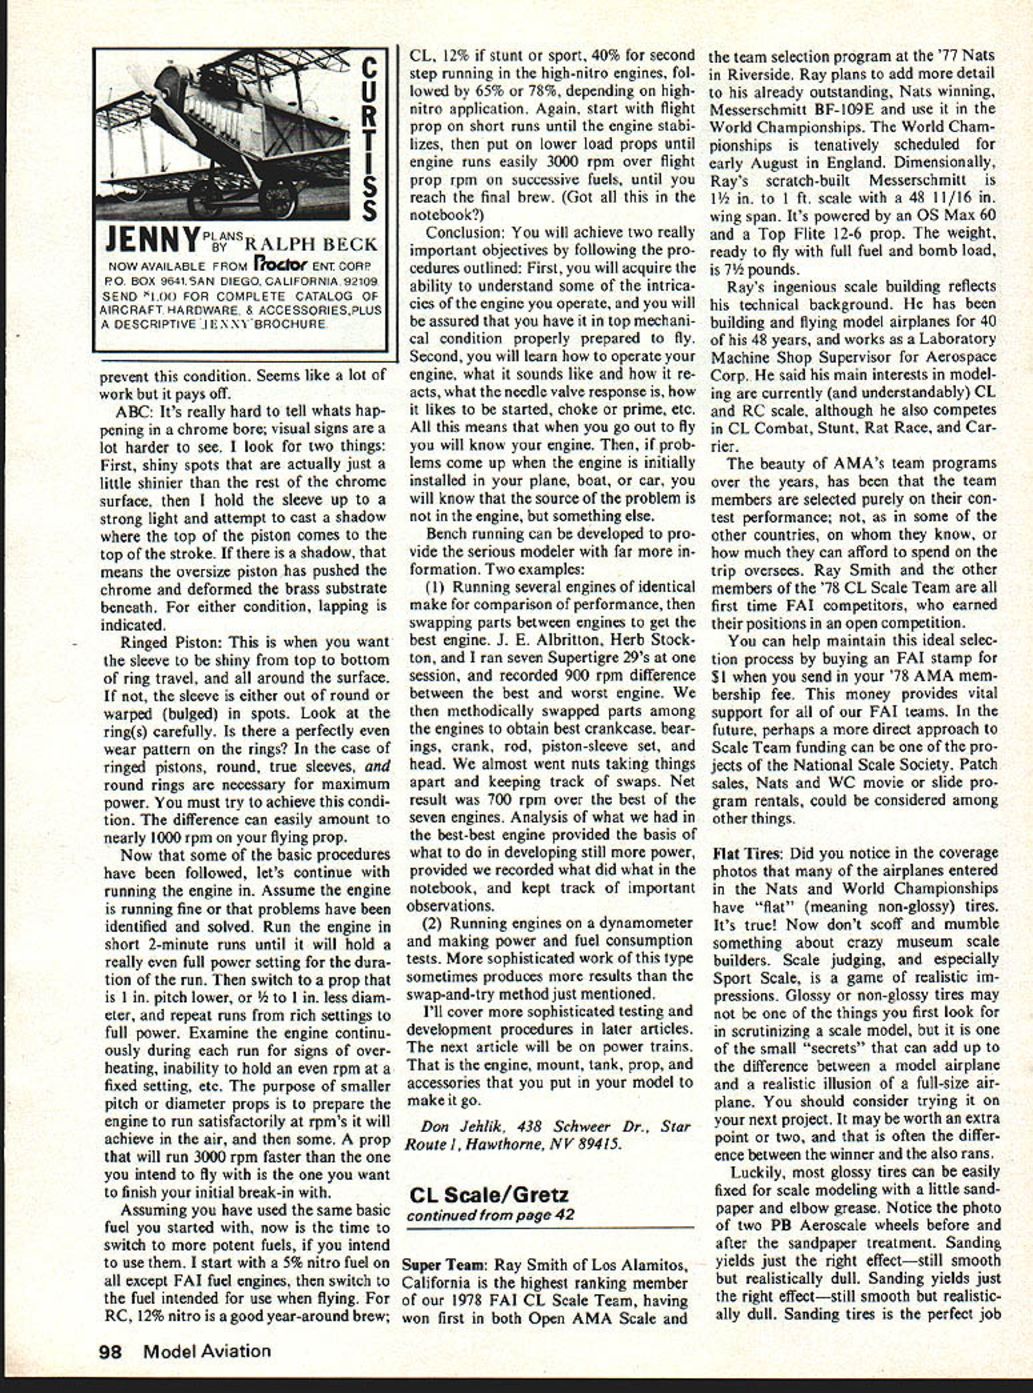
1) First: While running, feel the engine carefully. Touch the crankcase housing; it should feel cool at all times. If it is warm or hot, stop the engine. The shaft will be too tight in the housing, bearings improperly mounted, etc. This means, take the engine apart and examine the surfaces of the shaft and housing bore for signs of rubbing or galling; and back to the duPont white rubbing compound or #400 wet or dry paper to remove all signs of damage.
2) Feel the bottom of the crankcase front and back. Heat in the front means a problem with the rear ball bearings; in the rear, with the rotary valve induction (if the engine has it). Crankshafts pressed too tight in bearings, or loaded so that the bearing inner race is pulled off-center, will cause heat, lose power, and fail prematurely. Be sure the shaft slides in the bearing with easy finger push fit. Heat at the rotary valve means the valve is too close to the backplate, or warped, or pushed by the crankshaft drive pin into the backplate. By process of elimination you can identify the problem and correct it.
3) Feel the upper part of the crankcase for "hot spots." The case should remain cool where the bypass transfers are located and feel evenly hot around the fins. In contrast, the head should feel really hot, where you want to pull your hand away involuntarily. 70% of the heat absorbed by the engine itself is typically expressed through the head. If the upper part of the case is apparently as hot as the head, stop the engine, disassemble and hold the sleeve (wiped dry) up to a light and carefully look for bright shine or gall marks. That means too tight in that portion of the sleeve.
4) Condition of piston/sleeve: Lapped Steel: If the sleeve is shiny the full distance above the exhaust port, the piston/sleeve fit is too tight. There are two remedies: (a) run it in; and (b) lap it in. I do not recommend running a tight piston in, because it places too much strain on the reciprocating parts and takes too long to arrive at a correct fit (unless you use Lustrox as obtained from Duke Fox and used as directed). I prefer to lap again with the duPont white compound.
If the piston begins to show small vertical scratch marks when you look at it through the exhaust port, do not run until lapped out. I have found that those little marks really cut the power and life of the engine if you allow them to develop. I have lapped a new engine seven times in order to get rid of those faint scratches.
ENGINE TEST
Engine Plug Prop Fuel ______________________________________________________________________
1 Break-in Plug __________ Prop __________ Fuel __________ Notes __________
Final Plug/Prop/Fuel rpm __________ Notes __________
Plug test notes __________
Fuel test notes __________
Accessories test notes __________
Muffler __________ Throttle __________ Fuel Pump __________ Operating characteristics __________
Date __________ Final rpm __________
BENCH RUNNING ENGINES
Last, let's take engine running. This month we reviewed basic procedures. I've gone out in the field to run engines used in preparing new engines to run. Now and then I've found I've forgotten something I've needed to test. Here's a checklist of items: test stand (large and small), tank, tubing, props (test, flight, duplicate flight), fuels, fuel filler bulb, pump, plugs, safety glasses. Also: good battery leads, tachometer, stopwatch, 3-in-1 oil, tools, rags, notebook, pencil, ear protectors, engine practice set — everything. Set everything out and make sure it's ready.
Begin making an entry in the notebook. Engine tested, type, fuel, etc. A sample format is shown. The information entered will help keep you organized during running procedures.
B. Mount engine. Any of the engines suitable for bench-running require a test stand. Ear protectors and safety glasses are recommended.
C. Put on the prop you intend to fly, flipping the blade about 45° horizontal for compression.
D. Fill the tank.
E. Open the needle valve per the engine manufacturer's instructions and let the engine draw fuel through the line; prime exhaust and intake. Hook up the battery and start the engine. For those familiar with running engines, some tips will help:
a. Initial runs — recommended with the flying prop. Important because larger props load the engine down and tend to magnify mechanical or dimensional problems. Remember break-in should free abnormal stresses, if possible.
b. Keeping the needle valve closed until ready to start helps prevent accidental flooding due to fuel level in the tank being higher than the needle valve (siphon problems), etc.
c. Mounting the prop at about 45° horizontal does a couple of things. The flipping finger gets out of the way if the engine fires. You will learn to use just your hand, finger and wrist to flip. You actually turn the engine over faster, thereby helping the engine start. On some engines a piston raised to the top of the stroke will leak the fuel-air mixture; if the piston is turned over faster there are fewer leaks, consequently higher compression is available to provide effective combustion for starting.
d. After priming the engine, hook up the battery, grab the prop blade firmly and turn through compression rapidly. If the prop kicks and the engine fires, it means the engine was properly primed and ready to run. Turn by hand until it will normally flip-start. One last tip: always flip using the index finger with the prop blade between the last knuckle and the fingertip. Always flip with the finger close to the hub if possible — this greatly increases rotational speed. Remember ear protection.
e. When the engine starts, disconnect the battery until you have an opportunity to listen to the engine run and adjust the needle valve for smooth running. If the engine is running well but too rich or too lean, the battery will help keep it running until you can correct the needle-valve setting. Some symptoms:
- Too rich — too much fuel: engine can start slowly, quit, visibly throw fuel out the exhaust, run slowly and unevenly while throwing fuel. Turn the needle valve enough to allow the engine to run evenly — what is called a 4-stroke run means the engine still has too much fuel; fuel does not fully combust on the compression stroke. The initial run of a new engine in ideal condition requires turning the needle valve just enough to produce a 4-stroke run. Check for temperature at the head and inspect bearing areas, lower and upper crankcase for excessive heat spots. If excessive heat is found, stop and fully examine the engine.
Hook up the test stand, large tank, fuel line and pressure line as necessary; close the needle valve when setting up.
Transcribed from original scans by AI. Minor OCR errors may remain.

