

ET Electric Trainer
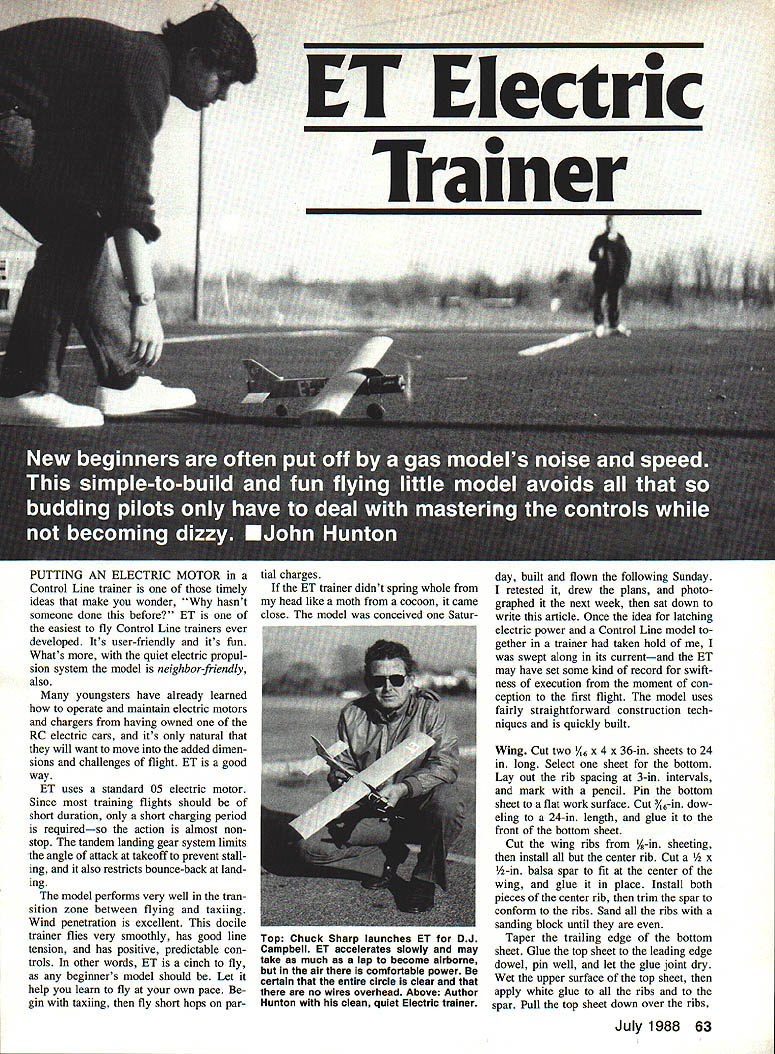
New beginners are often put off by a gas model's noise and speed. This simple-to-build and fun little model uses electric power so budding pilots can master the controls without distraction from noise or speed. ET is user-friendly, neighbor-friendly (quiet), and a very easy-to-fly control-line trainer. — John Hunton
ET uses a standard .05 electric motor. Short training flights require only short charging periods, so action is almost non-stop. The tandem landing gear limits the angle of attack at takeoff to prevent stalling and also reduces bounce-back at landing. The model taxis and transitions to flight smoothly, has good line tension, positive predictable controls, and excellent wind penetration. Begin by taxiing, then fly short hops on partial charges until you build confidence.
The prototype was conceived, built and flown in quick succession; the design uses straightforward construction techniques and can be built quickly.
Design notes
- Quiet electric propulsion makes ET neighbor-friendly.
- Tandem landing gear limits takeoff angle and bounce on landing.
- Use comfortable power settings; be certain the circle is clear of people and overhead wires.
- ET is a straight-and-level basic trainer, not a stunt model.
Construction
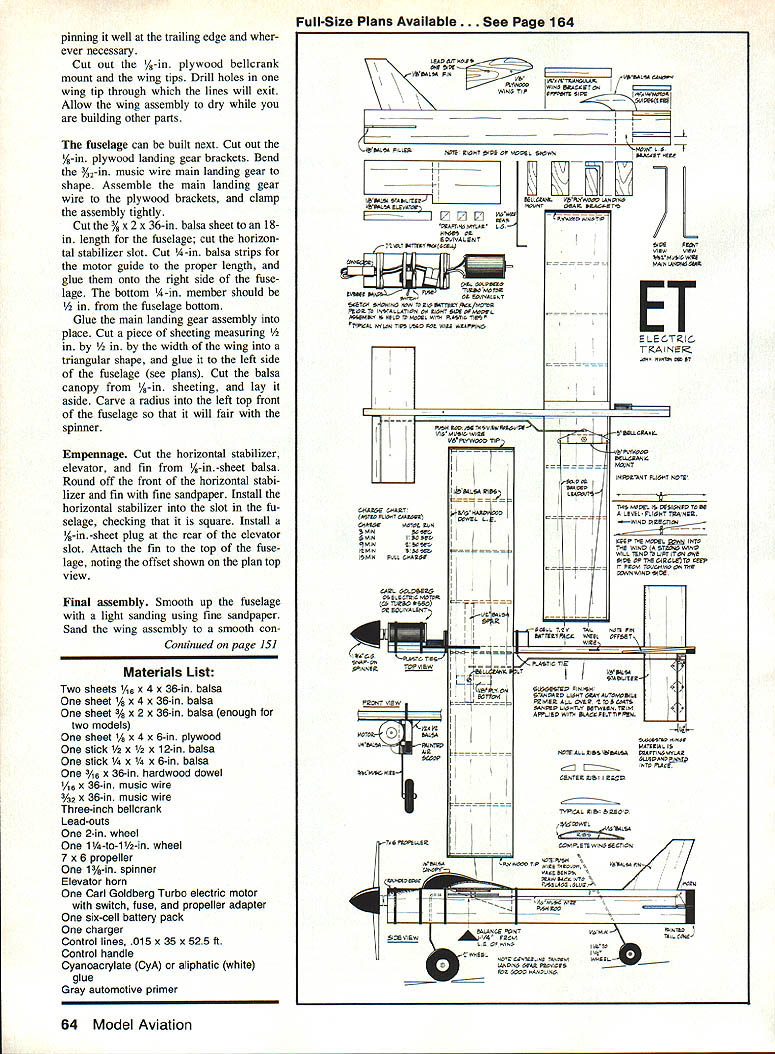
Follow the plans for exact shapes and offsets. The steps below summarize the key construction operations.
Wing
- Cut two 1/16 x 4 x 36-in. balsa sheets to 24 in. long. Select one sheet for the bottom.
- Lay out rib spacing at 3-in. intervals and mark with a pencil. Pin the bottom sheet flat to a work surface.
- Cut a 3/16-in. hardwood dowel to 24 in. and glue it along the leading edge of the bottom sheet.
- Cut the wing ribs from 1/8-in. sheeting. Install all ribs except the center rib.
- Cut a 1/2 x 1/2-in. balsa spar to fit at the center of the wing and glue it in place.
- Install both pieces of the center rib, then trim the spar to conform to the ribs. Fair the rib faces with a sanding block.
- Taper the trailing edge of the bottom sheet.
- Glue the top sheet to the leading-edge dowel; pin and let the glue joint dry.
- Wet the upper surface of the top sheet, apply white (aliphatic) glue to the ribs and spar, and pull the top sheet down over the ribs. Pin at the trailing edge and wherever necessary.
- Cut out the plywood bellcrank mount and the wing tips. Drill exit holes in one wing tip for the lines.
- Allow the wing assembly to dry while building other parts.
Fuselage
- Cut out plywood landing-gear brackets (see plans) and bend the main landing gear from music wire to shape. Assemble the wire to the plywood brackets and clamp tightly.
- Cut a 3/8 x 2 x 36-in. balsa sheet to 18 in. for the fuselage and cut the horizontal-stabilizer slot.
- Cut 1/4-in. balsa strips (motor guide) to the proper length and glue them onto the right side of the fuselage bottom. The lower member should lap the fuselage bottom about 1/2 in.
- Glue the main landing gear assembly into place.
- Cut a piece of sheeting to fit the left side of the fuselage where shown on the plans (triangular fill) and glue it in place.
- Cut the balsa canopy from 1/8-in. sheeting and set aside.
- Carve a radius into the left top front of the fuselage to fair to the spinner.
Empennage
- Cut the horizontal stabilizer, elevator, and fin from 1/8-in. sheet balsa.
- Round the front edges of the horizontal stabilizer and fin with fine sandpaper.
- Install the horizontal stabilizer in the fuselage slot, checking that it is square.
- Install a 1/8-in. sheet plug at the rear of the elevator slot.
- Attach the fin to the top of the fuselage, noting the offset shown on the plan top view.
Final assembly
- Smooth the fuselage and wing assembly with light sanding.
- Install the plywood bellcrank mount and the bellcrank (see plans).
- Install elevator hinges and the elevator horn.
- Install the rear landing-gear wire: push it through the fuselage, bend the top end, pull it into place and secure with glue.
- Glue the canopy in place after final checks.
- Finish the model to reduce drag and provide a cleanable surface. Fast-drying finishes work well; the prototype used three coats of automotive primer with light sanding between coats. Add black trim with felt-tip markers if desired.
- Install wheels after finishing.
Materials List
- Two sheets 1/16 x 4 x 36-in. balsa sheet (wing)
- One sheet 1/8 x 4 x 36-in. balsa sheet (ribs, spar stock)
- One 3/8 x 2 x 36-in. balsa sheet (fuselage)
- One 1/8 x 4 x 6-in. plywood (bellcrank mount and brackets; see plans)
- One stick 1/2 x 1/2 x 12-in. balsa (spar or stock)
- One stick 1/4 x 1/4 x 12-in. balsa (trim and guides)
- 3/16 x 36-in. hardwood dowel (leading-edge dowel)
- 1/16 x 36-in. music wire (lead-outs, small wire)
- 3/32 x 36-in. music wire (main landing gear and rear wire)
- 3-inch bellcrank
- Lead-outs
- 2-in wheel (main)
- 1-1/2-in wheel (tail)
- 7 x 6 propeller
- 1-3/8-in spinner
- Elevator horn
- Carl Goldberg Turbo electric motor with switch, fuse, and propeller adapter (or equivalent .05 electric motor with required accessories)
- Six-cell battery pack and charger
- Control lines: .015 in x 35 x 52.5 ft
- Control handle
- Cyanoacrylate (CyA) and aliphatic (white) glue
- Gray automotive primer
Charging times (typical Ni-Cd pack)
- Charge 6 minutes for a 1 minute 30 second run.
- Charge 9 minutes for a 2 minute 30 second run.
- Charge 12 minutes for a 3 minute 30 second run.
- Charge 15 minutes for a full charge.
Flying ET — procedures and tips
- Mark the control handle to show which end is up (when you pull the top of the handle back and the elevator moves up).
- Pick a calm day for first flights. Use a paved area if possible (grass must be mowed very short). Mark the center of the circle clearly and walk the model around the circumference to ensure clearance.
- The launch point should be on the downwind side of the circle so wind will help keep the lines tight at launch.
- Charge the battery for three minutes maximum for first flights.
- Have a helper launch the model pointing slightly outward. Leave controls neutral during the takeoff run; the model will take off by itself if aligned accurately.
- For early flights it may help to keep some down on the trainer to keep it on the ground while you get used to operations. ET taxis very well.
- Adjust throttle to suit desired run length. Ni-Cd output is relatively level during the run; power falls off slowly as the pack is spent, and the model will gently settle when the motor quits.
- To land: after taxiing a lap or so, reduce power and allow the lines to go slack so a wingtip can contact the ground to stop the model. Switch off the motor once stopped.
- When power is reduced, do not try to hold the model in the air—let it settle.
- Wind handling: ET performs well in wind, but strong winds will tend to raise the model on the downwind side and lower it on the upwind side. Counter this by pulling into control on the downwind side (use down control into the wind) so the model does not climb on the downwind leg.
Trimming and notes
- ET accelerates slowly and may take more than one lap to become airborne.
- Trim the trailing edge as necessary for best flight.
- The tandem landing-gear system limits takeoff angle and reduces bounce-back at landing.
- This trainer is docile, stable, and easy to fly—ideal for beginners learning taxiing, short hops, and partial-charge flights.
If you want to learn control-line flying, ET is a reliable trainer that will help you build skill and confidence.
Transcribed from original scans by AI. Minor OCR errors may remain.

