
F-16
The prototype is an outstanding air-superiority fighter designed by General Dynamics. It is extremely maneuverable, and its engine produces a thrust 50% greater than the plane's weight. The design of this single-seat fighter incorporates sophisticated aerodynamics. The center of gravity is so far aft that a computer system is necessary to provide artificial stability.
The F-16 is currently a joint project being built for the U.S., Holland, Belgium, Denmark, and Norway. It is also flown by the U.S. Air Force Thunderbirds.
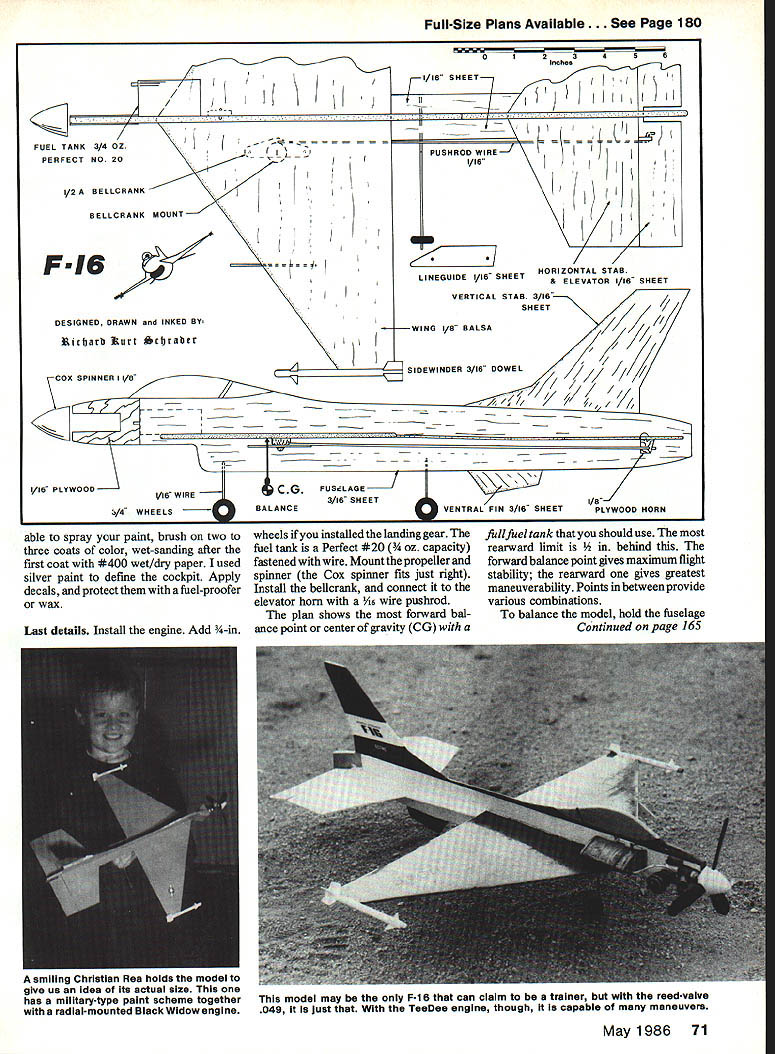
The vertical stabilizer is cut from 3/16" balsa sheet and glued to the top of the fuselage. The ventral fin, also from 3/16" balsa, is glued to the bottom. The landing gear is optional; if you plan on flying over grass only, leave it off. The gear is bent from 1/16" wire and held on with epoxy glue. Cut the horizontal stabilizer and elevator from 1/16" balsa, and glue the stabilizer to the fuselage. Attach the elevator with cloth hinges (or whichever type of hinge you prefer). Sand the edges of the fuselage and tail surfaces. Epoxy the ply horn to the elevator.
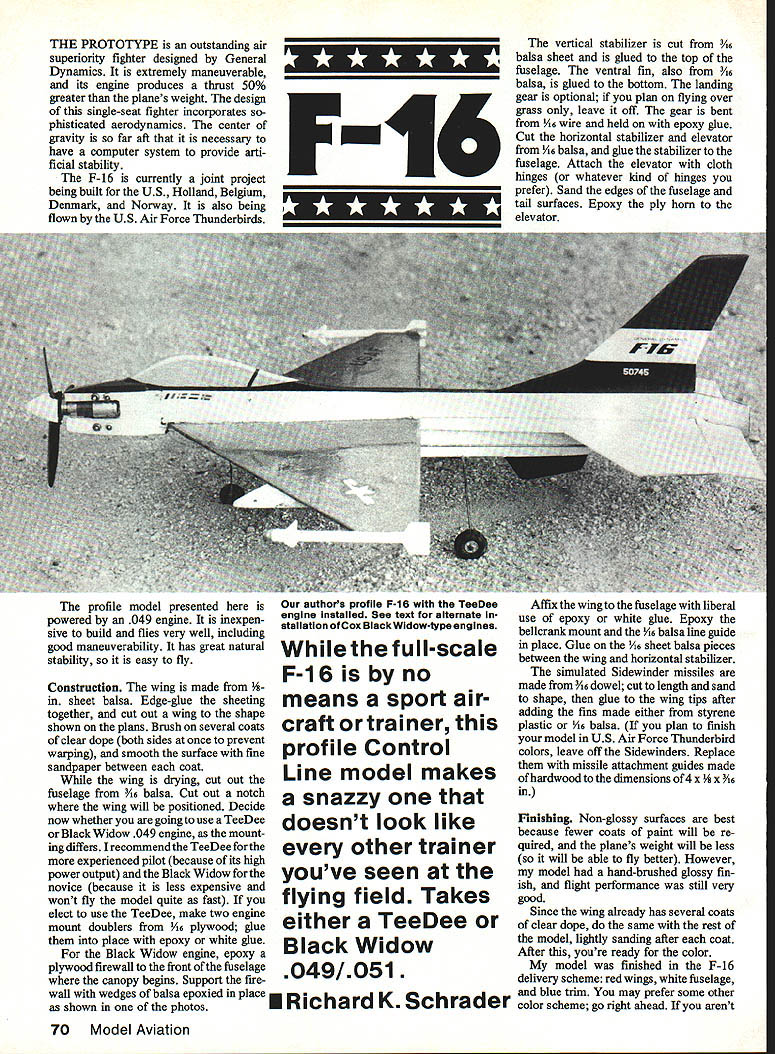
The profile model presented here is powered by a .049 engine. It is inexpensive to build and flies very well, including good maneuverability. It has great natural stability, so it is easy to fly.
Construction
- The wing is made from 1/8" sheet balsa. Edge-glue the sheeting together, and cut out a wing to the shape shown on the plans. Brush on several coats of clear dope (both sides at once to prevent warping), and smooth the surface with fine sandpaper between each coat.
- While the wing is drying, cut out the fuselage from 3/16" balsa. Cut a notch where the wing will be positioned.
- Decide now whether you are going to use a TeeDee or Black Widow .049 engine, as the mounting differs:
- TeeDee: recommended for the more experienced pilot because of its high power output. Make two engine mount doublers from 1/16" plywood; glue them into place with epoxy or white glue.
- Black Widow: recommended for the novice because it is less expensive and won't fly the model quite as fast. For the Black Widow, epoxy a plywood firewall to the front of the fuselage where the canopy begins. Support the firewall with wedges of balsa epoxied in place.
- Affix the wing to the fuselage with liberal use of epoxy or white glue. Epoxy the bellcrank mount and the 1/16" balsa line guide in place. Glue on the 1/16" sheet balsa pieces between the wing and horizontal stabilizer.
- The simulated Sidewinder missiles are made from 3/16" dowel; cut to length and sand to shape, then glue to the wing tips after adding the fins made either from styrene plastic or 1/16" balsa. (If you plan to finish your model in U.S. Air Force Thunderbird colors, leave off the Sidewinders. Replace them with missile attachment guides made of hardwood to the dimensions of 4 x 3/8 x 3/16".)
Finishing
Non-glossy surfaces are best because fewer coats of paint will be required, and the plane's weight will be less (so it will be able to fly better). However, a hand-brushed glossy finish still yields very good flight performance.
Since the wing already has several coats of clear dope, do the same with the rest of the model, lightly sanding after each coat. After this, you are ready for color.
My model was finished in the F-16 delivery scheme: red wings, white fuselage, and blue trim. You may prefer some other color scheme; go right ahead. If you aren't able to spray your paint, brush on two to three coats of color, wet-sanding after the first coat with #400 wet/dry paper. I used silver paint to define the cockpit. Apply decals, and protect them with a fuel-proofer or wax.
Last details:
- Install the engine.
- Add 3/4-in. wheels if you installed the landing gear.
- The fuel tank is a Perfect #20 (3/4 oz. capacity) fastened with wire.
- Mount the propeller and spinner (the Cox spinner fits just right).
- Install the bellcrank, and connect it to the elevator horn with a 1/16" wire pushrod.
The plan shows the most forward balance point or center of gravity (CG) with a full fuel tank that you should use. The most rearward limit is 1/2" behind this. The forward balance point gives maximum flight stability; the rearward one gives greatest maneuverability. Points in between provide various combinations.
To balance the model, hold the fuselage between two fingers at your selected point within the CG range. Add weight to the nose or tail until the model is perfectly horizontal.
Richard K. Schrader
Flying
Attach the control lines. Manufactured wire sets of 26 to 35 ft. length are recommended. Before each flight, check the elevator for proper and free movement.
If your model is built without a landing gear, it will have to be hand-launched. Have a helper run about 20 ft. with the model and then toss it into the air—straight ahead and with the fuselage level. At this point, the flier should have the elevator in a neutral (or very slightly up) position.
For taking off from the ground with the landing gear, start with the elevator in the neutral position. After letting it run on the ground for about a quarter of a circle, apply a little up-elevator to lift off.
You will find this model to be maneuverable and very stable. It has no vices and is not difficult to handle.
For landing, try to anticipate when the fuel will run out, and level out at about shoulder height. When the engine quits, let it descend in a glide, and apply up-elevator just prior to touching down.
Good luck, and happy flying with your F-16 model.
Transcribed from original scans by AI. Minor OCR errors may remain.

