
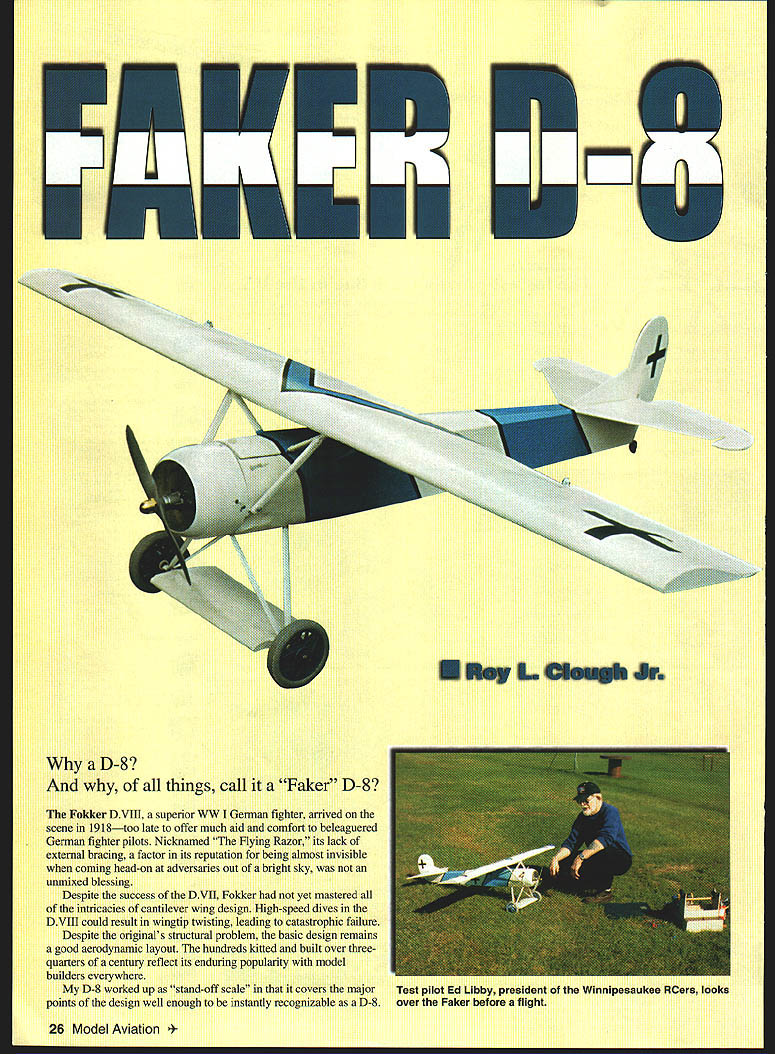

FAKER D-8
Roy L. Clough Jr.
Why a D-8?
And why, of all things, call it a "Faker" D-8?
The Fokker D.VIII, a superior WW I German fighter, arrived on the scene in 1918—too late to offer much aid and comfort to beleaguered German fighter pilots. Nicknamed "The Flying Razor," its lack of external bracing made it almost invisible when coming head-on at adversaries out of a bright sky, but that lack of bracing was not an unmixed blessing.
Despite the success of the D.VIII, Fokker had not yet mastered all of the intricacies of cantilever wing design. High-speed dives in the D.VIII could result in wingtip twisting, leading to catastrophic failure. Despite the original's structural problem, the basic design remains a good aerodynamic layout. The hundreds kitted and built over three-quarters of a century reflect its enduring popularity with model builders everywhere.
My D-8 was developed as a "stand-off scale"—it covers the major points of the design well enough to be instantly recognizable as a D-8. But since it's not a true scale model down to the last bolt and rivet, I tagged it the Faker D-8.
Sight- and sound-wise our model is a good scale-type performer. Powered with an Enya 46 four-stroke, it will loop from level flight, rolls well, and performs the usual scale aerobatics. It's not really that far off scale: the wing and tail feathers retain original proportions; the major difference is a longer, narrower fuselage that greatly mellows the usual rabbity air and ground response of short-nose-moment tail-draggers.
It builds and flies just great. Its choice of construction materials makes it an eye-opening adventure in scratch-building. Paper-faced foamboard is dirt cheap to buy and paper-doll easy to cut out and assemble. (Don't think of it as a "substitute." Knowingly used, it's a superior material with which to build crash-resistant and easily repairable model airplanes.)
Other materials used include:
- Brown-bag paper
- Lumberyard half-round molding and dowels
- Tyvek® house wrap
- Baby stroller wheels
- Plastic folder spine landing gear fairings
- Gulden's mustard-jar fuel tank (plastic)
- Plastic bottle cowling
- Blue foam
- Balsa wood
The landing gear wire, set in flexible tacky craft glue, has an adjustable incidence strut to fine-tune flight trim.
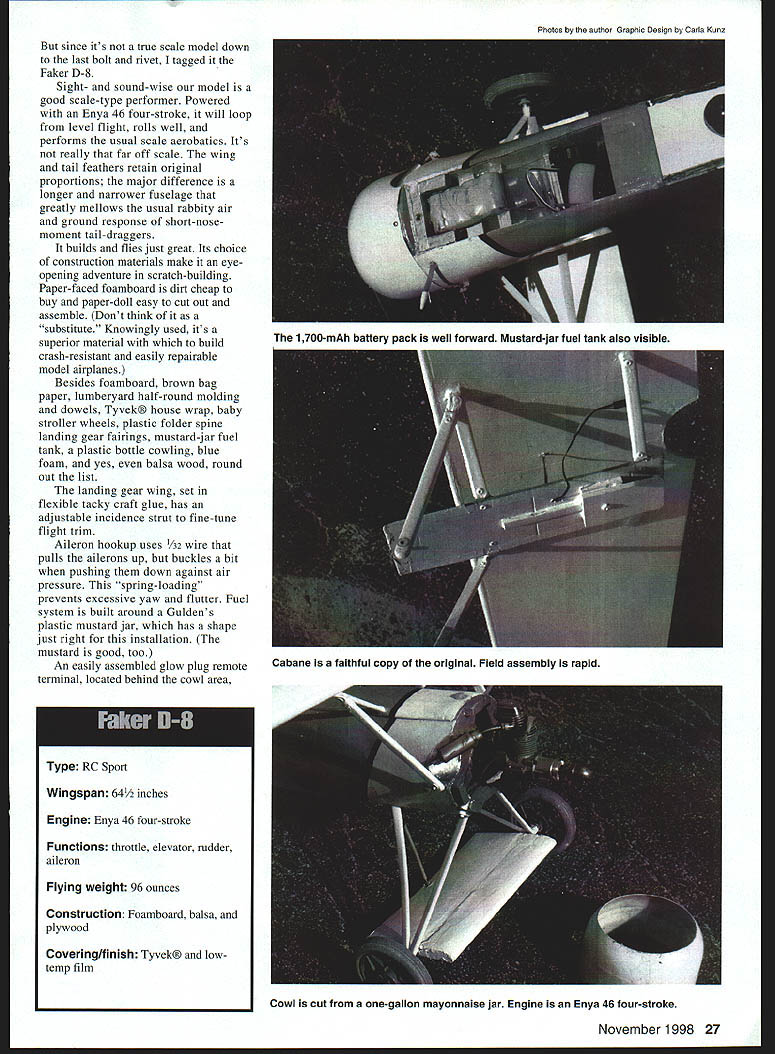
Aileron hookup uses 1/32" wire that pulls the ailerons up but buckles a bit when pushing them down against air pressure. This "spring-loading" prevents excessive yaw and flutter. The fuel system is built around a Gulden's plastic mustard jar, which has a shape just right for this installation. (The mustard is good, too.)
An easily assembled glow-plug remote terminal, located behind the cowl area, facilitates startup. Landing gear fairings are plastic folder spines.
One of the best features is the model's quick field assembly. All it takes is one 1/4-inch nylon bolt and two 3/8-inch locknuts.
Specifications
- Type: RC Sport
- Wingspan: 64½ inches
- Engine: Enya 46 four-stroke
- Functions: throttle, elevator, rudder, aileron
- Flying weight: 96 ounces
- Construction: Foamboard, balsa, and plywood
- Covering/finish: Tyvek® and low-temp film
CONSTRUCTION
Construction is largely foamboard, edged with balsa where applicable. Cowl cheeks and the spreader-bar wing are carved to shape from blue foam. These areas should be covered with silkspan or Skyloft set in diluted white glue before painting or covering with iron-on film. The headrest turtleback of the original airplane was covered with wet brown-bag paper, dried taut, then clear-doped and painted.
Details of the bulkheads, landing gear installation, cabane anchor, battery shelf, and tank installation should be clear from the plans. Landing gear fairings are plastic spines used to clip clear report covers; they are readily available at any stationer. Cut them to length, snap them over the wire landing-gear struts, and hold in place with Goop™ household cement at either end.
Tail surfaces are simple to make. Glue them to the fuselage on the balsa inserts. Use ready-made control horns on elevators and rudder and connect them to the servos with your preferred style of horn.
The wing is very simple but must be assembled in the right order. Ribs are glued to a foamboard lower surface, then the spar is dropped in place and spliced at center. Note that the aileron spars are tapered to match the ends of the outer wing ribs. Sand the outer part of the balsa aileron stock to conform to this thickness.
A 1/8" hardwood dowel protects the non-moving parts of the wing's trailing edge. A small block of soft balsa or blue foam is sanded to shape for the wing's cockpit-area cutout.
Install the wing's cabane anchors with brass fittings, pop rivets, and rivet burrs in four places. Be sure to use aluminum rivets; steel rivets produce excessive "crush" when popped in place. Add the 1/16" balsa leading-edge sheeting that rounds out the airfoil.
The plan shows installation of the aileron bellcranks and servo. Fasten the bellcranks to squares of lite ply to distribute stress and glue to the inner wing surface in the positions shown.
Aileron actuator installation
- Use a single 36" length of 1/32" music wire and make a Z bend for the servo arm in the middle.
- Remove the servo arm. Poke one end of the wire through the hole in the outboard rib (D) and thread through to the center section.
- Slip on the servo arm, continue through, turn the servo arm into position at the Z bend, and replace it on the servo.
- You will have free wire projecting past the position of the aileron bellcrank arms; Z-bend both to match.
- Bend the shorter rods to the aileron cranks from softer wire and make V-bends to allow for final aileron position adjustment. Attach the short rods to the aileron cranks and slip on thin 1/32" plywood slotted pass-throughs.
- Remove the bellcranks and hook up everything. Glue the pass-throughs lightly in place, then replace the aileron bellcranks.
While the wing is still wide open, hook up the servo to a receiver (or servo exerciser) and check aileron position with your transmitter. When OK, tighten everything and get ready to cover the wing.
Covering Having discovered Tyvek® a few years back and applied this lightweight, high-strength material to wing joints and reinforcing patches, I found it could be shrunk with a high-temp heat gun. I cut a full-length piece of Tyvek and glued it to the wing's structure with white glue (leading edge only, not the balsa sheeting). I worked it reasonably smooth, let the glue dry, and then used a heat gun. The results can be elegant or disastrous—the surface becomes wonderfully taut just before it melts through—so be careful. I finished with only a couple of holes that I covered over with patches.
You have a much easier choice for covering the wing: use low-temperature iron-on film. Cover top and bottom and you'll have nothing to paint and will have a fuelproof finish. A couple of years' experience since building the original (painted) D-8 has taught me that low-temp film is about the best finish possible for foamboard.
Balance and weight Because of the short nose moment, I feared the airplane might finish tail-heavy. To head off this eventuality, I decided that if ballast was needed, the extra weight should go into something useful. Locate a four- or five-cell, 1,700 mAh battery pack far forward, as shown. Surplus stroller wheels were cheap and a little heavier than regular airplane wheels. The rugged landing gear, sandwiched between plywood blocks, plus a heavy brass prop-spinner nut, helped bring the balance point exactly where it should be.
Electrics, tanking, and filling Since this is by no means a beginner's project, and since experienced builders already have their own notions of switches, wiring, tank venting, and filling schemes, those details are omitted here. One point: with the superior suction of four-stroke engines and the close proximity of the tank, I found that an exhaust-pressure line was unnecessary.
Flying No particular flying instructions are needed. The airplane tracks neatly, with no tendency to ground-loop; the tail lifts automatically on takeoff, and a twitch of the stick will ease it into a rock-solid climb. Have fun!
Roy L. Clough Jr. 1070 Upper City Rd. Pittsfield, NH 03263
Transcribed from original scans by AI. Minor OCR errors may remain.

