
Feather Merchant 72
Old-Timer Flies Anew with RC Assist
You remember them (provided you're of a certain age) from the old Li'l Abner comic strips. The Feather Merchants, those funny little fellows with the long black coats and tall black hats, were the bane of Pappy Yokum's existence—always trying to steal his Presarved Turnips, which he secretly made in the woods beyond the view of Mammy Yokum. When they succeeded—as often happened—a personally affronted Pappy would chase them with his shootin' iron, without much result. The Snuffy Smith strip featured the same cameo (remember Snuffy chasing revenoors confiscating moonshine?).
How did I happen to name a model after Pappy Yokum's persecutors? In those early days of gas model flying I belonged to the San Antonio Gas Model Airplane Association (SAGMAA). We did quite well in competition from 1938 to 1942 and attended meets together all over Texas. Arriving at an Austin meet one morning, we overheard someone quip, "Well, here are the Feather Merchants coming to steal our Presarved Turnips!" Before long I'd clapped the name onto a Bantam-powered original I'd had good results with during the 1940 and 1941 contest seasons.
I'd flown this model for both competition and fun and given it a new covering job the second year. During this period I broke three props on the airplane.
One prop broke after a long flight during a fun session at Kelly Field, our club flying site. The plane, escaping both Kelly's boundaries and the lift, glided over an area filled with mesquite trees, pear cactus, and rattlesnakes, and ended up in the middle of a clearing, where it struck a solitary mesquite tree just above ground level. Only the prop broke.
If there is truly justice in this world, why don't we fly over the pigeons sometimes?
The model I came to call Feather Merchant traces its origins to a Cavalier built from a standard Berkeley kit in 1938. I'd put together enough pocket money to buy the kit, then powered the finished plane with a Brown B I'd gotten for Christmas.
The Cavalier didn't last long. Despite its generous downthrust, the model made a loop on takeoff and crashed. Except for the wing, it was creamed.
Next, I built a Lackey Zenith. It flew like a dream, but I wasn't winning anything. So I came up with my own design. The Goon had a 60% stabilizer, which was radical for its day. The model's rate of climb, however, was too low for the time-limited engine-run events, dominated by the famous Goldberg Zipper.
In the meantime, I'd become one of the big boys—like Charley Adams, Richard Sherman, Fred Cordova, et al.—whom I'd so idolized just a few years before, and was achieving my successes with rubber designs. This, together with a ballooning interest in aerodynamics, got me to thinking about the Berkeley Cavalier.
Why was the model such a lemon? Why was all that downthrust without effect? My peers couldn't help, except that they, too, found nothing nice to say about the model. In fact, Berkeley apparently discouraged and soon stopped making the kit. I decided to build a new model using the Cavalier wing. Money scarce, I needed to salvage whatever I could from the misadventure.
Model aeronautics isn't a game. You can't blame Ozzie Reynolds's ideas about size-scale effect, although theories play a significant role. Theories relating full-scale aerodynamics must be modified using both modeling experience and hunches. Around the time I was designing the model, I somehow managed to have reports on aerodynamics mailed to me from NACA (now NASA). Though I partly understood what I read, correlating it with modeling experience helped make sense. The Kutta-Joukowski theory of lift completely fascinated me.
Remembering the Cavalier—its short tail moment arm (nearly mid-fuselage) and the wing's great downthrust causing nose-up instability—I could guess the design hadn't worked. Maybe trimmed right at low speed, it increased airspeed and generated a strong nose-up moment. Maybe the much-strengthened downwash from the wing struck the stabilizer mostly on its upper surface, decreasing the stab's angle of attack until it lifted down. I looked for answers in my latest design: a model with a narrow body, belly-low center of lateral area, long tail moment, large stab set at positive incidence, the wing placed on top of the cabin fuselage set at 2° incidence. The stab was kept conventional—Mr. Buckmaster, Mr. Tileson, please note—I refrained from using the word decalage for the sake of friendly relations. I used generous dihedral, washout at the tips, and kept the Cardinal's excessive downthrust out for the reason just discovered in high school trigonometry: sine and tangent of angles less than 5° are virtually equal, close to zero. Therefore downthrust imposes a downward force nearly zero; its name is improper because it diverts the downwash of the wing upward instead. I even checked this out with my teacher, Mrs. Wimberley.
My theory was that on release, the model's airspeed is zero and the propwash strikes the large stab. Since the stab is at a positive angle of incidence—say, 1°—and the propwash is diverted upward at 5°, a good portion of the stab is effectively at a 6° angle of attack and hence provides lift. As airspeed increases, so do wing lift and downwash. The combination of this downflow and the upflow of the propwash decreases the angle of attack of the affected stab area, reducing the down-elevator-like effect. I felt sure of this because I recalled the way my rubber jobs and gliders lifted their tails when in strong lift—diving, then stalling, yet still gaining altitude. Of course, sometimes the model would spiral, even all the way down, if the low tip remained in stall.
I was sure Kutta and Joukowski would have approved of my theory. Too, I had tried this idea on my Goon in late 1938. I could only hope I had the right amount of stab incidence and downthrust. Apparently, I did: the model flew very well.
I wanted to try a couple of other ideas, but this required money. With a teenager's business acumen, I sold my new plane to a spectator for five bucks. Though I hadn't intended the engine, Dad was disgusted with me. "What does he know?" I thought. "I just bought a Baby Cyclone C-less tank, coil, or condenser—for two bucks!"
With five bucks in my jeans, I was rich! I spent the last months of 1939 designing and testing a Hum-Dinger. It flew right off the drawing board. I made several flights in sheer ecstasy, drinking in the praise about the climb and glide.
Then the engine cut on takeoff, and the model stalled but made a nice recovery about three feet above the ground. Sharing that space on the other side of the Kelly runway was the headlight of a Model A. Both parties were demolished, but my empennage was untouched. The Model A owner was quite civil; even said he should have moved the car when we started flying our models in its direction. I was heartbroken; for my five-buck fortune was gone. I'd even put a dollar Moore prop on the model instead of the reworked 25-cent Modelcraft one I used for fun-flying.
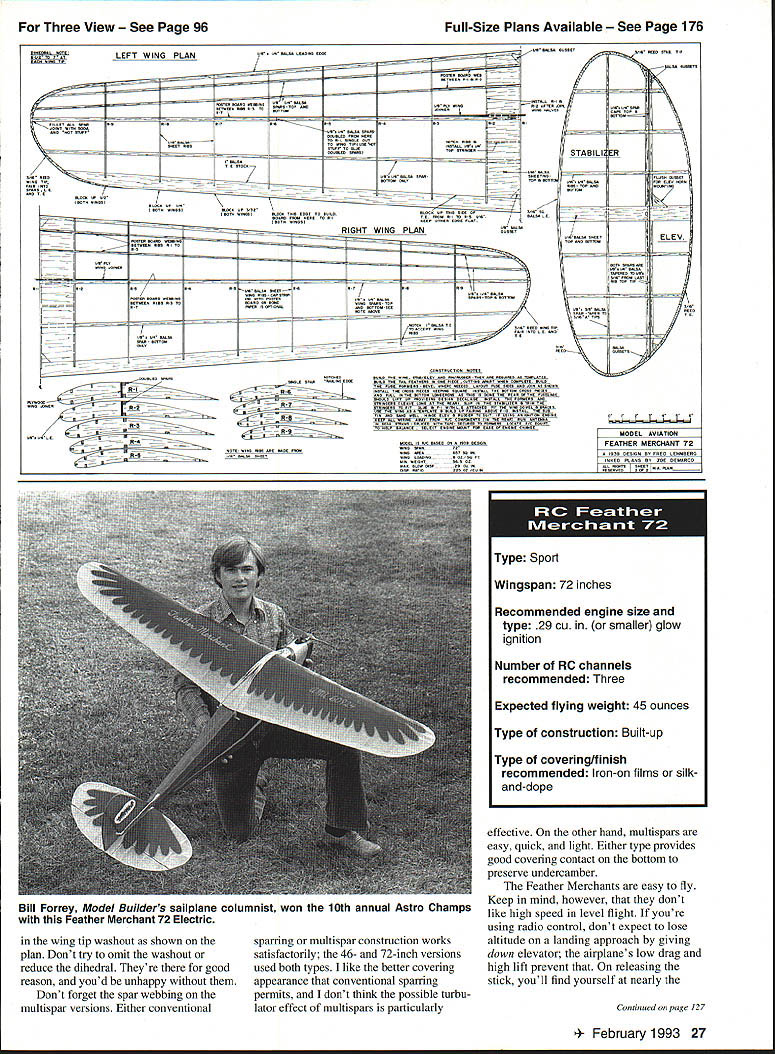
This model had been almost identical to the one I'd designed for the Cavalier wing. Because I didn't enjoy plotting the Eiffel 431 ribs, I had made the rib spacing fairly wide. To prevent the covering from sagging on the forward part of the upper camber, I'd used 1/8 x 1/8-in. multispars with an upper and a lower strip where the main spars would normally have been. To stiffen the spars I had used poster board as webbing between the ribs. This produced a very light, strong structure.
Incidentally, I hadn't used the multispars to provide turbulators on the forward part of the upper airfoil; that method of improving airfoil performance had not yet been invented.
The bottom longerons were cemented together from a point some distance behind the rectangular fuselage cross section, curving the fuselage downward. This automatically gave the stabilizer a little over a degree of positive incidence. Again, I had provided excessive washout at the tips and used generous dihedral. The model climbed to engine cutoff in a fairly tight and quite steep left spiral, then made a nice glide transition as the wing leveled and the right glide circle started.
This airplane's life was so short that I never called it anything except "my Brown job."
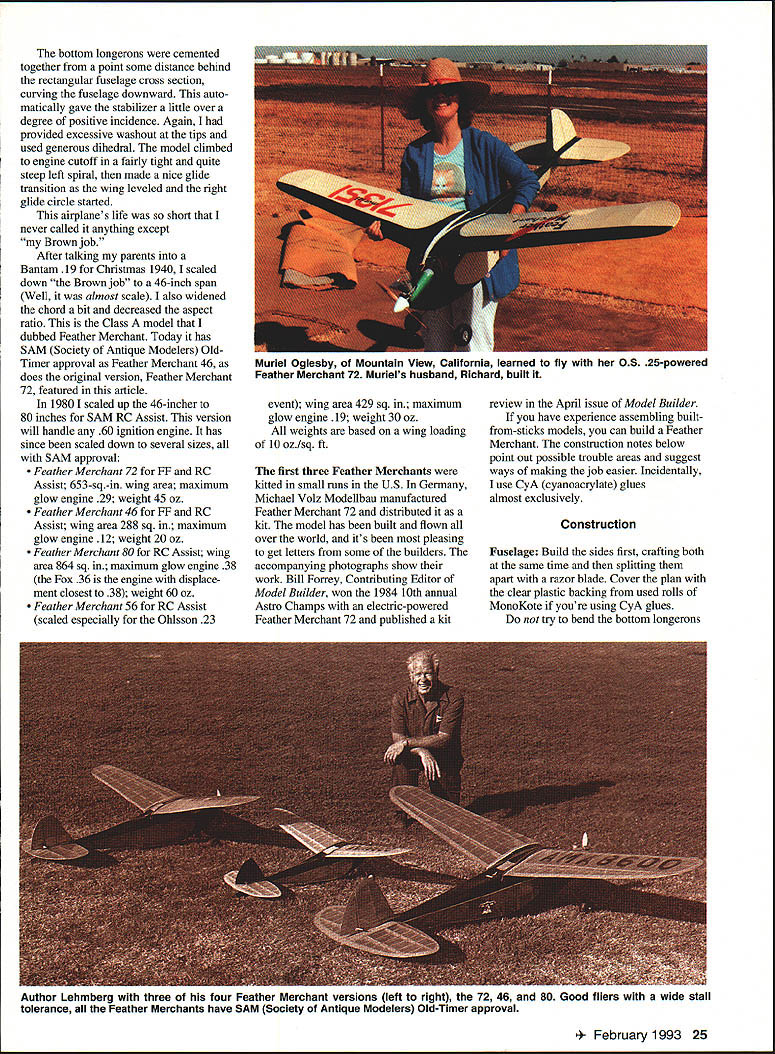
After taking my parents into a Bantam .19 for Christmas 1940, I scaled down "the Brown job" to a 46-inch span (well, it was almost scale). I also widened the chord a bit and decreased the aspect ratio. This is the Class A model that I dubbed Feather Merchant. Today it has SAM (Society of Antique Modelers) Old-Timer approval as 90.0 inch Feather Merchant 46, as does the original version, Feather Merchant 72, featured in this article.
In 1980 I scaled up the 46-inch to 80 inches for SAM RC Assist. This version will handle any .60 ignition engine. It has since been scaled down to several sizes, all with SAM approval:
- Feather Merchant 72 for FF and RC Assist; 653 sq. in. wing area; maximum glow engine .29; weight 45 oz.
- Feather Merchant 46 for FF and RC Assist; wing area 288 sq. in.; maximum glow engine .12; weight 20 oz.
- Feather Merchant 80 for RC Assist; wing area 864 sq. in.; maximum glow engine .38 (the Fox .36 is the engine with displacement closest to .38); weight 60 oz.
- Feather Merchant 56 for RC Assist (scaled especially for the Ohlsson .23 event); wing area 429 sq. in.; maximum glow engine .19; weight 30 oz.
All weights are based on a wing loading of 10 oz./sq. ft.
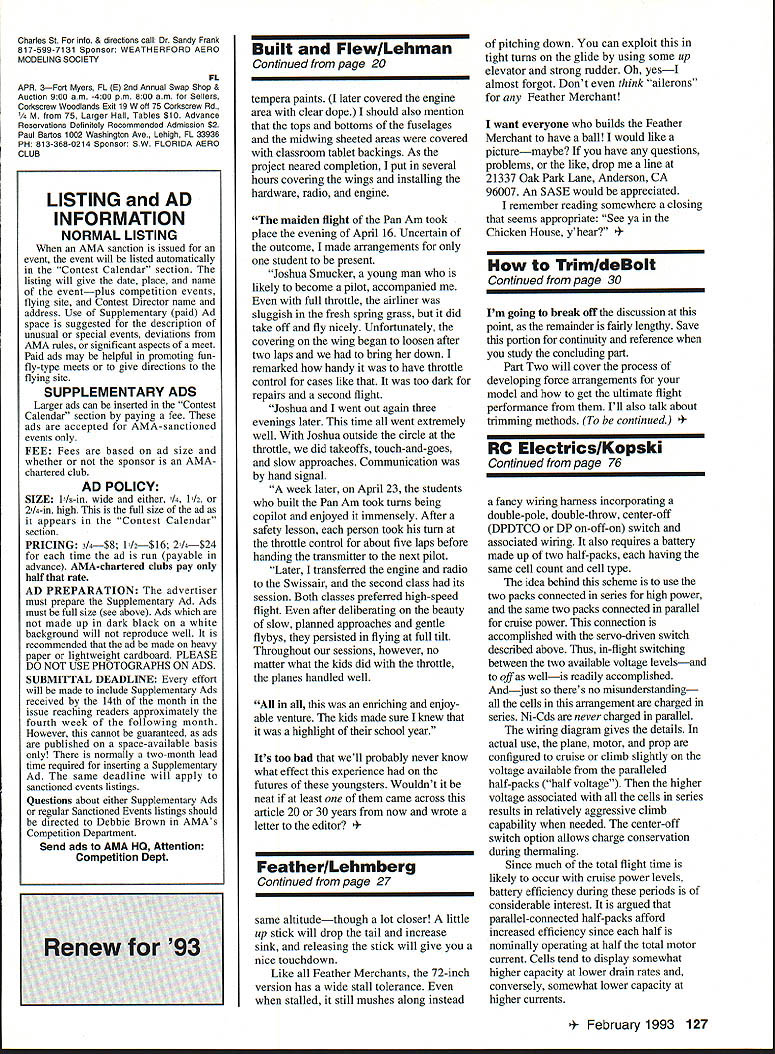
The first three Feather Merchants were kitted in small runs in the U.S. In Germany, Michael Volz Modellbau manufactured Feather Merchant 72 and distributed it as a kit. The model has been built and flown all over the world, and it's been most pleasing to get letters from some of the builders. The accompanying photographs show their work. Bill Forrey, Contributing Editor of Model Builder, won the 1984 10th annual Astro Champs with an electric-powered Feather Merchant 72 and published a kit review in the April issue of Model Builder.
If you have experience assembling built-from-sticks models, you can build a Feather Merchant. The construction notes below point out possible trouble areas and suggest ways of making the job easier. Incidentally, I use CyA (cyanoacrylate) glues almost exclusively.
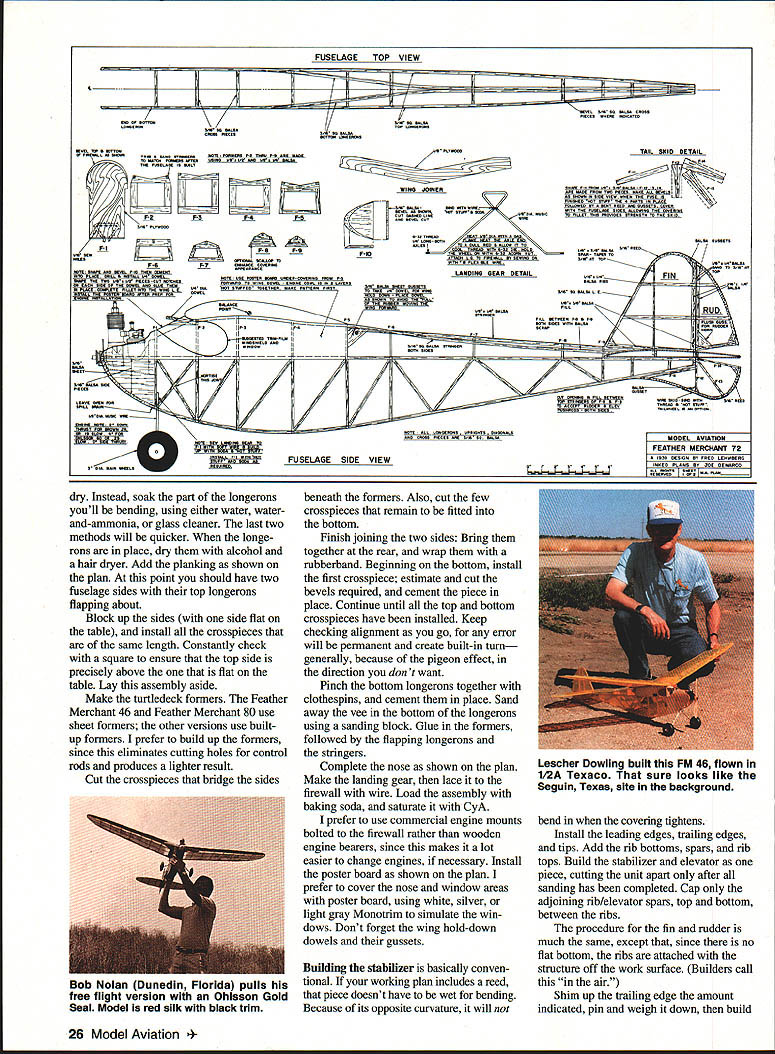
Construction
Fuselage: Build the sides first, crafting both at the same time and then splitting them apart with a razor blade. Cover the plan with the clear plastic backing from used rolls of MonoKote if you're using CyA glues. Do not try to bend the bottom longerons dry. Instead, soak the part of the longerons you'll be bending using either water, a water-and-ammonia mixture, or glass cleaner. The last two methods will be quicker. When the longerons are in place, dry them with alcohol and a hair dryer. Add the planking as shown on the plan. At this point you should have two fuselage sides with their top longerons flapping about.
Block up the sides (with one side flat on the table), and install all the crosspieces that are of the same length. Constantly check with a square to ensure that the top side is precisely above the one that is flat on the table. Lay this assembly aside.
Make the turtledeck formers. The Feather Merchant 46 and Feather Merchant 80 use sheet formers; the other versions use built-up formers. I prefer to build up the formers, since this eliminates cutting holes for control rods and produces a lighter result.
Cut the crosspieces that bridge the sides beneath the formers. Also cut the few crosspieces that remain to be fitted into the bottom.
Finish joining the two sides: bring them together at the rear, and wrap them with a rubber band. Beginning on the bottom, install the first crosspiece; estimate and cut the bevels required, and cement the piece in place. Continue until all the top and bottom crosspieces have been installed. Keep checking alignment as you go, for any error will be permanent and create built-in turn—generally, because of the pigeon effect, in the direction you don't want.
Pinch the bottom longerons together with clothespins, and cement them in place. Sand away the vee in the bottom of the longerons using a sanding block. Glue in the formers, followed by the flapping longerons and the stringers.
Complete the nose as shown on the plan. Make the landing gear, then lace it to the firewall with wire. Load the assembly with baking soda, and saturate it with CyA.
I prefer to use commercial engine mounts bolted to the firewall rather than wooden engine bearers, since this makes it a lot easier to change engines, if necessary. Install the poster board as shown on the plan. I prefer to cover the nose and window areas with poster board, using white, silver, or light-gray MonoKote to simulate the windows. Don't forget the wing hold-down dowels and their gussets.
Building the stabilizer is basically conventional. If your working plan includes a reed, that piece doesn't have to be wet for bending. Because of its opposite curvature, it will not bend in when the covering tightens.
Install the leading edges, trailing edges, and tips. Add the rib bottoms, spars, and rib tops. Build the stabilizer and elevator as one piece, cutting the unit apart only after all sanding has been completed. Cap only the adjoining rib/elevator spars, top and bottom, between the ribs.
The procedure for the fin and rudder is much the same, except that, since there is no flat bottom, the ribs are attached with the structure off the work surface (builders call this "in the air").
Shim up the trailing edge the amount indicated, pin and weigh it down, then build the fin and rudder over the plan. Install the wing-tip washout as shown on the plan. Don't try to omit the washout or reduce the dihedral—they're there for good reason, and you'd be unhappy without them.
Don't forget the spar webbing on the multispar versions. Either conventional sparring or multispar construction works satisfactorily; the 46- and 72-inch versions used both types. I like the better covering appearance that conventional sparring permits, and I don't think the possible turbulator effect of multispars is particularly effective. On the other hand, multispars are easy, quick, and light. Either type provides good covering contact on the bottom to preserve undercamber.
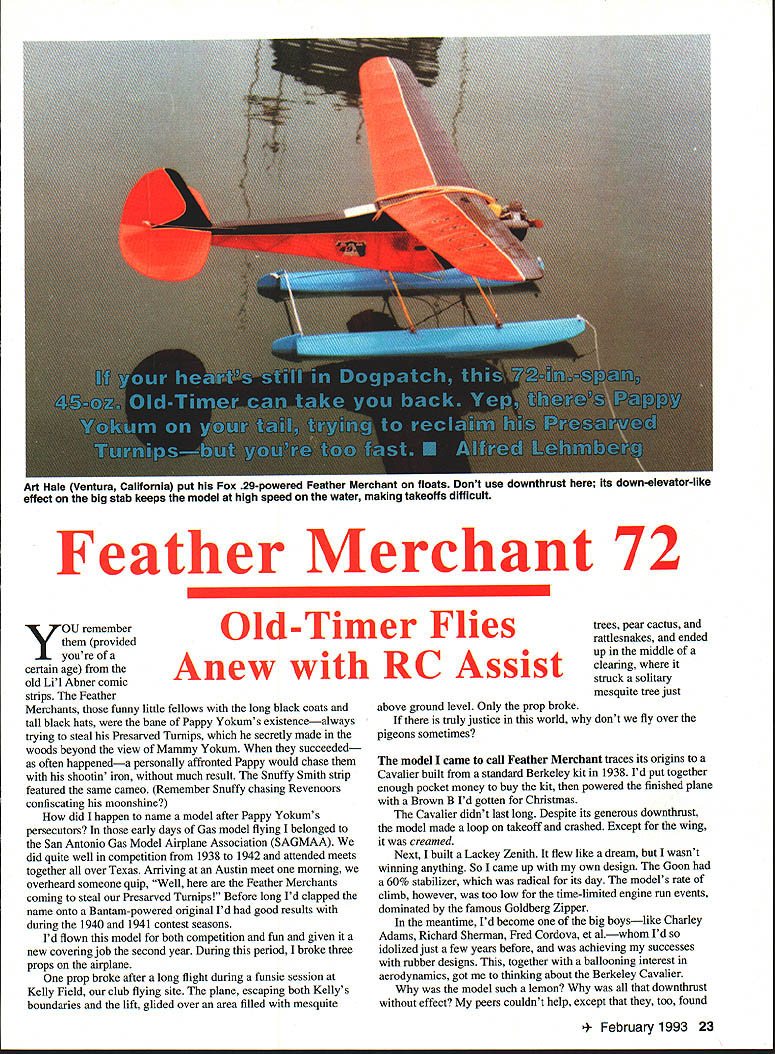
The Feather Merchants are easy to fly. Keep in mind, however, that they don't like high speed in level flight. If you're using radio control, don't expect to lose altitude on a landing approach by giving down elevator; the airplane's low drag and high lift prevent that. On releasing the stick, you'll find yourself at nearly the same altitude—though a lot closer! A little up stick will drop the tail and increase sink, and releasing the stick will give you a nice touchdown.
Like all Feather Merchants, the 72-inch version has a wide stall tolerance. Even when stalled, it still mushes along instead of pitching down. You can exploit this in tight turns on the glide by using some up elevator and strong rudder. Oh yes—don't even think 'ailerons' for any Feather Merchant!
I want everyone who builds the Feather Merchant to have a ball! I would like a picture—maybe? If you have any questions, problems, or the like, drop me a line at 21337 Oak Park Lane, Anderson, CA 96007. An SASE would be appreciated.
I remember reading somewhere a closing that seems appropriate: "See ya in the Chicken House, y'hear?"
Transcribed from original scans by AI. Minor OCR errors may remain.

