
FF Freebie: Stunt Glider
John Franke
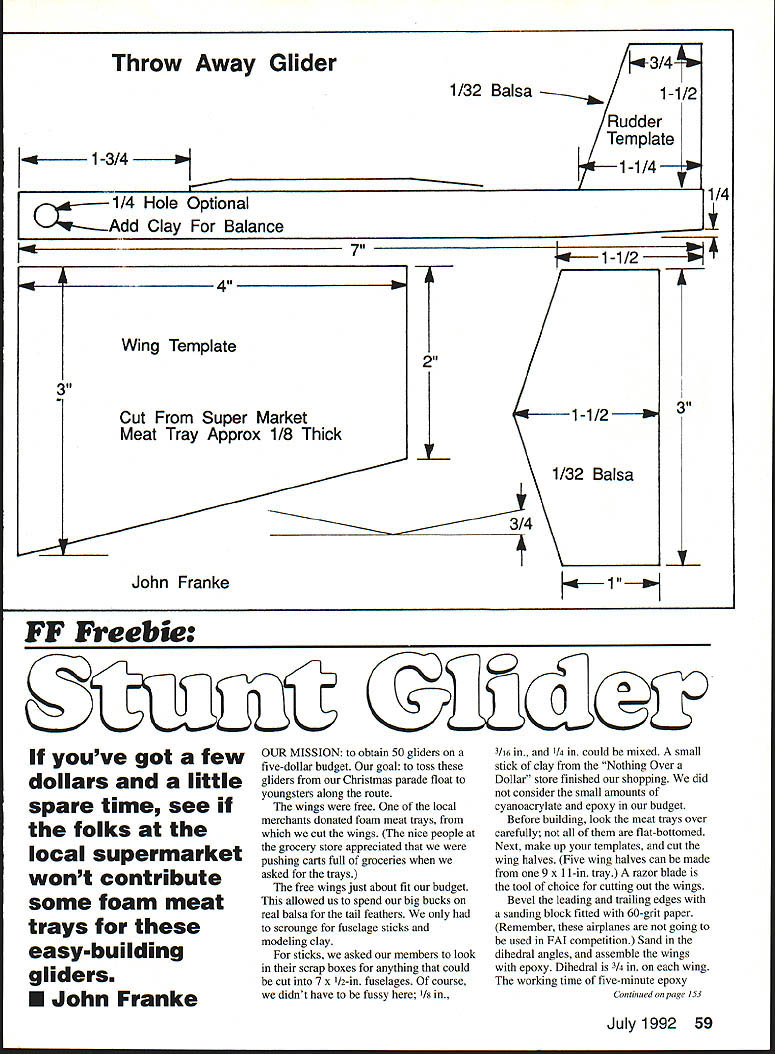
OUR MISSION: to obtain 50 gliders on a five-dollar budget. Our goal: to toss these gliders from our Christmas parade float to youngsters along the route.
The wings were free. One of the local merchants donated foam meat trays, from which we cut the wings. (The nice people at the grocery store appreciated that we were pushing carts full of groceries when we asked for the trays.)
The free wings just about fit our budget. This allowed us to spend our big bucks on real balsa for the tail feathers. We only had to scrounge for fuselage sticks and modeling clay. We did not consider the small amounts of cyanoacrylate and epoxy in our budget.
Materials
- Foam meat trays (wings) — five wing halves can be made from one 9 x 11 in. tray
- Balsa for tail feathers
- Fuselage sticks, cut to 7 x 1/2 in. (scrap stock of 1/8 in., 3/16 in., or 1/4 in. can be mixed)
- Modeling clay (small stick)
- Cyanoacrylate (super glue)
- Five-minute epoxy
Preparation and cutting
Before building, inspect the meat trays carefully; not all of them are flat-bottomed. Make up your templates and cut the wing halves. A razor blade is the tool of choice for cutting out the wings.
Bevel the leading and trailing edges with a sanding block fitted with 60-grit paper. (Remember, these airplanes are not going to be used in FAI competition.) Sand in the dihedral angles, and assemble the wings with epoxy. Dihedral is 3/4 in. on each wing. The working time of five-minute epoxy should let you do six or eight at a time.
Fuselage, tail and assembly
- Cut the fuselage sticks and taper the tail bottom as shown.
- Drill a 1/4-in. hole in the nose.
- Mount the elevator with cyanoacrylate; it will hold the fuselage upright while you add the wing and rudder.
- Mark the rudder position to assure its alignment, and zap it with cyanoacrylate.
- Put a bead of epoxy on the fuselage, position the wing, and hold it with a pin while the epoxy dries.
Flight testing and trimming
Press a small wad of clay over the hole in the nose, and fling the glider. It should make one loop and glide in. Add or subtract clay until you obtain a decent glide. Each ship should be tested and trimmed individually.
Safety
A note of caution: many gliders will come back toward the launch site. If you toss these gliders from a parade float, it is essential that at least one person walk on either side of the float to prevent youngsters from coming too close to the vehicle.
Now, prepare some happy young folks for your next parade, mall show, or other public event.
Transcribed from original scans by AI. Minor OCR errors may remain.

