

For Fiberglass Parts: How to: Make a Mold
Making your own fiberglass plugs and molds can save money while giving a great sense of satisfaction in a job well done. If it's something you've always wanted to do—or you're just curious about how it's done—read on! ■ M.H. Pickard
Planning and plugs
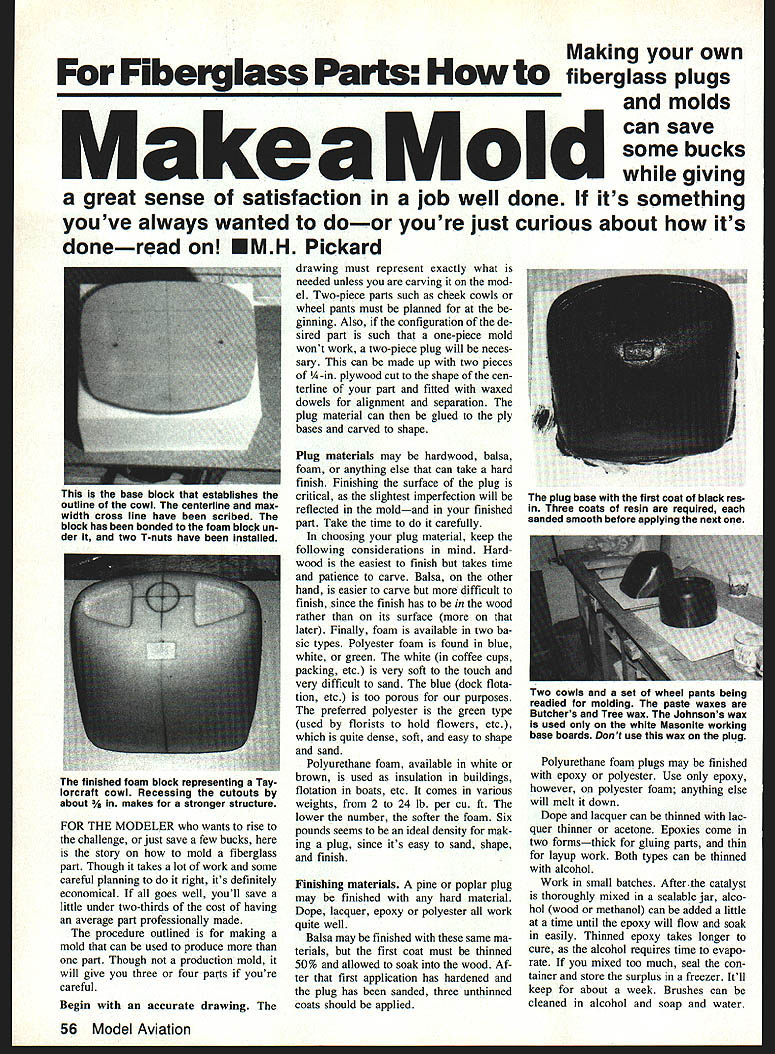
Begin with an accurate drawing. The drawing must represent exactly what is needed unless you are carving the shape on the model. Two-piece parts such as cheek cowls or wheel pants must be planned for at the beginning. If the configuration of the desired part is such that a one-piece mold won't work, a two-piece plug will be necessary. This can be made up with two pieces of 1/4-in. plywood cut to the shape of the centerline of your part and fitted with waxed dowels for alignment and separation. The plug material can then be glued to the ply bases and carved to shape.
Plug materials may be hardwood, balsa, foam, or anything else that can take a hard finish. Finishing the surface of the plug is critical, as the slightest imperfection will be reflected in the mold—and in your finished part. Take the time to do it carefully.
Plug materials
- Hardwood: Easiest to finish but takes time and patience to carve.
- Balsa: Easier to carve but more difficult to finish, since the finish must soak into the wood rather than sit only on the surface.
- Polyester foam: Comes in blue, white, or green. The white (packing, coffee cups) is very soft and difficult to sand. The blue (dock flotation) is too porous. The preferred polyester is the green florist foam—dense, soft, easy to shape and sand.
- Polyurethane foam: Available in various densities (2 to 24 lb/ft³). The lower the number, the softer the foam. Six-pound density is an ideal balance—easy to sand, shape, and finish.
Finishing the plug
- Pine or poplar plugs: Can be finished with dope, lacquer, epoxy, or polyester.
- Balsa: Same materials may be used, but the first coat must be thinned 50% and allowed to soak into the wood. After that first coat has hardened and the plug has been sanded, apply three unthinned coats.
- Polyurethane foam plugs: May be finished with epoxy or polyester. Use only epoxy on polyester foam; other solvents can melt it.
Dope and lacquer can be thinned with lacquer thinner or acetone. Epoxies come in two forms—thick for gluing and thin for layup work. Both can be thinned with alcohol. Work in small batches. After mixing the catalyst thoroughly, a little alcohol (wood methanol) can be added to help the epoxy flow and soak. Thinned epoxy takes longer to cure because the alcohol must evaporate. If you mix too much, seal the container and store the surplus in a freezer; it will keep about a week. Brushes can be cleaned in alcohol and soap and water.
Polyester resin types
Polyester resin comes in four types:
- Gel-coat resin — usually colored; the first coat applied in layup work.
- Laminating resin — general-purpose layup resin; no wax; stays tacky after curing for about a week; cannot be sanded.
- Finishing resin — general-purpose resin with wax; used for finishing since it is easily sanded; resin must be sanded between coats.
- Tooling resin — used in making molds.
All polyester resins can be thinned with styrene or acetone after mixing the catalyst. Brushes may be cleaned with acetone. Don't try to save polyester after it is mixed— it won't keep.
Preparing the plug for finishing
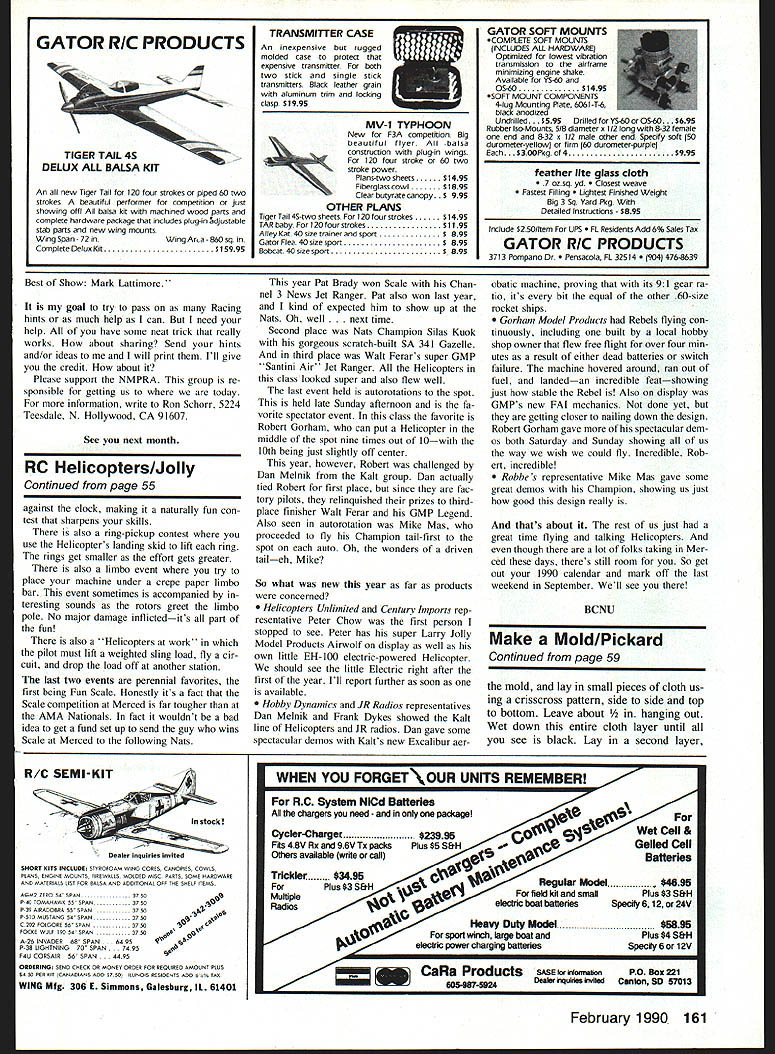
- If you intend to add panel lines, press-cut the lines into the plug before the finish is applied. Press-cut lines in the plug remain visible after applying resin.
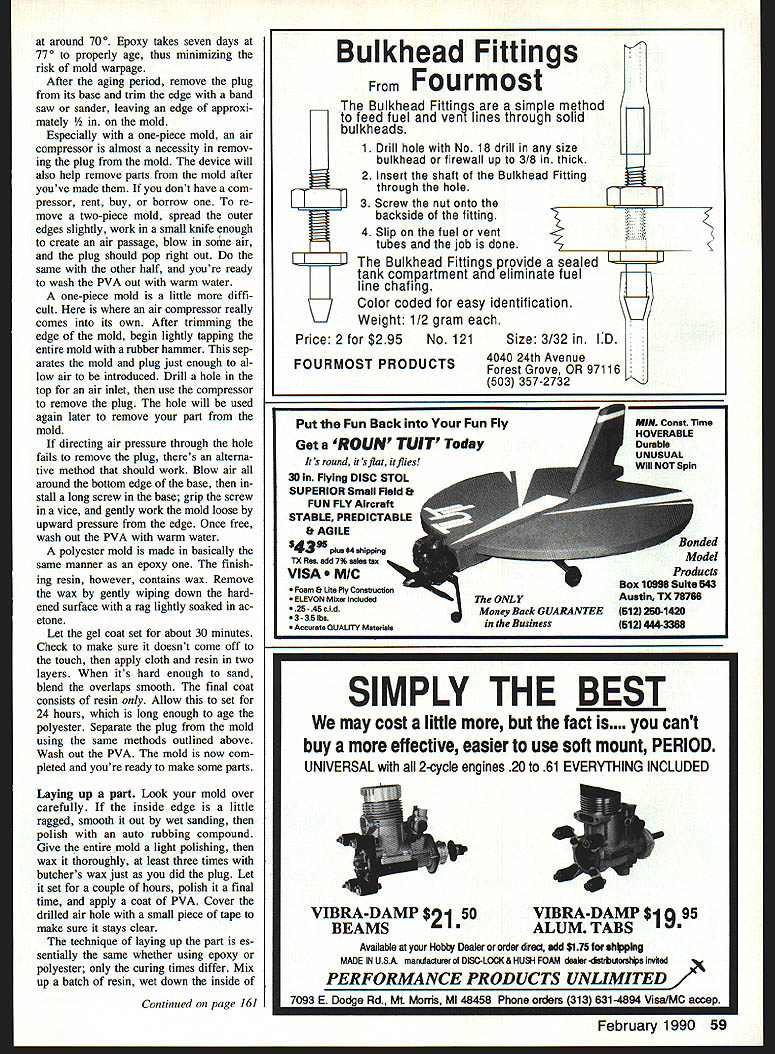
- Bolt the plug down to a piece of 3/4-in. plywood or similar, placing a slick smooth piece of Masonite or Formica between the plug and the mounting board. Coat the mounting board with paste wax. Don't use paste wax on the plug itself.
- Don't use five-minute epoxy for this kind of work.
- If you're using an epoxy finish, wax won't work; a thin piece of vinyl will serve the same purpose.
- Keep a tub of black dye (available at auto paint stores) to mix into your resin. Dye covers wood grain and darkens foam to help spot unsanded areas.
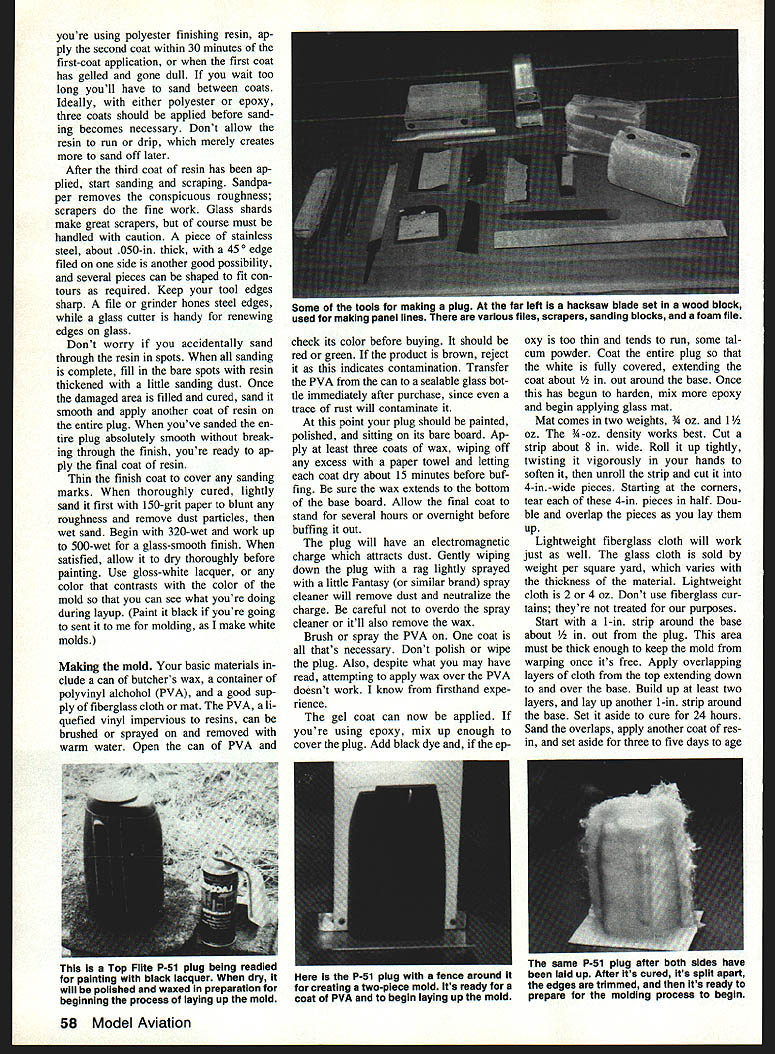
Mix your first batch of resin, add a little black dye, and thin it 50%. Apply this mixture to the plug and allow it to soak in thoroughly. Set the plug aside to cure while you clean brushes. The next coat is applied unthinned. Apply successive coats as required to build a smooth, uniform finish. Ideally, with either polyester or epoxy, three coats should be applied before sanding becomes necessary. Avoid runs or drips.
After the third coat, start sanding and scraping. Sandpaper removes conspicuous roughness; scrapers do the fine work. Glass shards make good scrapers (handle with caution). A piece of stainless steel about .050-in. thick with a 45° edge filed on one side is another good scraper; several pieces can be shaped to fit contours. Keep edges sharp—hone steel with a file or grinder and renew glass edges with a glass cutter.
If you accidentally sand through the resin in spots, fill bare spots with resin thickened with a little sanding dust. Once cured, sand smooth and apply another coat over the entire plug. When the entire plug is smooth with no more sanding-through, apply the final coat of resin thinned to cover sanding marks.
When thoroughly cured, lightly sand first with 150-grit paper, then wet sand beginning with 320-wet and working up to 500-wet for a glass-smooth finish. Allow to dry thoroughly before painting. Use gloss-white lacquer or any color that contrasts with the mold color so you can see during layup. (Paint it black if you intend to send it to the author for molding; he makes white molds.)
Making the mold
Basic materials: a can of butcher's wax, a container of polyvinyl alcohol (PVA), and a good supply of fiberglass cloth or mat. PVA is a liquefied vinyl impervious to resins; it can be brushed or sprayed on and removed with warm water. Open the can of PVA and check its color before buying—it should be red or green. If the product is brown, reject it as this indicates contamination. Transfer PVA to a sealable glass bottle immediately after purchase since even a trace of rust will contaminate it.
At this point your plug should be painted, polished, and sitting on its base board. Apply at least three coats of wax, wiping off excess with a paper towel and letting each coat dry about 15 minutes before buffing. Be sure the wax extends to the bottom of the base board. Allow the final coat to stand for several hours or overnight before buffing out.
The plug will have an electrostatic charge which attracts dust. Gently wipe down the plug with a rag lightly sprayed with a little spray cleaner (Fantasy or similar) to remove dust and neutralize the charge—don’t overdo it or you’ll remove the wax.
Brush or spray one coat of PVA on. Do not polish or wipe the plug after applying PVA. Do not attempt to apply wax over PVA—this does not work.
Applying gel coat and layup
The gel coat can now be applied. If using epoxy, mix enough to cover the plug, add black dye, and, if the epoxy is too thin and tends to run, add some talcum powder. Coat the entire plug so the painted surface is fully covered, extending the coat about 1/2 in. up around the base. Once this has begun to harden, mix more epoxy and begin applying glass mat.
Mat comes in two weights, 3/4 oz. and 1 1/2 oz. The 3/4-oz. density works best. Cut a strip about 8 in. wide, roll it up tightly, and twist vigorously in your hands to soften it; then unroll and cut into 4-in. pieces. Starting at the corners, tear each 4-in. piece in half. Double and overlap the pieces as you lay them up.
Lightweight fiberglass cloth will work as well. Glass cloth is sold by weight per square yard; lightweight cloth is 2 or 4 oz. Don't use fiberglass cloth in conjunction with mat—mat is treated differently.
Start with a 1-in. strip around the base about 1/2 in. out from the plug. This area must be thick enough to keep the mold from warping once it's free. Apply overlapping layers of cloth from the top extending down to and over the base. Build up at least two layers, and lay up another 1-in. strip around the base. Set aside to cure for 24 hours. Sand the overlaps, apply another coat of resin, and set aside for three to five days to age at around 70°F. Epoxy molds should ideally age longer—epoxy takes seven days at about 77°F to properly age, minimizing the risk of mold warpage.
Removing the plug from the mold
After the aging period, remove the plug from its base and trim the edge with a band saw or sander, leaving an edge of approximately 1/2 in. on the mold.
An air compressor is almost a necessity for removing the plug from the mold and later for removing parts from the mold. If you don't have a compressor, rent, buy, or borrow one.
- For a two-piece mold: spread the outer edges slightly, work a small knife in enough to create an air passage, blow in air, and the plug should pop out. Do the same with the other half, then wash the PVA out with warm water.
- For a one-piece mold: lightly tap the entire mold with a rubber hammer to separate mold and plug slightly. Drill a hole in the top for an air inlet, then use the compressor to remove the plug. The hole will be used later to remove parts from the mold.
If directing air through the hole fails, try this alternative: blow air around the bottom edge, then install a long screw in the base, grip the screw in a vice, and gently work the mold loose by upward pressure from the edge. Once free, wash out the PVA with warm water.
Polyester mold notes
A polyester mold is made similarly to an epoxy one. The finishing resin contains wax; remove this wax by gently wiping the hardened surface with a rag lightly soaked in acetone.
Let the gel coat set about 30 minutes and ensure it doesn't come off to the touch. Then apply body cloth and resin in two layers. When hard enough to sand, blend the overlaps smooth. The final coat consists of resin only. Allow 24 hours to age. Separate the plug from the mold as described above, wash out the PVA, and the mold is completed and ready to make parts.
Laying up a part
Inspect your mold carefully. If the inside edge is a little ragged, smooth it by wet sanding, then polish with auto rubbing compound. Give the entire mold a light polishing, then wax it thoroughly—at least three coats of butcher's wax just as you did the plug. Let it set for a couple of hours, polish a final time, and apply a coat of PVA. Cover the drilled air hole with a small piece of tape to keep it clear.
The layup technique is essentially the same for epoxy or polyester; only curing times differ:
- Mix up a batch of resin. Wet down the inside of the mold and lay in small pieces of cloth using a crisscross pattern—side to side and top to bottom. Leave about 1/2 in. hanging out.
- Wet down this cloth layer until the surface appears fully wetted (until you just see the mold color disappear). Lay in additional layers in the same manner until you reach the desired thickness. Overlap cloth pieces by about 1/2 in. until the mold is covered twice.
- Roll out trapped air with a plastic roller as you go.
- After cloth layers are tack-free, apply a final smooth coat of resin over the layup.
- Allow the part to cure thoroughly: polyester at least 24 hours; epoxy may require longer depending on the system.
When the part is cured, carefully trim the excess cloth with a sharp hobby knife or rotary cutter. Remove the part from the mold (use the drilled air hole and compressor if needed). If you used PVA, wash the mold interior with warm water to remove it. Clean and wax the mold as required before making additional parts.
To make additional parts: wax and polish the mold thoroughly (three coats of butcher's wax is recommended), wait a couple of hours, polish, and apply a fresh coat of PVA. Repeat the layup procedure for each part.
Tips and final notes
- Use peel ply over the last wet layer if you want a textured surface for secondary bonding.
- For large or structural parts, consider backing the laminate with foam or additional glass layups for stiffness.
- Store molds out of direct sunlight and avoid temperatures that will soften the mold material.
- Make sure resin doesn't pool in the bottom. Lay the mold on its side and keep turning it every couple of minutes until it begins to kick off.
- Leave an epoxy part in the mold at least three days; a polyester part should be left in overnight.
- Be careful when removing very lightweight parts with a compressor—compressed air can turn a lightweight part inside out. Consider leaving the 1/2-in. cloth overlap around the edge for extra bulk.
- After removing a part, wash the mold with water, dry thoroughly, rewax, and apply another coat of PVA before the next layup.
If problems develop that you have difficulty working out, the author offers help by mail only—send a SASE and a description of your problem to:
M. H. Pickard Fiberglass Master, Inc. R.F.D. Box 530 Goodview, VA 24095
Supplies and sources:
- Fiberglass Corporation — 1944 Neva Dr., Dayton, OH 45414; telephone 1-800/821-3283 or 1-513/274-1159 (Ohio).
- For polyurethane foam — P. R. Corp., 100 E. Montauk Hwy., Lindenhurst, NY 11757; telephone 1-516/957-8000.
Transcribed from original scans by AI. Minor OCR errors may remain.

