
Fieseler Storch
Hurst Bowers
IT IS SOMEWHAT ironical that one of the most ungainly aircraft ever designed should be the product of an accomplished acrobatic pilot and fighter ace. But such is the case of the "Storch." It was conceived, designed, and developed by Gerhard Fieseler, one of Germany's most renowned aerobatic pilots, and a World War I fighter ace — with 22 victories.
The Storch was the outgrowth of Fieseler's experience gained from work with light, highly-efficient aircraft during the early 1930s. It was one of three responses to an official specification issued in 1935 for a 2-3 seat, multi-purpose communications aircraft. The specification required that the latest aerodynamic high-lift devices be used in order to obtain maximum short take-off and landing capabilities. It also specified that the 8-cylinder, inverted-Vee, 240-hp Argus engine be used. And thusly, the Fi 156 came into being when Fieseler's company, Fieseler-Flugzeugbau G.m.b.H., of Kassel-Bettenhausen, was awarded the contract.
The prototype flew in early 1937 and its short-field characteristics were phenomenal. To clear a 50-foot obstruction, a strip of only 140 yards was required for landing. With maximum braking, the actual ground run was no more than 42 yards under zero wind conditions. The secret to this remarkable performance was largely attributable to the long landing gear oleo travel, and the center of gravity being well behind the wheels, which permitted maximum braking to be employed. Major Al Williams, U.S.M.C., who was invited in 1938 by General Ernst Udet to fly the Storch, very aptly summed it up when he was quoted as saying: "It was a funny-looking affair...with its great windows all that seemed necessary were a few geraniums to convert it into a conservatory...After a ground run of about 50 feet, the flying nightmare jumped into the air at an angle that had me lying on my back...the airspeed indicator (reading) about 35 mph."
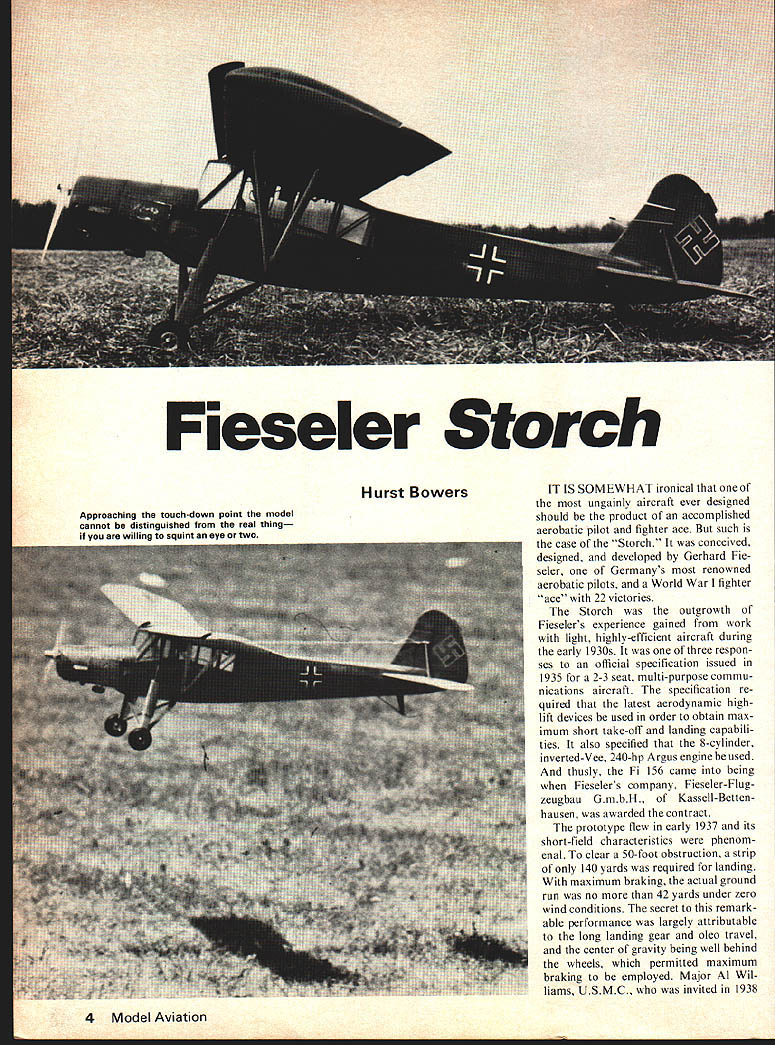
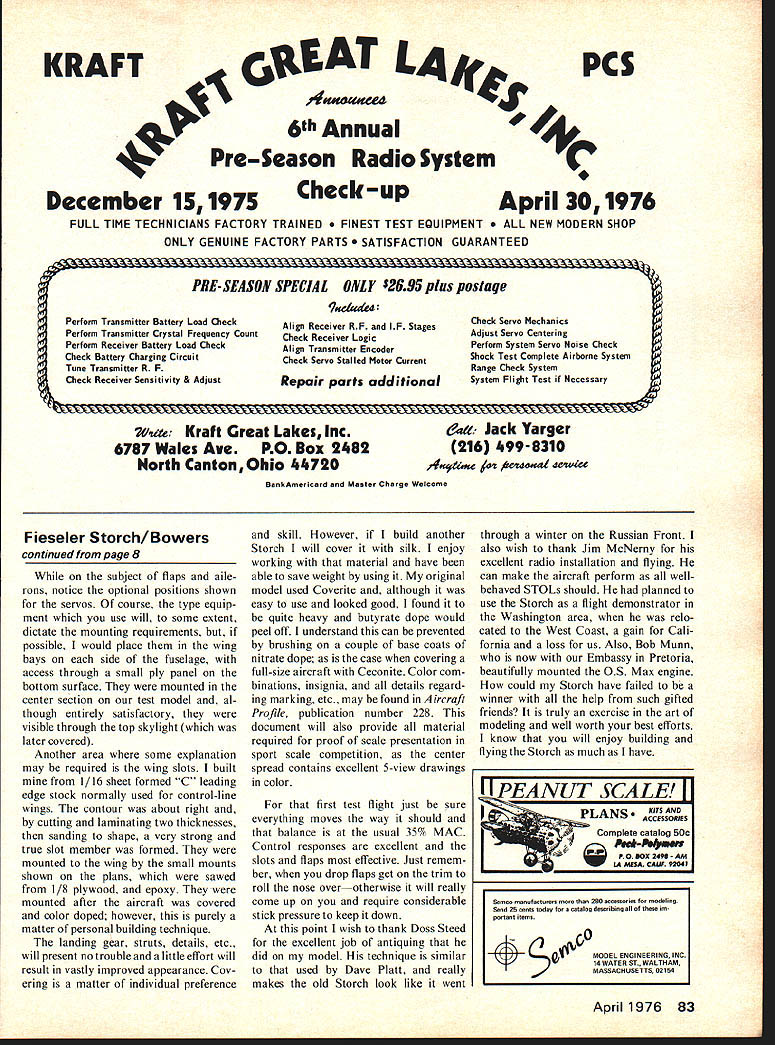
A total of approximately 2,900 Storchs were built between 1937 and 1945 in Czechoslovakia and France, as well as in Germany. All aviation enthusiasts are thoroughly familiar with the records which they made. Production even continued in France and Czechoslovakia for several years after the war, the aircraft being used for agricultural, rescue, club, and glider-tow purposes, as well as military tasks in far parts of the world. I saw Storchs being used by the French in Indo China in 1953. It may be compared with the Douglas DC-3/C-47 in versatility and longevity. Even today most small airfields which you may visit in Western Europe will have a Storch Approaching the touch-down point the model cannot be distinguished from the real thing unless you are willing to squint your eyes. — Hurst Bowers
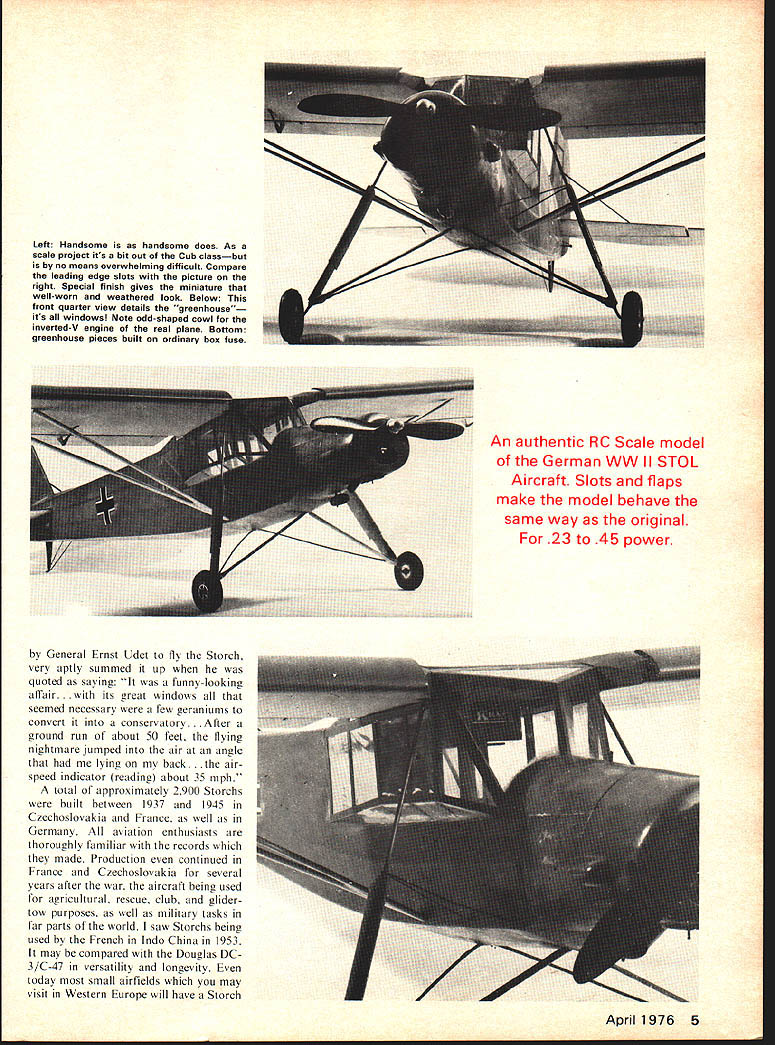
As a scale project it's a bit out of the Cub class but by no means overwhelmingly difficult. Compare the leading-edge slats (picture right). A special finish gives the miniature a well-worn, weathered look.
Below, the front-quarter view details the greenhouse and its windows. Note the odd-shaped cowl for the inverted-V engine on the real plane. The bottom greenhouse pieces are built on an ordinary box fuselage.
An authentic R/C scale model of the German WWII STOL aircraft. Slots and flaps make the model behave the same way as the original. Recommended power .23–.45. It is somewhat ironical that the most ungainly aircraft ever designed should be the product of an accomplished acrobatic pilot and fighter ace. In this case the Storch was conceived, designed and developed by Gerhard Fieseler, Germany's renowned aerobatic pilot and World War I fighter ace, with 22 victories.
The Storch was the outgrowth of Fieseler's experience gained in work on light, highly efficient aircraft during the early 1930s, and in response to an official specification issued in 1935 for a 2-3 seat multi-purpose communications aircraft. The specification required the latest aerodynamic high-lift devices to be used in order to obtain maximum short take-off and landing capabilities, and it also specified the 8-cylinder inverted-Vee 240-hp Argus engine. Thus the Fi 156 came into being.
Fieseler's company, Fieseler-Flugzeugbau GmbH, Kassel-Bettenhausen, was awarded the contract and the prototype flew early in 1937. Its short-field characteristics were phenomenal. To clear a 50-foot obstruction the takeoff run required 140 yards; for landing, with maximum braking, the actual ground run was only 42 yards under zero-wind conditions. This remarkable performance was largely attributable to the long landing-gear oleo travel and the center of gravity being well behind the wheels, which permitted maximum braking to be employed.
General Ernst Udet, who flew the Storch, very aptly summed it up, saying: "A funny-looking affair — the great windows seemed necessary; a few geraniums would convert it into a conservatory."
A total of approximately 2,900 Storchs were built between 1937 and 1945 in Czechoslovakia, France as well as Germany.
Fieseler Storch
or two continuing on as working airplanes, although most of them now are equipped with radial engines.
Why did I select the Storch for a radio-control building project? I guess I can answer that with another question: "why do people climb mountains?" I had just returned from a tour of duty with 7th Air Force in Saigon and had not done any modeling for some time. I had always been fascinated by this plane, and thought that it would be a good project to get back into the hobby with, as well as provide an interesting exercise in the use of flaps and slots on a model. Needless to say, my expectations were fulfilled. Through the years, I collected considerable data on the Storch which, I may add, is quite easy to obtain, so I kicked-off the project on a rainy Sunday afternoon.
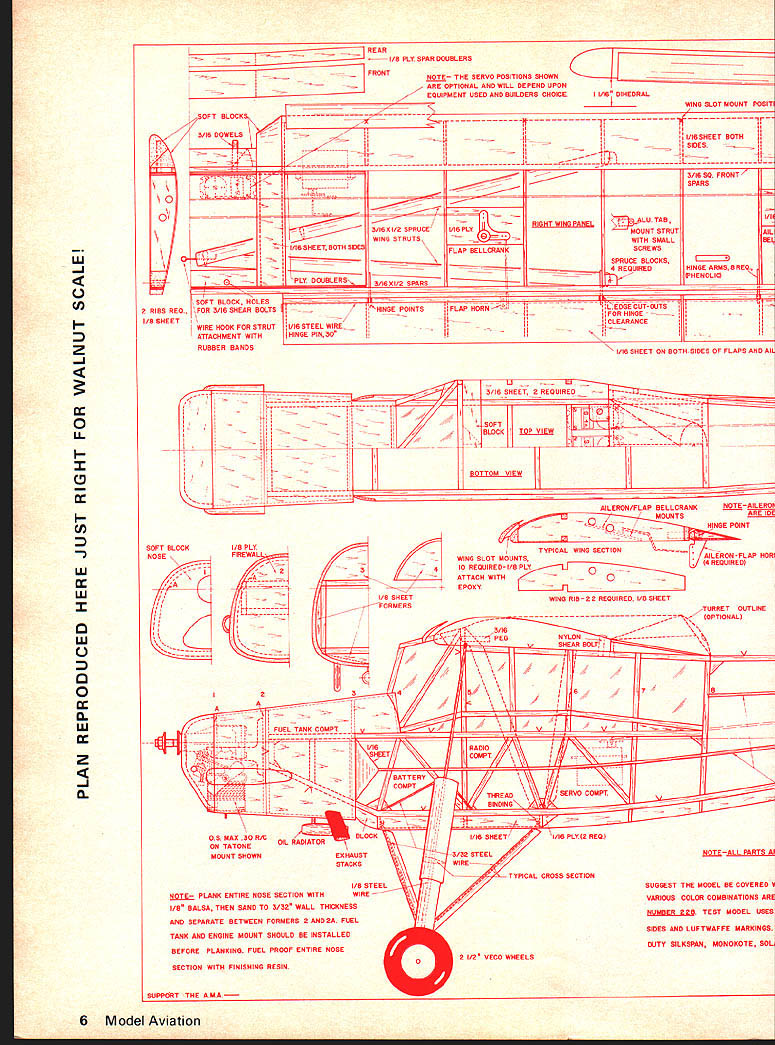
The construction of the Storch is truly an exercise in building, although it is generally straight forward, and simple. There are, however, a few areas where caution should be exercised and specific building techniques are helpful. I shall try to point out these without going into vast detail on all other areas where the plans are entirely self-explanatory.
Begin by building two fuselage sides directly on the plans. Notice that I have marked the basic side outline with "V" marks to eliminate confusion, particularly in the area of the cabin. Just stay within this outline, and when completed, remove from the plan and join together in the conventional "rubber model" manner. Add the keel pieces, formers, stringers, planking, etc., and the fuselage is complete and may be set aside.
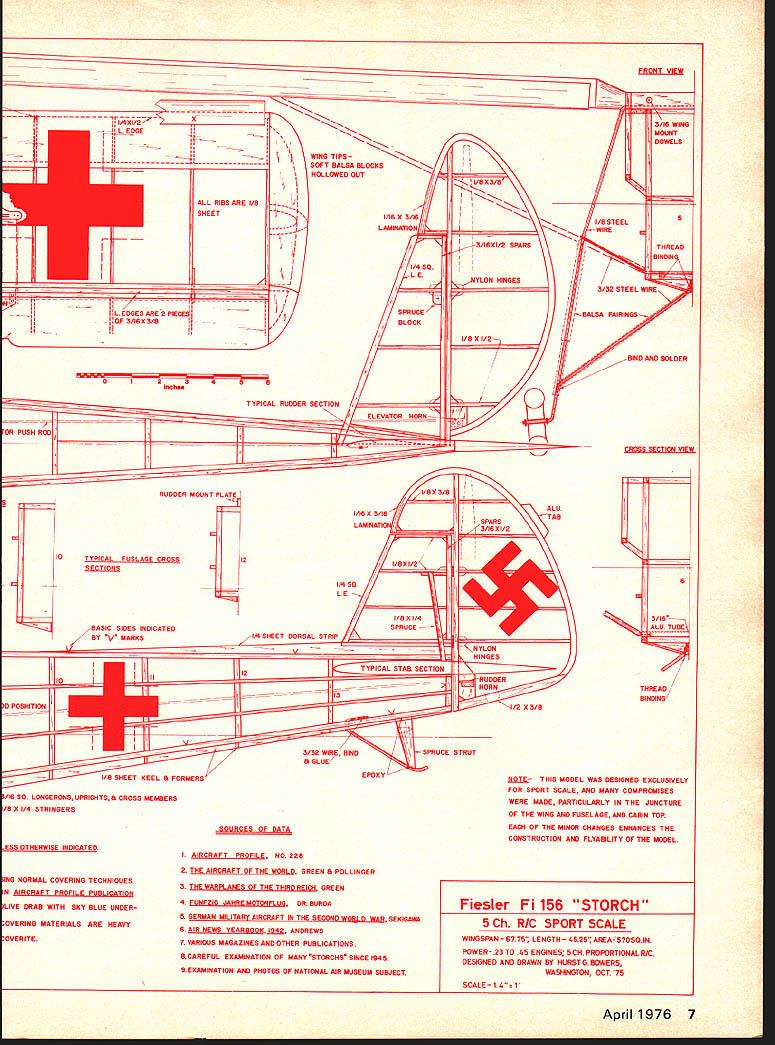
No explanation is needed with regard to the tail. I elected to use the lamination method for constructing the outline, however, if you prefer something else, by all means use it. Just remember that the tail has a long tail moment and that the tail members should be kept as light as possible. Of course, this holds true with the entire structure—the lighter it is built (without sacrificing strength) the better the aircraft will fly and the more realistic its STOL performance will be.
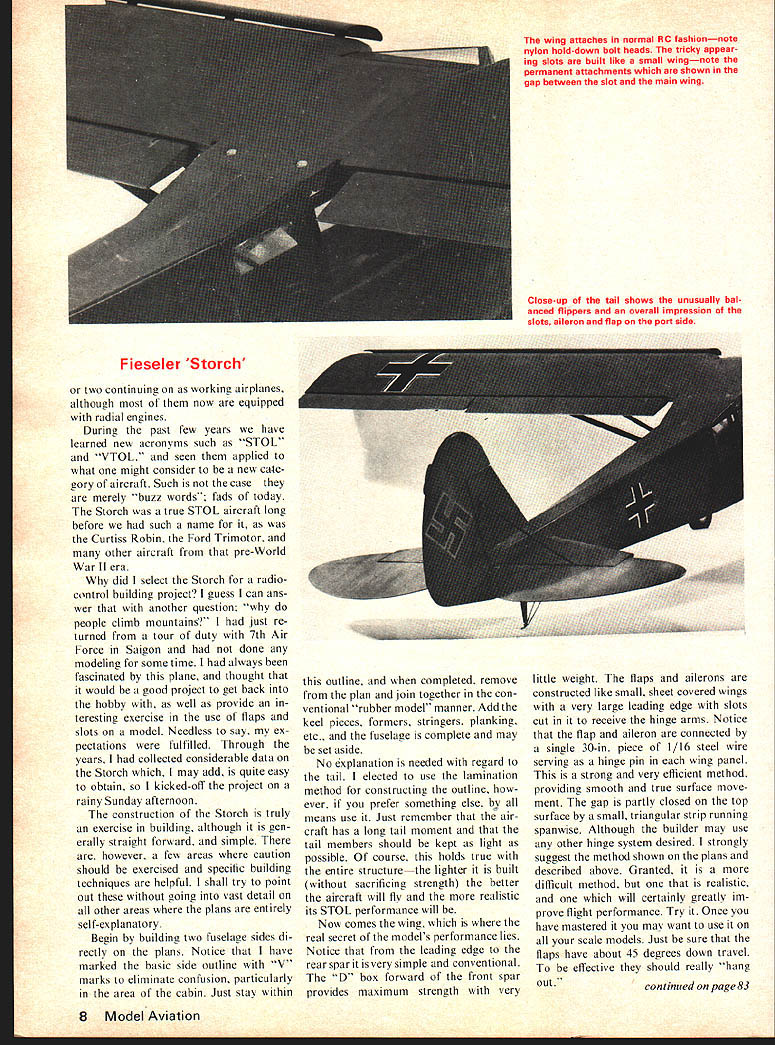
Now comes the wing, which is where the real secret of the model's performance lies. Notice that from the leading edge to the rear spar it is very simple and conventional. The "D" box forward of the front spar provides maximum strength with very little weight. The flaps and ailerons are constructed like small, sheet covered wings with a very large leading edge with slots cut in it to receive the hinge arms. Notice that the flap and aileron are connected by a single 30-in. piece of 1/16 steel wire serving as a hinge pin in each wing panel. This is a strong and very efficient method, providing smooth and true surface movement. The gap is partly closed on the top surface by a small, triangular strip running spanwise. Although the builder may use any other hinge system desired, I strongly suggest the method shown on the plans and described above. Granted, it is a more difficult method, but one that is realistic, and one which will certainly greatly improve flight performance. Try it. Once you have mastered it you may want to use it on all your scale models. Just be sure that the flaps have about 45 degrees down travel. To be effective they should really "hang out."
Fieseler Storch/Bowers
While on the subject of flaps and ailerons, notice the optional positions shown for the servos. Of course, the type equipment which you use will, to some extent, dictate the mounting requirements, but, if possible, I would place them in the wing bays on each side of the fuselage, with access through a small ply panel on the bottom surface. They were mounted in the center section on our test model, and, although entirely satisfactory, they were visible through the top skylight (which was later covered).
Another area where some explanation may be required is the wing slots. I built mine from 1/16" sheet formed "C" leading edge stock normally used for control-line wings. The contour was about right and, by cutting and laminating two thicknesses, then sanding to shape, a very strong and true slot member was formed. They were mounted to the wing by the small mounts shown on the plans, which were sawed from 1/8" plywood. The slots were also mounted after the aircraft was covered and color-doped; however, this is purely a matter of choice and personal preference.
The landing gear, struts, details, etc., will present no trouble and a little effort will result in vastly improved appearance. Covering is a matter of individual preference and skill. However, if I build another Storch I will cover it with silk. I enjoy working with that material and have been able to save weight by using it. My original model used Ceconite and, although it was easy to use and looked good, I found it to be quite heavy and butyrate dope would peel off. I understand this can be prevented by brushing on a couple of base coats of nitrate dope; as is the case when covering a full-size aircraft with Ceconite. Color combinations, insignia, and all details regarding markings, etc., may be found in Aircraft Profile, publication number 228. This document will also provide all material required for proof of scale presentation in sport scale competition, as the center spread contains excellent 3-view drawings in color.
For that first test flight just be sure everything moves the way it should and that balance is at the usual 35% MAC. Control responses are excellent and the slots and flaps most effective. Just remember, when you drop flaps get on the trim to roll the nose over—otherwise it will really come up on you and require considerable stick pressure to keep it down.
At this point I wish to thank Doug Steed for the excellent job of antiquing that he did on my model. His technique is similar to that used by Dave Platt, and really makes the old Storch look like it went through a winter on the Russian front. I also wish to thank Jim McNerny for his excellent radio installation and flying. He can make the aircraft perform as an all‑behaved STOL should. He had planned to use the Storch as a flight demonstrator in the Washington area, when he was relocated to the West Coast, a gain for California and a loss for us. Also, Bob Munn, who is now with our Embassy in Pretoria, beautifully mounted the O.S. Max engine. How could my Storch have failed to be a winner with all the help from such good friends? It is truly an exercise in the art of modeling and well worth your best efforts. I know that you will enjoy building and flying the Storch as much as I have.
Transcribed from original scans by AI. Minor OCR errors may remain.

