
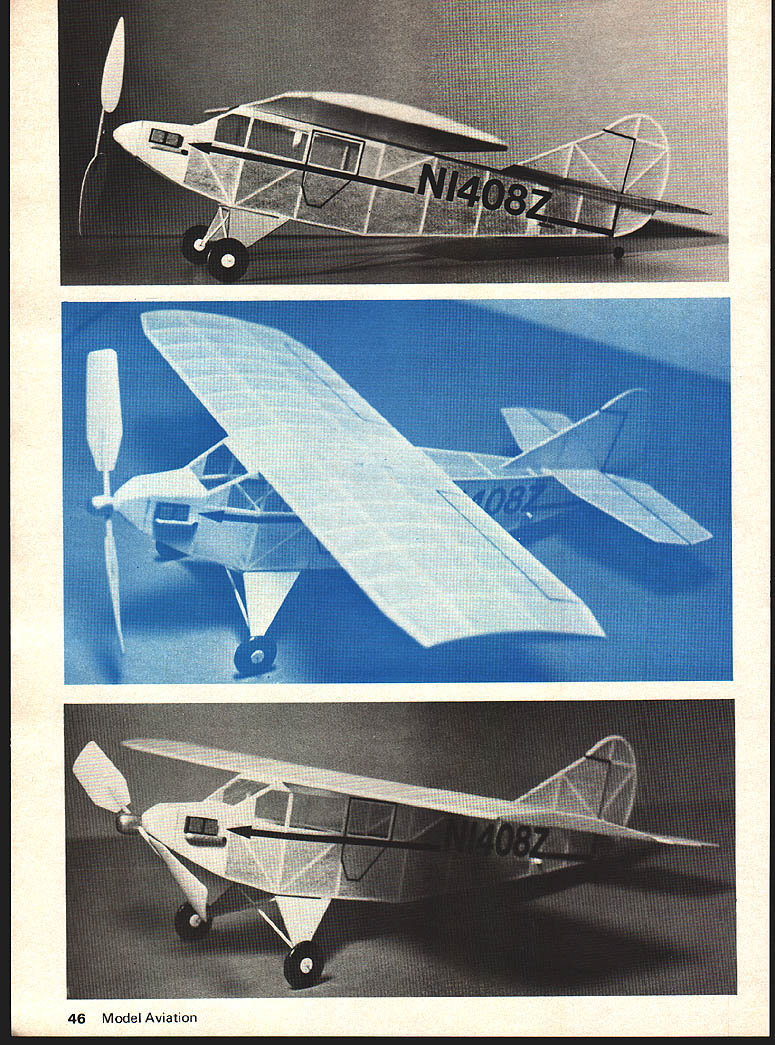
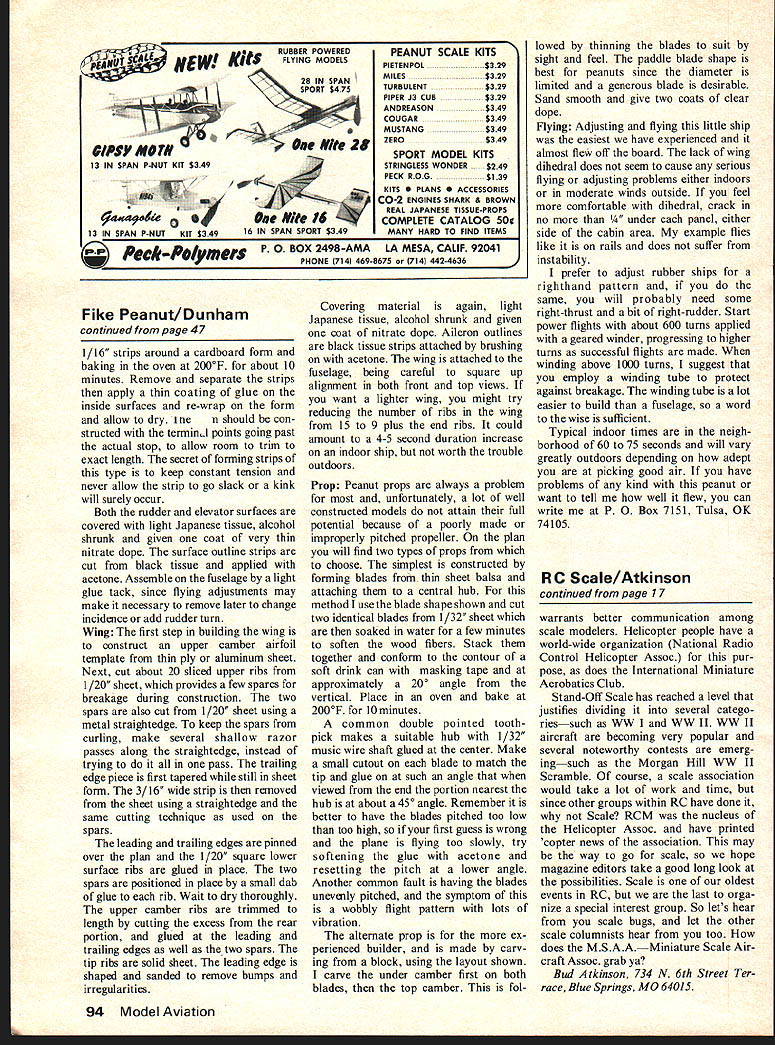
Fike Peanut
For those who scream "Lacey" and want to build and fly World War II fighter‑plane peanuts, scale ships might well go next — they ain't gonna like the Fike Model E. Want to beat Lacey? Please stay tuned to this article because the Fike is a likely candidate capable of the task. The super‑low‑aspect‑ratio homebuilt monowing lightplane is the brainchild of Win J. Fike of Anchorage, Alaska. Mr. Fike, a retired airline pilot, theorized that thin‑sectioned, lightly loaded, low‑aspect‑ratio wings have desirable features for climbing above the mountain ranges prevalent in Alaska. Actual practice proved this true and other benefits accrued, such as increased cruising speed and range due to less drag of the unbraced wing, along with improved landing characteristics.
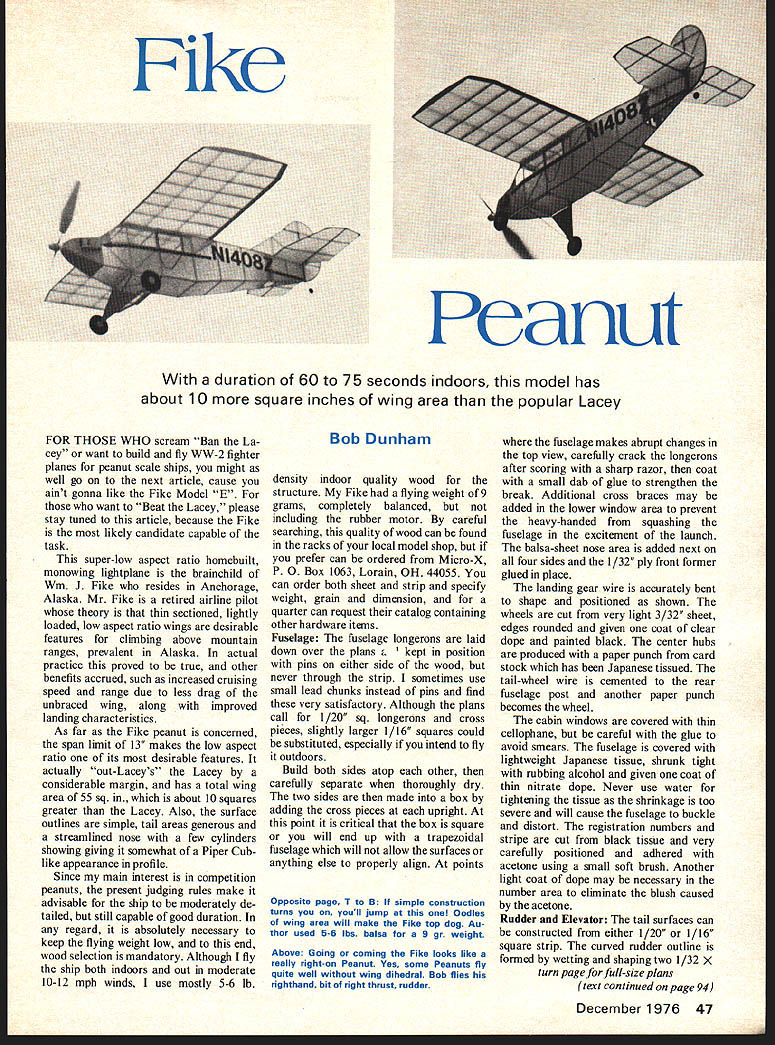
As far as the Fike peanut is concerned, the 13‑inch span limit makes a low aspect ratio one of its desirable features. It actually out‑Laceys the Lacey by a considerable margin and has a total wing area of 55 sq in — about 10 sq in greater than the Lacey. Also, surface outlines are simple, tail areas generous, streamlined nose with few cylinders showing, giving a somewhat Piper Cub‑like appearance in profile. Since the main interest is competition peanuts at present and judging rules make it advisable to have a ship moderately detailed yet still capable of good duration, it is absolutely necessary to keep flying weight low. Careful wood selection is mandatory.
Although the ship will fly both indoors and out in moderate 10–12 mph winds, use mostly 5–6 lb balsa for indoor‑quality wood. The Fike's flying weight is 9 grams, completely balanced including the rubber motor. With careful searching, quality wood can be found on the racks of your local model shop. Preferably these items can be ordered from Micro‑X, P.O. Box 1063, Lorain, OH 44055. You can order both sheet and strip—specify weight, grain and dimension. You can request a catalog containing other hardware items.
Fuselage longerons are laid down over the plans and kept in position with pins—either side wood, never through strip. Sometimes small lead chunks are used instead of pins and are found very satisfactory. Although the plans call for 1/20 sq longerons, cross pieces slightly larger, 1/16 sq, could be substituted, especially if you intend to fly outdoors. Build both sides atop one another; carefully separate them and allow to dry thoroughly. When the two sides are made into a box by adding crosspieces and uprights, a critical point is to keep the box square; otherwise it will end up trapezoidal and the fuselage will not allow the surfaces, or anything else, to properly align.
The simple construction will amaze you. Oodles of wing area will make the Fike a top dog. The author used 5–6 lb balsa and achieved a flying weight of 9 grams. The Fike really looks right on as a peanut. Yes, some peanuts fly quite well with wing dihedral. Bob flies with a slight right‑hand thrust and right rudder. The fuselage makes abrupt changes in top view; carefully crack the longerons after scoring with a sharp razor and coat the break with a small dab of glue to strengthen it. Additional crossbraces may be added in the lower window area to prevent heavy‑handed squashing of the fuselage during an enthusiastic launch.
A balsa‑sheet nose area is added next. The four sides of the 1/32 ply front former are glued in place. The landing gear wire is accurately bent to shape and positioned as shown. Wheels are cut very light from 3/32 sheet; edges are rounded and given a coat of clear dope. Painted black center hubs are produced from paper punch card stock. The tailwheel wire is cemented to a rear fuselage post; another paper punch becomes its wheel. Cabin windows are covered with thin cellophane—use care when gluing to avoid smears. The fuselage is covered with lightweight Japanese tissue, shrunk tight with rubbing alcohol and given a coat of thin nitrate dope. Never use water to tighten the tissue—shrinkage is too severe and will cause the fuselage to buckle or distort. Registration numbers and stripes are cut from black tissue and very carefully positioned; adhere with acetone using a small soft brush. Another light coat of dope may be necessary in the number area to eliminate any blush caused by the acetone.
Rudder and elevator tail surfaces can be constructed either of 1/20 or 1/16 square strip. The curved rudder outline is formed by wetting and shaping two 1/32 x ... Turn page for full-size plans
(text continued on page 94) 1/16" strips around a cardboard form and baking in the oven at 200°F. for about 10 minutes. Remove and separate the strips then apply a thin coating of glue on the inside surfaces and re-wrap on the form and allow to dry. The strips should be constructed with the terminal points going past the actual stop, to allow room to trim to exact length. The secret of forming strips of this type is to keep constant tension and never allow the strip to go so slack or a kink will surely occur.
Both the rudder and elevator surfaces are covered with light Japanese tissue, alcohol shrunk and given one coat of very thin nitrate dope. The surface outline strips are cut from black tissue and applied with acetone. Assemble on the fuselage by a light glue tack, since flying adjustments may make it necessary to remove later to change incidence or add rudder turn.
Wing: The first step in building the wing is to construct an upper camber airfoil template from thin ply or aluminum sheet. Next, cut about 30 slotted upper ribs from 1/20" sheet, which provides a few spares for breakage during construction. The two spars are also cut from 1/20" sheet using a metal straightedge. To keep the spars from curling, make several shallow razor passes along the straightedge, instead of trying to do it all in one pass. The trailing edge piece is first tapered while still in sheet form. The 3/16" wide strip is then removed from the sheet using a straightedge and the same cutting technique as used on the spars.
The leading and trailing edges are pinned over the plan and the 1/20" square lower surface ribs are glued in place. The two spars are positioned in place by a small dab of glue to each rib. Wait to dry thoroughly. The upper camber ribs are trimmed to length by cutting the excess from the rear portion, and glued at the leading and trailing edges as well as the two spars. The tip ribs are solid sheet. The leading edge is shaped and sanded to remove bumps and irregularities.
Covering material is again, light Japanese tissue, alcohol shrunk and given one coat of nitrate dope. Aileron outlines are black tissue strips attached by brushing on with acetone. The wing is attached to the fuselage, being careful to square up alignment in both front and top views. If you want a lighter wing, you might try reducing the number of ribs in the wing from 15 to 9 plus the end ribs. It could amount to a 4-5 second duration increase on an indoor ship, but not worth the trouble outdoors.
Prop: Peanut props are always a problem for most and, unfortunately, a lot of well constructed models do not attain their full potential because of a poorly made or improperly pitched propeller. On the plan you will find two types of props from which to choose. The simplest is constructed by forming blades from thin sheet balsa and attaching them to a central hub. For this method I use the blade shapes shown and cut two identical blades from 1/32" sheet which are then soaked in water for a few minutes to soften the wood fibers. Stack the two together and conform to the contour of a soft drink can with masking tape and approximately a 20° angle from the vertical. Place in an oven and bake at 200°F. for 10 minutes.
A common rubber boiled pointed toothpick makes a suitable hub with 1/32" music wire shaft glued at the center. Make a small cutout on the blade to match the hub and glue on at such an angle that when viewed from the end the portion nearest the hub is at about a 45° angle. Remember it is better to have the blades pitched too low than too high; if this first guess is wrong the plane is flying too slowly, try softening the glue with acetone and resetting the pitch at a lower angle. Another common fault is having the blades unevenly pitched, and the symptom of this is a wobbly flight pattern with lots of vibration.
The alternate prop is for the more experienced builder, and is made by carving from a block, using the layout shown. I carve the under camber first on both blades, then the top camber. This is followed by thinning the blades to suit by sight and feel. The paddle blade shape is best for peanuts since the diameter is limited and a generous blade is desirable. Sand smooth and give two coats of clear dope.
Flying: Adjusting and flying this little ship was the easiest we have experienced and it almost flew off the board. The lack of wing dihedral does not seem to cause any serious flying or adjusting problems either indoors or in moderate winds outside. If you feel more comfortable with dihedral, crack in no more than 1/4" under each panel, either side of the cabin area. My example flies with it in rails and does not suffer from instability.
I prefer to adjust rubber ships for a righthand pattern, and, if you do the same, you will probably need some right-thrust and a bit of right-rudder. Start power flights with about 600 turns applied with a geared winder, progressing to higher turns as successful flights are made. When winding above 1000 turns, I suggest that you employ a winding tube to protect against breakage. The winding tube is a lot easier to build than a fuselage, so a word to the wise is sufficient.
Typical indoor times are in the neighborhood of 60 to 75 seconds and will vary greatly outdoors depending on how adept you are at picking good air. If you have problems of any kind with this peanut or will not tell me how well it flew, you can write me at P. O. Box 7151, Tulsa, OK 74105.
Transcribed from original scans by AI. Minor OCR errors may remain.

