

Flexible Soldering Jig
This inexpensive shop accessory is a simple solution for holding items to be soldered. It takes only a few minutes to assemble and can save hours of frustration. — Larry Kruse
When it comes to holding all the parts in place for a delicate soldering job so often necessary to our hobby, no one I know has enough hands. Even if you enlist the aid of your semi-cooperative spouse and your two oldest offspring, eventually everyone's thumbs get in everyone else's way.
Thrusting a hot soldering iron or torch into this particular melee will very quickly bring you right back to where you started — trying to hold everything together by yourself without dropping hot solder into your lap.
Anticipating just such a struggle while soldering the landing gear on a recent project, I came up with the following jig. I take no credit for originality; I'm sure I've seen the idea sketched somewhere before.
Materials
- 24 in. of #12 Romex (common house wire)
- One 8 x 8 x 1‑in. scrap pine baseboard
- Four medium alligator clips with screws
- Modeling knife
- Needle‑nose pliers
- Drill with 3/8‑in. bit
- Tools for cutting and dadoing wood
Construction
- Cut the baseboard to size.
- On the bottom of the board, dado two 3/8‑in. grooves perpendicular to each other. Both grooves should be approximately 3/16‑in. deep.
- In each groove, drill a 3/8‑in. hole about 1 in. from each outside edge of the board. Then drill another 3/8‑in. hole in each groove approximately 2 in. from the first hole.
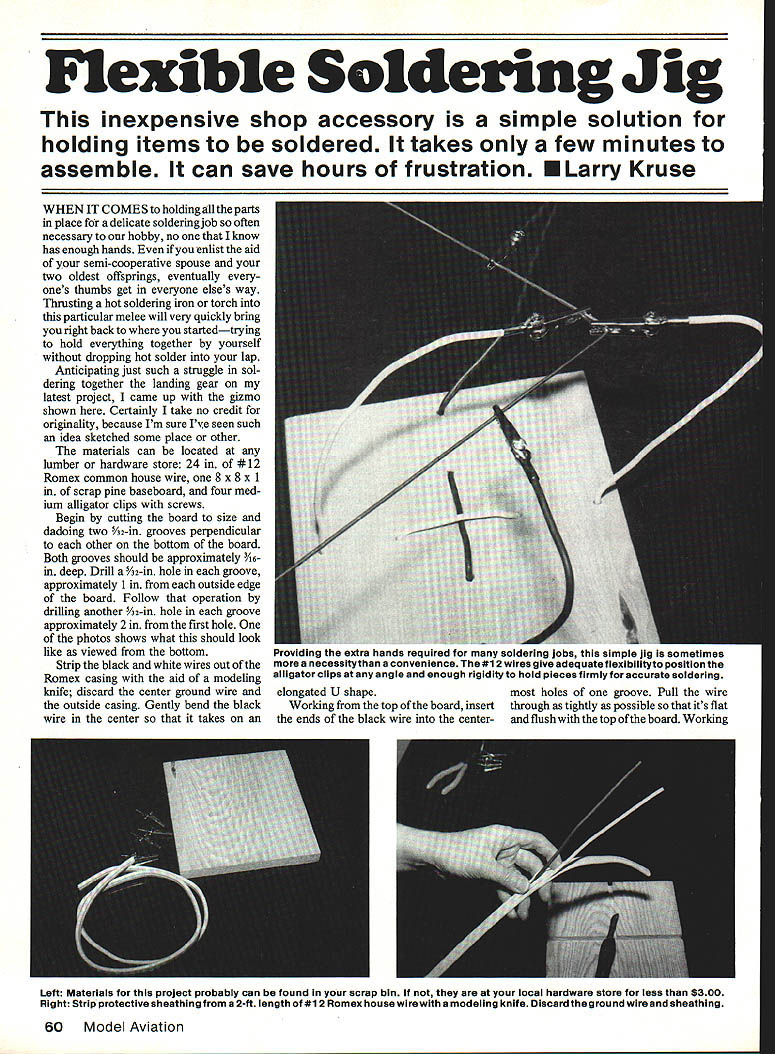
- Strip the black and white conductors out of the Romex casing with a modeling knife. Discard the center ground wire and the outer casing.
- Gently bend the black conductor in the center to form an elongated U shape.
- Working from the top of the board, insert the ends of the black wire into the center-most holes of one groove. Pull the wire through as tightly as possible so it lies flat and flush with the top of the board.
- From the bottom, poke the ends of the black wire back up through the outside holes of the groove and pull the wire tightly so it is buried in the groove and the board bottom remains flat. You may need to work the wire a little to pull it up tightly in the groove.
- When complete, the baseboard should rest flat and the two strands of black wire should stick straight up out of the top of the board.
- Repeat the stringing process with the white conductor so that both strands are sticking straight up and the board still rests flat.
- Strip 1/2 in. of insulation from the tops of the four wire strands.
Attaching the Alligator Clips
- Remove the screws from an alligator clip.
- Insert the corresponding wire up through the clip’s bottom collar.
- Form a small open loop (eyelet) with the wire using needle‑nose pliers.
- Reinsert and tighten the screw to secure the wire.
- Repeat for the remaining clips.
Finishing
You may paint or otherwise finish the baseboard, but it will be subject to hot solder and flux residue and will probably sustain some damage. I elected to leave mine unfinished.
I hope this simple project helps solve some particular soldering headaches.
Transcribed from original scans by AI. Minor OCR errors may remain.

