
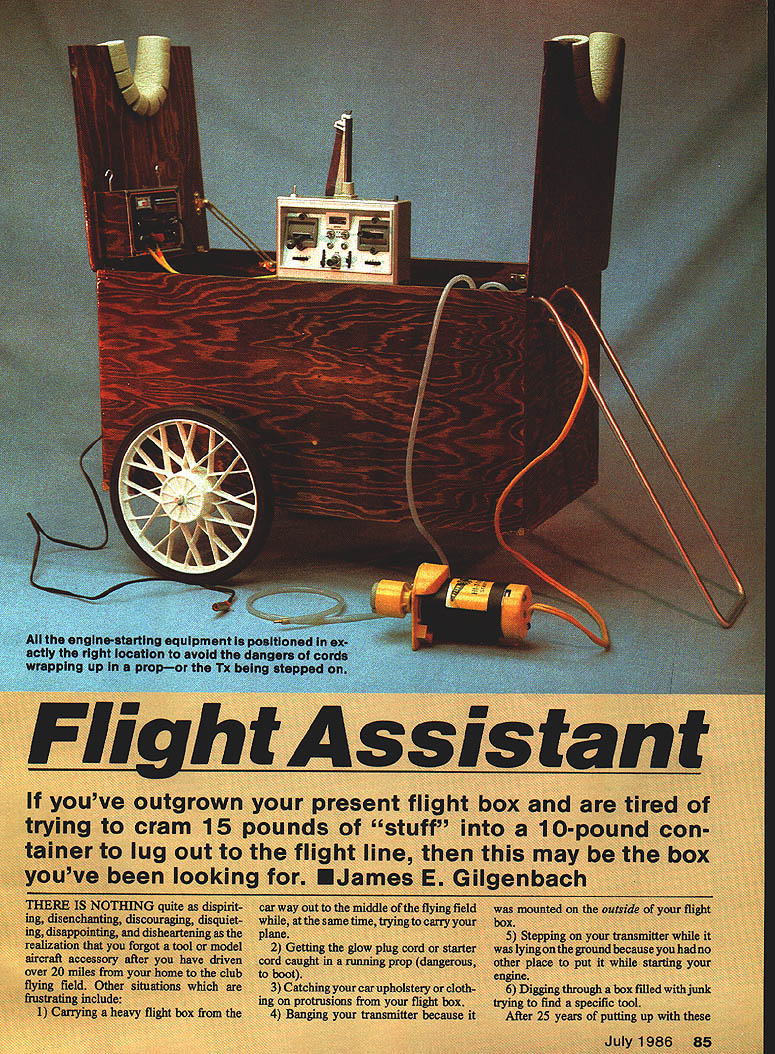

Flight Assistant
By James E. Gilgenbach
If you've outgrown your present flight box and are tired of trying to cram 15 pounds of "stuff" into a 10‑pound container to lug out to the flight line, this may be the box you've been looking for.
There is nothing quite as dispiriting, disenchanting, discouraging, disquieting, disappointing, and disheartening as the realization that you forgot a tool or model‑aircraft accessory after you have driven over 20 miles from home to the club flying field. Other situations which are frustrating include:
- Carrying a heavy flight box from the car way out to the middle of the flying field while, at the same time, trying to carry your plane.
- Getting the glow‑plug cord or starter cord caught in a running prop (dangerous, to boot).
- Catching your car upholstery or clothing on protrusions from your flight box.
- Banging your transmitter because it was mounted on the outside of your flight box.
- Stepping on your transmitter while it was lying on the ground because you had no other place to put it while starting your engine.
- Digging through a box filled with junk trying to find a specific tool.
After 25 years of putting up with these things, I finally decided to attack the problem head on. I would design a flight box that would minimize my frustrations and thereby prolong my life (if what modern doctors and psychiatrists say is true).
I have been so satisfied with the final design that I had to share it with other modelers who have endured the same agonies.
Design goals
Before designing, I listed all the features I wanted in the perfect flight box:
- Simple design. I didn't want all kinds of complicated parts and assembly procedures.
- Clean exterior. The box had to hold all necessary accessories without any protrusions when taken in and out of my car.
- Easy transporting. Why carry a flight box when you can pull it around on wheels? With the handle and wheels removed and stored in the box, it should be carried like a case of drink bottles.
- Adequate capacity. The ideal box should hold:
- a 12V battery
- electric starter
- power panel
- electric fuel pump
- transmitter
- paper towel roll
- one‑gallon fuel can
- tachometer
- spare props
- tools (Allen wrenches, ball wrenches, screwdrivers, needle‑nose pliers, four‑way wrench)
- miscellaneous parts (glow plugs, rubber bands, etc.)
- the handle, wheels, and axle
- Proper location of items in use. The box should be designed so the flier starts the engine with the right hand and uses the left hand for the tank (build a mirror image if you start with your left hand). The power panel must be very visible. The transmitter should be positioned for easy access. Glow‑plug and starter cords must be positioned away from the prop. A cradle for holding the model while installing or removing the wing should also be incorporated.
After designing a box with all these features, I felt it was more than just a flight box — it was my "Flight Assistant."
Construction
Building is straightforward and can be accomplished in just a couple of evenings. Finishing will take several evenings due to drying time, but the wait is worthwhile.
- Materials and preparation
- Get a straight, flat 4 ft x 4 ft sheet of 3/8‑in cabinet‑grade plywood and the necessary hardware (True Value stores typically have everything needed).
- Adhere the plans (Sheet 2) to the plywood with a light coat of contact cement on the back of the plans. Make sure to align the top edge of the box sides with the top edge of the plywood.
- Cutting and dry‑fit
- Carefully saw out the major parts using a fine‑toothed table saw.
- Saw out small parts and cutouts with a Dremel jigsaw.
- Glue the doubler to the inside of the left‑hand end with Zap cyanoacrylate (CyA).
- Drill all holes and sand all edges, holes, and cutouts.
- Assembly
- Glue and nail the ends to the bottom with 1‑1/4‑in paneling nails and aliphatic resin. (Punch all nails below the surface approximately 1/16 in.)
- Glue on and nail the two sides.
- Sand all the partitions, dividers, and the inside of the box.
- Glue and nail the following subassemblies:
- small and large transmitter partitions
- small and large battery partitions
- main and secondary dividers
- sub‑floor
- Glue and nail the subassemblies into the box.
- Covers, hinges, and hardware
- Assemble the hinges to the covers and install the covers to the box. Be careful not to strip the screws in the wood.
- Align and glue the center cover section and gussets.
- Glue the power‑panel supports to the cover.
- Make and/or form all hardware parts. The locking tab in the axle should be snugly fitted so it will stick in whatever position you put it; this allows easy installation of the axle through the wheels and the box.
- Install all hardware and accessories. When mounting the lid supports, position them so the covers can open approximately 50° past the vertical, and adjust them to have enough drag to ensure they will not collapse while holding an airplane.
- Finishing
- Once satisfied with the fit of parts and hardware, disassemble all removable parts and finish‑sand the wood, then stain it. Fill the nail holes with matching‑color putty.
- Apply the first coat of polyurethane varnish and let dry thoroughly.
- Finish‑sand the polyurethane with 320‑grit paper and apply a second coat.
- When the box is dry, install the hardware and covers. To ensure the small hinge screws will hold, squirt some Zap‑A‑Gap into the screw holes before assembly.
- Cut and slit pipe‑insulation material for the airplane‑support slots in the cover.
- Cut and Zap‑glue foam rubber into the transmitter and fuel‑can cavities.
- Mount the handle, axle, and wheels to ensure proper fit. You may have to trim excess polyurethane from the mounting holes.
The first time you use your Flight Assistant at the flying field, be prepared for jealous remarks from fellow modelers. After the initial snide comments about laziness and lack of strength, your friends will soon ask: "Where did you get the plans?" "How long did it take you to build it?" "How about building me one?"
Transcribed from original scans by AI. Minor OCR errors may remain.

