

FLOATPLANE FINE TUNING
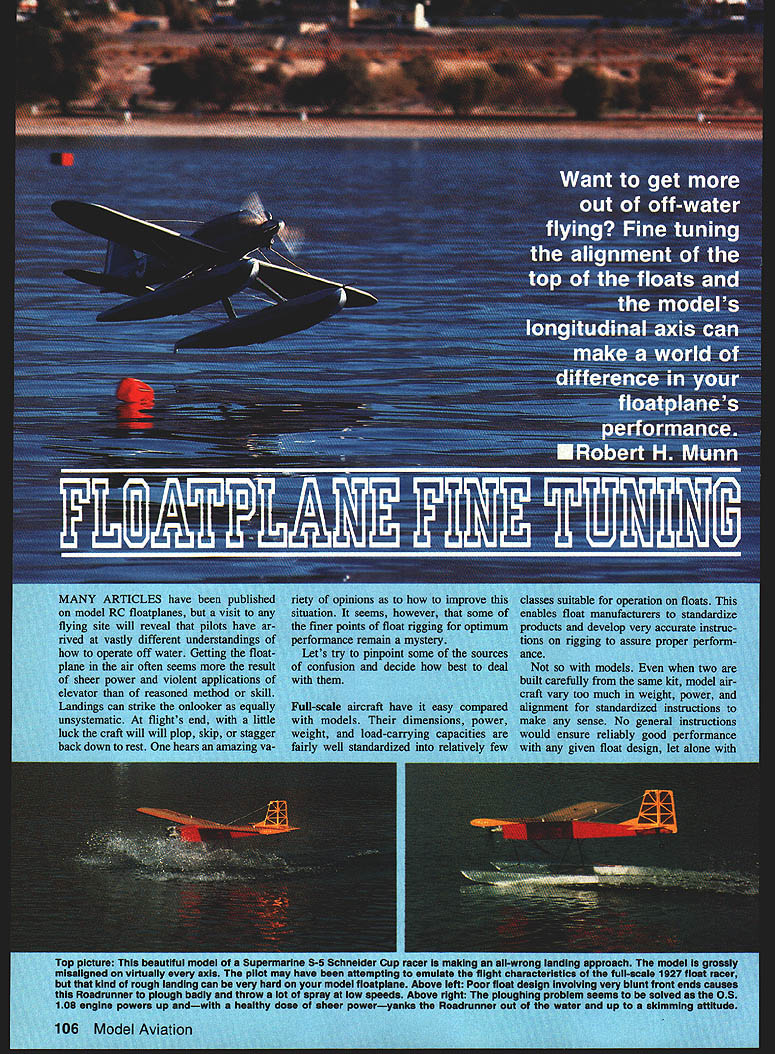
Many articles have been published on model RC floatplanes, but a visit to any flying site will reveal pilots have arrived at vastly different understandings of how to operate off water. Getting the floatplane in the air often seems more the result of sheer power and violent applications of elevator than of reasoned method or skill. Landings can strike the onlooker as equally unsystematic. At flight's end, with a little luck the craft will plop, skip, or stagger back down to rest. One hears an amazing variety of opinions as to how to improve this situation. It seems, however, that some of the finer points of float rigging for optimum performance remain a mystery.
Let's try to pinpoint some of the sources of confusion and decide how best to deal with them.
Scale vs. model realities
Full-scale aircraft have it easy compared with models. Their dimensions, power, weight, and load-carrying capacities are fairly well standardized into relatively few classes suitable for operation on floats. This enables float manufacturers to standardize products and develop very accurate instructions on rigging to assure proper performance.
Not so with models. Even when two are built carefully from the same kit, model aircraft vary too much in weight, power, and alignment for standardized instructions to make any sense. No general instructions would ensure reliably good performance with any given float design, let alone with the many variations of hull design and position on the fuselage. Still, by learning as much as we can we are less likely to bog down before getting the best out of our equipment.
General float construction and mounting
The general aspects of float construction, finish, and basic rigging have been dealt with in other articles. Important basics are:
- The floats must be parallel to each other and to the fuselage when viewed from above.
- They should be mounted far enough below the thrust line to provide generous prop clearance.
- There is a clear need for some form of water rudder to allow directional control on the water at slow speeds where the air rudder is ineffectual.
- Small spray rails along the forward bottom edges of the floats reduce spray and improve acceleration.
Float cross sections — flat vs. V-bottom
Which float cross section is preferable has been much debated.
- Flat-bottomed floats: Easy to construct and finish, they get on-step quickly but at the expense of directional stability. They can create dangerous airstream turbulence in flight, causing violent elevator reactions and possible power stalls or snaps, especially on takeoff.
- V-bottomed floats: Offer less resistance to downward power and water drag, track better, cause less turbulence in flight, and land more smoothly. Most pilots prefer to follow full-scale practice and use V-bottoms.
Displacement and sizing
Models are very lightly loaded compared with full-scale aircraft, so model floats can have considerably less displacement than suggested by scale. For model airplane applications, it is generally best to slim down the scale width dimension by about 20% to minimize drag and weight.
A more technical guideline: multiply the weight of your airplane in ounces by 1.8 to determine the number of cubic inches required, plus an allowance for the weight of the floats. This gives a safety factor of about two for the aircraft with both floats.
ALIGNMENT AND RIGGING
What we are trying to achieve
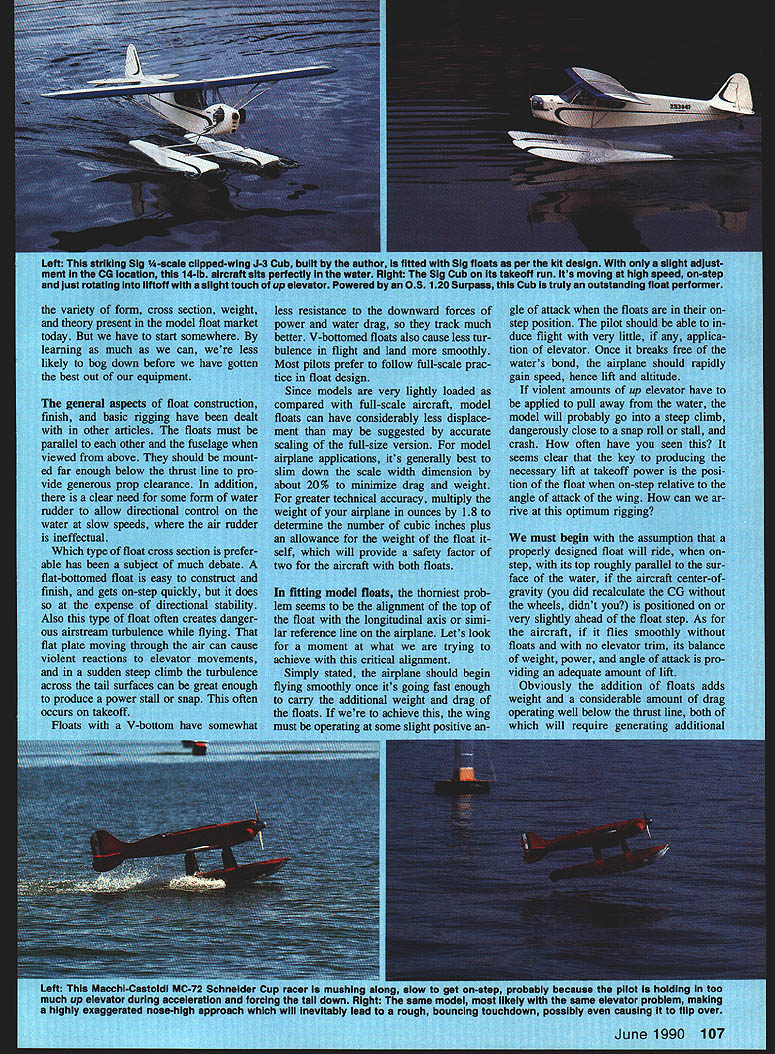
Simply stated, the airplane should begin flying smoothly once it's going fast enough to carry the additional weight and drag of the floats. The wing must be operating at some slight positive angle of attack when the floats are in their on-step position so the pilot can induce flight with very little, if any, elevator. Once it breaks free of the water surface, the airplane should rapidly gain speed, lift, and altitude.
If violent amounts of up-elevator are required to pull away from the water, the model will likely go into a steep climb, dangerously close to a snap roll or stall and crash. The key to producing the necessary lift at takeoff power is the position of the float when on-step relative to the wing's angle of attack.
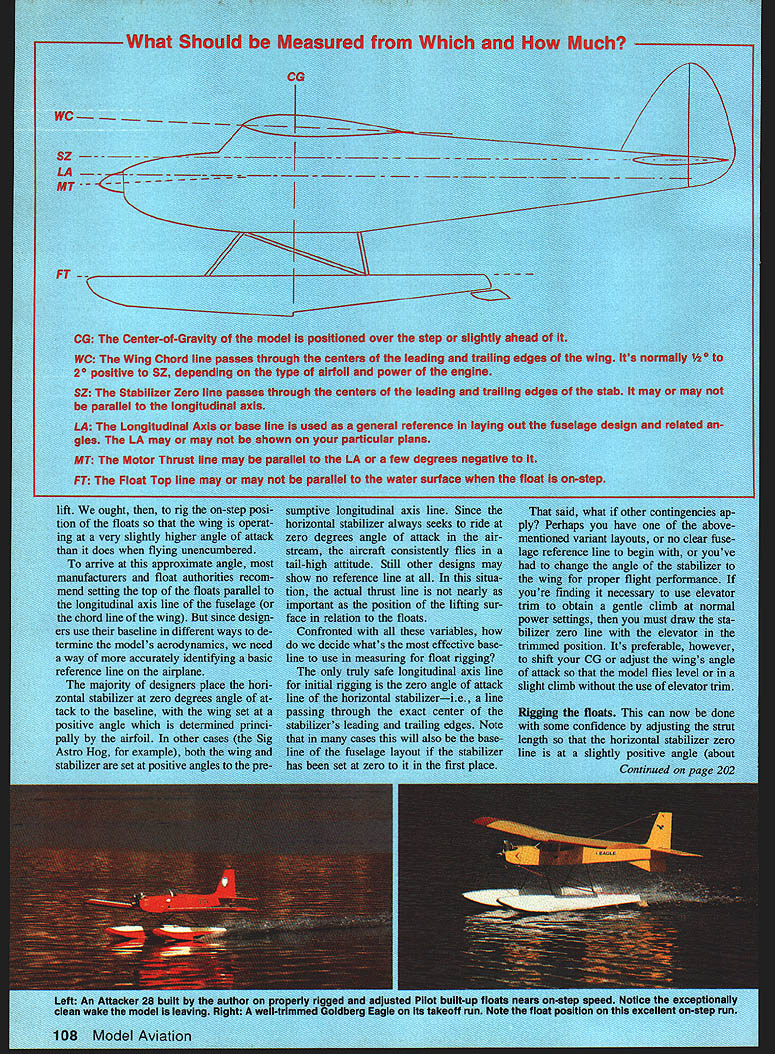
Choosing a baseline for measurement
Designers use different baselines when building models:
- In many designs, the horizontal stabilizer is set at zero degrees to the fuselage baseline, and the wing is set at a positive angle determined by the airfoil.
- In other designs, both wing and stabilizer may be set at positive angles to the presumptive longitudinal axis.
- Some designs show no clear fuselage reference line.
Given these variables, the safest longitudinal axis line for initial rigging is the zero angle-of-attack line of the horizontal stabilizer — i.e., a line passing through the exact center of the stabilizer's leading and trailing edges. In many cases this is also the fuselage baseline if the stabilizer was set at zero to it originally.
If you must use elevator trim in normal flight to obtain a gentle climb, draw the stabilizer zero line with the elevator in the trimmed position. Preferably, however, shift your CG or adjust the wing incidence so the model flies level or in a slight climb without elevator trim.
Rigging procedure
Rig floats by adjusting the strut length so the horizontal stabilizer zero line is at a slightly positive angle (about 1/2°) to the top line of the floats. When the stabilizer zero line is exactly level and viewed from the side, the front end of the floats will be slightly lower than the rear end, and the front edge of the wing should, in most cases, be slightly higher than the trailing edge.
Because the aircraft will be moving through the airstream in its normal flying attitude, adding about 1/2° of extra angle compensates for the extra drag and weight of the floats. The airplane should generate enough lift at takeoff speed to fly off water with little or no elevator, then proceed into a gentle climb.
When the aircraft is at rest on its floats, most models appear slightly to moderately tail-low. Floats have greater displacement forward of the step to counteract nose weight and the drag of water against the forward section.
Fine adjustments and test technique
Only after a number of flight tests can you determine the best rigging.
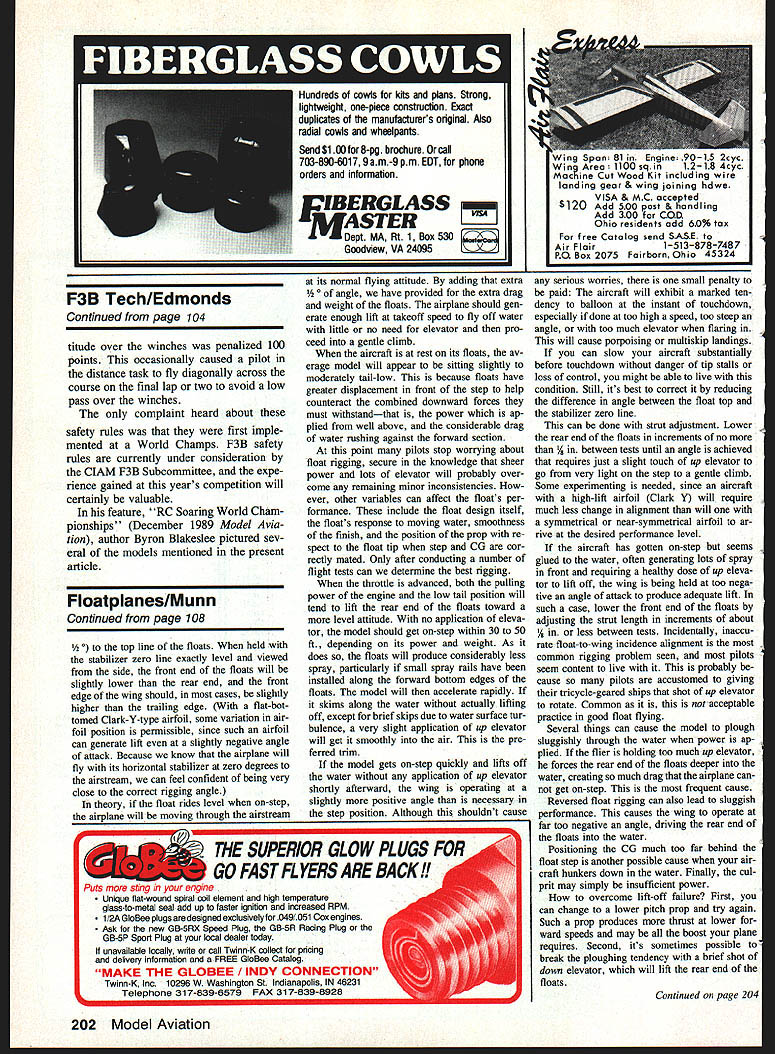
- Desired behavior: With throttle advanced and no elevator, the model should get on-step within 30–50 ft depending on power and weight. Once on-step it should accelerate rapidly, skim the water, and lift off with only a very slight application of up-elevator.
- If the model gets on-step quickly and lifts off without up-elevator shortly afterward, the wing is operating slightly more positive than necessary. This tends to make the model balloon at touchdown and can cause porpoising or multiple bounces. Remedy: reduce the difference in angle between the float top and the stabilizer zero line by lowering the rear end of the floats in small increments (no more than 1/8 in. between tests) until a slight touch of up-elevator produces a gentle climb.
- If the model gets on-step but seems glued to the water, generating lots of spray in front and requiring a healthy dose of up-elevator to lift off, the wing is at too negative an angle. Remedy: lower the front end of the floats (increase nose-down incidence) by adjusting strut length in increments of about 1/8 in. or less between tests.
Several aircraft factors affect how much adjustment is needed: a high-lift airfoil (e.g., Clark Y) will require much less change in alignment than a symmetrical or near-symmetrical airfoil.
Common rigging and setup mistakes
Several things can cause the model to plough sluggishly through the water when power is applied:
- Holding too much up-elevator while trying to accelerate — this forces the rear end of the floats deeper, increasing drag. This is the most frequent cause.
- Reversed float rigging — causes the wing to operate too negative and drives the rear floats into the water.
- CG positioned too far aft of the float step — causes the aircraft to hunker down in the water.
- Insufficient power.
How to overcome lift-off failure:
- Change to a lower-pitch propeller to get more thrust at lower forward speeds.
- Try a brief shot of down-elevator to lift the rear end of the floats and break the ploughing tendency.
A third, advanced method to reduce drag and allow better acceleration is to carefully rock the aircraft with the ailerons, lifting first one and then the other float free. This is touchy and should only be attempted by experienced pilots.
TAKEOFF AND LANDING TECHNIQUES
Takeoff
With the throttle advanced, both engine thrust and the low tail position will tend to lift the rear of the floats toward a level attitude. With no elevator the model should get on-step within 30–50 ft, produce less spray, accelerate rapidly, and lift off except for brief skips. A very slight application of up-elevator will get it smoothly airborne.
Preferred trim: the model gets on-step quickly and lifts off the water with only a slight up-elevator shortly afterward; the wing then operates at the slightly positive angle necessary for the step position.
Landing
When the angle between the top of the float and the wing has been properly adjusted, landings become much easier.
- After turning into the wind, reduce power until you have a steady, smooth descent. Try to avoid using the elevator.
- Reduce power further and add a touch of up-elevator to soften the touchdown, slowing airspeed while keeping the same rate of descent.
- Just before touchdown, flare slightly with a very gentle up-elevator or, preferably, with a slight addition of power. The goal is to contact the water in the same relatively flat attitude assumed at lift-off.
- The extra power at touchdown helps prevent abrupt slowing caused by water drag. Reduce power gradually after touchdown to obtain a smooth transition to taxi speed. This also helps prevent dumping the aircraft if you need to abort a takeoff near flying speed.
TROUBLESHOOTING AND OTHER VARIABLES
Other variables that can affect float performance include:
- Float design and hull shape
- Floats' response to moving water
- Smoothness of finish
- Position of the propeller relative to the float tip/step
- Correct CG location
Only through flight testing can optimal rigging be determined. Seek assistance from experienced float pilots to check rigging and help with adjustments.
AMPHIBIANS
The same general technique can be applied to amphibians, except you adjust the wing angle of attack rather than the float angle. Increasing the wing's angle of attack will shift the takeoff trim; small CG adjustments may be necessary to achieve the desired on-step attitude. This can produce the "almost flying when you're on-step" attitude without significant use of elevator.
Once you've flown a properly rigged floatplane, flying off water will be much more predictable and enjoyable — well worth the trouble to get it right.
Transcribed from original scans by AI. Minor OCR errors may remain.

