
FLOYD - A STUDY IN ONE DESIGN
Jess Walls
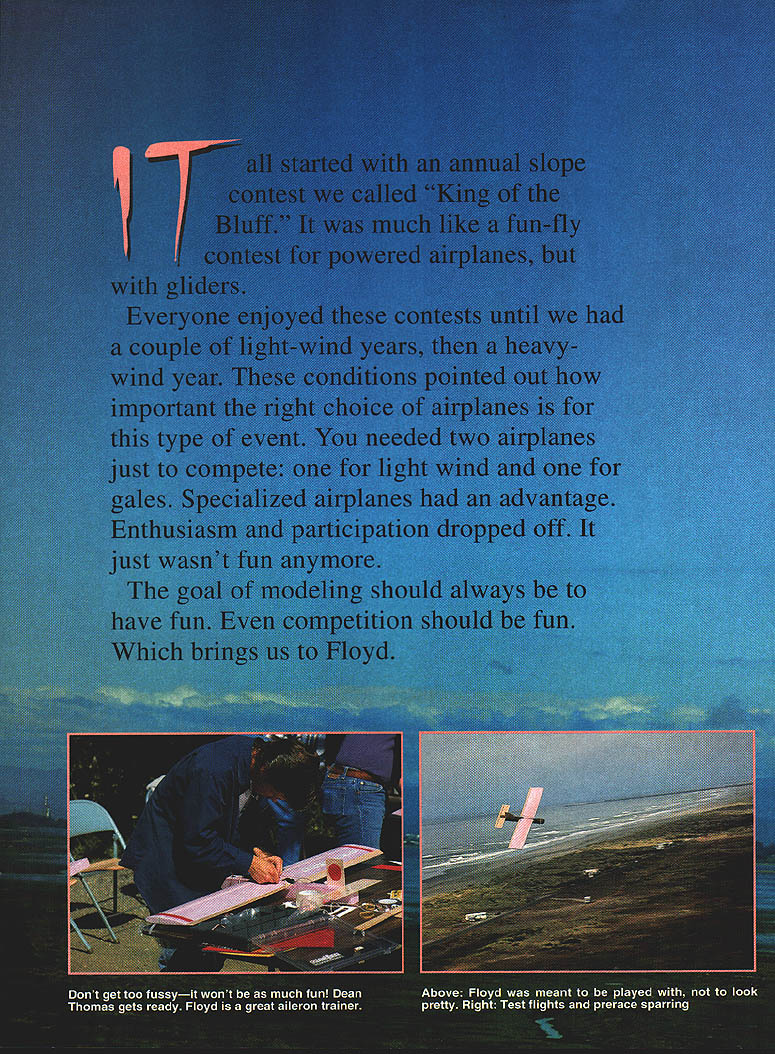
It all started with an annual slope contest we called "King of the Bluff." It was much like a fun-fly contest for powered airplanes, but with gliders. Everyone enjoyed these contests until a couple of light-wind years followed by a heavy-wind year pointed out how important the right choice of airplanes is for this type of event. You needed two airplanes just to compete: one for light wind and one for gales. Specialized airplanes had an advantage. Enthusiasm and participation dropped off. It just wasn't fun anymore.
The goal of modeling should always be to have fun. Even competition should be fun. Which brings us to Floyd.
On May 17, 1994, at 9 a.m., our one-design contest began. We had 8–10 people ready to start building the airplanes they would fly in the races that day. The sky was overcast and there was no wind until about 12:30. By then we had wind, 19 entrants had built and test-flown their planes, and spectators, turn judges, flags, banners, sun, and . . . a race!
There were three young men challenging the old guys. Andy Schuler had the fastest heat time of the day and had the veterans worried. Jim Roberts had been flying pylon racers in the valley and was determined to win. Dean Thomas had no contest experience but was fast nonetheless. Everyone else was older—near 40 or beyond.
We needed to rekindle interest—how? Cheaper airplanes? One-design events? Races? I figured a ridiculously low price on an airplane kit would encourage (or shame) club members into participating. A one-design event would give everyone an equal chance. Races are exciting to watch, and even nonfliers could enjoy the event.
Maybe we could do all these things at once. If a model were easy and cheap to build, the actual design would become secondary since they would all be equal anyway. Speed is not required for good racing, but parity is. Foot races can be extremely competitive—the fastest people go about 20 mph. Races should be much closer because entrants have the same power sources, wind, and gravity.
Gary Guttermuth met up with Andy in the eliminations. Gary saw how quick Andy was and figured the way to beat him was to put pressure and hope the kid cracked. On lap three Andy flew too low and got stuck in the bushes; Gary took it easy and finished for the win.
Joe Geiger met up with Jim in the eliminations and just edged out victory after a really close battle—Joe had beaten Jim in the heat races in a grudge match. During eliminations, Mitch Robinson and Joe had a midair at the end of the first lap; Mitch's airplane was blown downwind into the landing area while Joe recovered and completed the course to win. Mitch had beaten both Joe and Gary during the heat races.
Did I mention cheap? About $7 total per airplane, including entry fee and covering hardware (price didn't include labor, shipping, or overhead). It was a club project. Entrants brought transmitter, receiver, battery pack, and two servos. With careful shopping and creative material choices, early Floyds were assembled with tape—no glue anywhere. Brass welding rod was used for pushrod ends; barbecue-skewer pushrods were taped in place.
Floyd proved to be fun, durable, and forgiving. Most ideas worked, and the design is still evolving. Changes are easy to try and reverse. The one-design format also lends itself to aerobatic contests and fun-fly events. Emphasizing "lucky" events along with skill events gives beginners a chance to win, which builds enthusiasm.
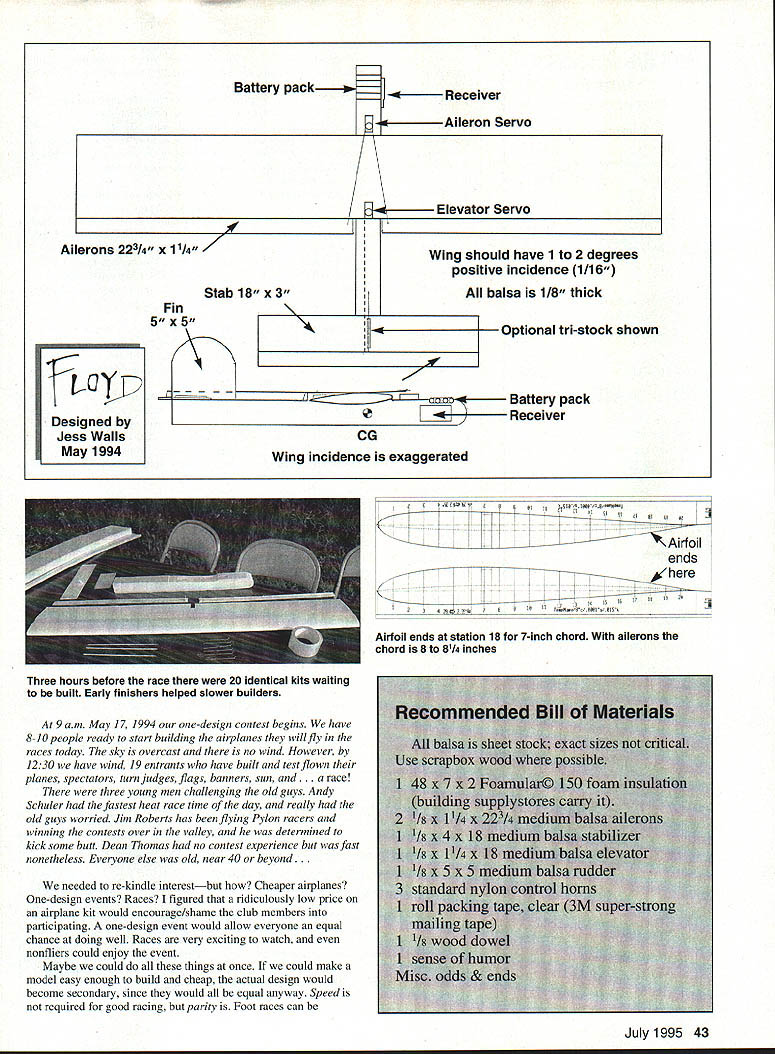
Recommended Bill of Materials
All balsa is sheet stock; exact sizes are not critical. Use scrapbook wood where possible.
- 48 × 7 × 2 in. Foamular 150 pink foam insulation (building supply stores)
- 1/8 × 1 1/4 × 22 1/4 in. medium balsa ailerons (2)
- 1/8 × 4 × 18 in. medium balsa stabilizer (1)
- 1/8 × 1 1/4 × 18 in. medium balsa elevator (1)
- 1/8 × 5 × 5 in. medium balsa rudder (1)
- 3 standard nylon control horns
- 1 roll clear packing tape (3M super-strong mailing tape recommended)
- 1/8 in. wood dowel
- 1 sense of humor
- Miscellaneous odds & ends
Design
Windy slopes eat airplanes. You have to build strong and be good at repairs; the alternative is to build so light the airplane won't have enough inertia and will self-destruct less predictably. Several all-foam planes fit the "built-light" category but weren't cheap enough or durable enough for our goals.
Floyd uses what we liked about designs we'd seen and makes it as simple as possible. It is prefabricated enough so an airplane can be built at the contest—there won't be time to exploit loopholes or make improvements that give ace builders big advantages. Most emphasis is on flying.
Key design choices:
- Pink Foamular instead of white beaded foam (hence the name)
- No spars or wood reinforcement required (though optional wood reinforcement is allowed)
- Shorter moment (shorter fuselage length) to reduce waste
- Longer span to help in light wind
- Less-streamlined fuselage for strength and ease of production and covering
- Thicker, cambered airfoil for strength and beginner-friendliness
- Smaller ailerons to balance control and feel
- Cheap packing tape as covering to keep costs down
Some very fast pilots eliminated themselves by trying too hard—turning too sharply and stalling, flying below good lift, or attempting risky maneuvers. You have to finish before you can win.
Did It Work?
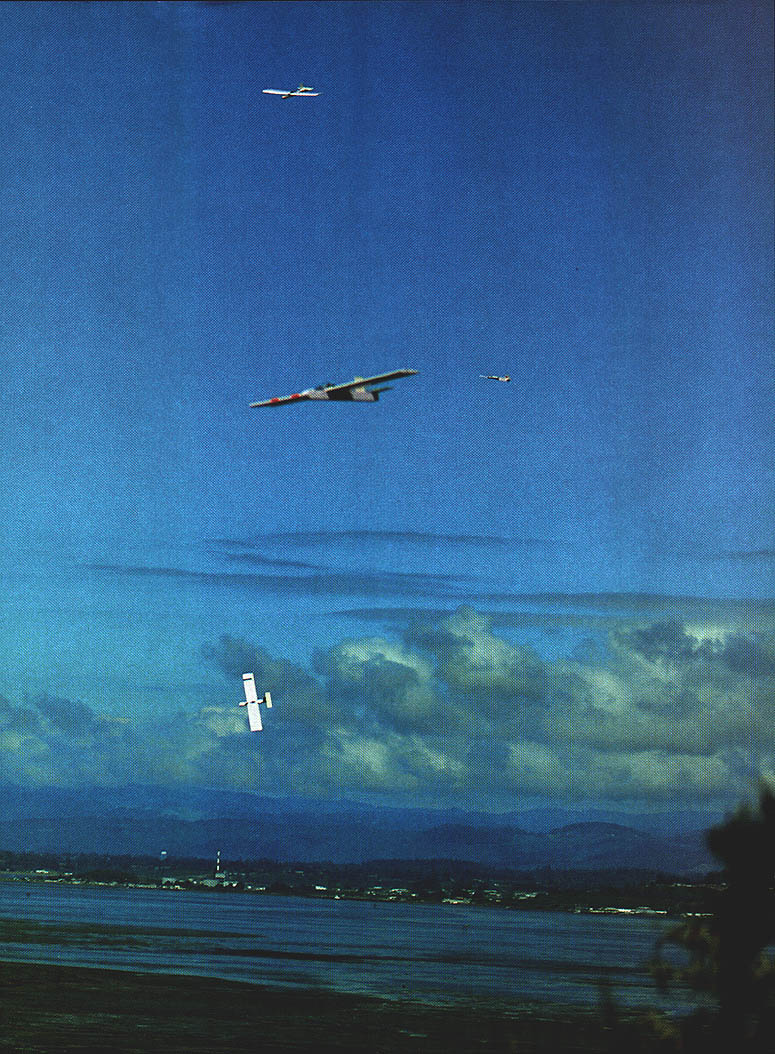
The first airplane flew at 11:30 a.m. Races began at 12:30, and all entrants had test-flown by then. Nineteen official entries made this our largest-ever club event.
After three rounds of four-lap heats we had an elimination-type runoff for the top eight pilots. These were very competitive flights; experienced racers reported sweaty palms and butterflies in the stomach just like "real" races. Those who came just for fun were treated to an exhibition of skill and technique.
The final element of this exercise is fun. Was this format fun? Absolutely. Pilots who spend thousands on detailed models said it was the most fun they'd ever had flying models. More than half of the contestants kept flying an hour after the races ended. There were midairs, radio failures, bush crashes, tree crashes, ground crashes, and most Floyds were still flyable or repairable within ten minutes at the end of the day.
Benefits of the one-design, build-them-together, fly-them-together format:
- Less-experienced builders learn by watching others construct their models.
- Experienced builders pick up new techniques.
- Power-only fliers can try motorless models in a low-cost, low-risk environment; some made it to the eliminations.
- Camaraderie and group flying are greatly enhanced.
- Close, exciting racing with similar equipment—young reflexes vs. old cunning makes for a good match.
Rules (kept to a minimum)
- Wing and fuselage must be as supplied.
- Wing must be covered with tape.
- Maximum span: 50 inches.
- Maximum weight: 22 ounces and maximum wing loading 8 ounces per square foot.
- Two servos maximum.
Construction
This is a great first foam-cutting project. Two-inch-thick Foamular 150 pink foam insulation may be the secret to Floyd's durability. A 4 × 8-foot sheet costs about $25 in our area—enough foam for a dozen Floyds. White beaded foam will crumble and tear if you try to repair it.
If you can't cut foam, and there's no club member who can, order foam parts from Datamaster Designs, 605 West Clark St., Eureka, CA 95501; Tel.: (707) 445-8425. Price about $15 plus shipping.
Kit assembly:
- Check the bill of materials and select wood and hardware.
- Use high-quality packing tape—the cheap stuff won't last.
- Don't waste money on contest balsa; this is light enough without it. Seal or finish wood as you like, or leave it bare.
Wing:
- Remove fuzz from foam cores; tape won't stick to fuzzy surfaces. Clean with a rag or your hand.
- Sand the leading edge smoothly round. Fill low spots with light spackle and sand when dry.
- For the main wing spar we used one-inch strapping tape from tip to tip at the thickest point of the airfoil. For a stiffer wing, lay 1 × 36 in. light fiberglass cloth and epoxy it on top and bottom instead of using tape.
- Lay a four-foot piece of packing tape sticky side up on a flat surface, set the wing core trailing edge down on the center, then wrap the tape up onto the wing surface to form a rear spar.
- Cover the wing with regular packing tape, starting at the trailing edge and running from tip to tip. One layer is sufficient; overlap sparingly to avoid wrinkles.
- Unroll six inches of tape at a time and press down. If you get a wrinkle, don't pull the tape up—cut out the bad section and continue.
Fuselage:
- Tape the fuselage lengthwise top, bottom, and sides with one layer of tape for strength. Rounding corners looks better but makes covering harder.
- Cut the tape out of the saddle for the airfoil once the sides are in place.
Final assembly:
- Sand or shape stabilizer, elevator, ailerons, and fin if desired. Decide whether to glue or tape; tape lets you experiment and remove components later.
- To tape the stabilizer: lay it in place starting three inches in front of the stab, run tape over the top, down the back, and along the bottom to hold it. Wrap a six-inch piece of tape around the fuselage just in front of the stab to keep the stab tape from peeling up. Make fillets under the stab from short pieces of tape, using your finger to form a radius.
- Silicone bathtub caulk (or similar) may be used to glue the tail to the fuselage and the wing to the fuselage. Silicone sticks to tape and will give a little in a bump on landing; it also tears less foam in a crash than epoxy or hard glues. Add fillets under the wing from excess silicone and form them with a Popsicle stick or wet finger. Set weight on the wing and let cure overnight.
- Double-check wing position in the saddle—negative incidence will ruin flight. If in a hurry you may tape the wing on temporarily and silicone it later.
Control surfaces:
- Tape ailerons in place with at least 1/8 in. gap so they won't bind. Ensure clearance from the fuselage.
- Tape the elevator on similarly.
- A neat way to attach nylon control horns: position the horn, drill a 1/16 in. hole where the screw goes, push a wood toothpick through the horn into the wood, thin CYA, and cut the toothpick flush.
Radio Installation
- Cut holes in the foam as indicated for servos and components.
- Tape radio gear in place so it won't fall out. The elevator servo goes in the rear hole; position the receiver so servo leads can be routed easily.
- Tape batteries and any necessary ballast on the airplane and check the center of gravity (CG). Two inches back from the leading edge is a good starting point.
- If desired, leave pushrods and hardware exposed during setup; it's easier to work on a unit that way. You can tape everything to the surface until positions are finalized.
Final Notes
- Set control throws to about 3/8 in. up and down for all surfaces for the first flight.
- After practicing, you may move the CG back to 2½ in. If it gets squirrely and stalls a lot, you've gone too far. Floyd is not a light-air floater; it needs some speed to fly.
- Repairs: prototype was recovered three times and the foam is still good. Repairs can be made with silicone glue or just by retaping.
- Floyd is a great aileron trainer: it will loop, roll, fly inverted, even do outside loops—just not as well as specialized designs. It was designed for beginners so you can look away from the throttle instead of concentrating totally on flying. Relative drag keeps speed down so things happen more slowly than with other slope models.
- The only time Floyds require unnatural concentration is when eight or nine identical pink planes are in the air together—it's hard to keep track of which is yours. Group flying encourages formation flying and "touches" don't hurt.
- The airplane's looks are secondary—build it to be fun and durable, and don't waste flying time trying to make it beautiful.
One-design contests have inspired our members; we're even on the verge of a Floyd 3B contest—multi-task like F3B only with Floyds. Floyds have been launched on high starts and perform well. They make tight circles, core small thermals, and can be used for distance and speed tasks that reward strategy.
Build one, fly with us, and have fun!
Transcribed from original scans by AI. Minor OCR errors may remain.

