
Flying for Fun
D.B. Mathews
909 N. Maize Rd., Townhouse 734, Wichita KS 67212
Office and industrial buildings replace burned-out ballast on a regular basis, providing a bottomless source of weights for our use.
Many years ago, ballasts contained Polychlorinated Biphenyls (PCBs), which are proven carcinogens; modern units do not. This makes you wonder what is buried in landfills, doesn't it?
Nonmetal Control Lines
In the very early days of 1/2A control line, most models were flown with kite string. It didn't work very well because of the material's tendency to stretch noticeably from the pull of the model in flight.
Later, single-strand, then .008-inch-diameter stranded cable became available. It was much better, but rather heavy relative to the small models. Such fine wire was rather tricky to reel in and out, and there was the ever-present danger of getting metal lines caught in power lines.
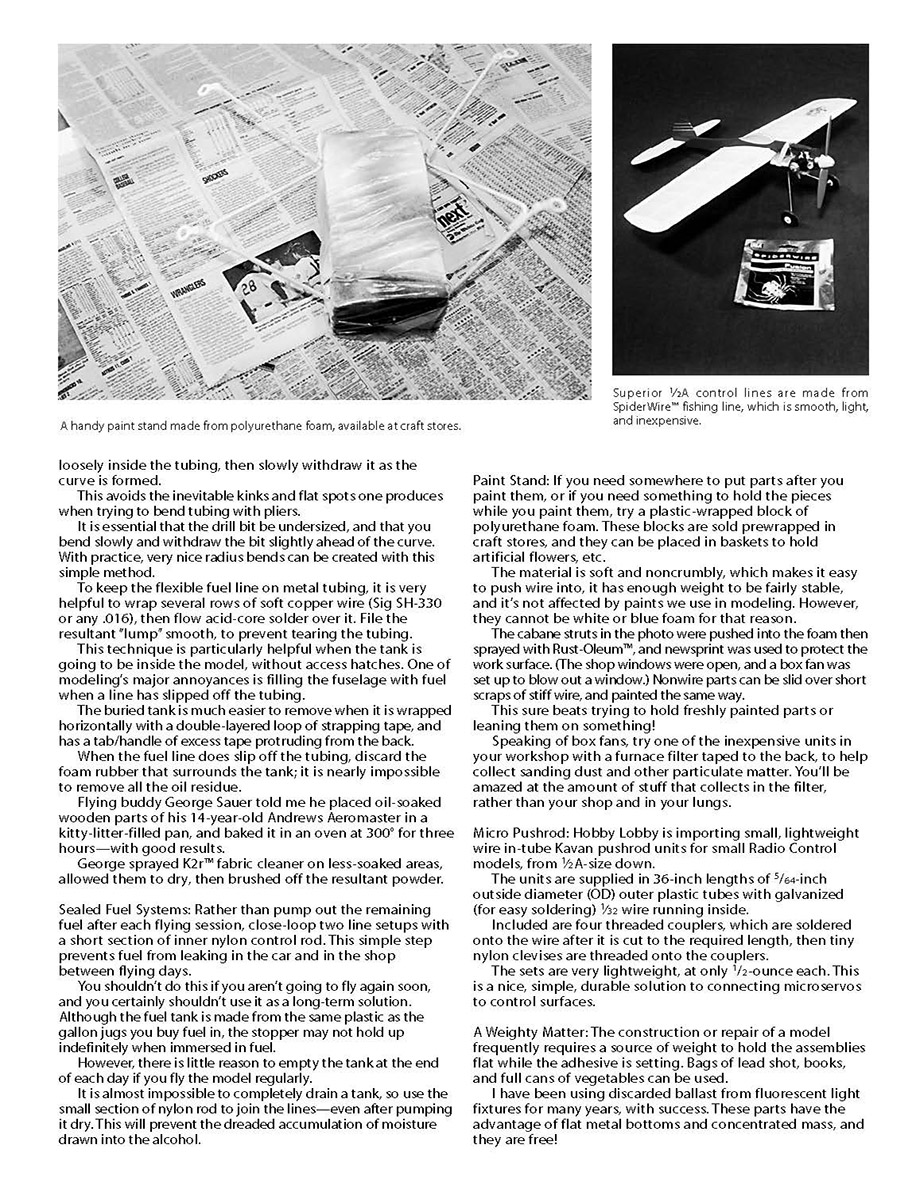
SpiderWire™ is .010-inch, 12-pound-test fishing line, available at Wal-Mart™ and other stores, and it works very well. It is a Teflon®-coated composite material that is smooth, light, and easy to reel—not to mention inexpensive.
Three-views
Three-views are essential and illuminating for scale modelers and for those with an abiding interest in airplanes.
Before World War II, a prime source of three-views was the Aircraft Year Book, published annually from 1919 on. In many instances, these three-views are the only reliable data for some of the more obscure and forgotten prototypes that were manufactured before 1946.
It would be difficult to collect all volumes of the Aircraft Year Book because of their rarity and expense. However, John McDonald has compiled all 939 three-views and has reproduced them in a soft-bound book—Aircraft Year Book 3-view Drawings.
John's book not only includes American civilian and military aircraft of the period, but includes airships, autogiros, balloons, and gliders. The drawings are presented four three-views per page, including the captions, dimensions, and specifications.
Contents are indexed alphabetically by manufacturer and by year, so it is easy to locate a specific aircraft in the 24-page index. Also included are 17 pages of specifications as supplied by the manufacturers.
I highly recommend Aircraft Year Book 3-view Drawings as a scale source for model builders, aero historians, and aviation nostalgia fans. For $35 (plus $4 shipping and handling), the book offers three-view drawings and specifications in one convenient volume.
Since my last few columns have focused on exotic or historical aspects of the hobby, this month I'll include some "nuts-and-bolts" items. Although some of you may be aware of all these little tricks, some of you may not be. Most of what I will discuss are not my ideas, but are things I have observed and borrowed from others. In some instances, I have forgotten the source.
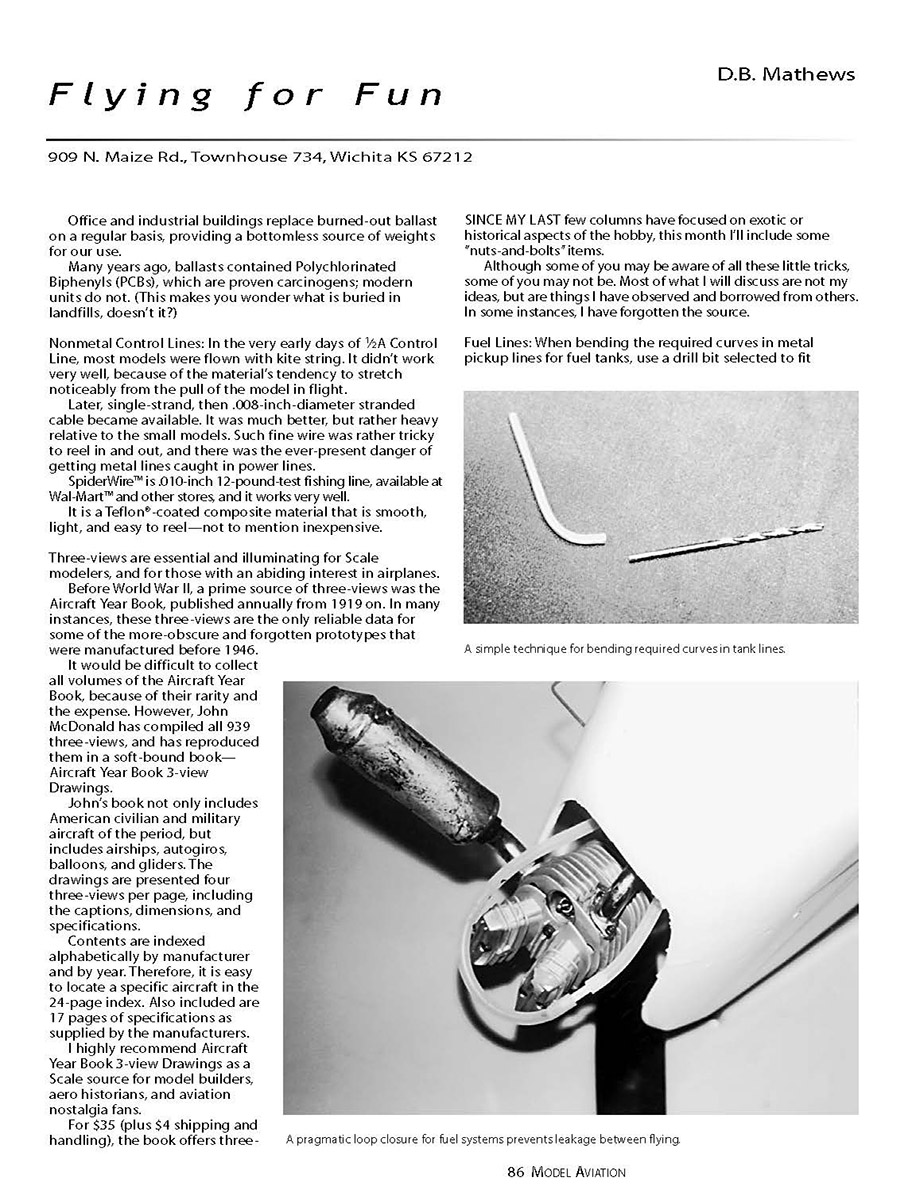
Fuel Lines
When bending the required curves in metal pickup lines for fuel tanks, use a drill bit selected to fit loosely inside the tubing, then slowly withdraw it as the curve is formed. This avoids the inevitable kinks and flat spots one produces when trying to bend tubing with pliers. It is essential that the drill bit be undersized, and that you bend slowly and withdraw the bit slightly ahead of the curve. With practice, very nice radius bends can be created with this simple method.
To keep the flexible fuel line on metal tubing, it is very helpful to wrap several rows of soft copper wire (Sig SH-330 or any .016), then flow acid-core solder over it. File the resultant "lump" smooth to prevent tearing the tubing. This technique is particularly helpful when the tank is going to be inside the model, without access hatches.
One of modeling's major annoyances is filling the fuselage with fuel when a line has slipped off the tubing. The buried tank is much easier to remove when it is wrapped horizontally with a double-layered loop of strapping tape and has a tab/handle of excess tape protruding from the back. When the fuel line does slip off the tubing, discard the foam rubber that surrounds the tank; it is nearly impossible to remove all the oil residue.
Flying buddy George Sauer told me he placed oil-soaked wooden parts of his 14-year-old Andrews Aeromaster in a kitty-litter-filled pan and baked it in an oven at 300°F for three hours—with good results. George sprayed K2r™ fabric cleaner on less-soaked areas, allowed them to dry, then brushed off the resultant powder.
Sealed Fuel Systems
Rather than pump out the remaining fuel after each flying session, close-loop two-line setups with a short section of inner nylon control rod. This simple step prevents fuel from leaking in the car and in the shop between flying days.
You shouldn't do this if you aren't going to fly again soon, and you certainly shouldn't use it as a long-term solution. Although the fuel tank is made from the same plastic as the gallon jugs you buy fuel in, the stopper may not hold up indefinitely when immersed in fuel. However, there is little reason to empty the tank at the end of each day if you fly the model regularly. It is almost impossible to completely drain a tank, so use the small section of nylon rod to join the lines—even after pumping it dry. This will prevent the dreaded accumulation of moisture drawn into the alcohol.
Paint Stand
If you need somewhere to put parts after you paint them, or if you need something to hold the pieces while you paint them, try a plastic-wrapped block of polyurethane foam. These blocks are sold prewrapped in craft stores, and they can be placed in baskets to hold artificial flowers, etc. The material is soft and noncrumbly, which makes it easy to push wire into; it has enough weight to be fairly stable, and it's not affected by paints we use in modeling. However, they cannot be white or blue foam for that reason.
The cabane struts in the photo were pushed into the foam then sprayed with Rust-Oleum™, and newsprint was used to protect the work surface. The shop windows were open, and a box fan was set up to blow paint fumes out. This sure beats trying to hold freshly painted parts or leaning them on something!
Speaking of box fans, try one of the inexpensive units in your workshop with a furnace filter taped to the back to help collect sanding dust and other particulate matter. You'll be amazed at the amount of stuff that collects in the filter rather than in your shop and lungs.
Micro Pushrod
Hobby Lobby is importing small, lightweight wire-in-tube Kavan pushrod units for small radio control models, from 1/2A-size down.
The units are supplied in 36-inch lengths of 5/64-inch outside diameter (OD) outer plastic tubes with galvanized (for easy soldering) 1/32-inch wire running inside. Included are four threaded couplers, which are soldered to the wire after it is cut to required length, then tiny nylon clevises are threaded onto the couplers.
The sets are very lightweight, at only 1/2 ounce each. This is a nice, simple, durable solution to connecting microservos to control surfaces.
A Weighty Matter
The construction or repair of a model frequently requires a source of weight to hold the assemblies flat while the adhesive is setting. Bags of lead shot, books, and full cans of vegetables can be used.
I have been using discarded ballast from fluorescent light fixtures for many years, with success. These parts have the advantage of flat metal bottoms and concentrated mass, and they are free!
Transcribed from original scans by AI. Minor OCR errors may remain.

