
Flying for Fun
D.B. Mathews 909 N. Maize Rd., Townhouse 734, Wichita KS 67212
IN THE LAST column I waxed enthusiastic at considerable length about 3-D miniature electric-powered foamies. In the interim I have begun flying mine in a vacant lot across the street from my home. This site is approximately half the size of a football field, with trees on either end. It is surrounded on three sides by townhouses. Thus far I have encountered no difficulty in flying from the site, and the neighbors are only aware anything is going on if they happen to look out their windows or step outside. I have actually been asked how I can fly the model without an engine, which succinctly summarizes the reasons behind the explosive growth of these little electric flickers.
Brief Notes
There seems to be some controversy regarding how far the Li-Poly packs can safely be discharged. Fred Marks of FMA Direct, who imports Kokam cells, introduced Li-Poly to us modelers and probably knows as much about them as anyone. He said, “There is so little capacity left in a cell below 3.00 volts (or 2.85 volts under load) that it makes no sense to run the risk of one cell in the pack being driven below 2.5 volts.”
Don Robinson recently called my attention to a clever and useful "vault" for charging and storing Li-Poly cells called the Battery Bunker. As you can see in the photo, it is a high-heat ceramic jar with a lid. You put the pack in it, close the tight-fitting top, hang the charging cord out of a slot, and charge the cells. In theory, in the unlikely event that the pack should ignite, the ceramic will contain the blaze and dissipate the heat. It’s handy if you would need to leave a pack unattended while it is charging. These containers are available from Park Flyer Motors: http://parkflyermotors.com.
Construction Features
All Fancy Foam Models kits (www.fancyfoam.com) are constructed from CNC-milled 6mm Depron foam (similar to the foam used for fast-food containers). All outlines, hinge lines, servo and hardware wells, wing and tail-feather slots, slots for the servo leads, and channels for the carbon-fiber reinforcement rods are precisely premilled. Only a light sanding of the exterior edges is required.
Features premilled into the foam include:
- Outlines and hinge lines
- Servo and hardware wells
- Wing and tail-feather slots
- Slots for servo leads
- Channels for carbon-fiber reinforcement rods
The recommended adhesive for assembling the models is Gorilla Glue (five-minute epoxy is much heavier). Gorilla Glue is an expanding urethane material that certainly adheres the parts well. However, the expansion can be a problem. I placed a few drops in a puddle, waited roughly 30 minutes, and gauged the amount of expansion in that time period. That was a mistake—the adhesive expands for hours and increases its volume many times in the process. I carefully applied some adhesive in the wing and fuselage slots for the carbon-fiber rods and then left the shop. When I returned the next morning, the adhesive had expanded well outside the confines of the milled slots and could not be removed. I have jokingly said that one could overuse Gorilla Glue and end up trapped in the shop by the expanded material. A little goes a long way; check a sample after 24 hours to gauge the quantity to use.
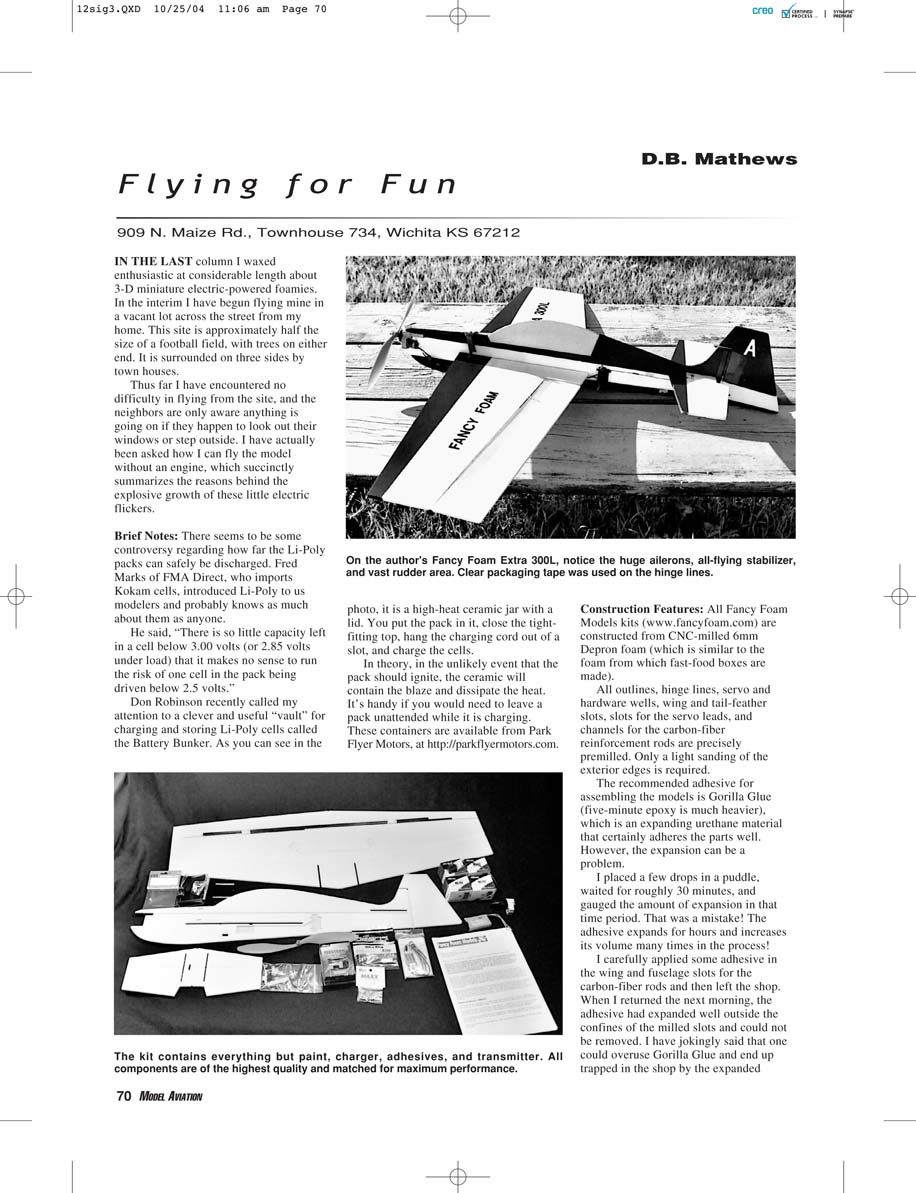
The models’ control surfaces are, by normal standards, absolutely huge and are set up with equally large movements. Hinging is accomplished by flexing the pre-beveled hinge lines and then reinforcing them with 2-inch clear packaging tape on the top and bottom—but you do this after painting the model with Krylon Short Cuts.
This Krylon product comes in small spray cans and is available in many colors. Found at most arts-and-crafts stores, it is exceptionally easy to apply, inexpensive, and adheres well. It is not fuelproof, but it does not need to be.
The all-moving horizontal stabilizer is hinged in the center using a carbon-fiber connector rod running inside sections of aluminum tubing. The horn is a section of Nyrod bolted through the carbon-fiber rod. The center section is glued into a precut slot in the fuselage.
Be extremely careful not to allow any adhesive to penetrate the interior of the aluminum tube! I suggest coating the interior of the tube with Vaseline or a similar product to prevent glue from flowing inside.
The motor gearbox is the familiar GWS 350 unit, which is screwed onto a section of 3/8" square hardwood embedded in the fuselage nose. The Himax brushless motor fits this gearbox using a supplied adapter plate.
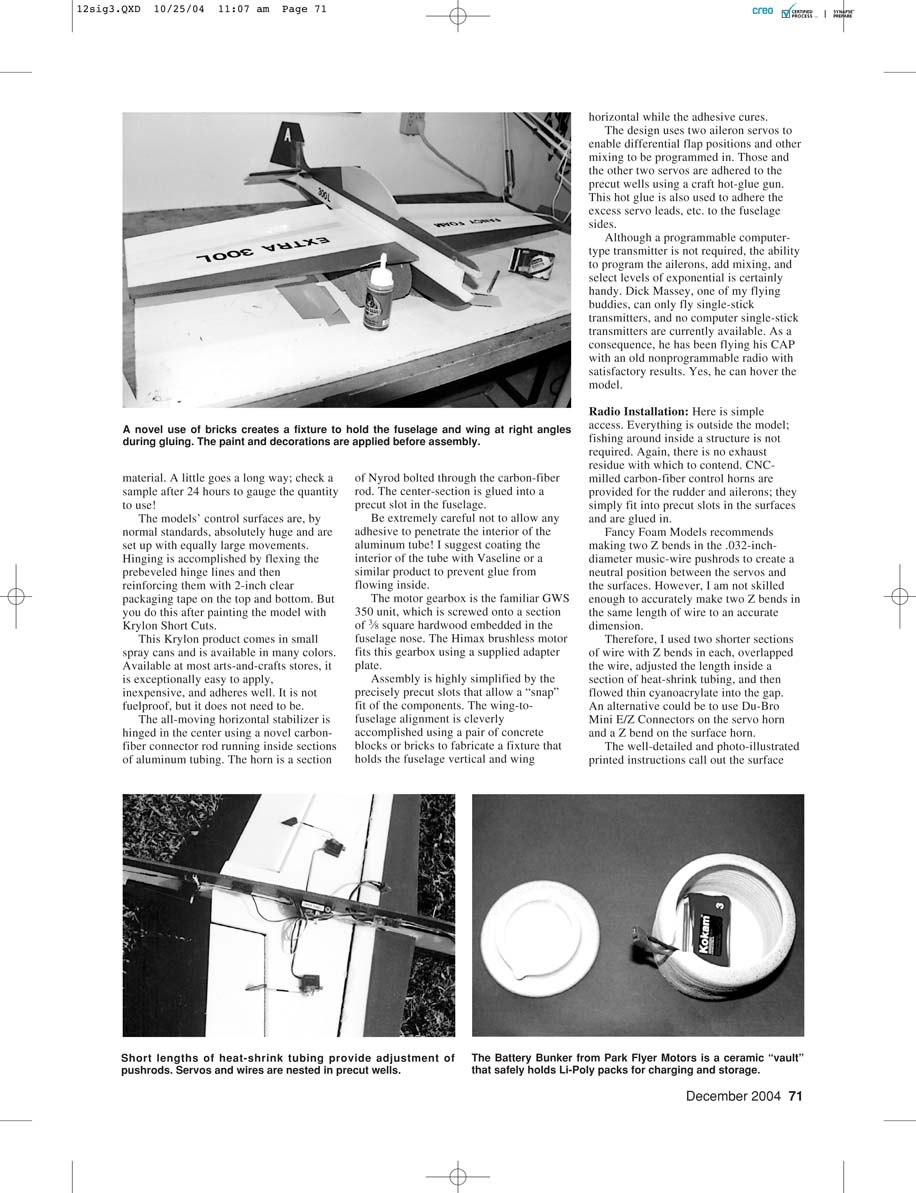
Assembly is highly simplified by the precisely precut slots that allow a "snap" fit of the components. The wing-to-fuselage alignment is cleverly accomplished using a pair of concrete blocks or bricks to fabricate a fixture that holds the fuselage vertical and the wing horizontal while the adhesive cures.
The design uses two aileron servos to enable differential flap positions and other mixing to be programmed in. Those and the other two servos are adhered to the precut wells using a craft hot-glue gun. This hot glue is also used to adhere the excess servo leads, etc., to the fuselage sides.
Although a programmable computer-type transmitter is not required, the ability to program the ailerons, add mixing, and select levels of exponential is certainly handy. Dick Massey, one of my flying buddies, can only fly single-stick transmitters, and no computer single-stick transmitters are currently available. As a consequence, he has been flying his CAP with an old nonprogrammable radio with satisfactory results. Yes, he can hover the model.
Radio Installation
Access is simple. Everything is outside the model; fishing around inside a structure is not required. Again, there is no exhaust residue with which to contend. CNC-milled carbon-fiber control horns are provided for the rudder and ailerons; they simply fit into precut slots in the surfaces and are glued in.
Fancy Foam Models recommends making two Z-bends in the .032-inch-diameter music-wire pushrods to create a neutral position between the servos and the surfaces. However, I am not skilled enough to accurately make two Z-bends in the same length of wire to an accurate dimension.
Therefore, I used two shorter sections of wire with Z-bends in each, overlapped the wire, adjusted the length inside a section of heat-shrink tubing, and then flowed thin cyanoacrylate into the gap. An alternative is to use Du-Bro Mini E/Z Connectors on the servo horn and a Z-bend on the surface horn.
The well-detailed, photo-illustrated printed instructions call out the surface deflections for all three surfaces in high and low rates. Would you believe that high-rate elevator is 70° in each direction? Yes—70°! The instructions also call for flaperon/spoileron mix and up-elevator with rudder to help knife-edge flight.
A "bobbin" is provided to shorten the antenna length, to avoid hanging excess length from the back. Without it, as tightly as this model loops, it might actually be possible to catch the antenna with the propeller.
The Castle Creations speed control is a splendid micro-sized unit with a tiny LED that goes through a series of flashes to signal its programmed steps. The instructions included with it go through a step-by-step method of setting the speed control up to match the motor and battery pack, but this is a bit complex. It involves setting a series of sequential flashes, and it is easy to lose track.
I suggest developing a flow chart and marking each step off as it is accomplished. An alternative is an interlink that uses a computer to set it up. This is available as an accessory from Fancy Foam Models.
Batteries
As I expressed last month, Li-Poly batteries are not dangerous; not adhering to the instructions is dangerous. Although the programmable ESC will shut off the motor before the battery reaches a dangerous discharge point, performance becomes sluggish and you can tell that it's time to land before the motor actually cuts out. It seems to sort of "hiccup" a few times as it reaches that point.
I am unfamiliar with all of the available chargers, but some of my flying buddies are using units from various manufacturers with good results. I use an ElectriFly Triton and am delighted with it in every way. Whatever you do, avoid going cheap on this critical piece of gear.
Flying
Forget everything you've ever learned about model aerodynamics! These little foam wonders will not glide on a bet; they have no recognizable airfoil—only a flat plate. Turn off the power, and they fall from the sky; they don't stall or spiral down in the conventional sense.
After several days of scratching my head, it dawned on me: these things use vectored thrust in the same way a Harrier jet does. No thrust, no flight. No thrust, no response to control inputs.
This makes it sound as if the models are viciously unstable, which they are not. Even with the power off, they don't stall and spin; they just sort of plop onto the ground. Therefore, one needs to keep power going until the model is extremely close to the deck, and then chop it. There is so much power relative to the light weight, and the propeller is so large compared to wingspan, that the model won't stall and certainly won't snap at slow or high speeds unless forced.
The Himax HA2015-4100 motor running on three 1500 mAh Kokam Li-Poly cells produces more than 100 watts for a model that weighs only 12.5 ounces, geared as it is in this series. The weight-to-thrust ratio is way off the chart. Flying is done at half throttle, except for short vertical maneuvers, yet flight duration is 12–24 minutes, depending on throttle management.
I admit to being humbled by all of this. But theory aside, the darn thing flies amazingly well. Aerobatics are incredibly tight, so one can perform all sorts of nutty stuff right on the deck. Toss off three consecutive outside downhill snap rolls. If you're disoriented at the end, hit full up and notice which direction the model goes in the loop, and then fly it from the top or bottom.
These little guys are wonderful aerobatic trainers for a number of reasons, not the least of which are minimal cost, minimal building effort, and minimal damage if you do prang them. Those virtues certainly help a pilot's confidence swell and motivate aggressiveness.
In all my years of flying RC, I've never had so much fun outdoors that was not illegal, immoral, or fattening. You and I deserve the best, and this may well be it!
MA
Transcribed from original scans by AI. Minor OCR errors may remain.

