
Flying for Fun
D.B. Mathews 909 North Maize Road, Townhouse 734, Wichita, KS 67212
Introduction
My wife subscribes to her weekly hometown newspaper. As is unfortunately typical of these village papers, the editor is responsible for everything from selling ads to delivering the finished product to mailing. Obviously there are no funds for hiring a photographer, so the harried editor must not only cover the events and write articles about them, she must also take the needed pictures, with no time for retakes.
I recently saw a front-page photo taken in a Legion hall of two ladies involved in some sort of award presentation. Unfortunately, one lady was positioned relative to the photographer in such a way that the brass eagle on top of the flag behind her appeared to be jutting out of the top of her head.
I said to my wife, “Look at this!” She did, and replied, “Why, that’s— I knew her in high school.” After a moment of reflection I then asked, “Back then did she have that eagle growing out of her head?”
That silliness inspired this month’s column. In talking to other columnists and to magazine staffers, the biggest headache they have is poor picture quality. While most submitted photos are excellent, some are too poor to use.
Much like my model design work, I am certainly not an expert on photography, but through trial and error I have picked up a few pointers that I’d like to share. Over the years I’ve taken an incredible number of photos—so many that I’ve twice worn out the shutter on my 20-year-old Nikon! Even now I still take lots of bad pictures. To avoid embarrassing anyone, we will use examples of bad pictures without identifying them.
Equipment
In a way, cameras are like musical instruments: a cheap one can produce excellent results in the hands of someone who has practiced and developed skills, while an expensive one is only as good as the operator. You do not have to have an expensive camera to take good photos. Sometimes a camera can be so complex or so automatic that it is actually a handicap.
Background
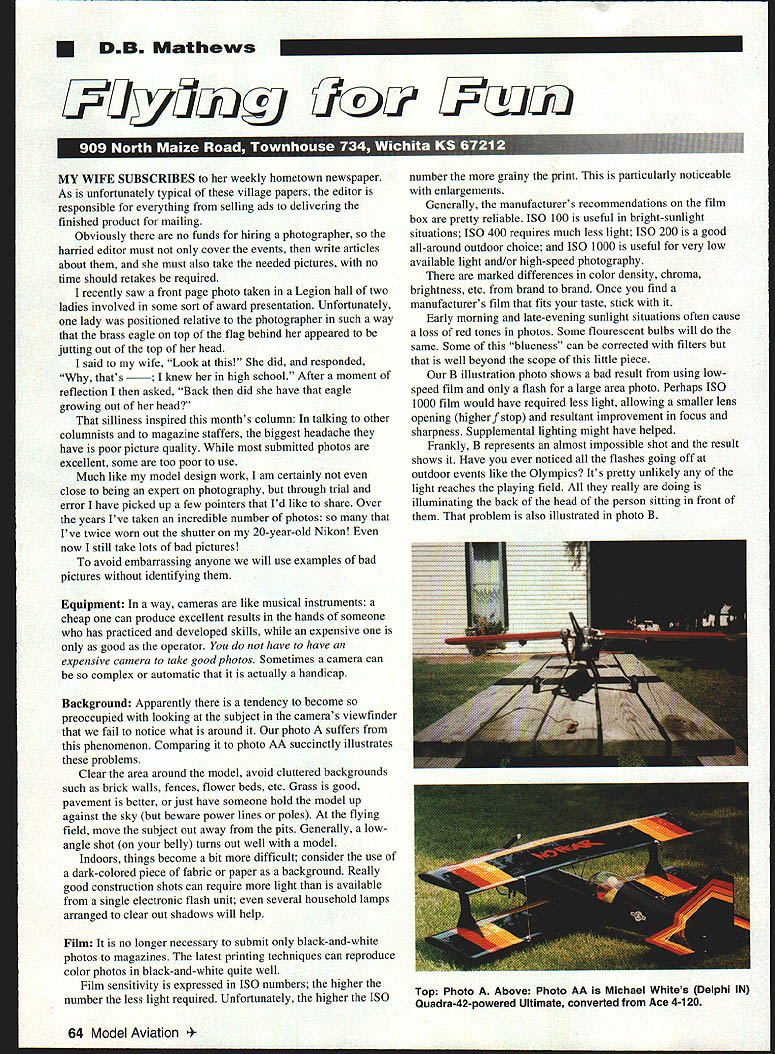
There is a tendency to become so preoccupied with looking at the subject in the camera’s viewfinder that we fail to notice what is around it. Our photo A suffers from this phenomenon. Comparing it to photo AA succinctly illustrates these problems.
Clear the area around the model; avoid cluttered backgrounds such as brick walls, fences, flower beds, etc. Grass is good, pavement is better, or just have someone hold the model up against the sky (but beware power lines or poles). At the flying field, move the subject away from the pits. Generally, a low-angle shot (on your belly) turns out well with a model.
Indoors, things become a bit more difficult; consider using a dark-colored piece of fabric or paper as a background. Really good construction shots can require more light than is available from a single electronic flash unit; even several household lamps arranged to clear out shadows will help.
Film
It is no longer necessary to submit only black-and-white photos to magazines. The latest printing techniques can reproduce color photos in black-and-white quite well.
Film sensitivity is expressed in ISO numbers: the higher the number, the less light required. Unfortunately, the higher the ISO number, the more grainy the print. This is particularly noticeable with enlargements.
Generally, the manufacturer’s recommendations on the film box are reliable:
- ISO 100 is useful in bright sunlight.
- ISO 200 is a good all-around outdoor choice.
- ISO 400 requires much less light.
- ISO 1000 is useful for very low available light and/or high-speed photography.
There are marked differences in color density, chroma, brightness, etc., from brand to brand. Once you find a manufacturer’s film that fits your taste, stick with it.
Early morning and late-evening sunlight situations often cause loss of red tones in photos. Some fluorescent bulbs will do the same. Some of this “blueness” can be corrected with filters, but that is beyond the scope of this piece.
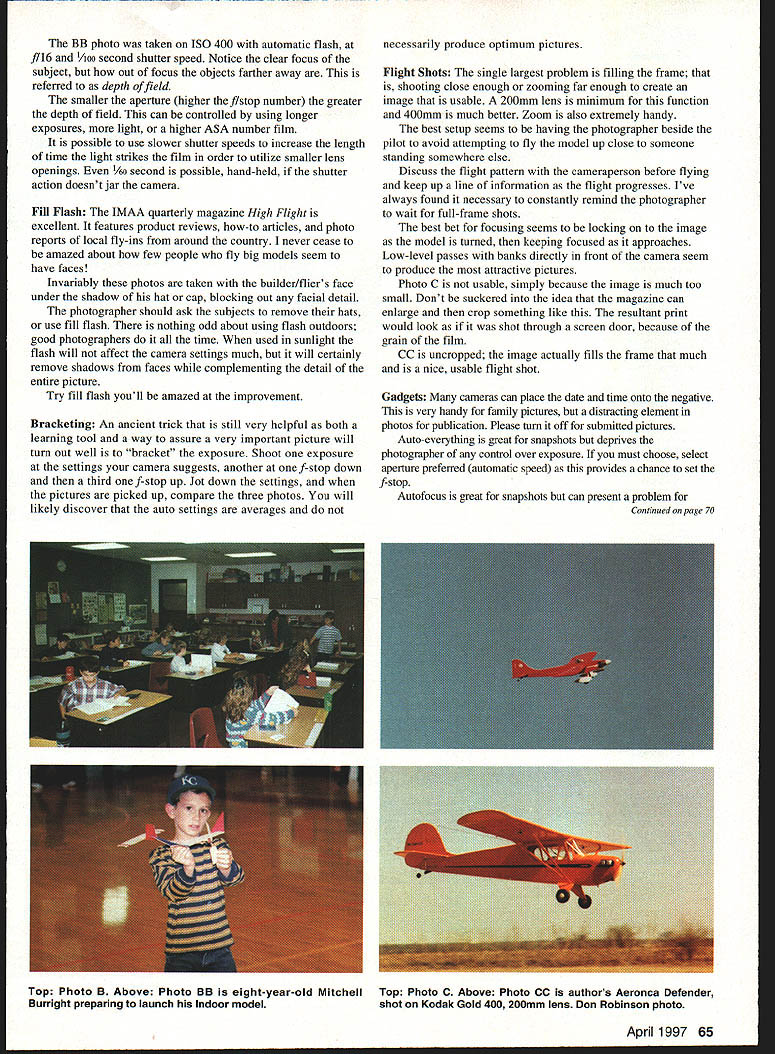
Our B illustration shows a bad result from using low-speed film and only a flash for a large-area photo. Perhaps ISO 1000 film would have required less light, allowing a smaller lens opening (higher f-stop) and a resultant improvement in focus sharpness. Supplemental lighting might have helped. Frankly, B represents an almost impossible shot and the result shows it.
Have you ever noticed all the flashes going off at outdoor events like the Olympics? It’s pretty unlikely any of the light reaches the playing field. All they really are doing is illuminating the back of the head of the person sitting in front of them. That problem is also illustrated in photo B.
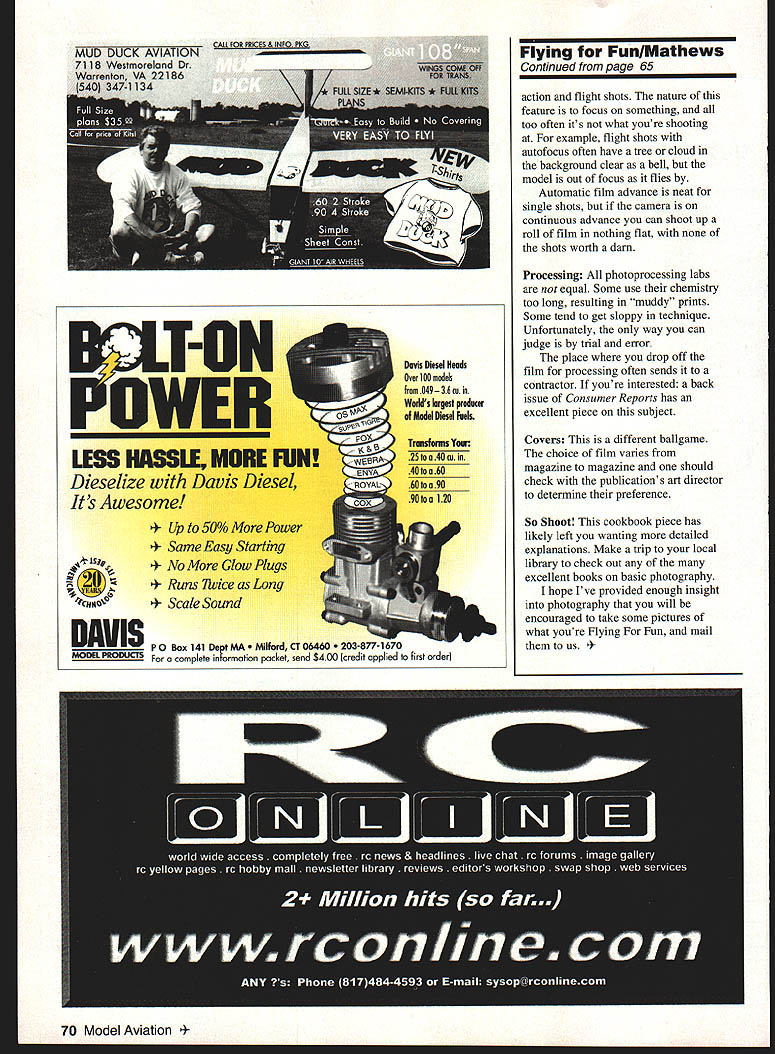
The BB photo was taken on ISO 400 with automatic flash, at f/16 and 1/100 second shutter speed. Notice the clear focus of the subject, but how out of focus the objects farther away are. This is referred to as depth of field.
The smaller the aperture (higher the f/stop number), the greater the depth of field. This can be controlled by using longer exposures, more light, or a higher ISO (ASA) film.
It is possible to use slower shutter speeds to increase the length of time the light strikes the film in order to utilize smaller lens openings. Even 1/60 second is possible hand-held, if the shutter action doesn’t jar the camera.
Fill Flash
The IMAA quarterly magazine High Flight is excellent. It features product reviews, how-to articles, and photo reports of local fly-ins from around the country. I never cease to be amazed at how few people who fly big models seem to have faces!
Invariably these photos are taken with the builder/flyer’s face under the shadow of his hat or cap, blocking out any facial detail. The photographer should ask the subjects to remove their hats, or use fill flash. There is nothing odd about using flash outdoors; good photographers do it all the time. When used in sunlight the flash will not affect the camera settings much, but it will certainly remove shadows from faces while complementing the detail of the entire picture.
Try fill flash—you’ll be amazed at the improvement.
Bracketing
An ancient trick that is still very helpful as both a learning tool and a way to assure a very important picture will turn out well is to “bracket” the exposure. Shoot one exposure at the settings your camera suggests, another at one f-stop down, and then a third one f-stop up. Jot down the settings, and when the pictures are developed, compare the three photos. You will likely discover that the auto settings are averages and do not necessarily produce optimum pictures.
Flight Shots
The single largest problem is filling the frame; that is, shooting close enough or zooming far enough to create an image that is usable. A 200 mm lens is a minimum for this function, and 400 mm is much better. Zoom is also extremely handy.
The best setup seems to be having the photographer beside the pilot to avoid attempting to fly the model up close to someone standing somewhere else.
Discuss the flight pattern with the camera person before flying and keep up a line of information as the flight progresses. I’ve always found it necessary to constantly remind the photographer to wait for full-frame shots.
The best bet for focusing seems to be locking on to the image as the model is turned, then keeping focused as it approaches. Low-level passes with banks directly in front of the camera seem to produce the most attractive pictures.
Photo C is not usable simply because the image is much too small. Don’t be suckered into the idea that the magazine can enlarge and then crop something like this. The resultant print would look as if it was shot through a screen door because of the grain of the film.
CC is uncropped; the image actually fills the frame that much and is a nice, usable flight shot.
Gadgets
Many cameras can place the date and time onto the negative. This is very handy for family pictures, but a distracting element in photos for publication. Please turn it off for submitted pictures.
Auto-everything is great for snapshots but deprives the photographer of any control over exposure. If you must choose, select aperture-preferred (automatic speed) as this provides a chance to set the f-stop.
Autofocus is great for snapshots but can present a problem for action and flight shots. The nature of this feature is to focus on something, and all too often it’s not what you’re shooting at. For example, flight shots with autofocus often have a tree or cloud in the background clear as a bell, but the model is out of focus as it flies by.
Automatic film advance is neat for single shots, but if the camera is on continuous advance you can shoot up a roll of film in nothing flat, with none of the shots worth a darn.
Processing
All photoprocessing labs are not equal. Some use their chemistry too long, resulting in “muddy” prints. Some tend to get sloppy in technique. Unfortunately, the only way you can judge is by trial and error.
The place where you drop off the film for processing often sends it to a contractor. If you’re interested, a back issue of Consumer Reports has an excellent piece on this subject.
Covers
This is a different ballgame. The choice of film varies from magazine to magazine and one should check with the publication’s art director to determine their preference.
So Shoot
This cookbook piece has likely left you wanting more detailed explanations. Make a trip to your local library to check out any of the many excellent books on basic photography.
I hope I’ve provided enough insight into photography that you will be encouraged to take some pictures of what you’re flying for fun, and mail them to us.
Transcribed from original scans by AI. Minor OCR errors may remain.

