

Flying for Fun
D.B. Mathews
909 North Maize Rd., Townhouse 734, Wichita KS 67212
Nostalgia
The conventional explanation for the interest in Old-Timer Free Flight (FF), Jimmie Allen designs, NosGas (Nostalgia Gas FF), Control Line (CL) Old-Time Stunt, Vintage Radio Control (RC), etc., is a common desire to recreate a bygone era.
A recent series of experiences has caused me to reexamine that rationalization, while adding a twist to my thinking. Could those of us with an interest in recreating models of our youth be motivated by a desire to overcome some less-than-pleasant memories?
Seldom are we presented with an opportunity to alter errors of the past, but we can through building and flying such model airplanes. We have the opportunity to build designs that were beyond our skills and/or financial means, and fly them in ways that were beyond our wildest dreams.
My joy in revisiting the classic Rudder Bug, related in a construction article in the May 1998 issue, is a perfect example.
Returning to modeling projects that were glorious failures in an earlier time, and successfully building and flying them, is a pleasure almost beyond description. Those who have successfully revisited their past failures understand this sense of redemption; those who have not, really should—it's great fun! You'll probably be astounded by how much you've learned, and how much more skilled you are.
My June 1999 column described my frustrations with attempting to build model airplanes using the designs and kits of the WWII era. Several readers have subsequently written to relate their struggles with the kits of that time. We felt that our failures were primarily associated with a lack of building skills and adult guidance, and the poor materials available then were a secondary factor.
Bill Schmidt had many similar experiences during that time period, and he decided to apply his contemporary building skills and knowledge to projects that were total failures in his youth. That darn guy has convinced me that we weren't total klutzes as kids after all!
Bill tried to build something from the wartime years that was beyond most of us youngsters at that time: Cleveland Scale models. Say that to most builders with memories of back then, and they immediately conjure up visions of multiple formers and a jillion stringers! Cleveland designs were gorgeous, but terrifically challenging.
I tried a Cleveland P-39 kit in 1944, at age 12, and I did complete most of the fuselage. It should have been covered in yellow, with Chiquita™ labels on the sides! My buddies and I had similar experiences with other kits of the era.
Bill shared those same miserable memories with me, and he shared his discovery that not all of the problems were completely the fault of the builder and the materials.
Many scale FF model kits of that era were constructed by building half of the fuselage flat on the board, then building the other half, then joining the two at the centerline. This technique is commonly called "half shell" construction.
Bill learned that it is virtually impossible to construct a multistringered fuselage that way with the wood sizes used back then, and have it come out straight and true. The built-in stresses created by gluing all of the formers and stringers on each side of a fuselage at one time are relieved when it is removed from the building board, introducing distortions in all three planes.
What a relief! If Bill can't build those fuselages true today, with carefully selected balsa and modern adhesives, only those with incredible skills could have done so back then.
I'm open to rebuttals, and I would love to hear from anyone who successfully completed a Cleveland Industrial Training (IT) series kit at 10–15 years of age, without adult help.
The Solution
Last month I presented Bill Schmidt's Popsicle® stick technique, which he uses to build straight-and-true multistringered fuselages. Originally developed for a series of wonderful rubber-powered scale designs that Bill has been publishing in another magazine, the system works equally well on ancient kit designs, and would work very well for complex CL and RC construction. Consider the potential for creating contemporary mini electric FF and RC models from some of those enchanting designs of the past—particularly with the ability to build them straight and true.
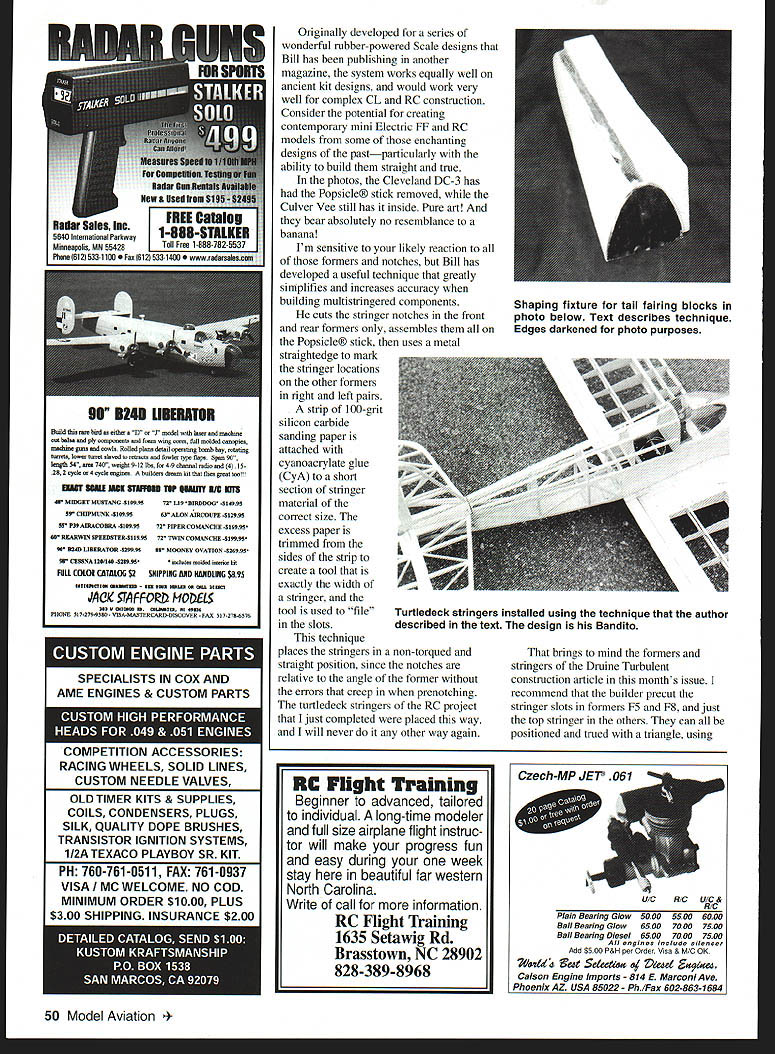
In the photos, the Cleveland DC-3 has had the Popsicle® stick removed, while the Culver Vee still has it inside. Pure art! And they bear absolutely no resemblance to a banana!
I'm sensitive to your likely reaction to all of those formers and notches, but Bill has developed a useful technique that greatly simplifies and increases accuracy when building multistringered components.
He cuts the stringer notches in the front and rear formers only, assembles them all on the Popsicle® stick, then uses a metal straightedge to mark the stringer locations on the other formers in right-and-left pairs.
A strip of 100-grit silicon carbide sanding paper is attached with cyanoacrylate glue (CYA) to a short section of stringer material of the correct size. The excess paper is trimmed from the sides of the strip to create a tool that is exactly the width of a stringer, and the tool is used to "file" in the slots.
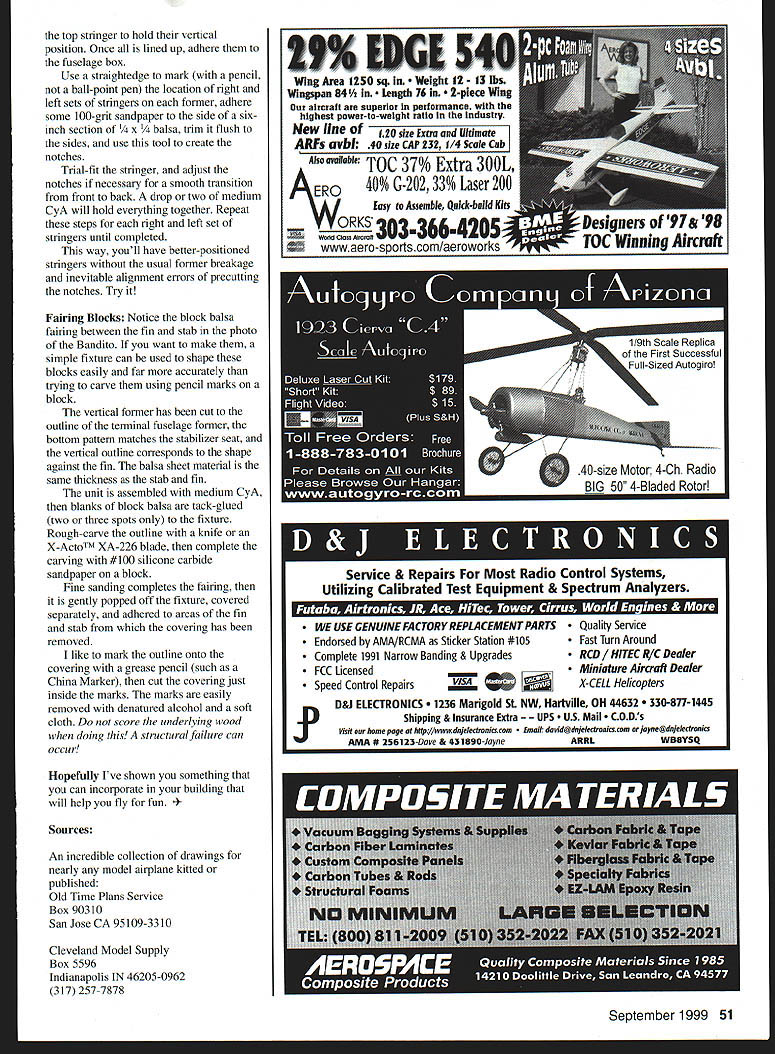
This technique places the stringers in a non-torqued and straight position, since the notches are relative to the angle of the former without the errors that creep in when prenotching. The turtledeck stringers of the RC project that I just completed were placed this way, and I will never do it any other way again.
That brings to mind the formers and stringers of the Druine Turbulent construction article in this month's issue. I recommend that the builder pre-cut the stringer slots in formers F5 and F8, and just top-notch the others. They can all be positioned and trued with a triangle, using the top stringer to hold their vertical position. Once all is lined up, adhere them to the fuselage box.
Use a straightedge to mark (with a pencil, not a ball-point pen) the location of right and left sets of stringers on each former. Adhere some 100-grit sandpaper to the side of a six-inch section of 1/4 x 3/4 balsa, trim it flush to the sides, and use this tool to create the notches.
Trial-fit the stringer, and adjust the notches if necessary for a smooth transition from front to back. A drop or two of medium CYA will hold everything together. Repeat these steps for each right-and-left set of stringers until completed.
This way, you'll have better-positioned stringers without the usual former breakage and inevitable alignment errors of precutting the notches. Try it!
Fairing Blocks
Notice the block balsa fairing between the fin and stab in the photo of the Bandit. If you want to make them, a simple fixture can be used to shape these blocks easily and far more accurately than trying to carve them using pencil marks on a block.
The vertical former has been cut to the outline of the terminal fuselage former, the bottom pattern matches the stabilizer seat, and the vertical outline corresponds to the shape against the fin. The balsa sheet material is the same thickness as the stab and fin.
The unit is assembled with medium CYA, then blanks of block balsa are tack-glued (two or three spots only) to the fixture. Rough-carve the outline with a knife or an X-Acto™ XA-226 blade, then complete the carving with #100 silicon carbide sandpaper on a block.
Fine sanding completes the fairing, then it is gently popped off the fixture, covered separately, and adhered to areas of the fin and stab from which the covering has been removed.
I like to mark the outline onto the covering with a grease pencil (such as a China Marker), then cut the covering just inside the marks. The marks are easily removed with denatured alcohol and a soft cloth. Do not score the underlying wood when doing this! A structural failure can occur.
Hopefully I've shown you something that will help you incorporate in your building that will help you fly for fun.
Sources
- Old Timer Plans Service, Box 90310, San Jose CA 95190-3310
- Cleveland Model Supply, Box 5596, Indianapolis IN 46205-0962, (317) 257-7878
Transcribed from original scans by AI. Minor OCR errors may remain.

