

EXITING THE TUNNEL
I've read somewhere (James Michener?) that Scandinavians refer to autumn as "entering the tunnel" and spring as "exiting the tunnel." Considering that in their far northern latitudes the sun neither rises in the winter months nor sets in the summer, the description seems appropriate, doesn't it?
Well, by golly, despite the gloomiest predictions, we're exiting the tunnel and it's flying time again! Actually, this winter has been the second mildest in my area's history, so I haven't had a bad ride through that tunnel at all. I hope your part of the world enjoyed a similar ride.
ON THE WATER FRONT
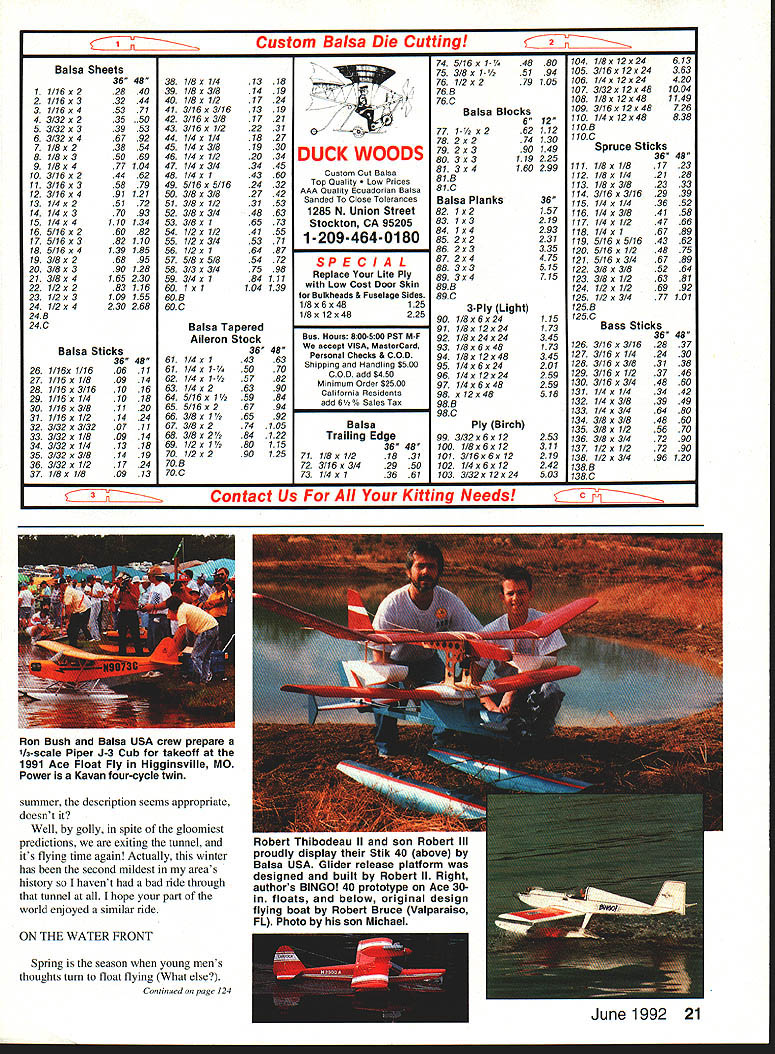
Spring is the season when young men's thoughts turn to float flying (what else?). This is the time of year I invariably get all revved up over the upcoming Ace Float Fly in Higginsville, MO. It's held the first weekend of June. Admittedly, I rave about this activity every year, but I do so justifiably. This event is wonderfully multifaceted and enjoyable; it has become something of a tradition for many of us. The Float Fly is great fun for everyone, fliers and spectators alike. I'd suspect many other areas of the country have similar activities that are every bit as much fun.
WHY ROW (Rise Off Water)
Considering how many local, state, and national parks have lakes, ponds, rivers, creeks (pronounced "crick" in my part of the world), and other forms of water set aside for recreational use, suitable sites for models flying off the water are plentiful. As always, it behooves modelers to be considerate of others who are sharing the facility. My local lake is part of a county-operated multi-use park, which also includes a grass runway and frequency board for wheel RC flying. We have a gentlemen's agreement that we will not fly during the hours campers would be sleeping; we also try not to fly model aircraft and pleasure boats at the same time, keep our engines well muffled, and stay out of the fishermen's territories. So far, because of our efforts, park management is very friendly toward us.
You might wonder how we control frequencies in a multi-use setup like ours. After all, we are flying off the water just down the road from the ground fliers. We've evolved a system by which a note is placed on the frequency board advising that we are water flying on that frequency. If someone needs to share the number with us, we work out a half-hour window system with them. For example, we may use the number from 12:00 to 12:30 and they get it from 12:30 to 1:00. It works just fine, except the ground fliers usually end up watching us rather than flying! We've had only one wheels-float complaint in three years.
Flying on floats not only presents a challenge to our piloting skills (including learning some new ones), it also presents new learning experiences in construction and engineering. Some writers make the requirements sound so difficult that they frighten potential float fliers out of trying. My limited experience indicates that float design is not terribly critical. All you need to do is keep the model from sinking! Well, not quite, but if you are aligned to run parallel with the datum line of the wing airfoil, track straight through the water with no toe-in or toe-out, and are rigid enough not to flex up and down or side to side, it'll work.
FLOAT DESIGN
Admittedly, some floats feature complex curvatures that would challenge the hull designers of America's Cup yachts, yet I personally don't find any need for this complexity. My first adventure with RC off-water flying was with floats developed by Dr. Paul Schlegel of Gunnison, Colorado. He cuts them out of foam and they are not only flat-bottomed, they are also neither tapered on top nor very rounded anywhere. Still, they work just fine.
This type of float design is similar to the ones Chuck Cunningham has written about in RCM. Paul covers his with Econocote rather than the packaging tape Chuck uses, but both designs are more akin to garbage scows than yachts. T'ain't for looks!
As float flying has increased in popularity, more commercially produced floats have come on the market:
- Built-up structures like the Sig and Goldberg units.
- Vacuum-formed ABS units like those from Ace.
- Combination units like the Balsa USA floats.
- Molded polypropylene floats.
- Foam floats covered with glass and cloth from John Sullivan and others.
FLOAT ALIGNMENT
A distinct advantage that comes with admitting one knows very little about the subject he is discussing is the immunity from criticism it engenders. On that note I'll try a little different tack on the subject of setting up the floats. We tend to confuse new float fliers by talking about positive/negative angle relative to the wing, so let's try this:
To clarify why the floats need to be nearly parallel to the wing or camber line, consider how the nose gear of a trike-geared wheeled model is set up. If you've ever tried to get a trike-geared model to take off with a too-long nose gear, you can see why the floats should not run level relative to the wing. No matter how much up elevator is applied, the wing in this setup will never get into the airflow at a low enough angle of attack to generate lift. It's in a small stalled alignment all the time! The model will just run off into the distance without ever rising into the air.
On the other hand, if a nose gear is too short, a huge amount of up elevator must be applied to raise the wing leading edge into the airflow far enough to create lift. This will produce a model that tends to stick to the surface like glue, and then suddenly jump into the air. The same principle applies to floats.
The placement of the float step relative to the balance point of the model is also best explained as if wheels were involved. A floatplane takes off by running on the float portion from the step forward just a bit. Think of this area as you would the footprint of the wheels, only broader. Just as with a wheeled model, if the wheel axles (or step) are too far forward relative to the balance point, the model will take off fairly well but jump and skip badly on landings. Conversely, if the axle (or step) is too far aft, the model will usually oscillate wildly and may even ground-loop on takeoff.
That portion of the float that is in contact with the water at takeoff needs to be in the same relationship to the balance point as wheels are—that is, ahead of the balance point, or about under the leading edge of the wing. The takeoff run must allow the rear of the floats to come out of the water with the model running on the step. Just as with wheels, the model won't take off properly if the tail is held down through the takeoff run.
With floats properly positioned relative to the wing and the balance point, landings are actually easier with a floatplane than with wheels. Perhaps the wider landing strip (at least on most lakes and ponds) allows us to get absolutely head-on with the wind on final, or maybe the much longer floats provide many more places for the model to touch down. At any rate, landing a floater isn't nearly as difficult as taking off.
A word of caution: the float landing approach needs to be at a higher speed than that needed on wheels because of the additional drag and weight of the floats. Try flaring higher to slow things down, then position the model just off the surface while reducing power until it sort of slides onto the water. A boat-step float will stall earlier but jump all over the place if it is landed too hot. Just set it up and let it "plop"—don't try to get a wheel landing or a fully stalled one.
POWER
If your model requires full power to get off a grass runway you'll never get it off the water. That is still true. Most .40-sized models will need a .50 or mild .60 for floats. A rule of thumb is that you will need about 25% to 35% more power, depending on weight and drag. Generally, the smaller the model, the more floats will add in weight and drag percentage because the additional landing gear and basic float structure can only be reduced so far.
Another consideration in the power department is the prop. The unavoidable water spray is really tough on wooden props, causing splitting and even blade loss. While I've seen lots of successful float flights made with wooden props, the conventional wisdom is to use molded fiberglass units.
A reliable idle is an absolute must unless you happen to have a boat to use for retrieval, or enjoy swimming while making like a tug boat. I try to set my idle stop for an additional 500 rpm or so, and I want to be absolutely certain the engine will run in that setting for several minutes when using the bottom part of the fuel load.
I don't use a boat or any other recovery device on our local lake; rather, I try to set up on a shore that has the wind blowing toward us and take off straight from the shore into the wind. In that way, if the engine flames out, the wind will eventually push the model back to me. Those neat RC retrieval boats used at the Ace Float Fly just aren't available on most ponds, though one can certainly appreciate them. Landings are entered from behind the takeoff position, approaching over the shore and into the wind. Safety considerations must be observed to protect others flying with you and to keep spectators on the side—not directly behind.
WATER RUDDERS AND SUBFINS
I find it nearly impossible to keep a float model headed into the wind for takeoff without using a water rudder. Additionally, my landings are never so good that they don't require some taxiing back to the launch site. Water rudders can be nothing more complex than a section of tin soldered onto a lengthened tail-wheel wire. They can range from that simple setup to a more complex, servo-driven rudder on the back of the floats. How it's done is not as important as that it is done.
By now you regular readers know I am a cut-and-try designer. I'm sure someone with an engineering background can show formulas to substantiate or refute the next statement; I have only observed it. It would seem that float-equipped high-wing models that utilize a flat-bottomed or a Clark Y-type airfoil usually need subfins added to control yaw—particularly at slow flight speeds. Conversely, mid- or low-wing symmetrical-section models do not.
That confuses me a bit since the classic Charles Grant CLA theory would suggest the added weight and surface area of the floats below the center of lift should make the model more stable. An ancient free-flight scale trick is to add weight to the wheels of a low-wing design to improve yaw stability. So why then are subfins on high-wing Cubs needed? I don't know why; I just know it to be a fact in my experience.
On the other side, my series of kits for Ace R/C show no need for any additional fin area, and this is true of other manufacturers' products of similar configuration.
A TYPICAL SETUP
To tie the above observations into something practical, I thought I'd describe a BINGO! 40 prototype on floats. One pilot I know flew in cold conditions and had spray begin to freeze on the airframe. He retreated to his living room with the model, and after he and it thawed out a bit he tried again. This time he worked the controls vigorously after takeoff in order to shake off the spray before it could freeze. It worked. No touch-and-goes, however—just great fun.
LOW
Robert Thibodeau of Cheltenham, Maryland has given us a new term! If a model doesn't take off (ROW) but lands on the water, shouldn't LOW (lands on water) be the proper term?
One LOW setup I saw used a Balsa USA Super Stik 40 as the power tug powered by a Fox .60. The glider was an Olympic .650. The uncovered foam floats are attached to the wing with saddles and rubber bands. A servo is used to release the glider from the tug while a second pilot guides the glider. Then the tug is landed. At this point something unusual happens: the glider is set down on the water. I'd like to see that—wouldn't you?
Bob expressed a willingness to write up an article on the mechanical and flying aspects of this project; I'd certainly encourage him to do so. Looks like loads of fun!
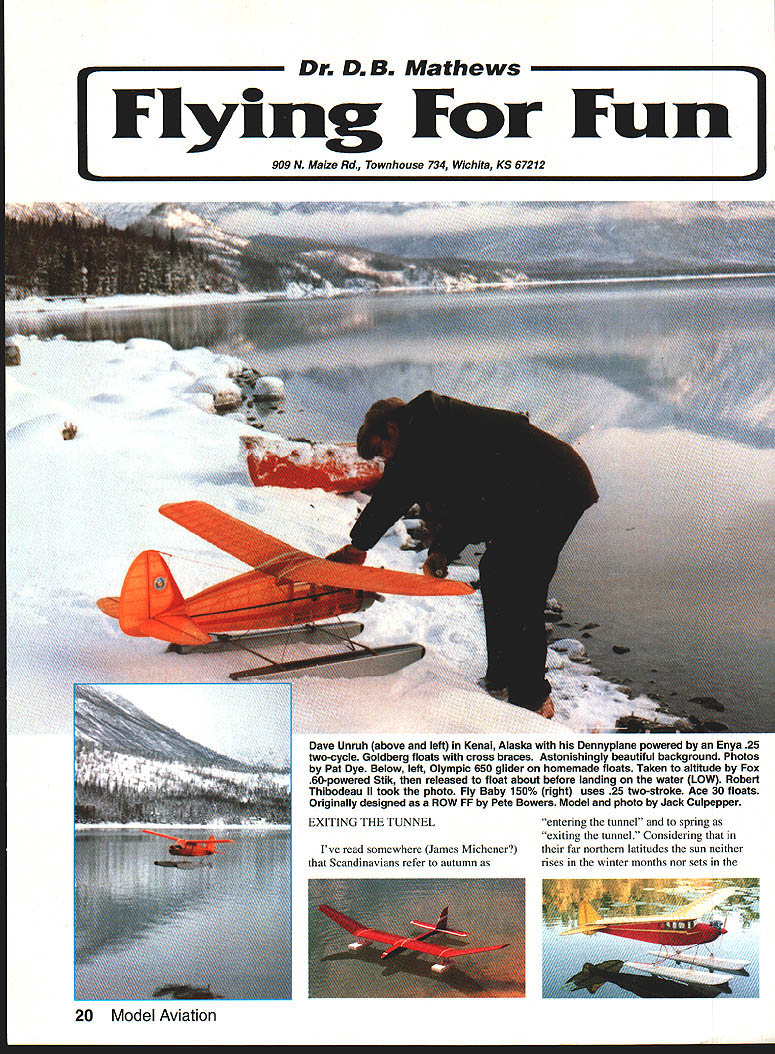
FLY BABY ON FLOATS
I mentioned in an August 1989 "Fly Baby +50%" construction article that the original smaller version had been used by Pete Bowers to set a ROW free-flight endurance record in 1940. The original drawings in Model Airplane News included a float design that was essentially a balsa frame covered with silk. Jack Culpepper of Tullahoma, Tennessee wrote to ask if I had drawings of those original Bowers floats. I recommended he substitute Ace's 30-inch units, which he did.
Jack's model uses an O.S. .25 engine, Sig Koverall on the fuselage, and MonoKote on the wing. He says the takeoff run is 10 ft. on wheels and 80 ft. on floats—there's a message there. Note the rather marked positive angle of attack of the wing relative to the floats! The original design had a subfin configuration, which isn't too hard to understand. The body of water Jack uses is a cooling pond for the large wind tunnel at Arnold AFB.
SO DO IT, ALREADY!
If all this has generated some interest in flying off water, don't be put off by the technical jargon and the perceived difficulties. Believe me, flying off water isn't that tough, and it's a great way to FLY FOR FUN.
Transcribed from original scans by AI. Minor OCR errors may remain.

