

Foam Core EDO 2000 Floats
Ed Westwood
If you have access to a hot-wire setup and a bandsaw, these floats are a snap—well, almost anyway.
The concept is to cut the cores down the middle before hot-wiring. Once the constant-curvature top contour is done, the floats are parted and the keel outline is drawn and cut to a bevel on the bandsaw. The halves are glued back together and finished.
Begin by sizing four 3 x 6 x 32-inch one-pound-density white-foam blocks. (6 x 6 blocks can be sawed in two with a bandsaw for this.) If the cut isn't perfect, it won't matter, as long as the halves are marked for matching.
Secure the blocks back together and fix the contour patterns on each end; I use aluminum roofing nails to accomplish this. A couple of long pins will secure the bottom. Remember not to pin where the wire will travel.
The constant-curvature top profile is then hot-wired out and the two sides are separated. The keel profile is then measured and drawn on the inside of a core half with a felt-tip pen.
With the bandsaw table set at 20°, the float-half keel contour is cut out. The core half must be secured in its flashing to hold the angle and provide a flat cutting surface. The profile is transferred to the other core half and the procedure is repeated.
With the halves still secured in their flashings, the top "flats" are measured from the bow, marked, and cut to the required depth. The saw can also be used to rout the flats out by making several cuts traversing the core from side to side. Should additional keel support be deemed necessary, slight depressions are sanded in and the support glued to one side. Joining is done with Titebond and a few long pins to hold the halves together (and in alignment) while the glue sets up.
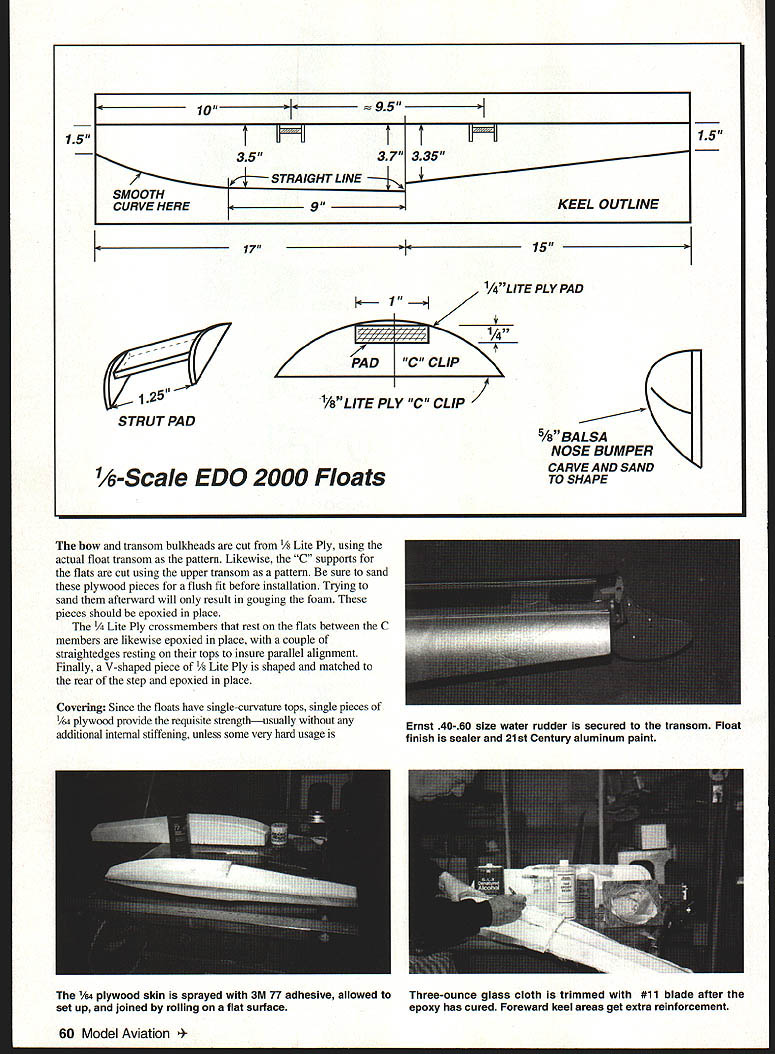
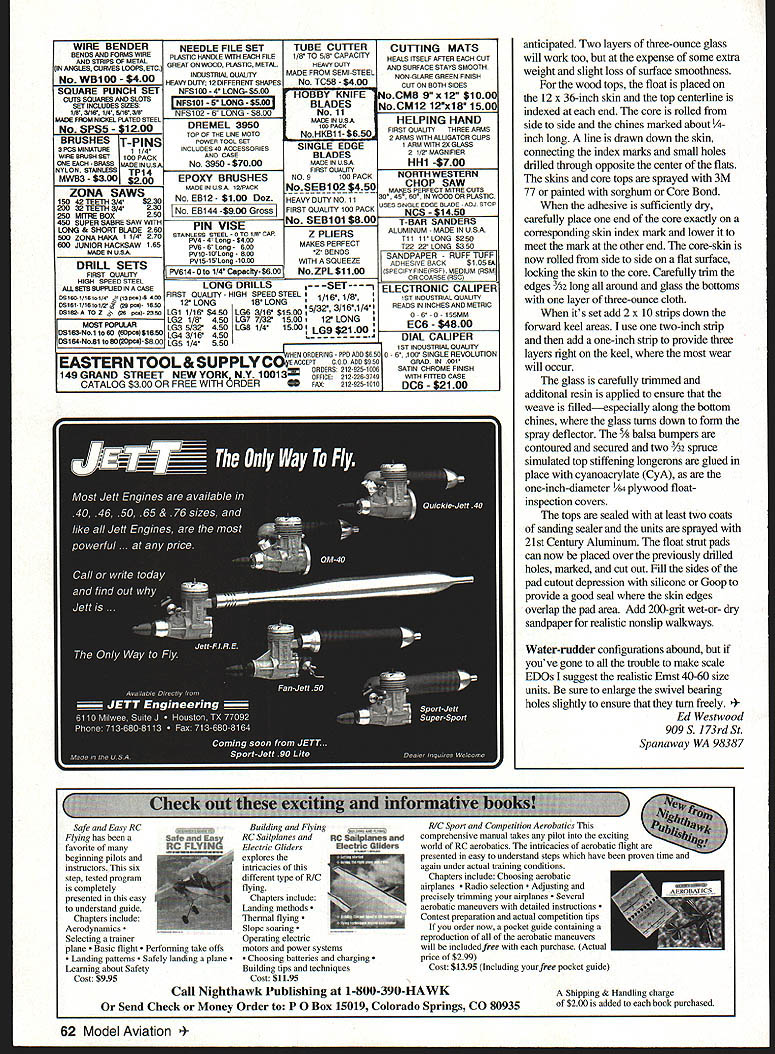
The bow and transom bulkheads are cut from 1/8" lite plywood, using the actual float transom as the pattern. Likewise, the "C" supports for the flats are cut using the upper transom as a pattern. Be sure to sand these plywood pieces for a flush fit before installation. Trying to sand them afterward will only result in gouging the foam. These pieces should be epoxied in place.
The 1/4" lite-ply crossmembers that rest on the flats between the C members are likewise epoxied in place, with a couple of straightedges resting on their tops to ensure parallel alignment. Finally, a V-shaped piece of 1/8" lite ply is shaped and matched to the rear of the step and epoxied in place.
Covering
Since the floats have single-curvature tops, single pieces of 1/64" plywood provide the requisite strength—usually without any additional internal stiffening, unless very hard usage is anticipated. Two layers of 3-ounce glass will work, too, but at the expense of some extra weight and a slight loss of surface smoothness.
For wood tops:
- Place the float on a 12 x 36-inch skin and index the top centerline at each end.
- Roll the core from side to side and mark the chines about 1/8" long.
- Draw a line down the skin connecting the index marks and drill small holes through opposite the center of the flats.
- Spray the skins and core tops with 3M 77 or paint with solvent or Core-Bond.
- When the adhesive is sufficiently dry, carefully place one end of the core exactly on the corresponding skin index mark and lower it to meet the mark at the other end.
- Roll the core-skin from side to side on a flat surface, locking the skin to the core.
- Carefully trim the edges 3/32" long all around and glass the bottoms with one layer of 3-ounce cloth.
When the glass is set, add strips down the forward keel area: I use one 2-inch strip and then add a 1-inch strip to provide three layers right on the keel where the most wear will occur.
Trim the glass carefully and apply additional resin to ensure the edges are well sealed—especially along the bottom chines, where the glass turns down to form the spray deflector. Contour and secure 5/8" balsa bumpers. Glue two 3/32" spruce simulated stop-stiffening longerons in place with cyanoacrylate (CYA), as are the 1" diameter inspection covers cut from 1/4" plywood.
Seal the tops with at least two coats of sanding sealer and spray the units with 21st Century Aluminum. Place the float strut pads over the previously drilled holes, mark and cut out. Fill the sides of the pad cutout depression with silicone or Goop to provide a good seal where the skin edges overlap the pad area. Add 200-grit wet-or-dry sandpaper for realistic nonslip walkways.
Water-rudder configurations abound, but if you're going to go to all the trouble to make scale EDOs I suggest the realistic Ernst 40–60 size units. Be sure to enlarge the swivel-bearing holes slightly to ensure that they turn freely.
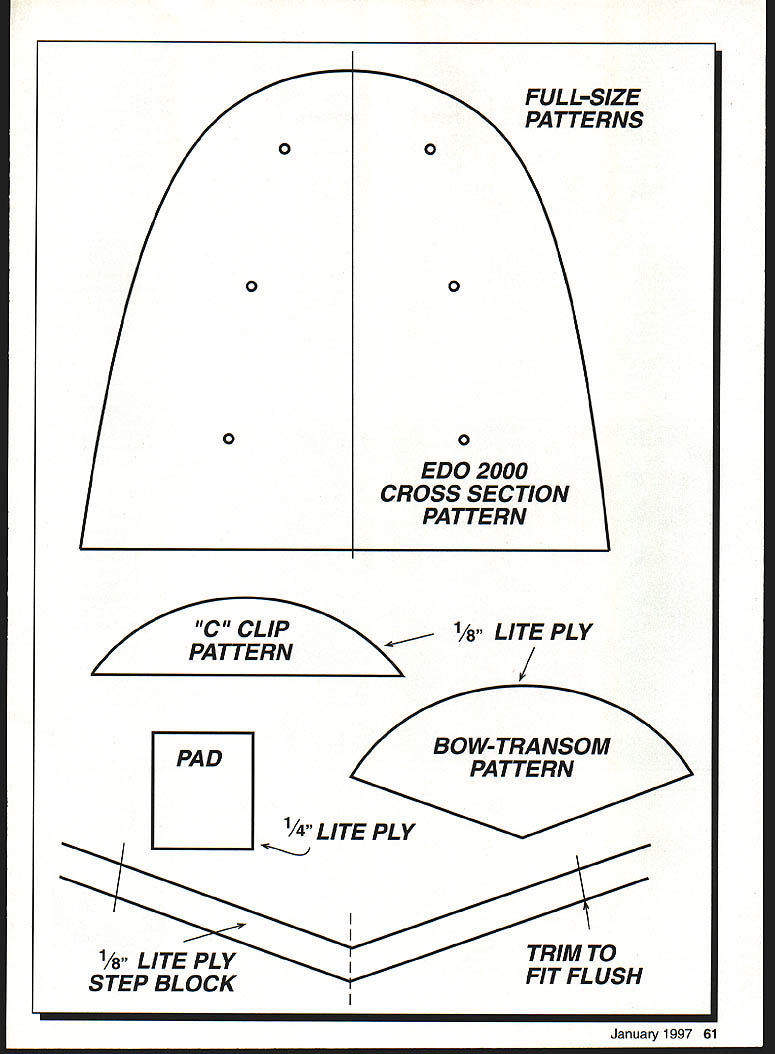
Full-Size Patterns
- EDO 2000 cross-section pattern
- "C" clip pattern (1/8" lite ply)
- Pad (1/8" lite ply)
- Bow-transom pattern (1/4" lite ply)
- Step block (1/8" lite ply) — trim to fit flush
Ed Westwood 905 S. 173rd St. Spanaway, WA 98387
Transcribed from original scans by AI. Minor OCR errors may remain.

