


Foam Cutting Made Easy
Now there's an easier way to fashion those replacement foam wings. This homemade foam cutter is inexpensive to make and simple to use.
Carl Dunaway
Introduction
Cutting a foam wing, or any part of a model airplane for that matter, can be a lot easier than you think. There's no need to buy a foam-cutting kit or an expensive power supply such as a Variac transformer. Here's an innovative way that will save you some money.
As with any do-it-yourself method, all it takes is a little patience and a halfway steady hand. All the items you'll need for your complete home foam-cutting workshop are listed below. The costliest piece of equipment is a simple 12-volt battery charger. What follows is a basic how-to presentation with no technical jargon. Even relative newcomers to the hobby should have no difficulties understanding it.
Why cut foam wings?
If you've ever destroyed the wing on your balsa-and-ply model, you know the problem: ready-cut pieces such as ribs are often not available at hobby shops. Rebuilding by tracing and hand-cutting ribs is time-consuming; band-sawing requires templates and a band saw. Many modelers will pay high prices for wing kits, but an easier alternative is to cut your own wings from foam.
Foam-cutting is quick, produces consistent parts, and can be used for replacement wings or other model parts.
Materials and tools
- 1 x 3-in. pine stock, 40 in. long (No. 2 pine is acceptable and economical)
- Two standard metal shelf brackets (10–12 in. size)
- Electrical tape
- Wire for cutting:
- Recommended: welding wire (copper-jacketed steel) .023 in.
- Alternative: solid stainless-steel fishing leader, .020–.025 in. (not braided)
- Optional: nickel-chromium wire (expensive but effective)
- Small paper clip or short piece of heavier-gauge solid wire (for attachment loop)
- Small, reasonably strong spring (for tensioning)
- 16-gauge lamp cord (or similar) to run from power supply to bow
- Alligator clips
- Battery charger (power supply) with ammeter — e.g., Sears model 934.503050 (10/2/50-amp charger)
- Scrap plywood for a cutting board, nails or pins to secure foam
- Templates (material depends on reuse needs: cardboard, formica, or metal)
- Round toothpicks or small dowels (to hold templates)
- Basic hand tools: drill, screws/bolts, pliers, vise, sandpaper
Build the foam-cutting bow
- Cut a 40-in. length of 1 x 3-in. pine stock.
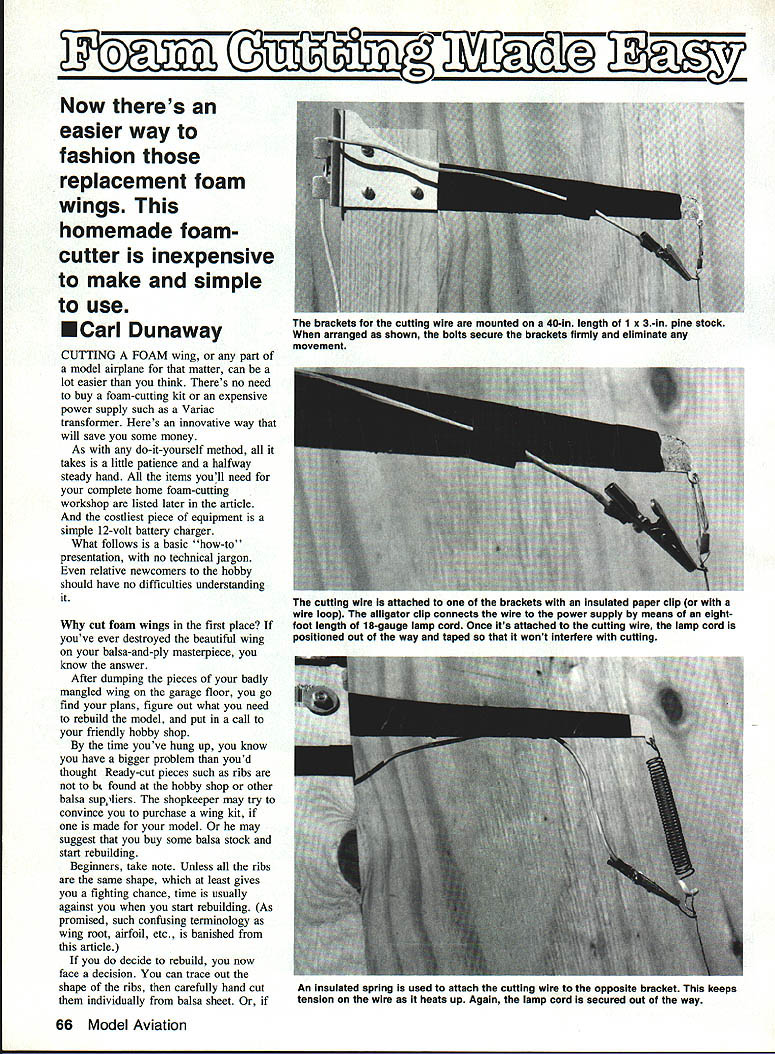
- Obtain two metal shelf brackets (10–12 in.). Drill three 1/4-in. holes in the broad end of each bracket to accept wood screws or bolts for fastening to the wood. Drill a 1/8-in. hole in the narrow end of each bracket for the cutting-wire attachment.
- Mount one bracket at one end of the board. Measure about 38 in. from that bracket and mount the other bracket at the opposite end. Face the brackets inward toward each other.
- Wrap the part of each bracket that fastens to the wood with electrical tape, running the tape from the bracket where it meets the wood down to the bottom. This insulates and protects the wood and provides a better mounting surface.
- Thread a small paper clip or a short loop of heavier wire through each 1/8-in. hole to serve as the attachment point for the cutting wire. Insulate the loop where the cutting wire will contact it (electrical tape or stripped insulation from 18-gauge wire works fine).
- Attach a small, strong spring to one of the loops; insulate the end where the cutting wire will be connected. The spring provides tension; choose one with good tension and cut it shorter if too long.
Choose and prepare the cutting wire
- Inspect the cutting wire for kinks or bends. Place one end in a vise and sight down its length while gently pulling to check for straightness. Remove kinks by bending with your fingers.
- Attach one end of the cutting wire to the paper-clip loop and twist a few times for security.
- Stretch the spring (use pliers) and attach the other end of the cutting wire to the spring.
- The effective wire length should be about 30–36 in.; this is the maximum cut length you'll comfortably work with.
Wire recommendations:
- Welding wire (Mig welding wire) .023 in., copper-jacketed steel: good choice; it resists sagging when heated. Do not use galvanized wire.
- Solid stainless-steel fishing leader: use solid (not braided) wire, diameter about .020–.025 in.
- Nickel-chromium (NiCr) wire: effective but more expensive.
Wiring and power supply
- Run a length of 16-gauge lamp cord from the power supply to one end of the bow. Secure the cord out of the way with tape so it won't interfere with cutting.
- Strip one end of the lamp cord and attach an alligator clip. Connect that clip to the cutting wire (or to the attachment clip on the bow).
- Strip and clip another length of lamp cord and attach it to the cutting wire at the spring end. Attach alligator clips to the free ends of both lamp cords for connection to the battery charger.
- Use a battery charger with an ammeter. The ammeter is essential to monitor current draw; too many amps will overheat the wire and burn the foam, producing uneven cuts.
- Set the charger low for cutting; the author sets it at about 2 amps. Typical cutting current is between 2 and 4 amps depending on wire and foam.
- Lay the bow down so the cutting wire isn't touching anything. Clamp one charger lead to the positive clamp and the other to the negative clamp. Make sure the clamps cannot touch each other while working.
- Turn on the charger and test on a small scrap of foam. The wire will heat quickly — do not touch it.
Safety note: The hot wire will burn you. Keep fingers and flammable materials well away. Work in a well-ventilated area.
Making templates
- Foam sheet sizes vary; the author uses 2-in.-thick bead foam in 2 x 3-ft. pieces. Insulating bead foam and other types will also work — experiment to find what you prefer.
- Choose template material according to reuse and required accuracy:
- Reusable, even cuts: formica or metal templates.
- One-off or simple templates: cardboard or scrap wood.
- Trace and notch templates for spars and other features. To attach templates to the bow, glue short round toothpicks or sticks to the template ends so about half their length extends beyond the template. These will help position and hold the template in the foam.
Preparing the cutting board
- Use a cutting board (scrap plywood) and drive several nails through it to act as pins to secure foam and templates.
- Position templates at each end of the foam blank and pin them firmly.
- Push the foam down so it's snug on the cutting board.
Cutting the foam
- Mold the bow to match the template curvature and lay the cutting wire across the template prongs.
- Gently slide the hot wire into the foam and allow it to melt through on its own. Apply only enough guide pressure to keep the wire moving; do not force it.
- For spar notches and detailed areas, proceed slowly and patiently. Forcing the wire causes poor cuts.
- It's suggested to start at the trailing edge and move forward, but you can use whatever direction is comfortable.
- Cut one half (top or bottom), then turn the foam and cut the other side.
- For the other wing half, set up templates on a second foam blank and repeat.
- Lightly sand and finish the foam wing as needed.
Final notes
- Foam-cutting with a simple bow is inexpensive and versatile; you can cut wings and many other model parts.
- An ammeter-equipped charger and proper wire selection are key to consistent results.
- Experiment with foam types and wire tensions to get the best finish.
Acknowledgments: Thanks to Paul Ross (Lakeside) and Doug Wilsman (Ramona) for helpful suggestions.
Contact: For additional information, write to Carl Dunaway at 310 N. Hunter St., Ramona, CA 92065. Include a SASE for a reply.
Transcribed from original scans by AI. Minor OCR errors may remain.

