
FOAM FOR SMALL MODELS
Paul McIlrath
Builders of commercial and homebuilt full-scale airplanes use foam extensively. Foam-core wings are routine in radio control and control line. Ready-to-fly models, kiddies' toys, and fast-food meals have been using plastic foam for 20 years or more. But the acceptance of foam by builders of small models has been very slow.
There are reasons for this. Some are obvious engineering reasons and some are more psychological. I won't go into the psychological reasons, with one exception:
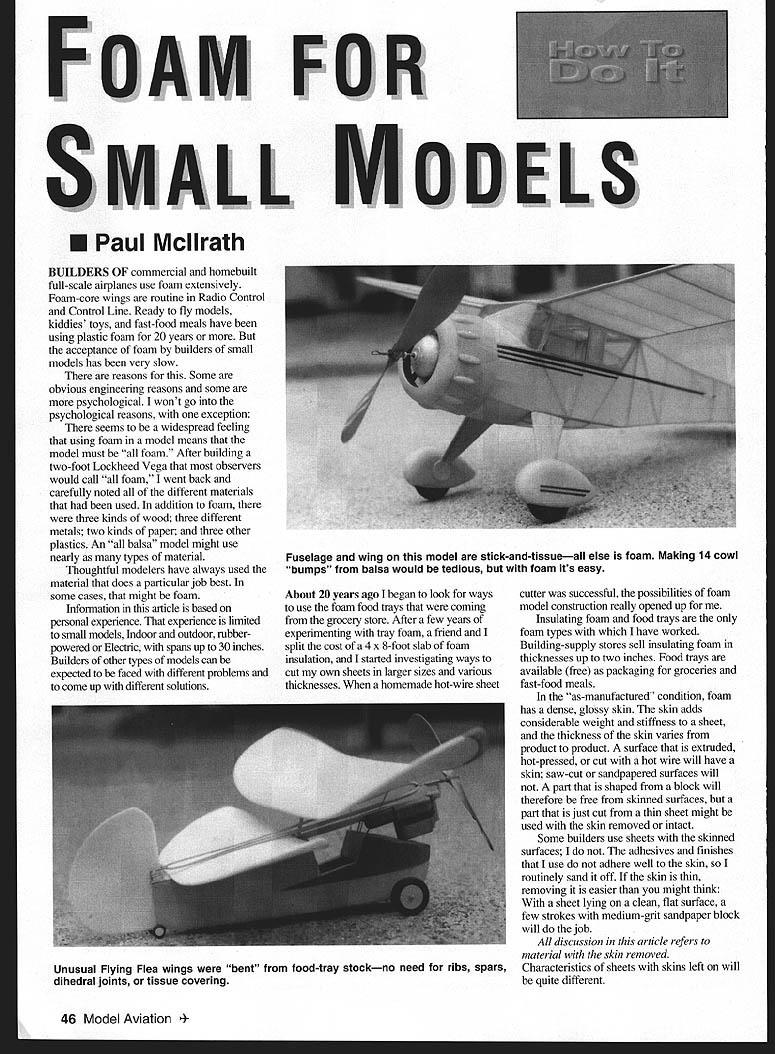
There seems to be a widespread feeling that using foam in a model means that the model must be "all foam." After building a two-foot Lockheed Vega that most observers would call "all foam," I went back and carefully noted all the different materials that had been used. In addition to foam, there were three kinds of wood; three different metals; two kinds of paper; and three other plastics. An "all balsa" model might use nearly as many types of material.
Thoughtful modelers have always used the material that does a particular job best. In some cases, that might be foam.
Information in this article is based on personal experience. That experience is limited to small models, indoor and outdoor, rubber-powered or electric, with spans up to 30 inches. Builders of other types of models can be expected to be faced with different problems and to come up with different solutions.
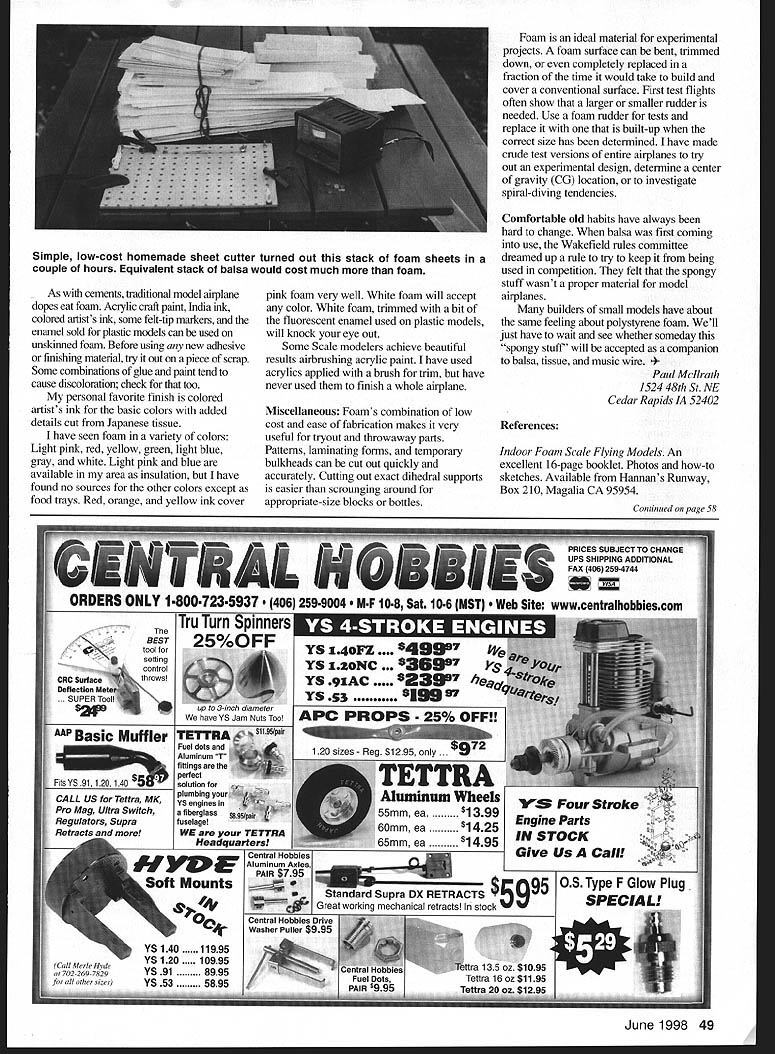
About 20 years ago I began to look for ways to use the foam food trays that were coming from the grocery store. After a few years of experimenting with tray foam, a friend and I split the cost of a 4 x 8-foot slab of foam insulation, and I started investigating ways to cut my own sheets in larger sizes and various thicknesses. When a homemade hot-wire sheet cutter was successful, the possibilities of foam model construction really opened up for me.
Insulating foam and food trays are the only foam types with which I have worked. Building-supply stores sell insulating foam in thicknesses up to two inches. Food trays are available (free) as packaging for groceries and fast-food meals.
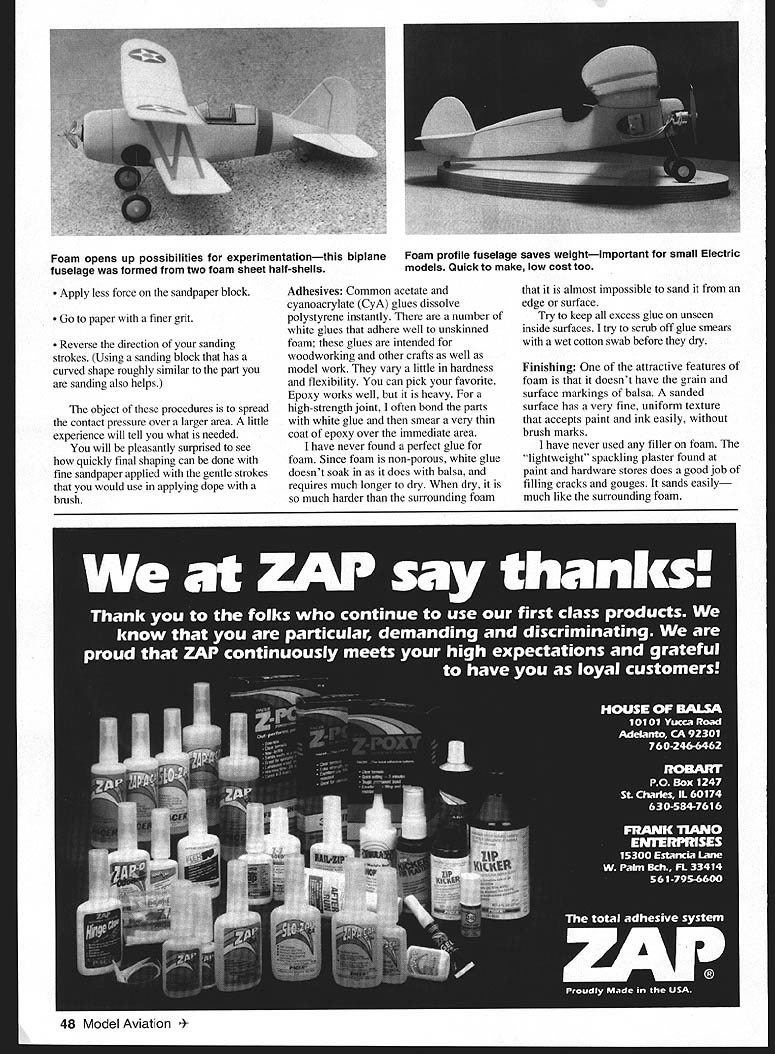
In the "as-manufactured" condition, foam has a dense, glossy skin. The skin adds considerable weight and stiffness to a sheet, and the thickness of the skin varies from product to product. A surface that is extruded, hot-pressed, or cut with a hot wire will have a skin; saw-cut or sandpapered surfaces will not. A part that is shaped from a block will therefore be free from skinned surfaces, but a part that is just cut from a thin sheet might be used with the skin removed or intact.
Some builders use sheets with the skinned surfaces; I do not. The adhesives and finishes that I use do not adhere well to the skin, so I routinely sand it off. If the skin is thin, removing it is easier than you might think: with a sheet lying on a clean, flat surface, a few strokes with a medium-grit sandpaper block will do the job.
All discussion in this article refers to material with the skin removed.
Characteristics of sheets with skins left on will be quite different.
Sources
Some American hobby suppliers are beginning to offer foam-form sheets. Two such sources are listed at the end of the article. Other sources of foam already mentioned are food trays and making your own sheets using a homemade hot-wire cutter or a scroll saw fitted with a fine-tooth blade.
Cost
A purchased slab of insulation costs about the same as a single sheet of model-building size. If a family devours a lot of groceries, food trays can be considered free. Costs from hobby sources may vary; foam will probably be cheaper than balsa.
Weight
Balsa weighs about four to fifteen pounds per cubic foot. Unskinned foam weighs about two pounds per cubic foot. Thin sheets with skin still might weigh four to seven pounds per cubic foot, depending on the thickness of the skins.
Strength
It's hard to make an exact comparison of strength of foam versus balsa. In sheet applications you usually make a foam part 1-1/2 to 2 times the thickness called out in balsa. Unstressed parts made from blocks, like headrests and air scoops, can be substituted with foam for a good saving in weight without harmful consequences. An entire fuselage can be carved from foam blocks; high-stress areas like wing or landing-gear attachment points will require some internal reinforcement—spars, longerons, stick balsa.
Cutting and shaping
When your use of foam starts to increase, you might want to make a hot-wire cutter for cutting your own sheets in various thicknesses. Otherwise, common tools used for balsa can be used on foam. However, tools must be sharp; a dull tool will just mash the material, just as it would on very soft balsa. Foam is easy to sand; sandpaper blocks will quickly become the number-one tool. A foam part can be shaped in a fraction of the time.
But like cutting tools, sandpaper must be sharp and clean. "Sawdust" (foam dust) should often be brushed from the part and from the cutting surface of the sandpaper. The sandpaper requires frequent vigorous cleaning. Although foam seems soft, it dulls sandpaper and edged tools rather quickly. Blades must be sharpened or replaced regularly.
A lighter touch is required for sanding foam than for balsa, and sometimes an ugly-looking scuff mark will unexpectedly appear on the part you are sanding. When this happens, stop sanding immediately and do one or more of these things before resuming:
- Inspect and clean the surfaces of the part and the sandpaper, removing any loose or embedded material.
- Apply less force on the sandpaper block.
- Go to paper with a finer grit.
- Reverse the direction of your sanding strokes. (Using a sanding block that has a curved shape roughly similar to the part you are sanding also helps.)
The object of these procedures is to spread the contact pressure over a larger area. A little experience will tell you what is needed.
You will be pleasantly surprised to see how quickly final shaping can be done with fine sandpaper applied with the gentle strokes that you would use in applying dope with a brush.
Adhesives
Common acetate and cyanoacrylate (CA) glues dissolve polystyrene instantly. There are a number of white glues that adhere well to unskinned foam; these glues are intended for woodworking and other crafts as well as model work. They vary a little in hardness and flexibility. You can pick your favorite. Epoxy works well, but it is heavy. For a high-strength joint, I often bond the parts with white glue and then smear a very thin coat of epoxy over the immediate area.
I have never found a perfect glue for foam. Since foam is non-porous, white glue doesn't soak in as it does with balsa, and requires much longer to dry. When dry, it is so much harder than the surrounding foam that it is almost impossible to sand it from an edge or surface. Try to keep all excess glue on unseen inside surfaces. I try to scrub off glue smears with a wet cotton swab before they dry.
Finishing
One of the attractive features of foam is that it doesn't have the grain and surface markings of balsa. A sanded surface has a very fine, uniform texture that accepts paint and ink easily, without brush marks.
I have never used any filler on foam. The "lightweight" spackling plaster found at paint and hardware stores does a good job of filling cracks and gouges. It sands easily—much like the surrounding foam.
As with cements, traditional model airplane dopes eat foam. Acrylic craft paint, India ink, colored artist's ink, some felt-tip markers, and the enamel sold for plastic models can be used on unskinned foam. Before using any new adhesive or finishing material, try it out on a piece of scrap. Some combinations of glue and paint tend to cause discoloration; check for that too.
My personal favorite finish is colored artist's ink for the basic colors with added details cut from Japanese tissue.
I have seen foam in a variety of colors: light pink, red, yellow, green, light blue, gray, and white. Light pink and blue are available in my area as insulation, but I have found no sources for the other colors except as food trays. Red, orange, and yellow ink cover pink foam very well. White foam will accept any color. White foam, trimmed with a bit of the fluorescent enamel used on plastic models, will knock your eye out.
Some scale modelers achieve beautiful results airbrushing acrylic paint. I have used acrylics applied with a brush for trim, but have never used them to finish a whole airplane.
Miscellaneous
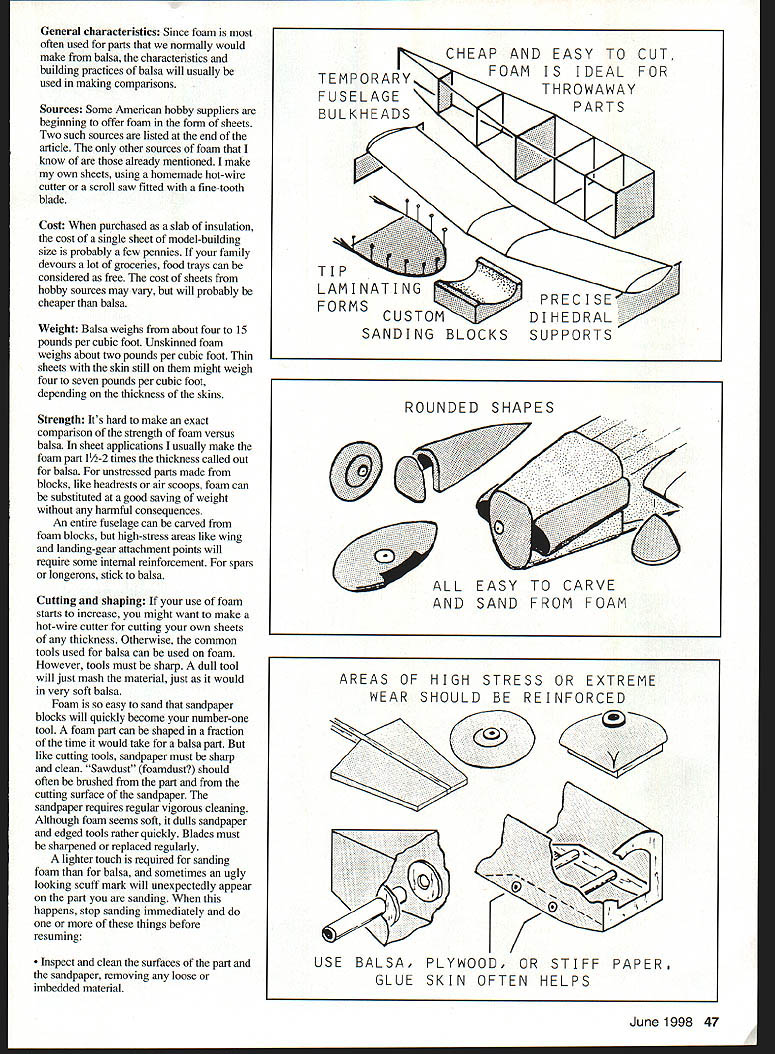
Foam's combination of low cost and ease of fabrication makes it very useful for tryout and throwaway parts. Patterns, laminating forms, and temporary bulkheads can be cut out quickly and accurately. Cutting out exact dihedral supports is easier than scrounging around for appropriate-size blocks or bottles.
Foam is an ideal material for experimental projects. A foam surface can be bent, trimmed down, or even completely replaced in a fraction of the time it would take to build and cover a conventional surface. First test flights often show that a larger or smaller rudder is needed. Use a foam rudder for tests and replace it with one that is built-up when the correct size has been determined. I have made crude test versions of entire airplanes to try out an experimental design, determine a center of gravity (CG) location, or to investigate spiral-diving tendencies.
Comfortable old habits have always been hard to change. When balsa was first coming into use, the Wakefield rules committee dreamed up a rule to try to keep it from being used in competition. They felt that the spongy stuff wasn't a proper material for model airplanes.
Many builders of small models have about the same feeling about polystyrene foam. We'll just have to wait and see whether someday this "spongy stuff" will be accepted as a companion to balsa, tissue, and music wire.
— Paul McIlrath 1524 48th St. NE Cedar Rapids, IA 52402
References
- Indoor Foam Scale Flying Models. An excellent 16-page booklet. Photos and how-to sketches. Available from Hanan's Runway, Box 210, Magalia, CA 95954.
Transcribed from original scans by AI. Minor OCR errors may remain.

