
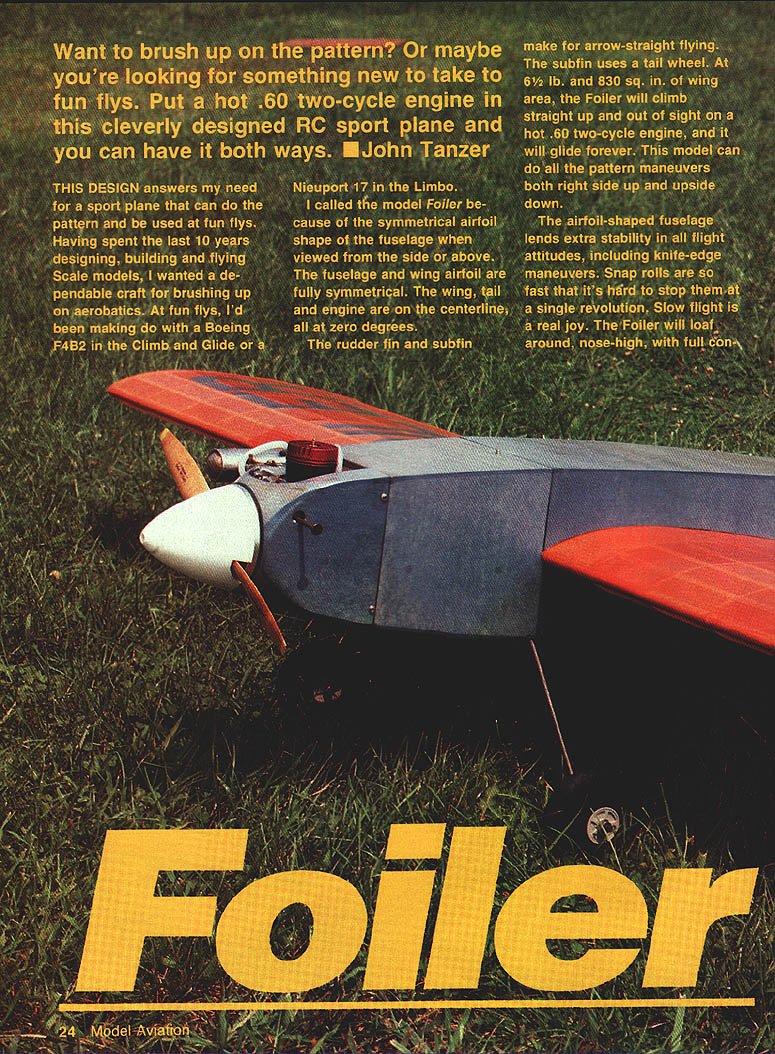
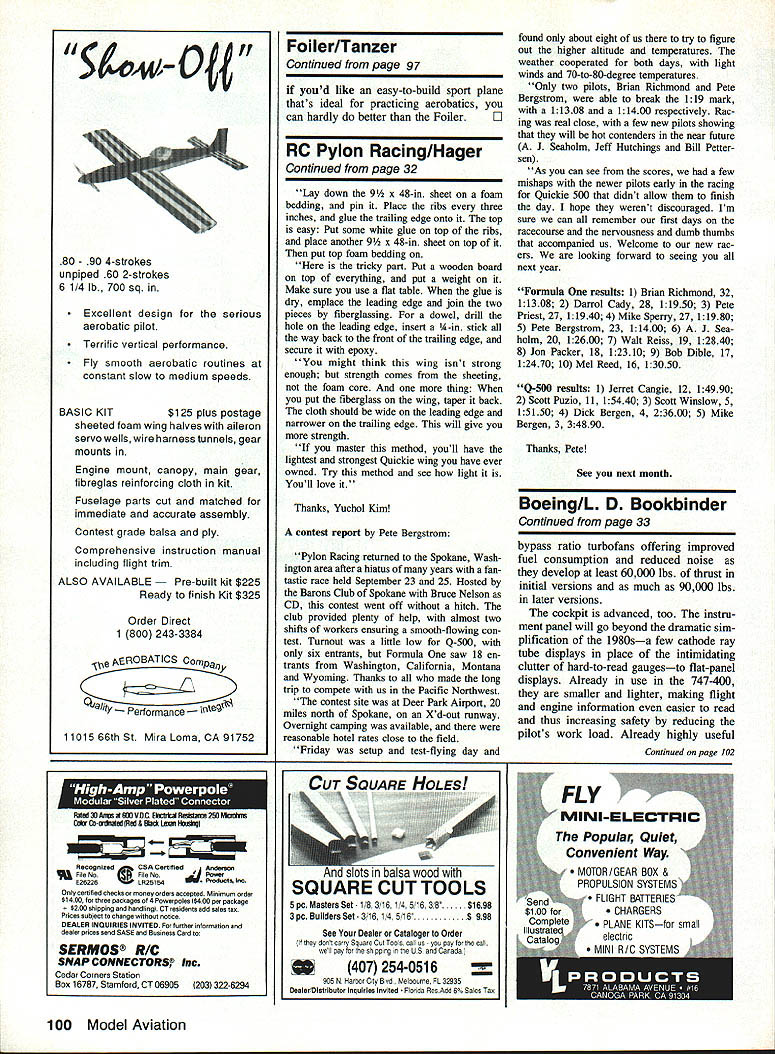
Foiler
Want to brush up on the pattern? Or maybe you're looking for something new to take to fun flies. Put a hot .60 two-cycle engine in this cleverly designed RC sport plane and you can have it both ways. — John Tanzer
This design answers my need for a sport plane that can do the pattern and be used at fun flies. Having spent the last 10 years designing, building and flying scale models, I wanted a dependable craft for brushing up on aerobatics. At fun flies, I'd been making do with a Boeing F4B2 in the Climb and Glide or a Nieuport 17 in the Limbo.
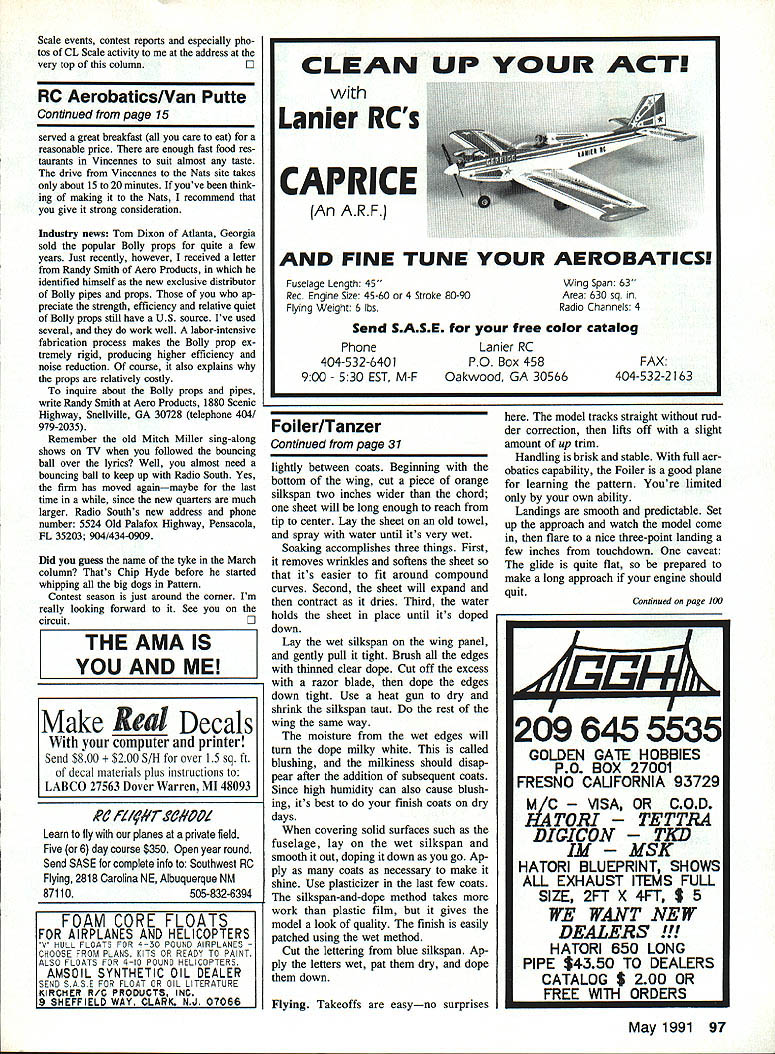
I called the model Foiler because of the symmetrical airfoil shape of the fuselage when viewed from the side or above. The fuselage and wing airfoil are fully symmetrical. The wing, tail and engine are on the centerline, all at zero degrees.
The rudder fin and subfin make for arrow-straight flying. The subfin uses a tail wheel. At 6-1/2 lb. and 830 sq. in. of wing area, the Foiler will climb straight up and out of sight on a hot .60 two-cycle engine, and it will glide forever. This model can do all the pattern maneuvers both right side up and upside down.
The airfoil-shaped fuselage lends extra stability in all flight attitudes, including knife-edge maneuvers. Snap rolls are so fast that it's hard to stop them at a single revolution. Slow flight is a real joy. The Foiler will loaf around, nose-high, with full control. Takeoffs and landings are a breeze.
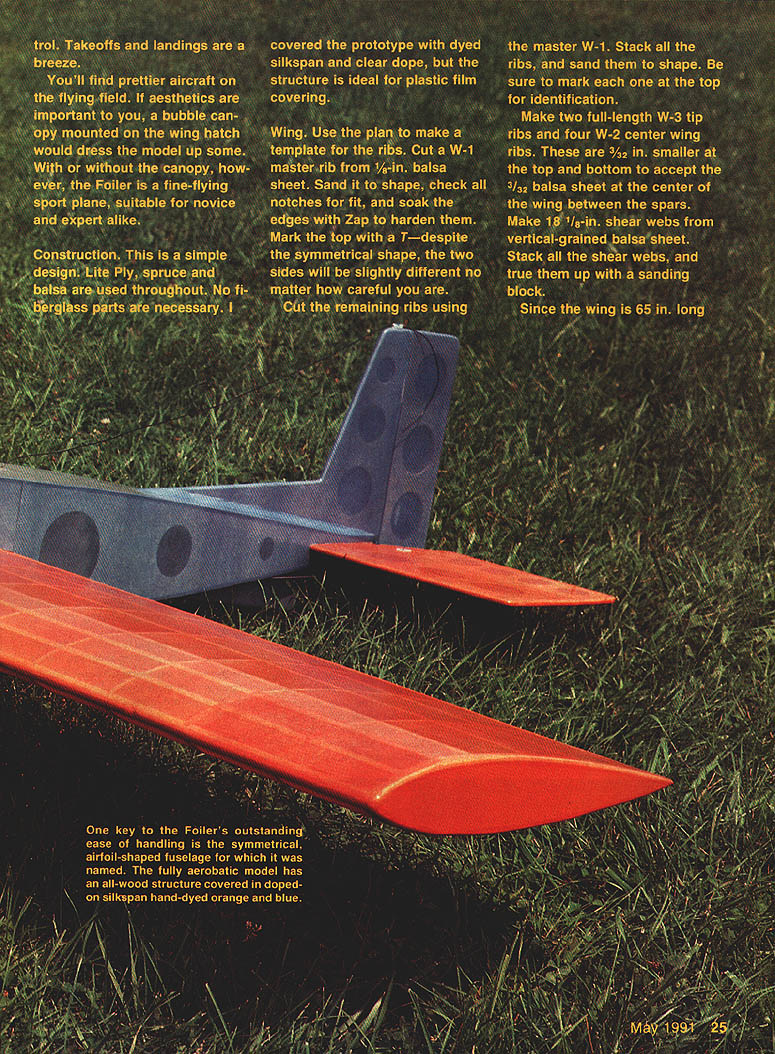
You'll find prettier aircraft on the flying field. If aesthetics are important to you, a bubble canopy mounted on the wing hatch would dress the model up some. With or without the canopy, however, the Foiler is a fine-flying sport plane, suitable for novice and expert alike.
Construction is simple. Lite Ply, spruce and balsa are used throughout. No fiberglass parts are necessary. I covered the prototype with dyed silkspan and clear dope, but the structure is ideal for plastic film covering.
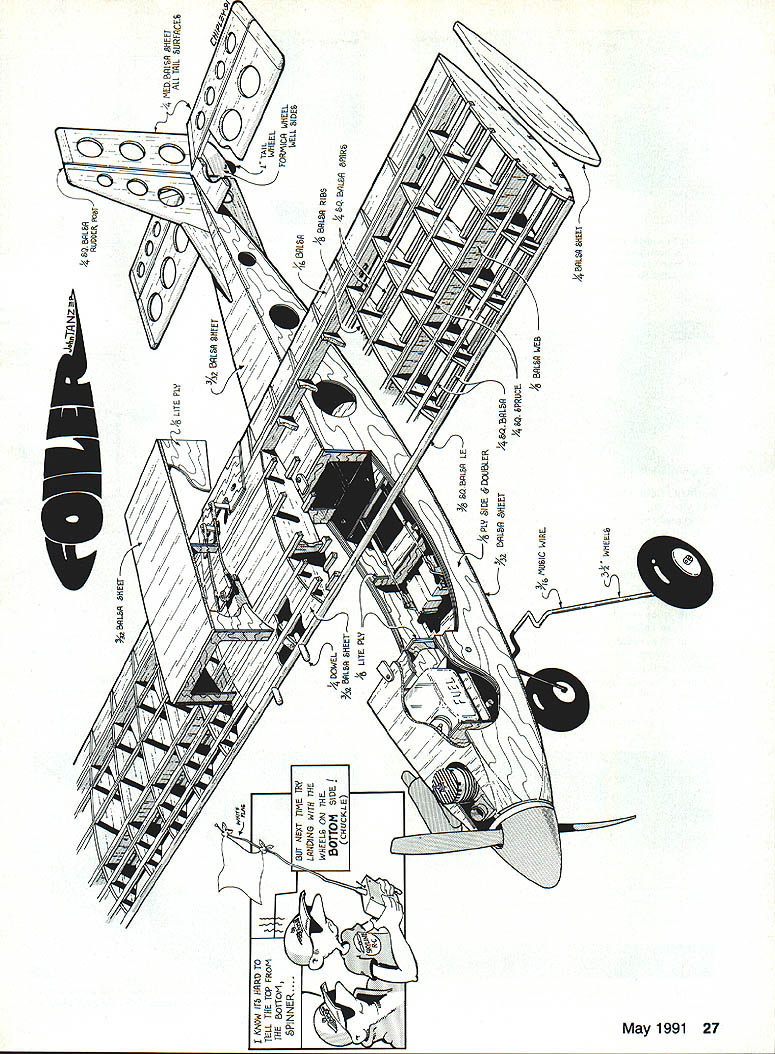
Wing
- Use the plan to make a template for the ribs. Cut a W-1 master rib from 1/8-in. balsa sheet. Sand it to shape, check all notches for fit, and soak the edges with Zap to harden them. Mark the top with a T—despite the symmetrical shape, the two sides will be slightly different no matter how careful you are.
- Cut the remaining ribs using the master W-1. Stack all the ribs, and sand them to shape. Be sure to mark each one at the top for identification.
- Make two full-length W-3 tip ribs and four W-2 center wing ribs. These are 3/32 in. smaller at the top and bottom to accept the 3/32-in. balsa sheet at the center of the wing between the spars.
- Make 1/8-in. shear webs from vertical-grained balsa sheet. Stack all the shear webs, and true them up with a sanding block.
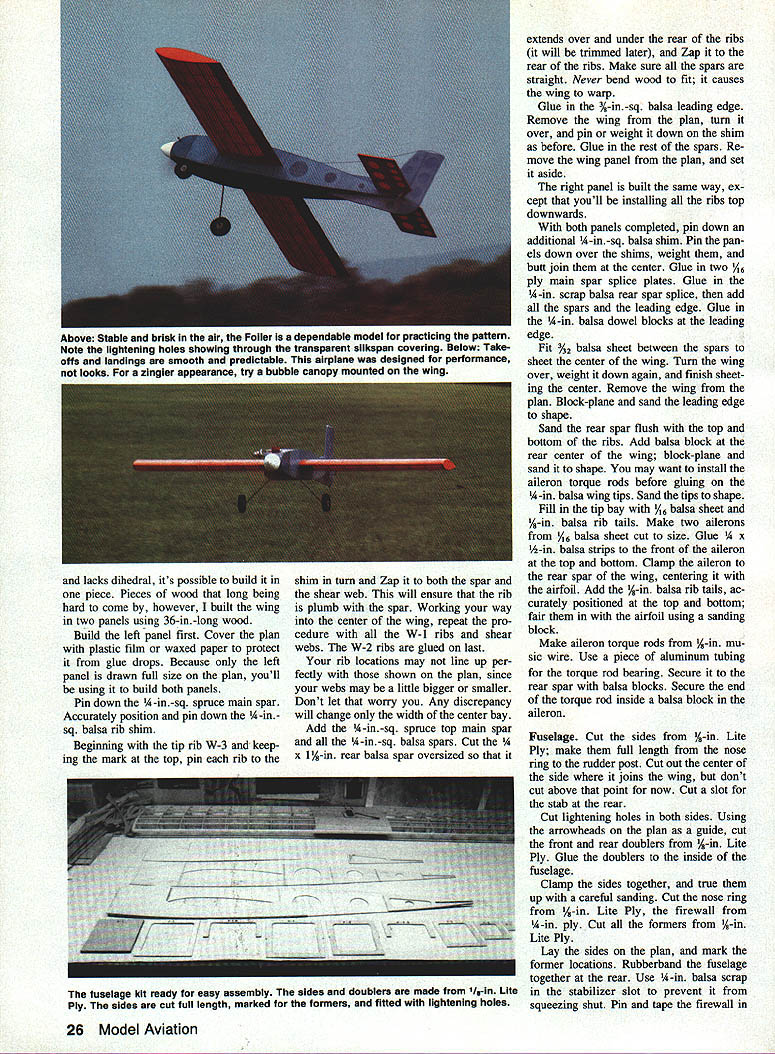
Since the wing is 65 in. long and lacks dihedral, it's possible to build it in one piece. Pieces of wood that long being hard to come by, however, I built the wing in two panels using 36-in.-long wood.
Build the left panel first. Cover the plan with plastic film or waxed paper to protect it from glue drops. Because only the left panel is drawn full size on the plan, you'll be using it to build both panels.
Pin down the 1/4-in.-sq. spruce main spar. Accurately position and pin down the 1/4-in.-sq. balsa rib shim. Beginning with the tip rib W-3 and keeping the mark at the top, pin each rib to the shim in turn and Zap it to both the spar and the shear web. This will ensure that the rib is plumb with the spar. Working your way into the center of the wing, repeat the procedure with all the W-1 ribs and shear webs. The W-2 ribs are glued on last. Your rib locations may not line up perfectly with those shown on the plan, since your webs may be a little bigger or smaller. Don't let that worry you. Any discrepancy will change only the width of the center bay.
Add the 1/4-in.-sq. spruce top main spar and all the 1/4-in.-sq. balsa spars. Cut the 1 1/2-in. rear balsa spar oversized so that it extends over and under the rear of the ribs (it will be trimmed later), and Zap it to the rear of the ribs. Make sure all the spars are straight. Never bend wood to fit; it causes the wing to warp.
Glue in the 3/32-in.-sq. balsa leading edge. Remove the wing from the plan, turn it over, and pin or weight it down on the shim as before. Glue in the rest of the spars. Remove the wing panel from the plan, and set it aside.
The right panel is built the same way, except that you'll be installing all the ribs top downwards.
With both panels completed, pin down an additional 1/4-in.-sq. balsa shim. Pin the panels down over the shims, weight them, and butt join them at the center. Glue in two 1/16-in. ply main spar splice plates. Glue in the 1/4-in. scrap balsa rear spar splice, then add all the spars and the leading edge. Glue in the 1/4-in. balsa dowel blocks at the leading edge.
Fit 3/32-in. balsa sheet between the spars to sheet the center wing. Turn the wing over, weight it down again, and finish sheeting the center. Remove the wing from the plan. Block-plane and sand the leading edge to shape.
Sand the rear spar flush with the top and bottom of the ribs. Add a balsa block at the rear center of the wing; block-plane and sand it to shape. You may want to install the aileron torque rods before gluing on the 1/4-in. balsa wing tips. Sand the tips to shape.
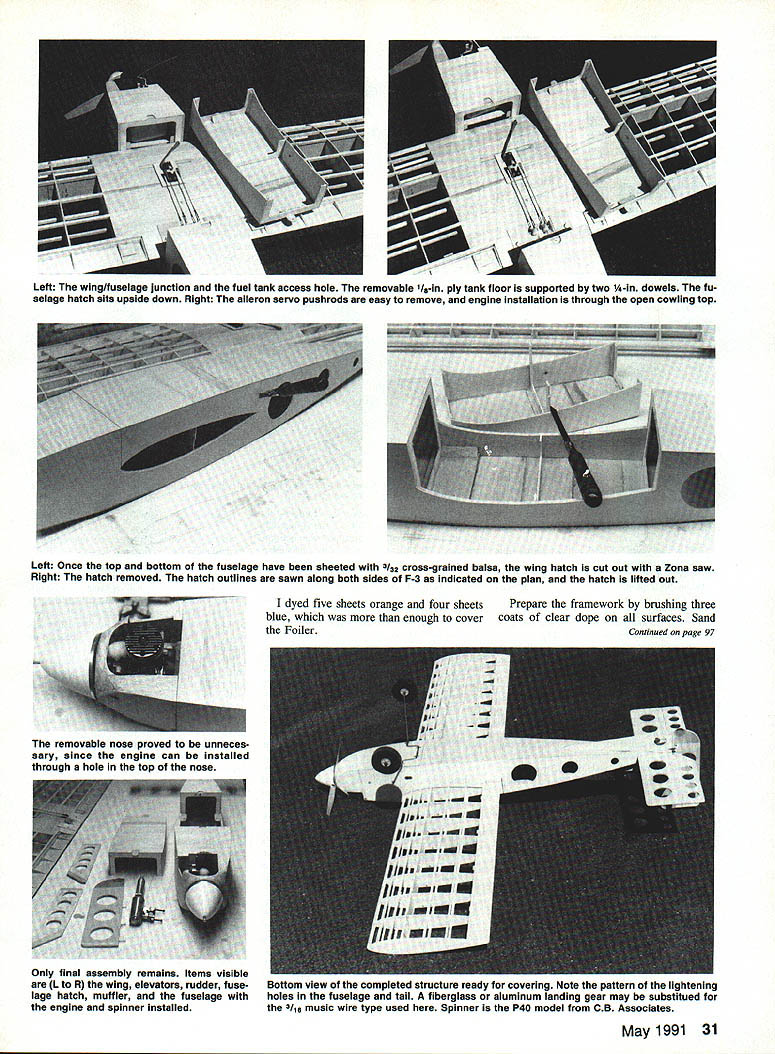
Fill in the tip bay with 1/16-in. balsa sheet and 1/8-in. balsa rib tails. Make two ailerons from 1/16-in. balsa sheet cut to size. Glue 1/4 x 1/2-in. balsa strips to the front of the aileron at the top and bottom. Clamp the aileron to the rear spar of the wing, centering it with the airfoil. Add the 1/8-in. balsa rib tails, accurately positioned at the top and bottom; fair them in with the airfoil using a sanding block.
Make aileron torque rods from 1/8-in. music wire. Use a piece of aluminum tubing for the torque rod bearing. Secure the rear spar with balsa blocks. Secure the end of the torque rod inside a balsa block in the aileron.
With its basic framework completed, the wing is ready for the 1/4-in. balsa tips and the ailerons. Note that all the ribs have been glued to the spars and the shear webs.
Fuselage
- Cut the sides from 1/8-in. Lite Ply; make them full length from the nose ring to the rudder post. Cut out the center of the side where it joins the wing, but don't cut above that point for now. Cut a slot for the stab at the rear.
- Cut lightening holes in both sides. Using the arrowheads on the plan as a guide, cut the front and rear doublers from 1/16-in. Lite Ply. Glue the doublers to the inside of the fuselage.
- Clamp the sides together, and true them up with careful sanding. Cut the nose ring from 1/8-in. Lite Ply; the firewall from 1/8-in. ply. Cut all the formers from 1/8-in. Lite Ply.
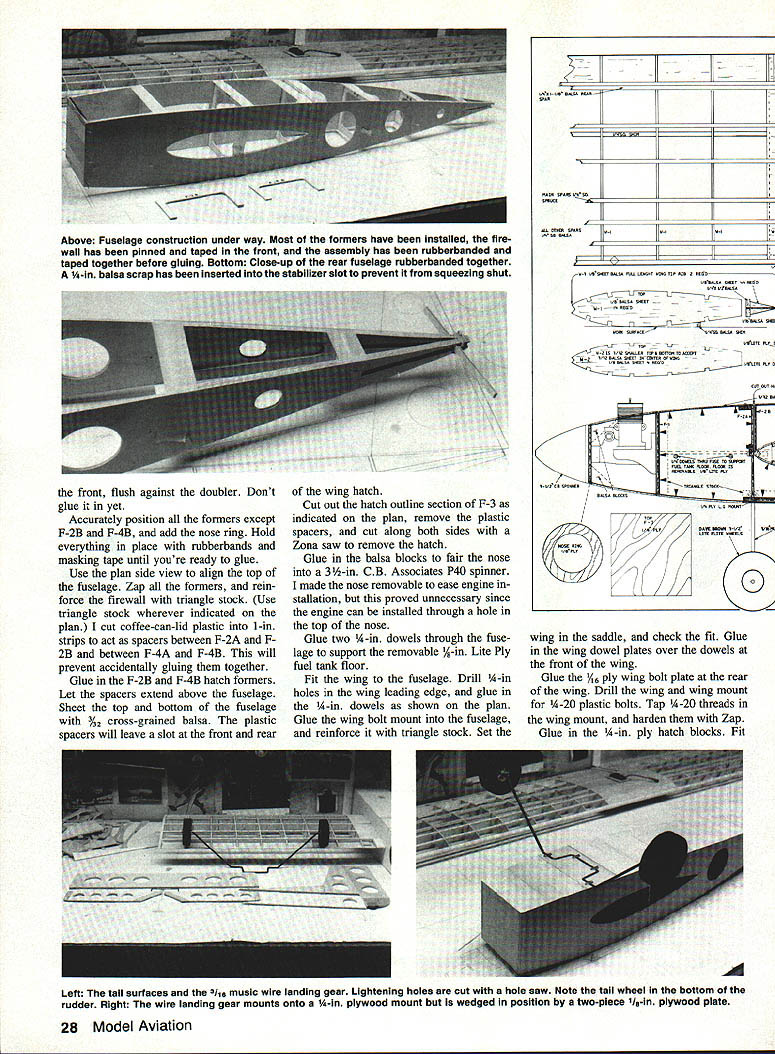
Lay the sides on the plan, and mark the former locations. Rubberband the fuselage together at the rear. Use 1/4-in. balsa scrap in the stabilizer slot to prevent it from squeezing shut. Pin and tape the firewall in place, front flush against the doubler. Don't glue yet.
Accurately position formers, except F-2B and F-4B; add the nose ring. Hold everything in place with rubberbands and masking tape until you're ready to glue. Use the plan sides as a guide when fitting formers and doublers.
Use the plan side view to align the top of the fuselage. Zap all the formers, and reinforce the firewall with triangle stock. (Use triangle stock wherever indicated on the plan.) Cut out coffee-can-lid plastic into 1-in. strips to act as spacers between F-2A and F-2B and between F-4A and F-4B. This will prevent accidentally gluing them together.
Glue in the F-2B and F-4B hatch formers. Let the spacers extend above the fuselage. Sheet the top and bottom of the fuselage with 3/32-in. cross-grained balsa. The plastic spacers will leave a slot at the front and rear of the wing hatch.
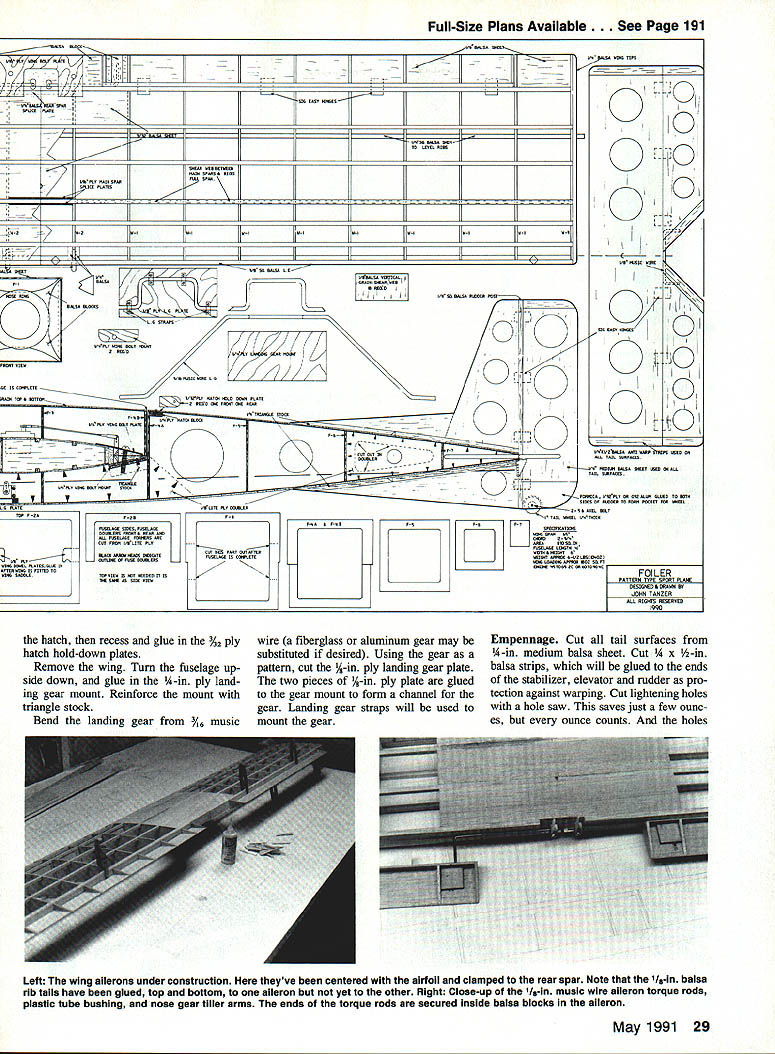
Cut out the hatch outline section of F-3 as indicated on the plan, remove the plastic spacers, and cut along both sides with a Zona saw to remove the hatch.
Glue in the balsa blocks to fair the nose into a 3-1/2-in. C.B. Associates P-40 spinner. I made the nose removable to ease engine installation, but this proved unnecessary since the engine can be installed through a hole in the top of the nose.
Glue two 1/4-in. dowels through the fuselage to support the removable 1/2-in. Lite Ply fuel tank floor.
Fit the wing to the fuselage. Drill 1/4-in. holes in the wing leading edge and glue in the 1/4-in. dowels as shown on the plan. Glue the wing bolt mount into the fuselage and reinforce it with triangle stock. Set the wing in the saddle and check the fit. Glue in the wing dowel plates over the dowels at the front of the wing.
Glue in the 1/16-in. ply wing bolt plate at the rear of the wing. Drill the wing and wing mount for 4-20 plastic bolts. Tap 4-20 threads in the wing mount and harden them with Zap.
Glue in the 1/4-in. ply hatch blocks. Fit the wing in the saddle and check the fit. Recess and glue in the 3/32-in. ply hatch hold-down plates for the hatch.
Remove the wing. Turn the fuselage upside down, and glue in the 1/4-in. ply landing gear mount. Reinforce the mount with triangle stock.
Bend the landing gear from 3/16-in. music wire (a fiberglass or aluminum gear may be substituted if desired). Using the gear as a pattern, cut the 1/8-in. ply landing gear plate. The two pieces of 1/8-in. ply plate are glued to the gear mount to form a channel for the gear. Landing gear straps will be used to mount the gear.
Empennage
Cut all tail surfaces from 1/4-in. medium balsa sheet. Cut 1/4 x 1/2-in. balsa strips, which will be glued to the ends of the stabilizer, elevator and rudder as protection against warping. Cut lightening holes with a hole saw. This saves just a few ounces, but every ounce counts. The holes will show through the transparent silkspan covering and help the surfaces look attractive.
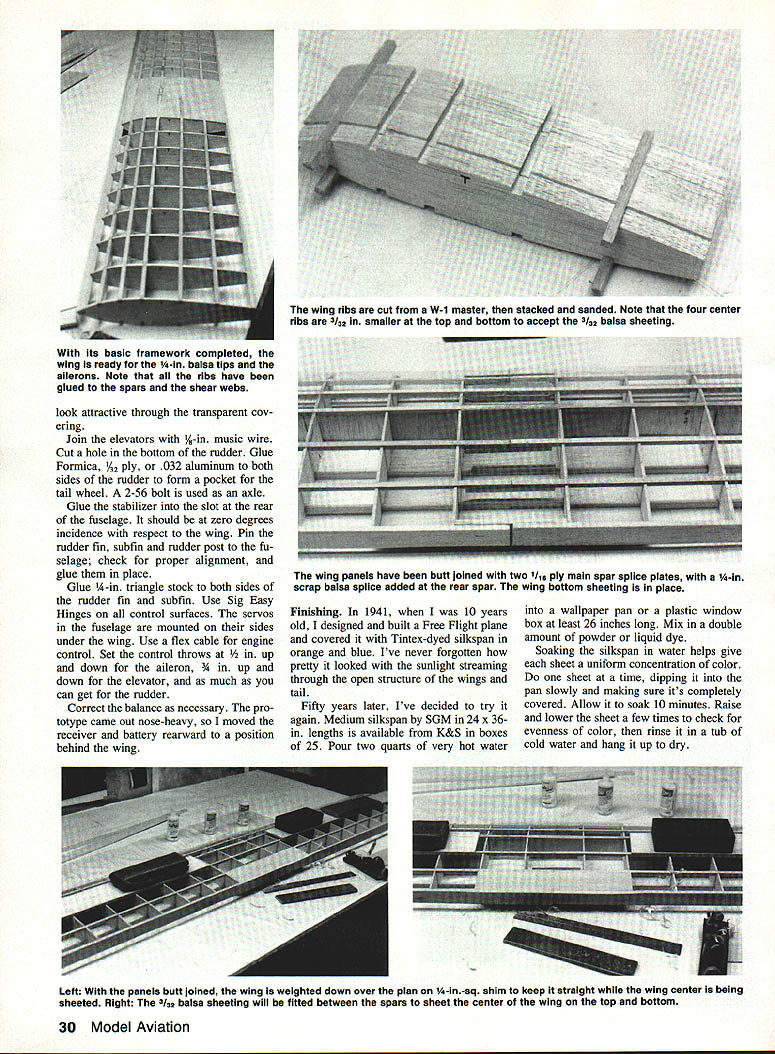
Join the elevators with 1/8-in. music wire. Cut a hole in the bottom of the rudder. Glue Formica, 1/32 ply, or .032 aluminum to both sides of the rudder to form a pocket for the tail wheel. A 2-56 bolt is used as an axle.
Glue the stabilizer into the slot at the rear of the fuselage. It should be at zero degrees incidence with respect to the wing. Pin the rudder fin, subfin and rudder post to the fuselage; check for proper alignment, and glue them in place.
Glue 1/4-in. triangle stock to both sides of the rudder fin and subfin. Use Sig Easy Hinges on all control surfaces. The servos in the fuselage are mounted on their sides under the wing. Use a flex cable for engine control. Set the control throws at 1/4 in. up and down for the aileron, 3/4 in. up and down for the elevator, and as much as you can get for the rudder.
Correct the balance as necessary. The prototype came out nose-heavy, so I moved the receiver and battery rearward to a position behind the wing.
Finishing
In 1941, when I was 10 years old, I designed and built a free-flight plane and covered it with tinted silkspan in orange and blue. I've never forgotten how pretty it looked with the sunlight streaming through the open structure of the wings and tail.
Fifty years later, I've decided to try it again. Medium silkspan by SGM in 24 x 36-inch rolls is available from K&S in boxes of 25. Pour two quarts of very hot water into a wallpaper pan or a plastic window box at least 26 inches long. Use double the normal amount of powder or liquid dye in the water.
Soaking the silkspan in water helps give each sheet a uniform concentration of color. Do one sheet at a time, dipping it into the pan slowly and making sure it's completely covered. Allow it to soak 10 minutes. Raise and lower the sheet a few times to check for evenness of color, then rinse it in a tub of cold water and hang it up to dry. I dyed five sheets orange and four sheets blue, which was more than enough to cover the Foiler.
Prepare the framework by brushing three coats of clear dope on all surfaces. Sand lightly between coats. Beginning with the bottom of the wing, cut a piece of orange silkspan two inches wider than the chord; one sheet will be long enough to reach from tip to center. Lay the sheet on an old towel, and spray with water until it's very wet.
Soaking accomplishes three things. First, it removes wrinkles and softens the sheet so that it's easier to fit around compound curves. Second, the sheet will expand and then contract as it dries. Third, the water holds the sheet in place until it's doped down.
Lay the wet silkspan on the wing panel, and gently pull it tight. Brush all the edges with thinned clear dope. Cut off the excess with a razor blade, then dope the edges down tight. Use a heat gun to dry and shrink the silkspan taut. Do the rest of the wing panels the same way.
The moisture from the wet edges will turn the dope milky white. This is called blushing, and the milkiness should disappear after the addition of subsequent coats. Since high humidity can also cause blushing, it's best to do your finish coats on dry days.
When covering solid surfaces such as the fuselage, lay on the wet silkspan and smooth it out, doping it down as you go. Apply as many coats as necessary to make it shine. Use plasticizer in the last few coats. The silkspan-dope method takes more work than plastic film, but it gives the model a look of quality. The finish will be patched using the wet method.
Cut the lettering from blue silkspan. Apply the letters wet, pat them dry, and dope them down.
Flying
Takeoffs are easy—no surprises here. The model tracks straight without rudder correction, then lifts off with a slight amount of up trim.
Handling is brisk and stable. With full aerobatics capability, the Foiler is a good plane for learning the pattern. You're limited only by your own ability.
Landings are smooth and predictable. Set up the approach and watch the model come in, then flare to a nice three-point landing a few inches from touchdown. One caveat: the glide is quite flat, so be prepared to make a long approach if your engine should quit.
If you'd like an easy-to-build sport plane that's ideal for practicing aerobatics, you can hardly do better than the Foiler.
Transcribed from original scans by AI. Minor OCR errors may remain.

