
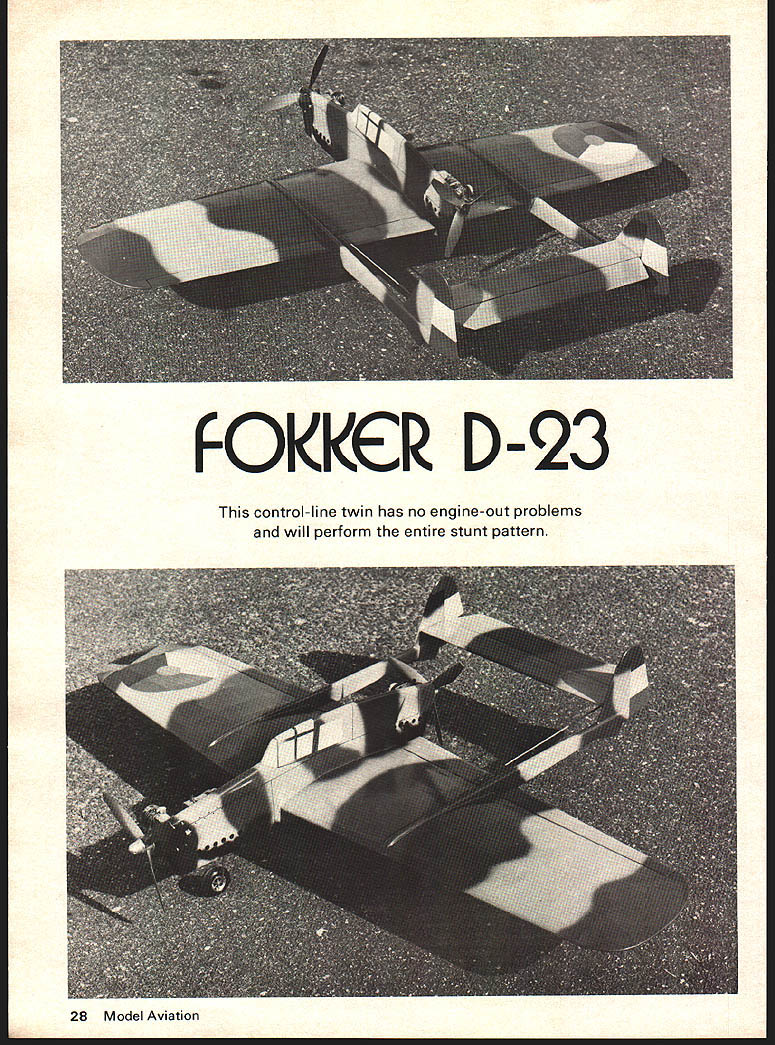
FOKKER D-23
This control-line twin has no engine-out problems and will perform the entire stunt pattern. Dick Sarpolus
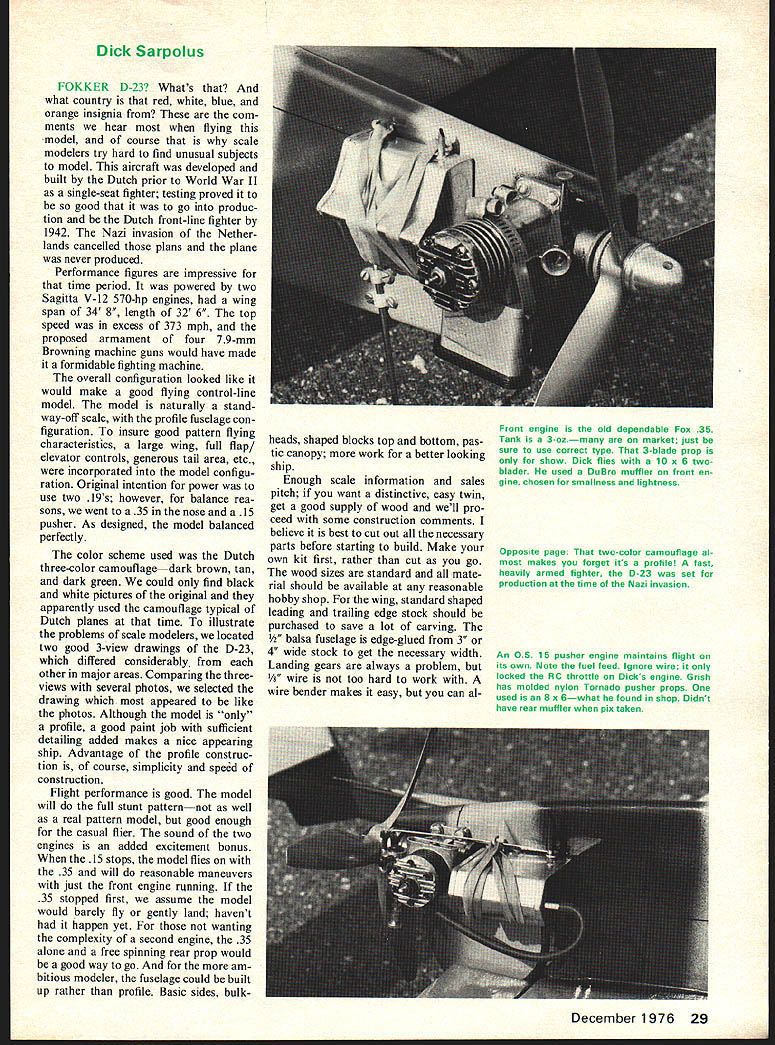
FOKKER D-23? What's that? And what country is that red, white, blue, and orange insignia from? These are the comments we hear most when flying the model, and of course that is why scale modelers try hard to find unusual subjects to model. This aircraft was developed and built by the Dutch prior to World War II as a single-seat fighter; testing proved it to be so good that it was to go into production and be the Dutch front-line fighter by 1942. The Nazi invasion of the Netherlands cancelled those plans and the plane was never produced.
Performance figures are impressive for that time period. It was powered by two Sagitta V-12 570-hp engines, had a wing span of 34'8", length of 32'6". The top speed was in excess of 373 mph, and the proposed armament of four 7.9-mm Browning machine guns would have made it a formidable fighting machine.
The overall configuration looked like it would make a good flying control-line model. The model is naturally a stand-off scale, with the profile fuselage configuration. To insure good pattern flying characteristics, a large wing, full flap/elevator controls, generous tail area, etc., were incorporated into the model configuration. Original intention for power was to use two .19's; however, for balance reasons, we went to a .35 in the nose and a .15 pusher. As designed, the model balanced perfectly.
The color scheme used was the Dutch three-color camouflage—dark brown, tan and dark green. We could only find black and white pictures of the original and they apparently used the camouflage typical of Dutch planes at that time. To illustrate the problems of scale modelers, we located two good 3-view drawings of the D-23, which differed considerably from each other in major areas. Comparing the three-views with several photos, we selected the drawing that appeared like the photos. Although the model is "only" a profile, a good paint job with sufficient detailing added makes a nice appearing ship. Advantage of the profile construction is, of course, simplicity and speed of construction.
Flight performance is good. The model will do the full stunt pattern—not as well as a real pattern model, but good enough for the casual flier. The sound of the two engines is an added excitement bonus. When the .15 stops, the model flies on with the .35 and will do reasonable maneuvers with just the front engine running. If the .35 stopped first, we assume the model would barely fly or gently land; haven't had it happen yet. For those not wanting the complexity of a second engine, the .35 alone and a free-spinning rear prop would be a good way to go. And for the more ambitious modeler, the fuselage could be built up rather than profile. Basic sides, bulkheads, shaped blocks top and bottom, plastic canopy; more work for a better looking ship.
Enough scale information and sales pitch; if you want a distinctive, easy twin, get a good supply of wood and we'll proceed with some construction comments. I believe it is best to cut out all the necessary parts before starting to build. Make your own kit first, rather than cut as you go. The wood sizes are standard and all material should be available at any reasonable hobby shop. For the wing, standard shaped leading and trailing edge stock should be purchased to save a lot of carving. The 1/8" balsa fuselage is edge-glued from 3" or 4" wide stock to get the necessary width. Landing gears are always a problem, but 1/8" wire is not too hard to work with. A wire bender makes it easy, but you can always clamp in a vise and go to work with a hammer.
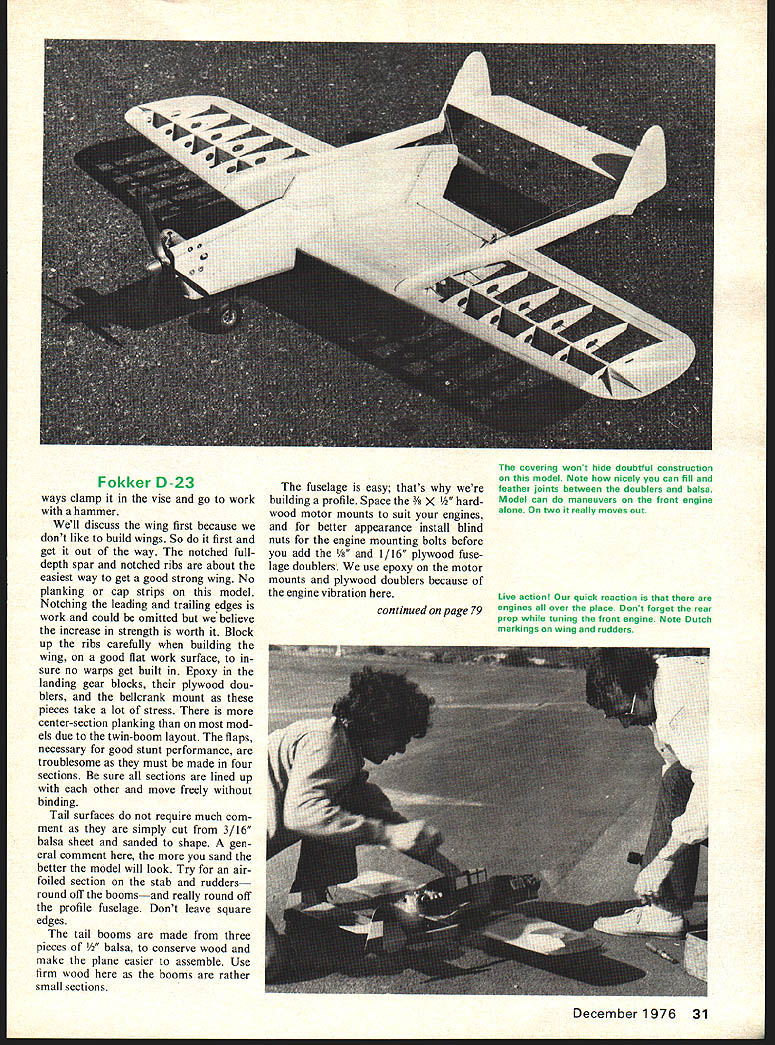
We'll discuss the wing first because I don't like to build wings. So first get it out of the way — notched full-depth spar, notched ribs — about the easiest way to get a good strong wing. No planking or cap strips on this model. Notching the leading and trailing edges will work; it could be omitted, but I believe the increase in strength is worth it. Block up ribs carefully, building the wing on a good flat work surface to be sure no warps get built in. Epoxy landing gear blocks, plywood doublers, bellcrank mount pieces take a lot of stress. Center-section planking on models due to twin-boom layout. Flaps necessary for good stunt performance are troublesome — they must be made in four sections; be sure sections line up and the others move freely without binding. Tail surfaces require much comment; simply cut 3/16" balsa sheet and sand to shape. General comment — sand better and the model will look. Try air
FOKKER D-23
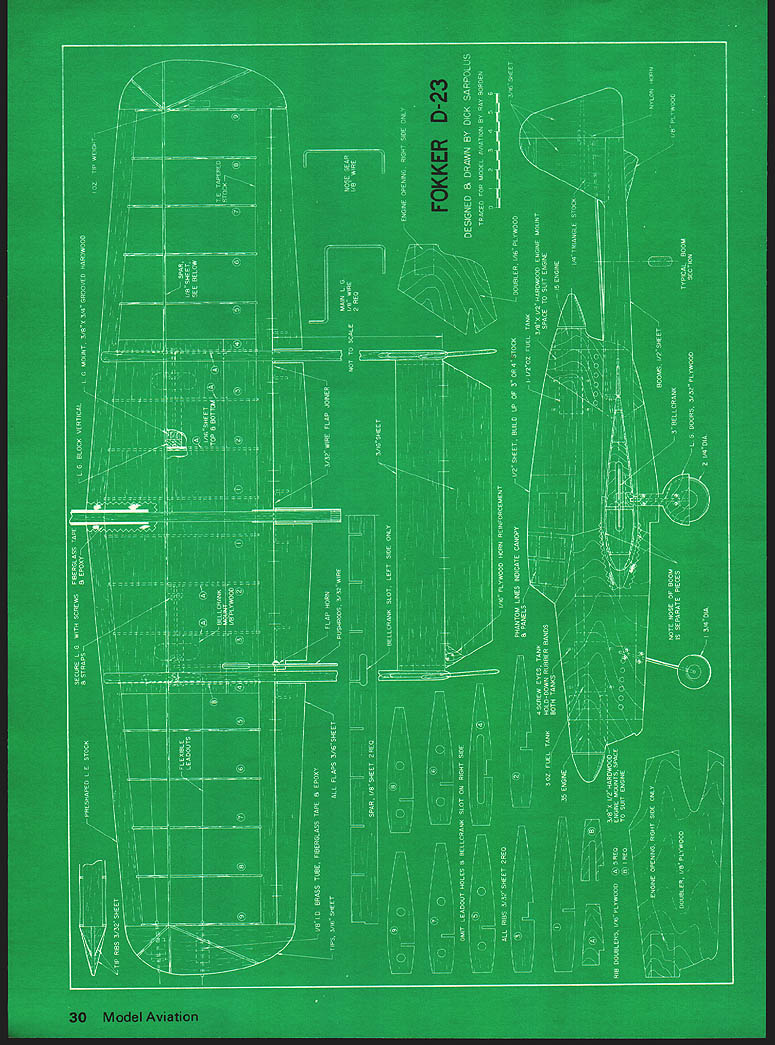
Designed & drawn by Dick Sarpolus The tail booms are made from three pieces of 1/2" balsa, to conserve wood and make the plane easier to assemble. Use firm wood here as the booms are rather small sections.
The fuselage is easy; that's why we're building a profile. Space the 3/8" x 1/2" hardwood motor mounts to suit your engines, and for better appearance install blind nuts for the engine mounting bolts before you add the 1/8" and 1/16" plywood fuselage doublers. We use epoxy on the motor mounts and plywood doublers because of the engine vibration here. Overall assembly must be done carefully to insure true alignment so you will have a straight flying aircraft. First major assembly step is the fuselage onto the wing. It must be perpendicular to the wing and installed using epoxy and fiberglass cloth to reinforce the fuselage/wing joint at the leading edge. With the fuselage on, the flaps may be added.
Prior to putting the booms on the wing, install the fins/rudders on the booms. The triangle stock tab mounts onto the rudders. Slide the booms onto the wing and pin the stab into place on the rudders, adjust the booms to keep the stab level with the wing and glue all in place. Make up the pushrod to the elevator, mount landing gears, install screw-eyes in fuselage for the gas tank rubber-bander retainers.
We suggest you then remove all possible hardware to be re-installed after painting is completed. Use nylon hinges and epoxy them into the surfaces after all parts have been painted. Everyone has their own favorite finishing technique and materials they prefer. We are sold on Super Coverlite for the wing covering because it accepts several coats of clear dope and sanding sealer, sanding thoroughly between coats. For the camouflage paint job a spray gun or airbrush is almost a necessity; done with a brush or masked off it will not look as authentic. Other detailing: panel lines done with a drafting pen, rivets simulated with rub-off dots, windows painted on, etc., all will add to the finished model.
The pusher .15 is installed with no offset; the front .35 is installed with two washers under the front of the cowl mounting lug. Use well broken-in engines. Run up each engine separately, adjust the needle valves, and top off the tanks. The rear engine should be set fairly lean as it tends to richen with the air due to the tank location.
The plane flies well, with no bad characteristics.
Transcribed from original scans by AI. Minor OCR errors may remain.

