
Fokker E-II
After the neighborhood kids get a load of this WW I–era pursuit fighter humming like the dawn patrol overhead, you won't be able to keep them out of your workshop. —Larry Conover
Introduction: simplicity and purpose
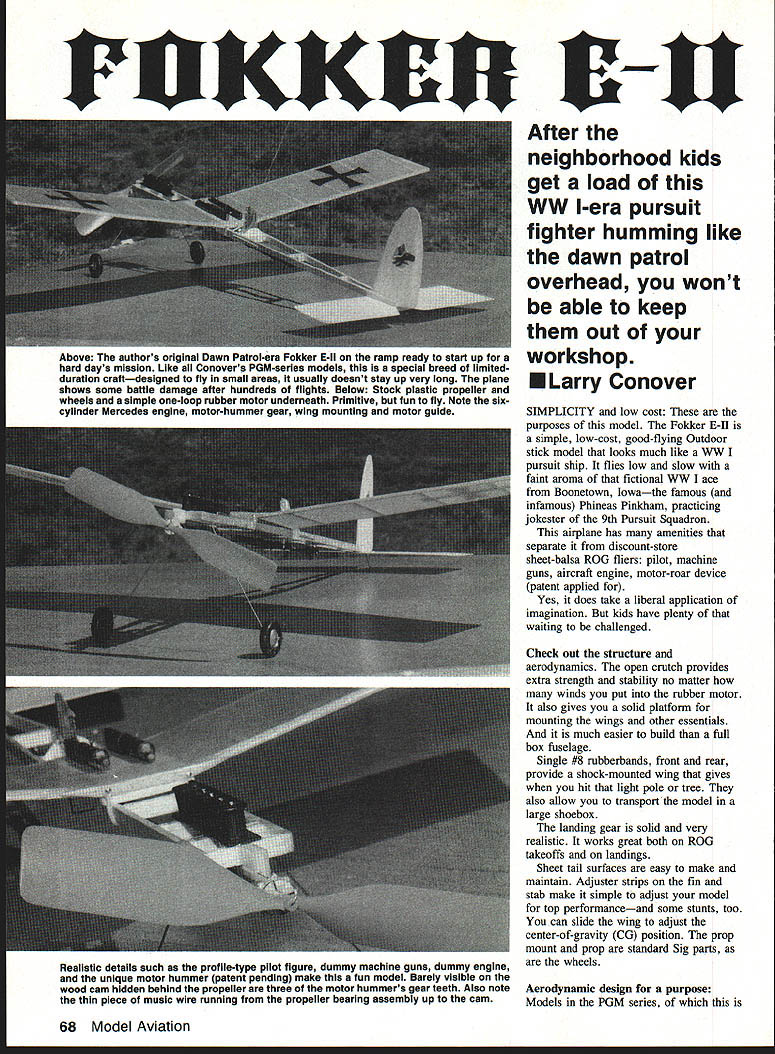
Simplicity and low cost: these are the purposes of this model. The Fokker E‑II is a simple, low-cost, good-flying outdoor stick model that looks much like a WW I pursuit ship. It flies low and slow with a faint aroma of that fictional WW I ace from Boonetown, Iowa—the famous (and infamous) Phineas Pinkham, practicing jokester of the 9th Pursuit Squadron.
This airplane has many amenities that separate it from discount-store sheet-balsa ROG fliers: pilot, machine guns, aircraft engine, motor-roar device (patent applied for). Yes, it does take a liberal application of imagination. But kids have plenty of that waiting to be challenged.
Structure and aerodynamics
Check out the structure and aerodynamics. The open crutch provides extra strength and stability no matter how many winds you put into the rubber motor. It also gives you a solid platform for mounting the wings and other essentials. And it is much easier to build than a full box fuselage.
Single #8 rubberbands, front and rear, provide a shock-mounted wing that gives when you hit that light pole or tree. They also allow you to transport the model in a large shoebox.
The landing gear is solid and very realistic. It works great both on ROG takeoffs and on landings.
Sheet tail surfaces are easy to make and maintain. Adjuster strips on the fin and stab make it simple to adjust your model for top performance—and some stunts, too. You can slide the wing to adjust the center-of-gravity (CG) position. The prop mount and prop are standard Sig parts, as are the wheels.
Aerodynamic design for a purpose
Models in the PGM series, of which this is one, are a special breed of limited-duration aircraft. That doesn't mean they're limited in all-around performance, just that they're designed to be flown in limited areas such as small parks, school athletic fields, large corner lots, or supermarket parking lots.
To accomplish this goal we use a flat-plate wing section. You don't even have to shape the leading edge—although it flies better if you do. You don't have to taper and shape your tail surfaces (again, it flies better if you do). There's enough tail volume (the product of tail area and its moment arm from the CG) to give good stability. If you want expanded motor length for a longer prop run, you can use Wakefield model techniques to pack in enough winds to take the little bird to a quite high altitude. This model flies really well!
Even top-gun contest fliers will get a pleasant change of pace out of this WW I pursuit model. You can show it off at family picnics or to the neighborhood kids.
Inspiring the next generation
Attracting those kids is the most important thing you can do: stir up the interest of a whole new generation of town kids who experience aircraft and flight mainly through their TVs and videos. They live the thrill of flying vicariously. You can change that by giving them a real hands-on experience. It's a chance for them to earn the satisfaction of building and flying a model airplane of their own.
Building instructions? I have a standard answer for questions like that during my PGM model classes: "Check the plans. Check the plans!"
This model was designed for program modelers as a teaching tool—intended for the hundreds of thousands of neighborhood young people who are urgently looking for an alternative to the often short-lived shoot-'em-up activities that come across their TV screens every day. They don't know an RTF from an ARF, or a CL model from an RC. And they've probably never even heard of the AMA.
The motor-hummer system
What a neat device this turned out to be. Old-time motor-hummer devices were usually just a wire or a strip flapped by the prop. That takes away too much energy from the long-suffering rubberband power source. You lose 10% to 25%, and the climb looks like a pregnant pelican's.
I researched the design of musical instruments, and after the fifth try came the latest state-of-the-art hummer: a gear-driven, striker-wire, drumhead (sound box) motor popper. It sounds like the dawn patrol droning overhead, returning from the Boche lines. It takes less than 5% of your rubberband's energy. Do it! You'll love the sound of the engine ticking over as your WW I pursuit comes gliding in.
Flying instructions
The center-of-gravity is located at 50% of the wing chord. Balance the model there by sliding the wing for best glide. (You are going to give it a series of test glides before trying it under power, aren't you?)
It's important to warp wash in (trailing edge of the wing tip warped down—check the plan) into the right wing to offset the right rudder adjustment for the proper glide circle. Higher torque on high winds will make it up straight and high, crossing over into a nice right climb. Do not reduce the wing incidence. Keep the tail light.
Cautions
- You can lightly shrink the tissue covering on the wing by misting it with water. Use only plasticized clear dope (Sig Lite-Coat) on the tissue. If the covering is too tight, the wing will be twisted like a pretzel.
- Use a heat lamp or steam to take out or put in warping adjustments.
- Do not use the stock wire prop shaft that comes with the plastic prop. The rubberband will crawl off the hook. Use the plan pattern to bend a new one from .032 music wire.
- Make the stab in one piece using the half pattern.
Top performance would call for eliminating the engine, machine guns, and pilot. Don't do it! You'll miss half the fun. And a word for your all-out, top-gun, hot-dog performance fliers: Attention! Do not fly this little, inefficient WW I pursuit model too close to thermals. It might disappear into the blue, just like the Red Baron.
Project Grandpa: Mentor (PGM)
WANTED—a few good grandpas, to use their expertise and experience to teach model-building skills to a new generation of grandchildren and kids right in their neighborhoods. Project Grandpa is a unique grass-roots model aviation educational program designed to direct the interests of your young students toward the scientific disciplines, thus helping the kids, the public schools, and our country maintain a leadership role in the New World Order.
The Wright brothers took up aviation as a hobby/sport. It was the challenge to their inventive minds that drove them, not thoughts of fame or fortune. After all, they made very good racing bicycles. Why not a flying machine?
You never know where a new endeavor or interest will lead. Model aircraft building is that way. It has lifted thousands of modelers from the 1930s and 1940s into responsible positions: scientists, teachers, writers, industrialists, aircraft designers, engineers, Air Force officers, astronauts—each and every one with a certain creative curiosity that designing and building model aircraft cannot help but sharpen.
But it isn't so today. I research and write about public education. I also study social trends in our culture. Today I see the consequences of a long slide into a society that craves instant gratification. In our hobby, the emphasis has swung to operating RTF (ready-to-fly) and RTR (ready-to-run) models. Even the ARF (almost-ready-to-fly) kits require little personal effort. But, as Olympic decathlon champion Bob Richards said: "No strain, no pain . . . no glory!"
Building a model from scratch or even from a kit (not-ready-to-fly) offers a wonderful bonus: the satisfaction of being the real creator of that miniature aircraft.
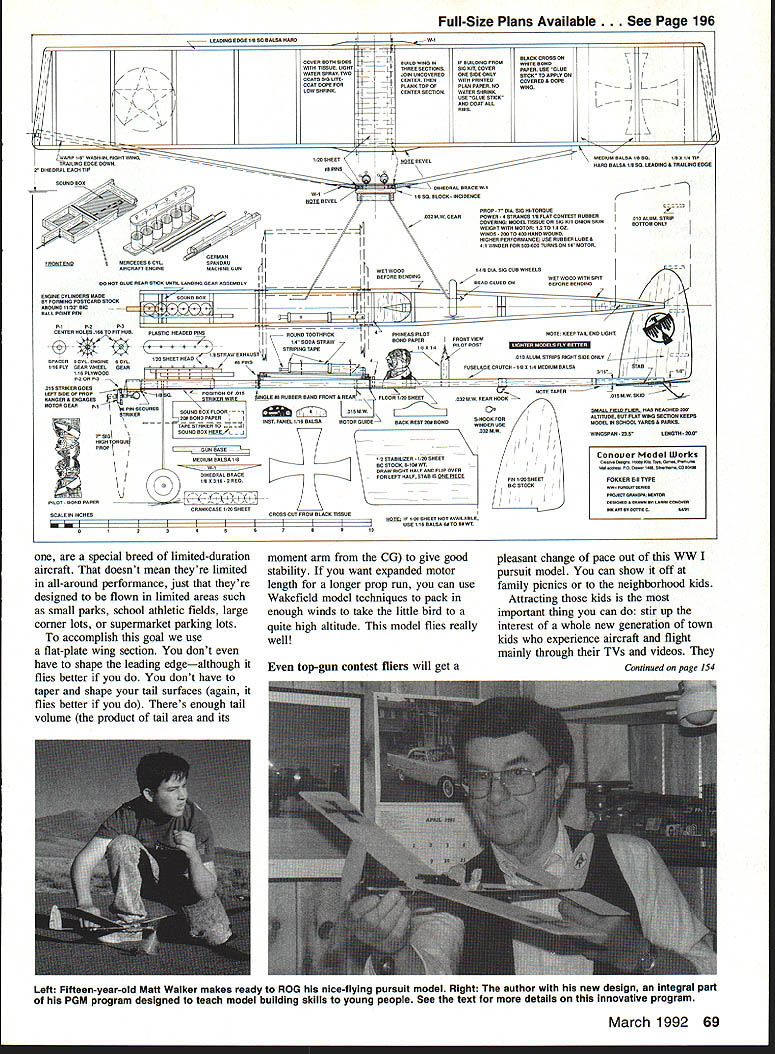
Fokker E-II Materials List
- Two 1/8 x 1/4 x 36‑in. medium-hard balsa stock
- One and one-half 1/8 x 3/8 x 36‑in. medium balsa stock
- One 1/8 x 3 x 12‑in. B–C grain sheet medium balsa, or one 1/4 x 3 x 12‑in. B–C grain sheet medium balsa
- One length .032 x 18‑in. music wire
- One length .015 x 9‑in. music wire
- One 1/8‑in. soda straw
- One 1/4‑in. soda straw
- Five feet of 1/8‑in. flat rubber strip (fair tan)
- One sheet 18 x 24‑in. colored Japanese tissue
- Two Sig 1‑1/4‑in. light plastic wheels
- Twelve small plastic head pins
- One 1/16 x 1 x 2‑in. plywood sheet
- Four #8 pins and four #8 rubberbands
- One oz. Sig balsa cement
- One 4‑oz. bottle Sig Lite-Coat clear dope
- One 7‑in. Sig Hi‑Torque plastic prop and nose piece
Full-Size Plans Page 196
Transcribed from original scans by AI. Minor OCR errors may remain.

