
Free Flight: Duration
Bob Meuser
Semi-retirement and deadlines
This is rather neat, being semi-retired (or is it semi-employed?) as a Free Flight columnist. I now actually get to see, in print, what I wrote in one column before the deadline for the next one. But it has its drawbacks.
Deadline times are always fun. The deadline for my June column, for example, is March 1. So, on March 3 I get a typical letter from Associate Editor Ross McMullen which reads, "THUNDERATION? Here it is, March 1st already, and you don't have your column in! Let's look alive, out there!" (If I had gotten my column in on time, I'd have deprived myself of Ross's latest missive. I look forward to them anticipatively.) (That's a word? If NASA can invent words—schedulization, commonize, actualize, etc.—willy-nilly at taxpayers' expense, I guess I'm entitled to a few freebies.)
Then, around March 10, I can expect a friendly call from Ross inquiring as to the status of my health, the local weather, and perhaps slithering sly innuendo regarding the status of my column. It is always nice talking to Ross. Too bad it happens only every other month now.
I've got a gripe! If you followed the instructions at the bottom of page 75 of my April column—namely "Continued on page 172"—you would have missed two pages of neat stuff. It should have been "Continued on page 170."
Tomy timers, again
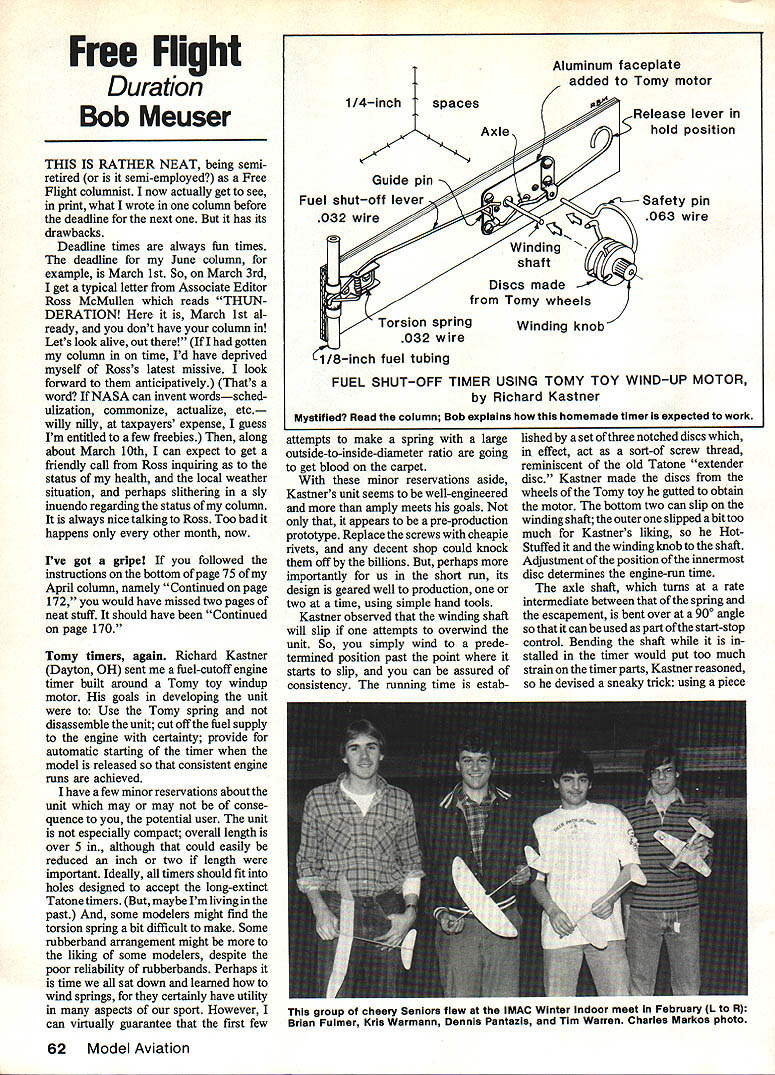
Richard Kastner (Dayton, OH) sent me a fuel-cutoff engine timer built around a Tomy toy windup motor. His goals in developing the unit were to:
- use the Tomy spring and not disassemble the unit;
- cut off the fuel supply to the engine with certainty; and
- provide for automatic starting of the timer when the model is released so that consistent engine runs are achieved.
I have a few minor reservations about the unit which may or may not matter to potential users. The unit is not especially compact; overall length is over 5 in., although that could easily be reduced an inch or two if length were important. Ideally, all timers should fit into holes designed to accept the long-extinct Tatone timers. (Maybe I'm living in the past.) Also, some modelers might find the torsion spring a bit difficult to make. Some rubber-band arrangement might be more to the liking of some modelers, despite the poor reliability of rubber bands. Perhaps it is time we all sat down and learned how to wind springs, for they certainly have utility in many aspects of our sport. However, I can virtually guarantee that the first few attempts to make a spring with a large outside-to-inside-diameter ratio are going to get blood on the carpet.
With those minor reservations aside, Kastner's unit seems well engineered and more than amply meets his goals. It appears to be a pre-production prototype. Replace the screws with cheapie rivets, and any decent shop could knock them off by the billions. More importantly for us in the short run, its design is geared well to production, one or two at a time, using simple hand tools.
Kastner observed that the winding shaft will slip if one attempts to overwind the unit. So you simply wind to a predetermined position past the point where it starts to slip, and you can be assured of consistency. The running time is established by a set of three notched discs which act as a sort-of screw thread, reminiscent of the old Tatone "extender" discs. Kastner made the discs from the wheels of the Tomy toy he gutted to obtain the motor. The bottom two can slip on the winding shaft; the outer one slipped a bit too much for Kastner's liking, so he Hot-Stuffed it to the winding knob shaft. Adjustment of the position of the innermost disc determines the engine-run time.
The axle shaft, which turns at a rate intermediate between that of the spring and the escapement, is bent over at a 90° angle so it can be used as part of the start-stop control. Bending the shaft while it is installed in the timer would put too much strain on the parts, so Kastner devised a sneaky trick using a piece of .032 wire. Insert a piece of wire no larger than the axle shaft, push the axle shaft out of the unit, bend or cut the axle shaft to your heart's desire, then use the axle shaft to push the other piece of wire out of the unit.
The timer itself doesn't have enough oomph to skooch fuel tubing with the required authority, so Kastner devised a mechanical relay, or "mousetrap," to do the job.
The sequence of operations for a flight goes like this:
- Position the release lever under its retainer, and insert the safety pin.
- Hook the bent end of the safety pin under the release-lever retainer so that engine vibration will not cause the pin to fall out.
- Place the end of the fuel shutoff lever under the innermost disc and against its guide pin.
- Start the engine. Hold your thumb against the release lever as you grasp the model for launching.
- Pull the safety pin. As you launch the model, the timer will start.
If you forgot to pull the safety pin, send me an SASE and check in the amount of $437.54 for an Official NFFS Crying Towel, personally autographed by NFFS President Tony Italiano. You can get my condolences for just the SASE.
The drawing of Kastner's timer is an isometric, not true perspective, so it looks a little funny. Isometrics are useful in that you can measure off them; a set of scales is included for doing just that.
High-tech materials
While performing the monthly ritual known locally as the Balancing of the Books (a lie, for they never really balance; I figure that if the bank's computer can get it within $10 to $20, that's close enough—even computers aren't perfect), I came across a strange entry: "Bob Violett, samples, $15." Who the heck is Bob Violett? Samples of what?
Next day, a big package from Bob Violett Models arrived. I opened it expectantly (expecting what, I'm still not sure). Inside were great gobs of crunched-up newspapers and a teeny-weeny envelope. I poured the envelope out onto the table. Nothing much came out. I tore the envelope limb from limb. Fifteen bucks for that? Oh well, it's deductible.
Included were four four-inch squares of material that seems perfect for firewalls: light, seemingly tough. The core is end-grain balsa, butcher-block style (grain parallel to the thickness). Facings are fiberglass cloth, hardwood plywood, or carbon fiber; thicknesses are 1/8 or 1/4 in. There's a bit of 50-mil carbon-fiber rod (seems almost as stiff as music wire of the same size, but far lighter), a bit of carbon-fiber cord (not like the "roving" that frazzles easily; this seems doused with something that gives it stiffness), and some 2 x 10-in. sheets of 7-mil and 14-mil uni-directional carbon fiber bonded to very thin fiberglass cloth for cross-grain strength. There's an envelope of milled carbon fiber (I dare not open it in the house for fear of getting blood on the carpet), a long strip of 1/4-in.-wide carbon-fiber laminate (spar cap strips), a chunk of carbon-fiber angle (1/16-in. thick with 1/2-in. and 3/4-in. legs), and a 4-in. length of 1/4-in. dia. rod that I doubt I'll use much.
Also included was a wad of a dozen-or-so sheets showing perhaps a hundred potential applications of this stuff—well thought-out and well illustrated. They immediately catalyze your brain to invent a hundred more.
Some of the applications shown include:
- spars—strips or angle stock stuck on here and there with CA (ethyl cyanoacrylate adhesives, such as Hot Stuff);
- leading-edge (LE) and trailing-edge (TE) reinforcement;
- dihedral joint reinforcement;
- 1/8-in. reinforcement;
- 50-mil rod used as LE bumper/gusset for straightish wings;
- cord set in epoxy or CA for curvy LEs and outlines;
- carbon strip as spar cap-strips;
- carbon strips used as surface reinforcement for foam wings (if you ever get into Ron St. Jean's foam techniques for Free Flight);
- firewalls;
- 50-mil rod let into longerons or at the corners of box-type fuselages wherever needed;
- cord set into any joint that would otherwise be a bit weak;
- and dozens of other uses.
Stronger and lighter; it's the only way to fly.
Price: roughly $10 a square foot for the balsa-core laminates. Not cheap, but a square foot would make a lot of firewalls. Brochure $1. Address: Bob Violett Models, 1373 Citrus Rd., Winter Springs, FL 32708.
More about those rules-change proposals
I have already caught some flack over my comments (February issue); I'd have been surprised, and somewhat disappointed, if I hadn't. I'd also have been surprised if I had been absolutely correct.
Richard Doig corrected me on my statement that there was nothing in the rule book requiring a Hand-Launched Stick model, for example, to be hand-launched. The rule governing that does not appear in the FF Indoor Rubber rules, but is tucked away under Free Flight, General (page 8 of the 1984–85 rule book), paragraph 3: "Except for specific events requiring rise-off-ground (ROG), all models shall be hand-launched (HL)."
His proposal would prohibit sticking wheels on hand-launched models so that time spent running on the floor would not be counted as flight time. That proposal would not prohibit Helicopter, Autogiro, and Ornithopter models from having wheels, as they are not required to be hand-launched, although it seems to me the hand is best. (When was the last time you saw an ROG Ornithopter?) Perhaps Doig could modify his proposal to include such models in the hand-launched category.
Initial Vote
The ballots for the essentially useless Initial Vote have been cast. I'm not sure whether they make me want to cry, puke, or both, but it certainly isn't "none of the above." It is enough to make me lose interest in the whole rules-making process. But I can't, in good conscience. It is our life's blood. Details later, perhaps, when and if I'm up to it. It's a lot easier to just be a good guy and smile a lot.
CO-2, revisited
As a result of the lead item in my April column, Herb Clukey, headperson at Flyline Models Kitworks, sent me plans of his CO-2 Funster. It is a two-footer with a built-up wing and sheet-box fuselage with traditional windshield and side windows. Ed Lidgard could have designed it, although it lacks a few of his trademarks. The drafting is superb, in the finest tradition of Free Flight plans—almost as good as some of Paul Plecan's best. It can't help but fly great.
I have to admit I've never seen or built a Flyline kit, but those who have built them seem to swear by them. Mostly scale stuff. Send 50¢ for Flyline's catalog to Flyline, P.O. Box 2136, Fairfax, VA 22031.
Some small rubber-power kits—Peck's Prairie Bird, for example—show how to convert to CO-2. Any rubber-power design with about a 20-inch wingspan can be converted to CO-2 quite easily.
Rib-cutting, revisited
Make a template from thin metal or plywood, hold it firmly against the balsa sheet stock, cut around it with a razor blade, and you have a rib. What's the big deal? No big deal, really, unless you want to do the job just a little better or faster. We've presented half a dozen variations on the basic theme over the past few years.
World-class Wakefield competitor Paul Van Leuven (from Australia) read what we had to say and didn't think much of it. "Good for small models, perhaps, but I'd hardly use those methods for FAI projects." Paul's method is a bit elaborate, and you may elect not to pay that price. Nevertheless, even if you don't go all the way with Paul's method, there are many nifty features you might take from it. Here is Paul's method:
- Make two kinds of templates. The large one is made about 1/16 in. larger all around than the finished size and is used for rough cutting. Using this, you can conserve precious C-grain balsa, avoid bad spots, and ensure that the grain is in the same direction on every rib by carefully locating the template.
- The second set of templates—two or more are required—are for finish sanding and are cut about 1/64 in. larger than the finished dimensions. These should be made of steel, or if made of 1/16-in. plywood, be faced with Laminex.
- Rough-cut ribs are then stacked together using a "little rub of rubbing glue" on the leading and trailing edges. The rubbing-glue stick I found in a local art-supply store is called Uhu Stic. Stationery stores should have it, too.
- Stick a sanding template to each end of the stack, then block-sand the stack to conform to the template. Paul says about 1/64 in. of the template will be sanded away in the process, so you come out on the nose. If you use steel templates, you might wish to cut them closer to the line because it's hard to sand 1/64 off a steel template.
- If the templates are to be reused, build up the edge with a layer of model cement, which will be sanded away during the sanding of the next lot of ribs.
- For sanding spar notches to finished size, Paul uses a piece of spar stock with a strip of sandpaper of the same width glued to it.
Payment for photos, etc.
You are supposed to be paid for photos and information used in this column—$5 a whack—by the publisher. (Material from newsletters, etc., doesn't count, however.) Payment should be received within a month after I submit a voucher—but sometimes I get behind in submitting vouchers (recently by as much as 10 months). I promise to do better.
There are many chances for slip-ups, especially with photos. If a photo gets published without a credit, it is almost impossible for me to trace its source. Also, it is hard to keep track of photos sent to me by one person but taken by another. If you feel you should have been paid for an item but have not been, please let me know and I'll try to sort it out.
If you send me photos taken by another person, please include his/her address. Writing caption material on the back of photos is OK, although it often transfers to the front of another photo, so it is best if the caption material is written on a piece of paper that is taped to the back of the photo in such a way that it can be read from the front.
That's all for now. I'll be back in two months. Keep those cards, letters, and photos coming!
Bob Meuser 4200 Gregory St. Oakland, CA 94619
Transcribed from original scans by AI. Minor OCR errors may remain.

