
Free Flight: Duration
Bob Meuser
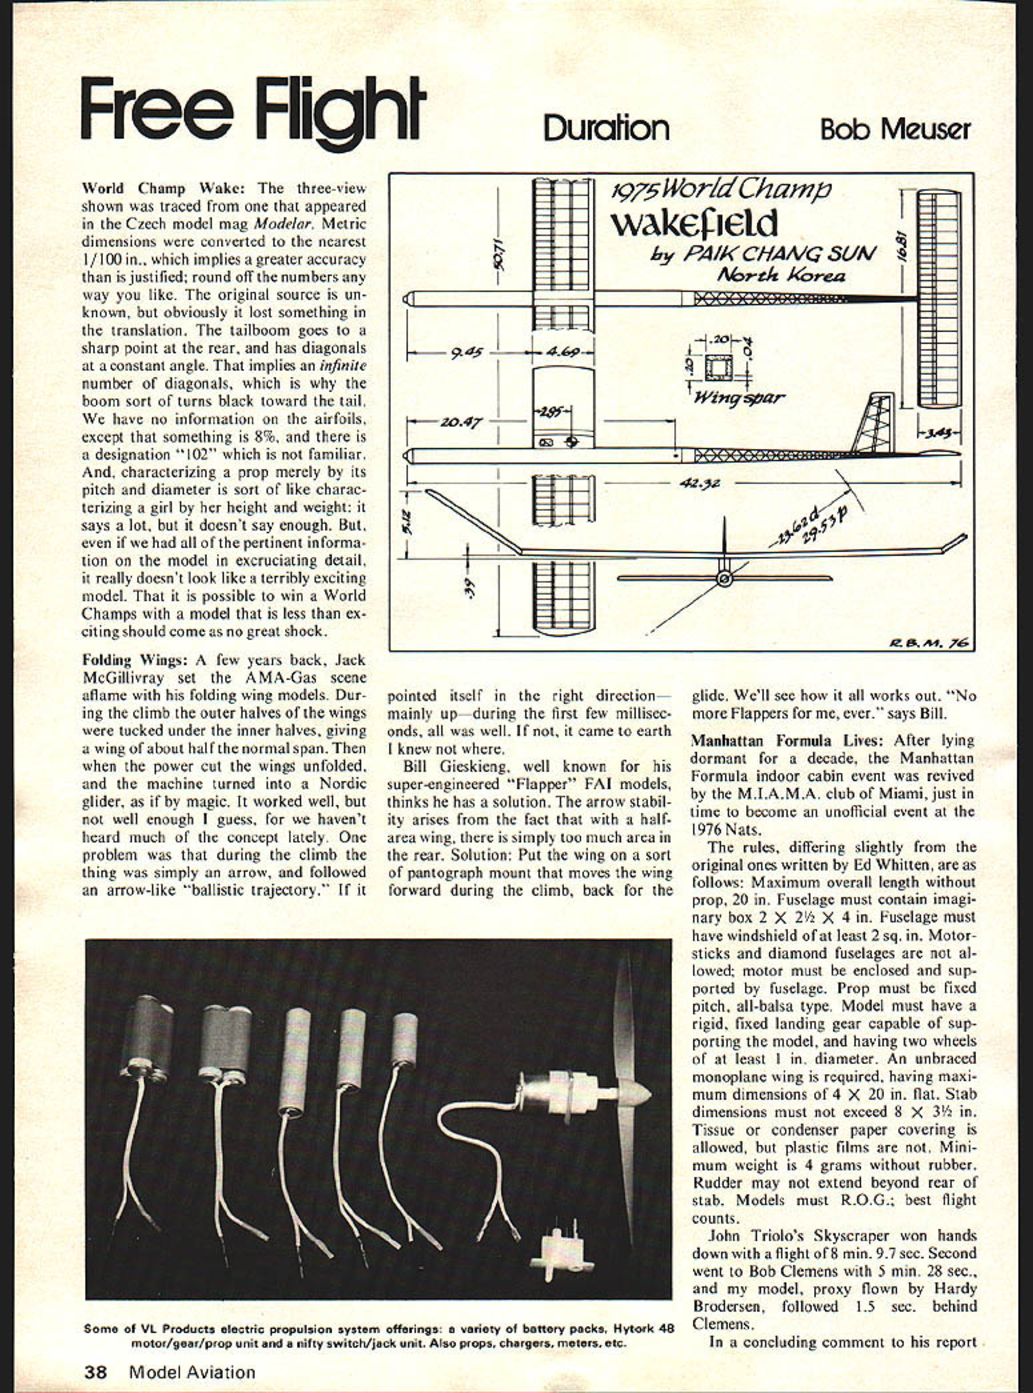
World Champ Wake: The three-view shown was traced from one that appeared in the Czech model mag Modelar. Metric dimensions were converted to the nearest 1/100 in., which implies a greater accuracy than is justified; round off the numbers any way you like. The original source is unknown, but obviously it lost something in the translation. The tailboom goes to a sharp point at the rear, and has diagonals at a constant angle. That implies an infinite number of diagonals, which is why the boom sort of turns black toward the tail. We have no information on the airfoils, except that something is 8%, and there is a designation "102" which is not familiar. And, characterizing a prop merely by its pitch and diameter is sort of like characterizing a girl by her height and weight: it says a lot, but it doesn't say enough. But, even if we had all of the pertinent information on the model in excruciating detail, it really doesn't look like a terribly exciting model. That it is possible to win a World Champs with a model that is less than exciting should come as no great shock.
Folding Wings: A few years back, Jack McGillivray set the AMA-Gas scene aflame with his folding wing models. During the climb the outer halves of the wings were tucked under the inner halves, giving a wing of about half the normal span. Then when the power cut the wings unfolded, and the machine turned into a Nordic glider, as if by magic. It worked well, but not well enough I guess, for we haven't heard much of the concept lately. One problem was that during the climb the thing was simply an arrow, and followed an arrow-like "ballistic trajectory." If it pointed itself in the right direction — mainly up — during the first few milliseconds, all was well. If not, it came to earth I knew not where.
Bill Gieskieng, well known for his super-engineered "Flapper" FAI models, thinks he has a solution. The arrow stability arises from the fact that with a half-area wing, there is simply too much area in the rear. Solution: Put the wing on a sort of pantograph mount that moves the wing forward during the climb, back for the glide. We'll see how it all works out. "No more Flappers for me, ever," says Bill.
Manhattan Formula Lives: After lying dormant for a decade, the Manhattan Formula indoor cabin event was revived by the M.I.A.M.A. club of Miami, just in time to become an unofficial event at the 1976 Nats.
The rules, differing slightly from the original ones written by Ed Whitten, are as follows: Maximum overall length without prop, 20 in. Fuselage must contain imaginary box 2 X 2 X 4 in. Fuselage must have windshield of at least 2 sq. in. Motorsticks and diamond fuselages are not allowed; motor must be enclosed and supported by fuselage. Prop must be fixed pitch, all-balsa type. Model must have a rigid, fixed landing gear capable of supporting the model, and having two wheels of at least 1 in. diameter. An unbraced monoplane wing is required, having maximum dimensions of 4 X 20 in. flat. Stab dimensions must not exceed 8 X 3 1/2 in. Tissue or condenser paper covering is allowed, but plastic films are not. Minimum weight is 4 grams without rubber. Rudder may not extend beyond rear of stab. Models must R.O.G.; best flight counts.
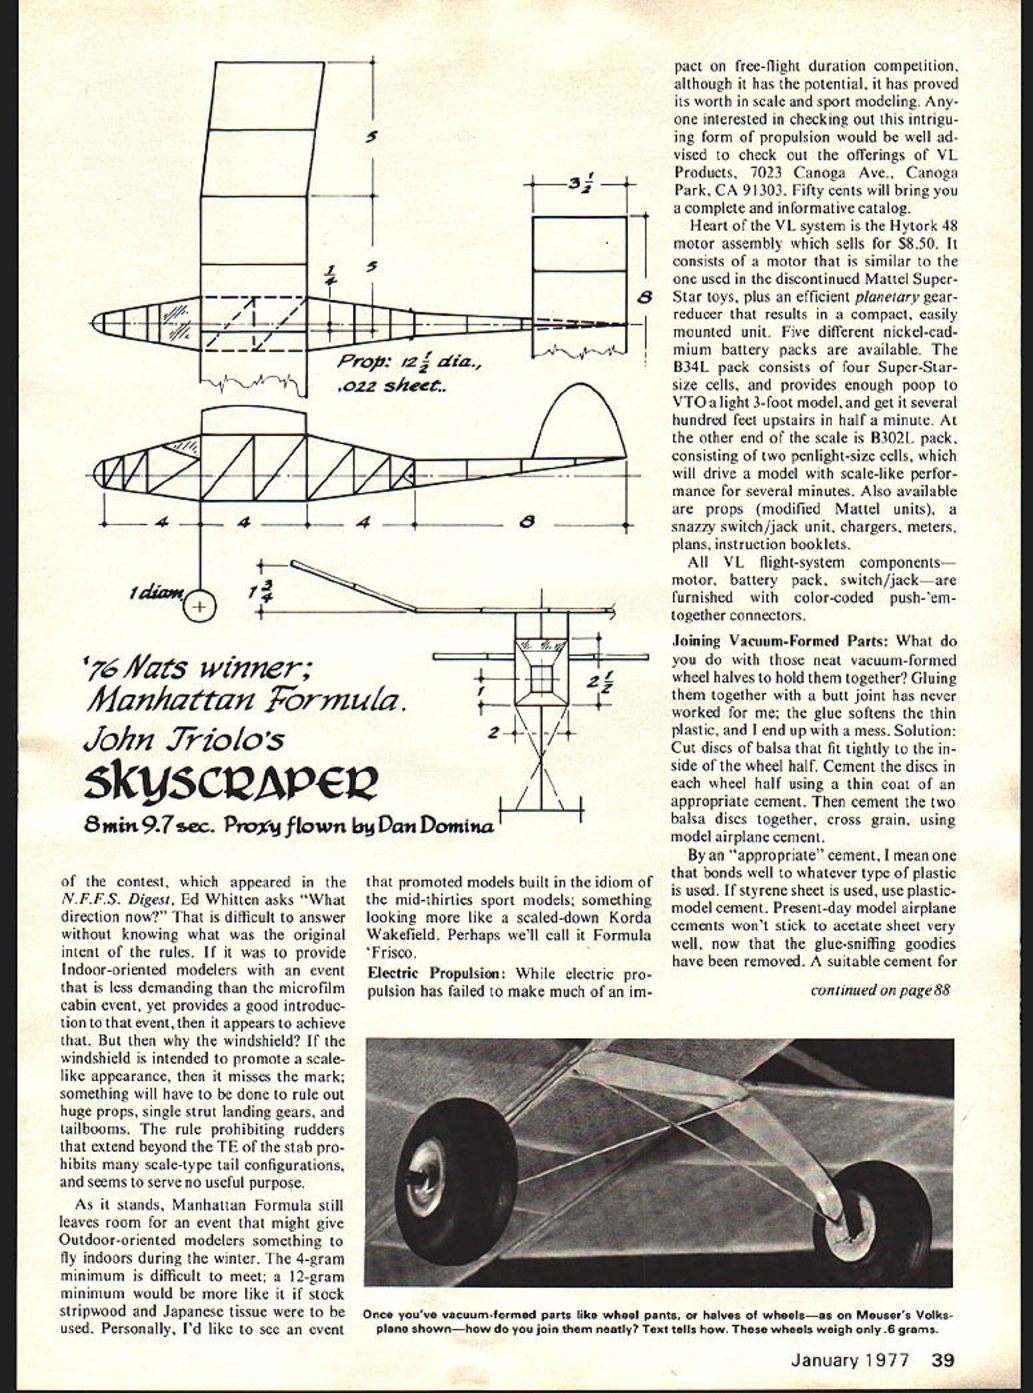
John Triolo's Skyscraper won hands down with a flight of 8 min. 9.7 sec. Second went to Bob Clemens with 5 min. 28 sec., and my model, proxy flown by Hardy Brodersen, followed 1.5 sec. behind Clemens.
In a concluding comment to his report, of the contest, which appeared in the N.F.F.S. Digest, Ed Whitten asks "What direction now?" That is difficult to answer without knowing what was the original intent of the rules. If it was to provide Indoor-oriented modelers with an event that is less demanding than the microfilm cabin event, yet provides a good introduction to that event, then it appears to achieve that. But then why the windshield? If the windshield is intended to promote a scale-like appearance, then it misses the mark; something will have to be done to rule out huge props, single-strut landing gears, and tailbooms. The rule prohibiting rudders that extend beyond the TE of the stab prohibits many scale-type tail configurations, and seems to serve no useful purpose.
As it stands, Manhattan Formula still leaves room for an event that might give Outdoor-oriented modelers something to fly indoors during the winter. The 4-gram minimum is difficult to meet; a 12-gram minimum would be more like it if stock stripwood and Japanese tissue were to be used. Personally, I'd like to see an event that promoted models built in the idiom of the mid-thirties sport models; something looking more like a scaled-down Korda Wakefield. Perhaps we'll call it Formula 'Frisco.
Electric Propulsion:
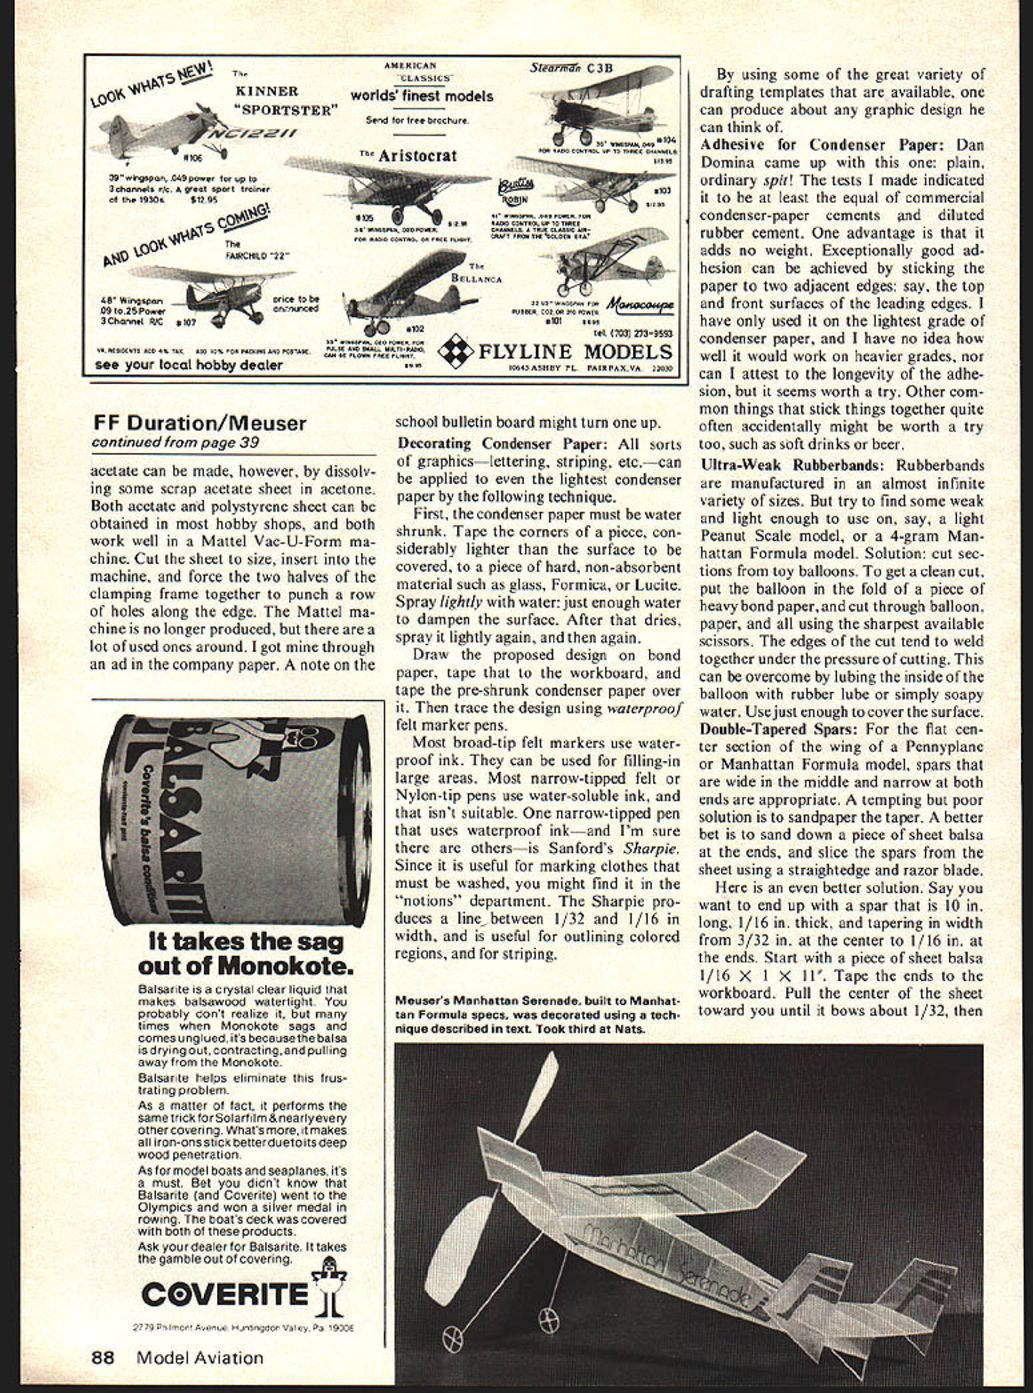
While electric propulsion has failed to make much of an impact on free-flight duration competition, although it has the potential, it has proved its worth in scale and sport modeling. Anyone interested in checking out this intriguing form of propulsion would be well advised to check out the offerings of VL Products, 7023 Canoga Ave., Canoga Park, CA 91303. Fifty cents will bring you a complete and informative catalog.
Heart of the VL system is the Hytork 48 motor assembly which sells for $8.50. It consists of a motor that is similar to the one used in the discontinued Mattel Super-Star toys, plus an efficient planetary gear reducer that results in a compact, easily mounted unit. Five different nickel-cadmium battery packs are available. The B34L pack consists of four Super-Star-size cells, and provides enough pop to VTO a light 3-foot model, and get it several hundred feet upstairs in half a minute. At the other end of the scale is the B302L pack, consisting of two penlight-size cells, which will drive a model with scale-like performance for several minutes. Also available are props (modified Mattel units), a snazzy switch/jack unit, chargers, meters, plans, instruction booklets.
All VL flight-system components—motor, battery pack, switch/jack—are furnished with color-coded push-together connectors.
Joining Vacuum-Formed Parts:
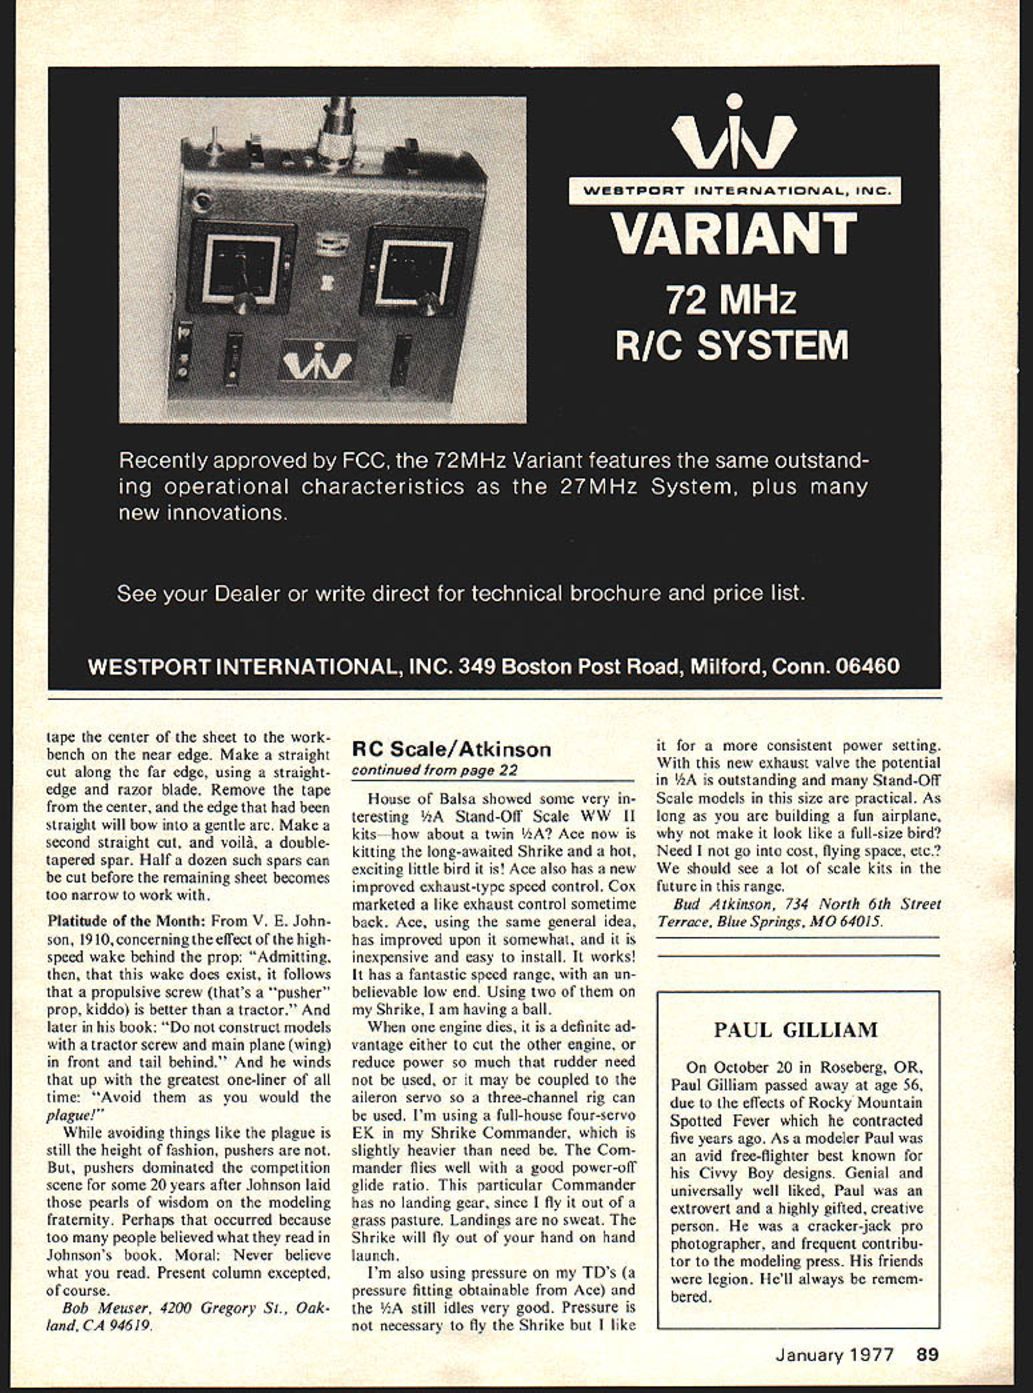
What do you do with those neat vacuum-formed wheel halves to hold them together? Gluing them together with a butt joint has never worked for me; the glue softens the thin plastic, and I end up with a mess. Solution: Cut discs of balsa that fit tightly to the inside of the wheel half. Cement the discs in each wheel half using a thin coat of an appropriate cement. Then cement the two balsa discs together, cross grain, using model airplane cement.
By an "appropriate" cement, I mean one that bonds well to whatever type of plastic is used. If styrene sheet is used, use plastic-model cement. Present-day model airplane cements won't stick to acetate sheet very well, now that the glue-sniffing goodies have been removed. A suitable cement for acetate can be made, however, by dissolving some scrap acetate sheet in acetone. Both acetate and polystyrene sheet can be obtained in most hobby shops, and both work well in a Mattel Vac-U-Form machine. Cut the sheet to size, insert into the machine, and force the two halves of the clamping frame together to punch a row of holes along the edge. The Mattel machine is no longer produced, but there are a lot of used ones around. I got mine through an ad in the company paper. A note on the school bulletin board might turn one up.
Decorating Condenser Paper:
All sorts of graphics—lettering, striping, etc.—can be applied to even the lightest condenser paper by the following technique.
First, the condenser paper must be water shrunk. Tape the corners of a piece, considerably lighter than the surface to be covered, to a piece of hard, non-absorbent material such as glass, Formica, or Lucite. Spray lightly with water; just enough water to dampen the surface. After that dries, spray it lightly again, and then again.
Draw the proposed design on on paper, tape that to the workboard, and tape the pre-shrunk condenser paper over it. Then trace the design using waterproof felt marker pens.
Most broad-tip felt markers use waterproof ink. They can be used for filling-in large areas. Most narrow-tipped felt or Nylon-tip pens use water-soluble ink, and that isn't suitable. One narrow-tipped pen that uses waterproof ink—and I'm sure there are others—is Sanford's Sharpie. Since it is useful for marking clothes that must be washed, you might find it in the "notions" department. The Sharpie produces a line between 1/32 and 1/16 in width, and is useful for outlining colored regions, and for striping.
Adhesive for Condenser Paper:
Dan Domina came up with this one: plain, ordinary spit! The tests I made indicated it to be at least the equal of commercial condenser-paper cements and diluted rubber cement. One advantage is that it adds no weight. Exceptionally good adhesion can be achieved by sticking the paper to two adjacent edges: say, the top and front surfaces of the leading edges. I have only used it on the lightest grade of condenser paper, and I have no idea how well it would work on heavier grades, nor can I attest to the longevity of the adhesion, but it seems worth a try. Other common things that stick things together quite often accidentally might be worth a try too, such as soft drinks or beer.
Ultra-Weak Rubberbands:
Rubberbands are manufactured in an almost infinite variety of sizes. But try to find some weak and light enough to use on, say, a light Peanut Scale model, or a 4-gram Manhattan Formula model. Solution: cut sections from toy balloons. To get a clean cut, put the balloon in the fold of a piece of heavy bond paper, and cut through balloon, paper, and all using the sharpest available scissors. The edges of the cut tend to weld together under the pressure of cutting. This can be overcome by lubing the inside of the balloon with rubber lube or simply soapy water. Use just enough to cover the surface.
Double-Tapered Spars:
For the flat center section of the wing of a Pennyplane or Manhattan Formula model, spars that are wide in the middle and narrow at both ends are appropriate. A tempting but poor solution is to sandpaper the spar. A better bet is to sand down a piece of sheet balsa at the ends, and slice the spars from the sheet using a straightedge and razor blade.
Here is an even better solution. Say you want to end up with a spar that is 10 in. long, 1/16 in. thick, and tapering in width from 3/32 in. at the center to 1/16 in. at the ends. Start with a piece of sheet balsa 1/16 X 1 X 11. Tape the ends to the workboard. Pull the center of the sheet toward you until it bows about 1/32, then tape the center of the sheet to the workbench on the near edge. Make a straight cut along the far edge, using a straightedge and razor blade. Remove the tape from the center, and the edge that had been straight will bow into a gentle arc. Make a second straight cut, and voilà, a double-tapered spar. Half a dozen such spars can be cut before the remaining sheet becomes too narrow to work with.
Platitude of the Month: From V. E. Johnson, 1910, concerning the effect of the high-speed wake behind the prop: "Admitting, then, that this wake does exist, it follows that a propulsive screw (that's a 'pusher' prop, kiddo) is better than a tractor." And later in his book: "Do not construct models with a tractor screw and main plane (wing) in front and tail behind." And he winds that up with the greatest one-liner of all time: "Avoid them as you would the plague!"
While avoiding things like the plague is still the height of fashion, pushers are not. But, pushers dominated the competition scene for some 20 years after Johnson laid those pearls of wisdom on the modeling fraternity. Perhaps that occurred because too many people believed what they read in Johnson's book. Moral: Never believe what you read. Present column excepted, of course.
Bob Meuser, 4200 Gregory St., Oakland, CA 94619.
Transcribed from original scans by AI. Minor OCR errors may remain.

