
FREE FLIGHT DURATION
Louis Joyner, 4257 Old Leeds Rd., Birmingham, AL 35213
Please allow me to introduce myself: I'm Louis Joyner, and I'll be writing the Duration column every other month, alternating with Harry Murphy. I'm 47 years old, and to be honest, I can't remember when I started with free flight. I do recall teething on a Jim Walker .74 Fighter. The usual Comet and Monogram models followed. I built my first Wakefield at the age of eight, and who knows how many more since then. As a Junior and Senior I flew just about every free flight event, as well as some indoor and control line. After getting back into free flight some 20 years ago, I dabbled with glider and power, but I have concentrated on Wakefield for the last few years.
To me, the technical evolution of this hobby/sport offers the most challenge and interest. I will try to cover all facets of free flight duration, so please drop me a note about what you are doing. We all have a lot to learn.
Variable pitch (VP)
If you've looked at a graph of the torque curve of a rubber motor, you know it's like a ski slope — all downhill. It doesn't take a rocket scientist to see that some sort of variable-pitch propeller could help even out that torque, which can vary from well over 120 inch-ounces to less than 30 during the half-minute or so of a typical Wakefield motor run.
But engineering a workable variable-pitch prop isn't easy. The simplest approach, used by Löffler back in the 1970s in Germany, used the air resistance of the blades working against motor torque to increase pitch during the power burst.
Mechanically, this type of VP prop is fairly easy to make. A few years back I cobbled one up using a drill press, hacksaw, and files. The design was loosely based on Löffler's. The two wire outriggers each went from the blade through an aluminum block, made a 180° turn and went back into a second block mounted about a half-inch further forward on the shaft. Under high torque, the front block, which was driven by the shaft, would twist a few degrees relative to the rear block. This caused the prop outriggers (and the blades) to twist to a higher pitch. As torque dropped off and aerodynamic load on the blades lessened, the prop outrigger wires, which acted like torsion springs, would gradually return the blades to the low-pitch setting.
The first full-power flight was a real mess. I had neglected to incorporate any sort of stop into the system. Under maximum torque the blades twisted around to about a 90° angle. The model barely missed the ground, with the almost-feathered blades turning very slowly. When the torque dropped off a bit, the blades moved back to a more normal pitch and the model began to climb.
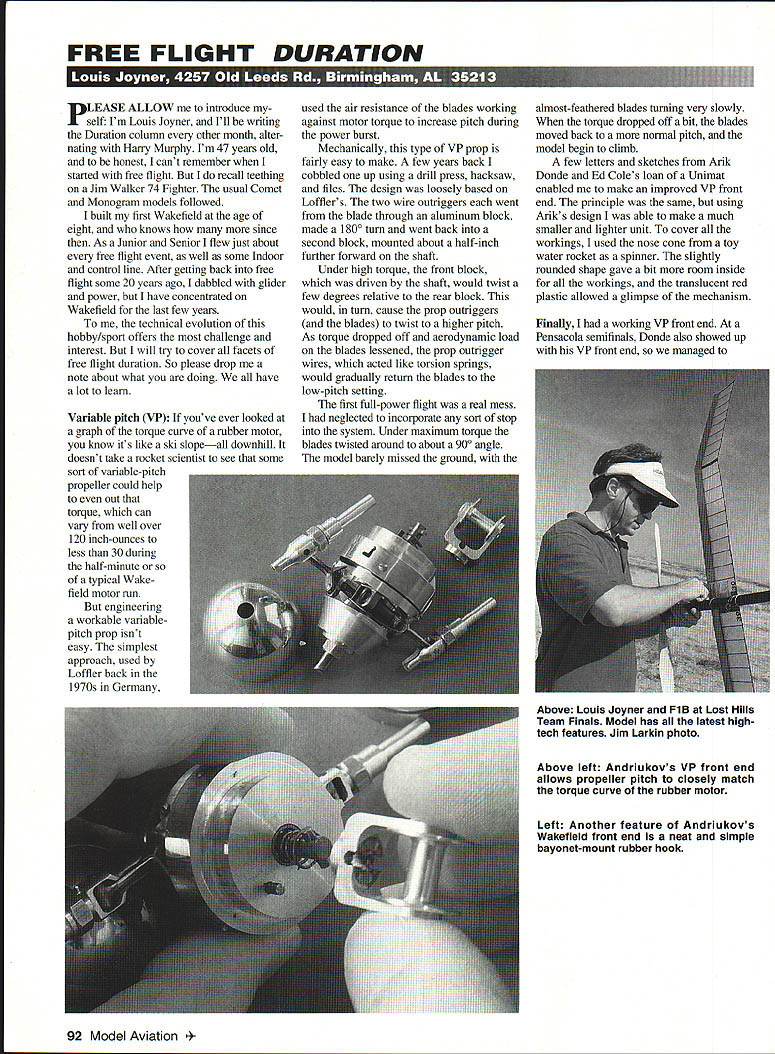
A few letters and sketches from Arik Donde and Ed Coles and the loan of a Unimat enabled me to make an improved VP front end. The principle was the same, but using Arik's design I was able to make a much smaller and lighter unit. To cover all the workings, I used the nose cone from a toy water rocket as a spinner. The slightly rounded shape gave a bit more room inside for the mechanism, and the translucent red plastic allowed a glimpse of the workings.
At a Pensacola semifinal Donde also showed up with his VP front end, and we compared notes and designs. After a few false starts I finally threw the VP pieces in a box and forgot about variable pitch for a while. Although the front end would decrease blade pitch, torque still fell off and I was never satisfied — the model didn't climb noticeably better. Besides, it was easier just to make a fairly limp blade; its area forward would do about the same thing without the complications.
Over in Ukraine, Alexander Andriukov developed a rather complicated VP front end that also incorporated delayed prop release (DPR). Aeromodeller published photos and a sketch showing how it worked. I tracked down detailed drawings in a Soviet aviation publication; a look at the drawings convinced me the thing was way past my skill level as a machinist.
Andriukov's front end was, in a word, complicated. A torque-wound rubber motor turned a cone-shaped cam near the front. A blade-mounted, spring-loaded outrigger cam follower changed pitch as the cam moved. A rather beefy spring inside the cone turned the cam back against motor torque. The cam was a significant breakthrough: by changing the cam shape, pitch could be changed in either direction along the torque curve. You could have low pitch at launch, high pitch during the burst, and gradually reduce pitch during cruise.
California's Bob Piserchio was also working on a cam-operated VP front end, but much simpler to make. Bob eliminated the blade-feathering DPR feature and the ball-bearing cam followers, producing a VP front end about the same size and weight as his conventional Montreal-stop front ends. You can find complete details on Bob's VP front end in the 1988 Symposium.
Aside from simplicity, the main difference between the Andriukov and Piserchio front ends is the amount of change between high and low pitch settings. Bob used about 15° of change, while Andriukov used about 6°. Piserchio decided not to market his VP front end, and Andriukov had originally quoted prices upwards of $1,000 for his.
Evidently Andriukov rethought his market and set up some production. Through Ed Turner I finally was able to get one of the Andriukov front ends. Although the price has dropped considerably, it is still about the cost of one-and-a-half Nelson .15s — so much for Rubber being a cheap event.
You do get a lot for your money. The workmanship and finish are impeccable; I understand from Ed that most of the work is done with a CNC milling machine. Even the spinner is milled from aluminum bar stock. As with most Ukrainian DPR front ends, this one uses an internal plunger, working off the timer, to hold the prop out and feathered for launch. A ratchet inside the nose block allows extra turns to be added by hand during the wait for good air.
Pump it out
Mixing epoxy used to be one of my least favorite activities: measuring, weighing, spilling, and then hoping you'd done it right. A handy set of measuring pumps from West System solved all the problems and makes measuring epoxy quick and trouble-free.
The two pumps, which look like fast-food ketchup dispensers, are designed to work with West System 105 resin and 205 or 206 hardener. The mix ratio is 1:5. All you do is take off the lids and screw on the pumps. One squirt from each pump will give you just the right ratio of resin to hardener. Need more? Use two squirts of each, or three, and so on. I found that one squirt of each, using the quart-size minipump, will fill a 35mm film can about two-thirds full.
The West System epoxies and pumps are available from the manufacturer:
- Gougeon Brothers, Inc., P.O. Box 908, Bay City, MI 48707;
- Local marine supply stores;
- Weston Aerodesign Co., 944 Placid Ct., Arnold, MD 21012;
- Composite Structures Technology, 2090 Andre Ave., Los Gatos, CA 93402.
Imports
One by-product of the breakup of the Soviet Union is all the neat model parts and pieces that are now available here. Ron Felix is handling components made by two modelers: Vladimir Alexandrovich Feodorov of Moscow and Sergey Dolzhenko of Vilnius, Lithuania. Available components include:
- Wakefield motor tubes
- Tail booms
- Prop blades
- Front ends (no VP yet)
- Carbon-fiber spars
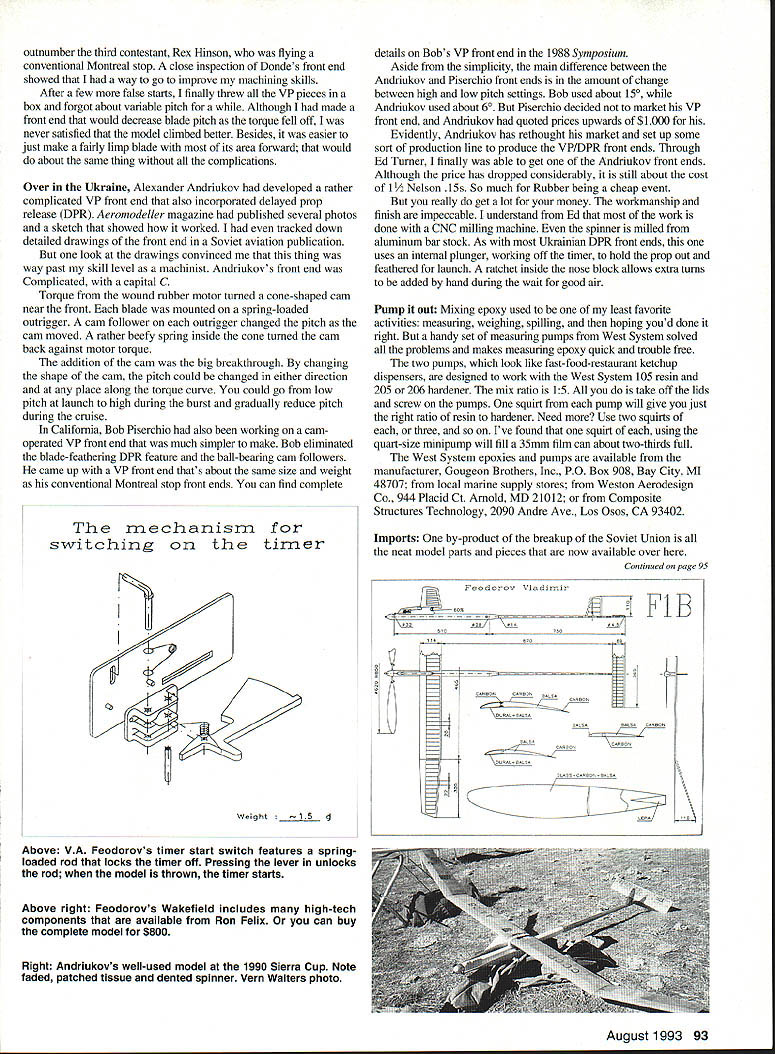
One interesting item is a glass-and-carbon tube for use as a stab spar. Weight is about 1.5 grams; two diameters, 4.0 and 5.2 mm, are available. The timer start switch shown in the accompanying sketch gives some idea of the innovative design abilities of these two emerging capitalists. For both catalogs, send $2 to Ron Felix, P.O. Box 74, Solebury, PA 18963.
Zeek chronicles
(No — a piece from Harry Murphy's column didn't drift in here by mistake!) I probably have the honor of being the last person to win a trophy at the NATS with a Zeek (not counting all the recent Nostalgia stuff). At the 1961 Willow Grove NATS I won two third-place trophies in the Junior division, but I'm getting ahead of myself.
My first Zeek was the 1/2A kit. I built it for the 1956 Dallas NATS. Not much luck on the contest field, but my dad, my brother, and I stayed at the Alamo Plaza, as did Lew Mahieu. It was quite a thrill for me, as a teenager, to meet him.
That Zeek was put aside as a seemingly endless procession of other, bigger, more up-to-date models followed (including a very badly kitted A/B Zeek). For the 1960 NATS in Dallas, I rummaged through the attic, found the old 1/2A Zeek and used it as the basis for an FAI Power model.
First I cut a few inches out of the center section of the wing and stab to reduce the area to the minimum for an .049 engine. Since weight was no problem, I sheeted the wing top and bottom with some rather hard 1/32" sheet and covered everything with red silkspan. Lots of dope and a few coats of paste wax made the wing glisten. Then I made a new, longer fuselage with beam mounts to accommodate a Cox Space Hopper. The rudder was relocated to the bottom.
At Dallas the model proved fast going up and coming down. A bigger rudder made the climb a little less squirrely. No luck at Dallas, but the model somehow survived.
The next year, at Philadelphia, I entered FAI Power again. On the first flight I maxed. The model climbed quite well and then went into a decent glide. I thought I had a three-minute dead-air airplane; little did I realize the first flight had been in lift. As subsequent flights proved, the model was hopeless in neutral air. Anyway, I ended up in third place. Then I stuck some floats on it for ROW — another third place. At least it was consistent! College and the introduction of 80/20 fuel put an end to the Zeek.
Transcribed from original scans by AI. Minor OCR errors may remain.

