

FREE FLIGHT DURATION
Louis Joyner, 4221 Old Leeds Rd., Birmingham AL 35213
Looking and Learning
If you are like most Free Flighters, you toil in relative isolation with only limited contact with like-minded modelers. That’s all the more reason to take every opportunity at a contest to examine the work of other modelers. Study their models up close, check out the details, and ask questions. As long as the modeler isn’t busy getting ready for a contest flight, most will be more than willing to show off their handwork. The question “How did you do that?” usually leads into a long discussion of tools and techniques.
Which models should you look at? Don’t limit yourself to the events you fly—many, if not all, techniques can carry over from one type of Free Flight to another. Don’t limit your attention to the winning models; there are good ideas even on the worst-flying models (and bad ideas are sometimes used on good-flying models). Use judgment.
Overall appearance is a good place to start. At the risk of generalizing, most well-built and well-detailed models are clean and neat; that doesn’t necessarily mean an elaborate multicolored tissue-trim job or fancy graphics. Alexander Andriukov’s 1993 World Championships-winning model had plain white Polyspan on the wing, clear Mylar on the tail, and all the other parts were natural balsa, aluminum, carbon, or aramid. The model identification numbers were applied with a felt-tip pen. However, the structure was accurately built, and all the mechanical details were well thought out and neatly executed. I had the feeling that Alex invested a great deal of time in developing the fixtures to build the model, and in designing and producing the mechanisms, such as the variable-pitch front end. This particular model was a product of Alex’s production line, but it flew superbly.
As an ultimate extension of “looking and learning,” Jerry Fitch purchased Alex’s 1993 winner, studied it, improved it, and went on to win the World Championships with his design two years later. A good analogy in full-scale aviation is to compare the Wright brothers’ 1903 aircraft with the rival Langley Aerodrome. The Wrights’ Flyer was simple and straightforward—built with care, but without embellishment. The important thing was their concept, not the manifestation of it. Built at considerably higher cost, Langley’s aircraft was exquisitely detailed, with thin-walled steel tubing joined by elaborately filigreed brackets that would rival an Italian racing bicycle. The Wrights’ simple, straightforward Flyer could be repaired easily on site, with minimal delays. The more complicated Aerodrome required extensive repairs after its first attempt at flight.
This doesn’t mean attractive models can’t fly well. A few years ago I examined Bob White’s Nats-winning coupe. The workmanship, in traditional balsa and tissue, was superb. What impressed me most was the attention to detail and finish on even the smallest component. Unlike the simple piece of 1/16 plywood most builders use as the stabilizer mount, Bob sculpted a streamlined mount from plywood and balsa, which flowed smoothly into the rolled-balsa tailboom. The pylon didn't seem to be attached to the motor tube, but rather to grow out of it. The whole fuselage looked as if it had been carved from one piece of shiny red plastic. But knowing Bob, it was all balsa and a lot of sandpaper was used. And as if to prove that pretty doesn't have to be heavy, a neat piece of lead was attached at the center of gravity (CG).
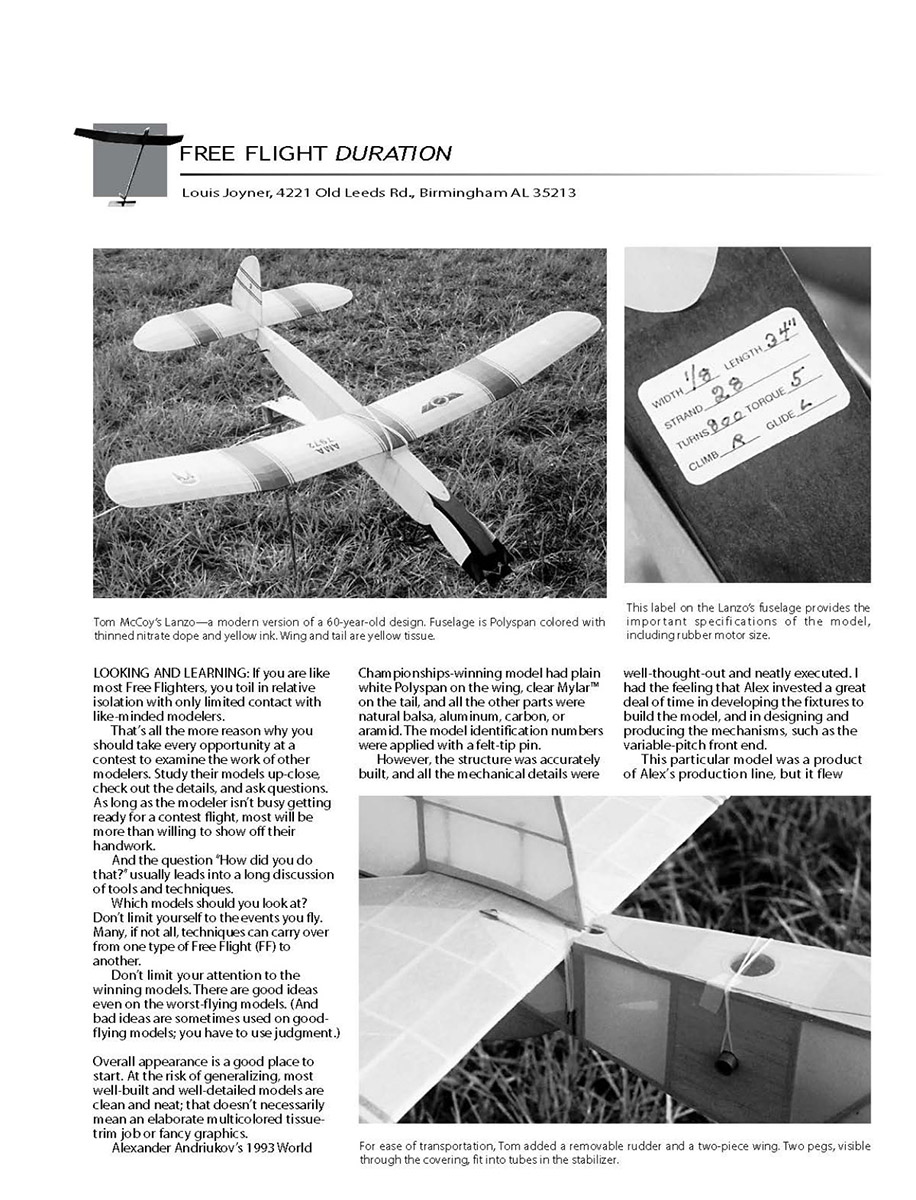
Tom McCoy is another builder who uses traditional modeling materials to turn out attractive, well-planned models. Close-up shots of his Lanzo Old-Time Rubber model show careful workmanship and clever ideas. The Lanzo features a two-piece wing and removable rudder to allow for easier packing when Tom takes the model to Society of Antique Modelers (SAM) meets overseas. The wing conversion is straightforward, with aluminum tubes in each half and wire joiners. The wing is strapped down to the fuselage in the conventional manner.
The removable rudder also uses two short pieces of aluminum tubing, mounted vertically in a flattened center stabilizer rib. Two wires extend from the bottom of the rudder, allowing it to be plugged into place easily or removed. Tom attaches the dethermalizer (DT) line to the trailing edge of the rudder to help hold it in place—tension on this line keeps enough downward pressure on the rudder to hold it.
Another neat feature on Tom's model is the simple, out-of-sight location for the Walston radio transmitter. Many modern FF models use a tiny, low-powered radio transmitter to aid in finding them when they are lost. This device has increased the life expectancy of a contest FF model from weeks to years. Now you can lavish attention on a model knowing it won't be lost on its first outing.
A small box made from 1/32" sheet balsa creates a recess on top of the fuselage at the CG. A piece of die-cut tape holds the box in place. The wing serves as the top cover for the transmitter box. The wire antenna leads back along one of the top longerons, through several short pieces of tubing.
Although the Lanzo's propeller seems fat and clunky by modern standards, the workmanship is flawless. The blades are covered with yellow silk and trimmed with black dope to complement the black tissue trim on the rest of the model.
One especially useful item is a small adhesive-backed sticker on the underside of the fuselage, on which Tom recorded the rubber-motor size and length, maximum turns, and torque. You could custom-make labels for all your models with a computer and a sheet of pre-printed labels from the office-supply store.
As an alternative, write directly on the model. My brother and I did that years ago with hand-launched gliders; we jotted trimming instructions on the balsa with a ball-point pen. Now I note such things—starter settings and CG location—with a fine-point permanent marker. Information on the model is much easier to keep track of than information in a notebook.
Ground Support Equipment and the PVC Starter Box
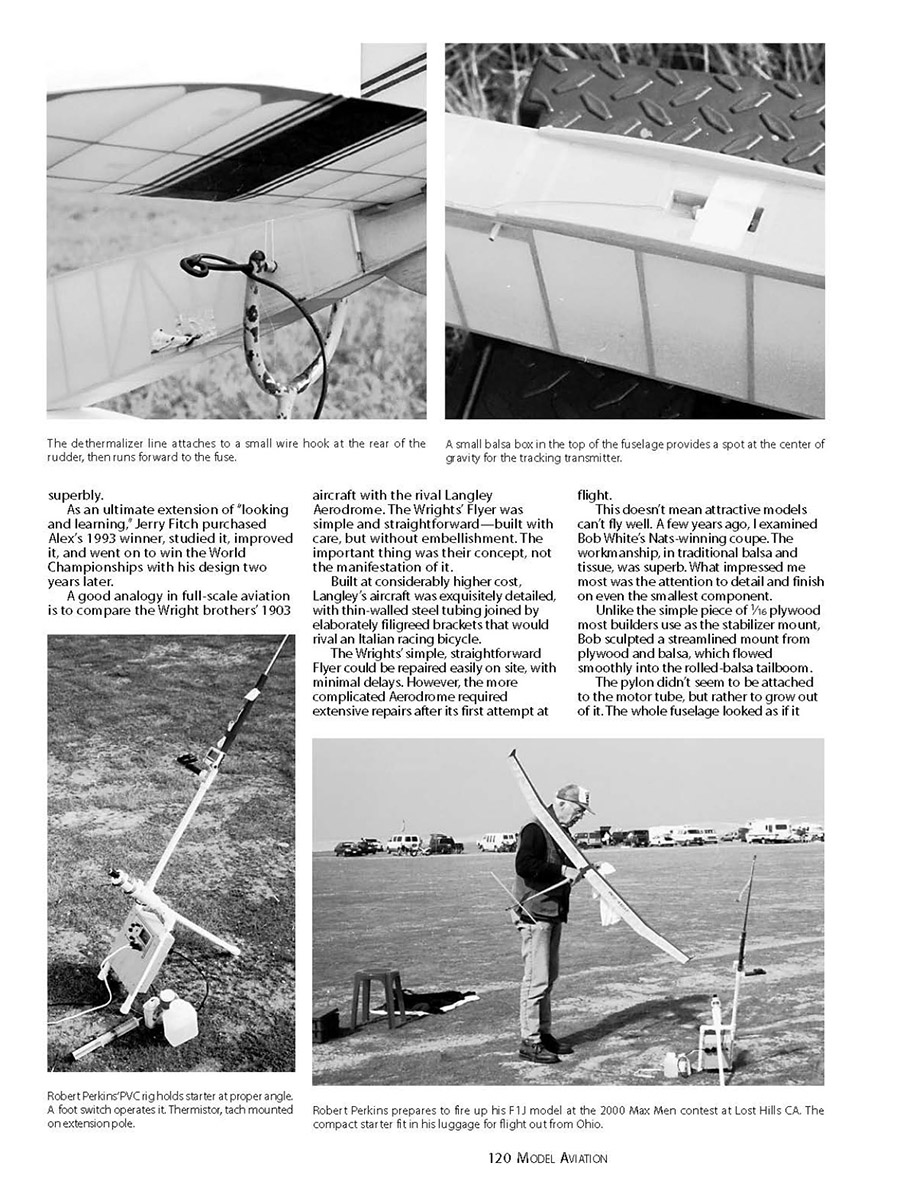
Don't limit your observation to the models; ground-support equipment often shows as much innovation as the aircraft themselves. Robert Perkins' neat starter box is made from polyvinyl chloride (PVC) plumbing pipe. The device—hardly a "box" in the traditional sense—holds a starter, power panel, battery, the motor, and a tachometer.
The unit can easily be disassembled for transport. Three legs provide support—even on uneven ground.
If you have never worked with PVC, it's quite easy. A trip to the local hardware or home-supply store will turn up all manner of pipes and fittings, and the cleaner and glue used to join the pieces. (Don't use epoxy or other model-gluing adhesives; the purpose-made adhesive works best.) Note that the sizes of plumbing pipe bear little resemblance to their actual sizes. Take along a ruler or a pair of calipers to check sizes.
Not all fittings are glued; bolts and wing nuts are used for many of the joints, allowing the unit to be taken apart easily. On Robert's version, the front two legs and the plywood box housing the power panel are one unit. The back leg comes off, as does the extension pole for the thermistor.
The starter is held in a cut-down piece of PVC by two stainless-steel hose clamps. If you want to make your own starter, begin with the power panel, battery, and starter. Shorten or lengthen the front legs to adjust overall height; change the back leg length to vary the angle of the starter.
Assemble the parts without glue and fiddle until everything suits you and the way you fly, then glue or bolt together as needed.
Helpful notes:
- The PVC needs no finish, but put a few coats of fuel-proof dope or epoxy resin on any wood components to protect them from weather and fuel.
- If you’re unsure of pipe sizing, measure before you buy fittings.
- Use bolts and wing nuts for joints you’ll need to disassemble frequently.
Transcribed from original scans by AI. Minor OCR errors may remain.

