

FREE FLIGHT DURATION
Louis Joyner, 4257 Old Leeds Road, Birmingham, AL 35213
In the August column I mentioned one of the Ukrainian Wakefields had a near miss with the ground when the flier stretched the delayed prop release (DPR) out a bit too long. (He maxed anyway.) I had thought the flier was Eugeny Gorban, but after the August column was in production Tucson F1B flier Vern Walters called with a correction. The flier was actually Yuri Blachevich, who ended up in seventh place. Vern should know—he and Sal Fruciano spent the week at the field with Yuri and the winner, Alexander Andriukov.
Vern said he watched Yuri launch; the delay was long, the model stalled, nearly hit the ground, then zoomed up to max. Andriukov was also watching. He shortened the delay time slightly before launching and had no problems.
Andriukov made another slight adjustment just before the final flyoff round. He opened the glide turn up slightly to give an almost two-minute circle in the glide. It obviously worked; he did almost nine minutes.
Gorban, on the other hand, tweaked the stab up just a bit and stalled all the way down. He still did more than four minutes. Later he told Ed Turner that he was going to throw away his screwdriver.
DPR — Part Two
Last time I talked about the various DPR front ends and how they worked. This time we'll discuss the most critical part: making sure they work.
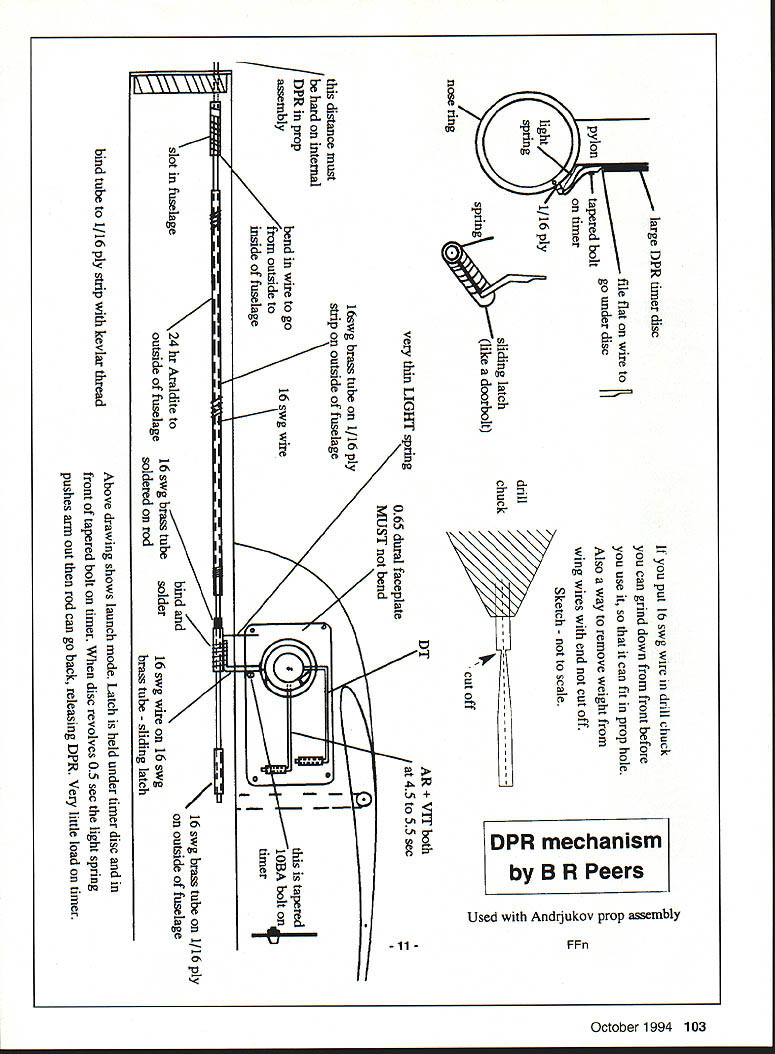
No matter what front end you use, it still must be connected back to the timer. Most systems I’ve seen use solid wire running from the nose back to the pylon. The simplest system, favored by Andriukov, uses a piece of piano wire with a right-angle bend at the back. This is trapped behind a disc on the timer and blocked from rearward movement by a small screw head on the timer faceplate. When the timer begins to turn, a slot in the disc moves over the wire, allowing it to ride up and back past the screw head. (A sketch in Free Flight News illustrates this well.)
Another common system uses an extra wire lever on the timer. The lever extends forward to an aluminum block pivot. The lever goes through the block and then is bent down, where it blocks a fore-and-aft hole in the block. The wire from the DPR front end extends through this hole and is blocked by the timer lever. When the timer trips a fraction of a second after launch, the lever flips up, allowing the wire to move to the rear and the prop to start turning.
All of this presupposes an accurate timer and a good start switch. One that works most of the time just isn't going to get it. Thirty-two strands of FAI Tan II rubber will pull a model straight up very fast; it will pull it straight down even faster. Make sure everything works perfectly every time.
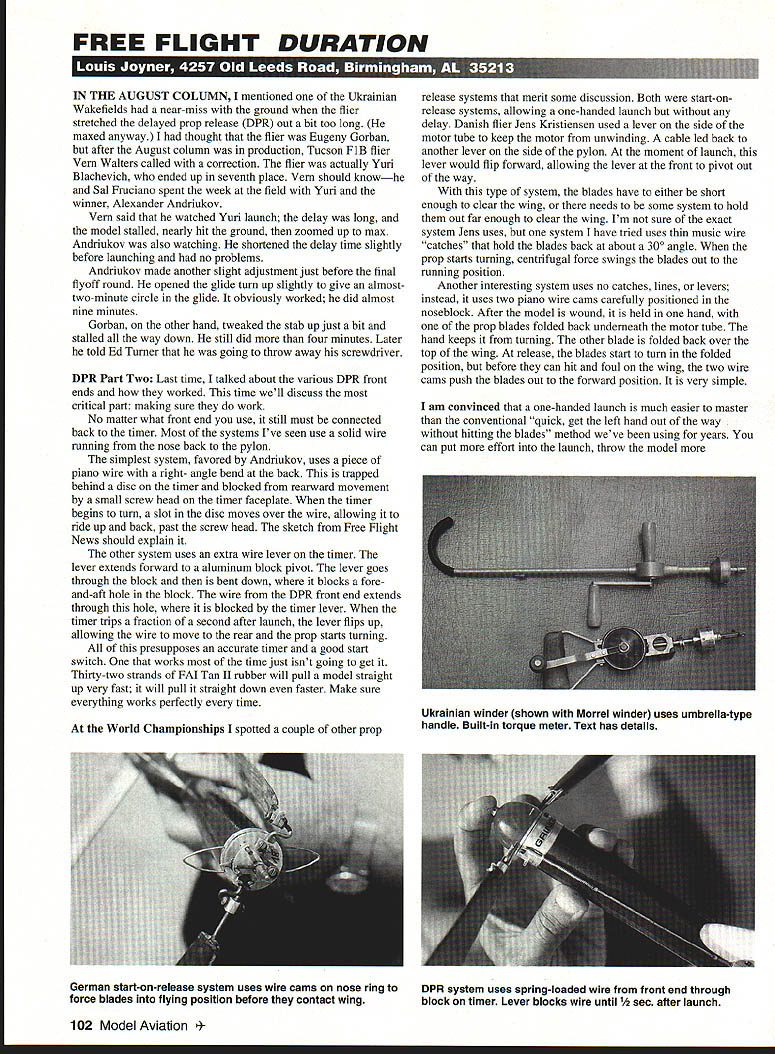
At the World Championships I spotted a couple of other prop release systems that merit discussion. Both are start-on-release systems, allowing a one-handed launch but without any delay.
- Danish flier Jens Kristensen used a lever on the side of the motor tube to keep the motor from unwinding. A cable led back to another lever on the side of the pylon. At the moment of launch this lever would flip forward, allowing the lever at the front to pivot out of the way. With this type of system the blades have to be short enough to clear the wing, or the wire needs to hold the blades out far enough to clear the wing. One approach uses thin music-wire "catches" that hold the blades back at about a 30° angle; when the prop starts turning centrifugal force swings the blades out to the running position.
- Another interesting system uses no catches, lines, or levers; instead it uses two piano-wire cams carefully positioned in the noseblock. After the model is wound it is held in one hand, with one prop blade folded back underneath the motor tube and the other folded back over the top of the wing. At release the blades start to turn in the folded position before they can hit the wing. The two wire cams push the blades out to the forward position. It is very simple and makes a one-handed launch much easier to master than the conventional “quick, get the left hand out of the way without hitting the blades” method. You can put more effort into the launch, throw the model more vertically, and not run the risk of hitting a blade and possibly breaking it.
A couple of construction notes and tips observed at the contest:
- Large DPR timer disc: file the wire pylon flat where the disc rides. Use a tapered bolt under the disc as a latch. Put 16 swg wire in a drill chuck and grind the front down so it can fit in the prop hole. Cutting off wire ends is an easy way to remove a small amount of weight.
- Some DPR front ends use a spring-loaded wire front end to force the blades to flying position before contact with the wing; a lever blocks the wire until about 1/4 second after launch.
Very little load on the timer is the goal—properly arranged latches and cams make that possible.
Give DPR, or at least start-on-release, a try.
CAD for Free Flight
At work I’ve been using both a 2-D and a 3-D CAD (Computer Aided Design) system for the last year or so. Once I got used to the software it seemed much easier than conventional triangle-and-T-square drafting. It is certainly more accurate and considerably faster.
The same company that makes the software I use at work, American Small Business Computers, also markets a stripped-down, simplified, and very affordable ($99) CAD system for modelers called ModelCAD. ModelCAD offers most of the advantages of regular 2-D software plus a couple of features for modelers.
- ModelCalc: you plug in the numbers for your latest design and the computer tells you if it will fly. This is mainly intended for R/C models. (I tried Randy Archer's typical F1C power model; ModelCalc warned: “This plane is probably overpowered” and “the wings may have a tendency to rip off.” Fortunately the program didn't stop Randy from winning his second world championship in a row.)
- Airfoil library: the software includes a couple dozen Benedek sections (though not the popular B-6356B), RAF 32, the old Basic Nolder section, and many RC glider airfoils.
The best use I’ve found for ModelCAD is drawing full-size wing and stab plans. Workflow I use:
- Draw the outline of half the wing, then zoom in to add ribs, spars, etc.
- Mirror the half to create the other wing half.
- Draw using arbitrary units (I use millimeters because I design and build in metric).
Practical tips:
- Set the cursor increment to 10 units per stroke to avoid thousands of tiny moves when drawing long panels (e.g., 400 mm wings).
- Adjust line width for rib placement: set the line width to 1.6 units so when you print full-size (25.4 units per inch) rib lines will be 1.6 mm — just right to show slightly on each side of 1/16" balsa ribs when gluing.
- If you don’t have a plotter, the program tiles the drawing so you can print on standard 8½ x 11 paper.
ModelCAD is available from American Small Business Computers, Inc., 327 South Mill, Pryor, OK 74361; Tel.: (918) 825-4844.
Free Flight News
One of the best magazines in the world is the British monthly Free Flight News (FFn). A typical issue contains a couple of three-views, several airfoil sections, and useful text pieces on all aspects of competition free flight, including Indoor. Contest results, want ads, and technical articles round out the coverage. Since one of the editors, Ian Kaynes, is actively involved in the Free Flight subcommittee of CIAM, FFn is often the first place to hear about FAI rules changes.
Subscription rates:
- 12 issues (one year): $24 surface mail, $34 air mail.
- Address: Free Flight News, 7 Ashley Road, Farnborough, Hants, England GU14 7EZ. Payment should be made through a British bank.
No More
For as long as I can remember, civilian aircraft registered in the United States have carried the letter N preceding the aircraft number. Models flown in international events also had to carry the letter N followed by the flier's AMA number.
I never did know what the N stood for. A few other country designations made some sense, like F for France and G for Great Britain. Others were based on the country's name in its own language: D for Deutschland (Germany), H for Helvetia (Switzerland), and CCCP for the USSR. Some made no sense at all, including OY for Denmark and 4X for Israel.
According to an article in FFn, the FAI has voted to adopt the abbreviations used by the International Olympic Committee. These new designations are typically three letters long and fairly obvious: USA for the United States, CAN for Canada, ISR for Israel, GER for Germany, and so on.
This new rule goes into effect with the next Sporting Code, due out in January 1997.
Winding Up
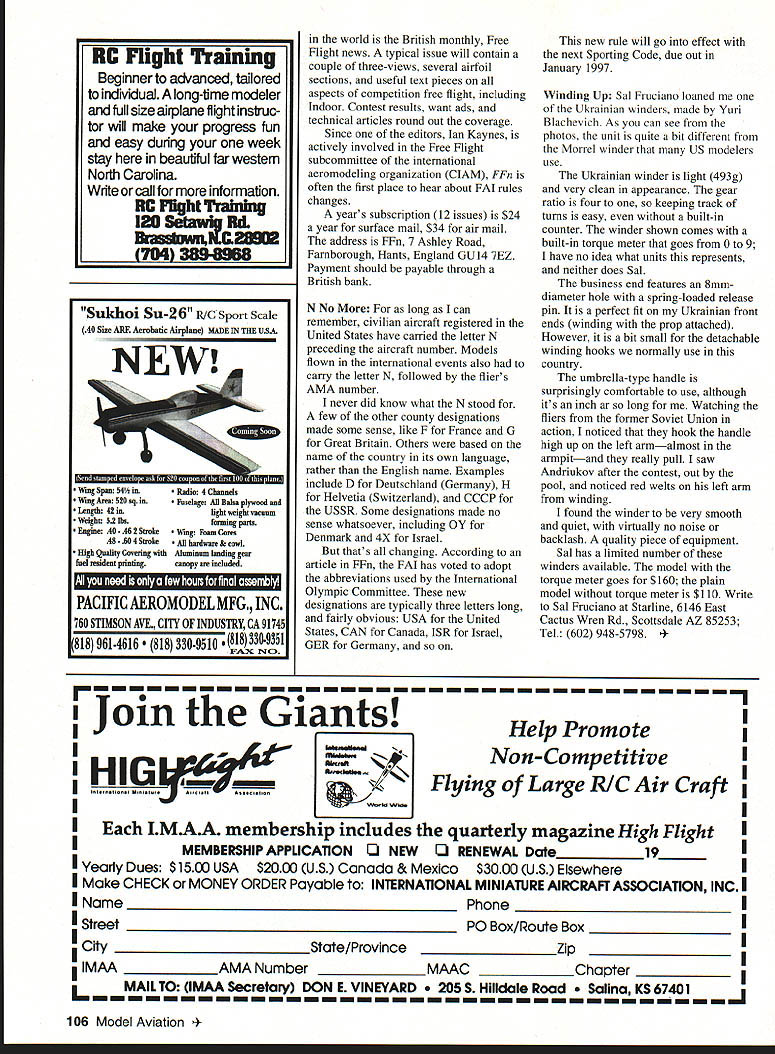
Sal Fruciano loaned me one of the Ukrainian winders made by Yuri Blachevich. As you can see from the photos, the unit is quite different from the Morrell winder that many U.S. modelers use.
The Ukrainian winder is light (493 g) and very clean in appearance. The gear ratio is 4:1, so keeping track of turns is easy even without a built-in counter. The winder shown comes with a built-in torque meter that goes from 0 to 9; I have no idea what units this represents, and neither does Sal.
The business end features an 8 mm diameter hole with a spring-loaded release pin. It is a perfect fit on my Ukrainian front ends (winding with the prop attached). However, it is a bit small for the detachable winding hooks commonly used here.
The umbrella-type handle is surprisingly comfortable to use, although it's an inch or so long for me. Watching the fliers from the former Soviet Union in action I noticed they hook the handle high up on the left arm—almost in the armpit—and they really pull. I saw Andriukov after the contest, out by the pool, and noticed red welts on his left arm from winding.
I found the winder very smooth and quiet, with virtually no noise or backlash. A quality piece of equipment.
Sal has a limited number of these winders available:
- With torque meter: $160
- Plain model without torque meter: $110
Write to Sal Fruciano at Starrline, 6146 East Cactus Wren Rd., Scottsdale, AZ 85253; Tel.: (602) 948-5798.
Transcribed from original scans by AI. Minor OCR errors may remain.

