
FREE FLIGHT DURATION
Louis Joyner, 4257 Old Leeds Road, Birmingham, AL 35213
Which glue to use? Growing up, the choice was easy—Ambroid was the stuff my father used, so I used it too. Later I began using cyanoacrylates (CyAs) for field repairs and aliphatic resin (Titebond) for general construction. If I was in a hurry, I'd opt for CyA for construction. But I really liked Titebond. It was cheap, easy to use, and safe.
About 15 years ago, I built two A-1 glider wings—one using CyA, and the other, Titebond. The unfinished panels were stored away in a cardboard box which, as it turned out, was under a leak in my workshop roof. When I discovered the leak, the box was full of water. The Titebond wing re-kitted itself, with all the parts floating around loose. The CyA wing was soggy but still intact. I weighed it down on a flat surface and let it air dry; it was fine.
After that I stayed with CyA until Franklin (the makers of Titebond) introduced their new Titebond II Weatherproof Wood Glue. It has all the good qualities of the original Titebond, plus it is water-resistant. I now use it for all balsa-to-balsa joints, as well as any balsa-to-plywood applications.
After trying several different syringes (they all clogged), I now use toothpicks. Simply squirt out a drop or two on a piece of paper and use a flat toothpick to transfer the glue to the parts to be joined. Just remember that "open" time is only about five minutes, so don't try to glue up too many parts at one time.
As with any adhesive, it will add weight, so don't use any more than necessary. Titebond II will fill gaps to a certain extent, but a good fit and a minimal amount of glue will usually yield a stronger joint than will a sloppy fit and lots of glue.
By the way, Titebond II is great for making balsa-plywood. Just laminate two or three pieces of thin balsa with the grain at right angles to make a more rigid material. Use it for gas-model pylons, wing mounts, formers, or anywhere else you need extra stiffness. Be sure to get an even, light spread of glue on the balsa, and clamp securely between two flat surfaces. (I use scrap pieces of 3/4-inch birch plywood.)
Lately, as carbon fiber and Kevlar have replaced balsa as my main building materials, I find that I am using more and more CyA and epoxy. Titebond II is reserved for rudders and stabs, which are still mostly balsa.
I never really liked using epoxy for general construction, such as gluing balsa ribs to carbon spars. The mixing was a slight deterrent, but the main reason was that epoxy had too long an "open" time. With CyA, you can put a rib in place, dot the glue, and you are done. With epoxy, you must put the adhesive in place somehow and hold exactly the right position for several hours. I'm talking about using slow epoxies; I would just as soon use wads of chewing gum. Five-minute epoxy seems to give a better balsa-to-carbon joint.
CyAs I've tried, for example, on Wakefield wings where the trailing-edge piece is carbon less than 1/32 inch thick, result in a very small gluing area and a very weak joint. Of course, I reinforced the trailing edge with carbon-fiber capstrips on top and bottom until the capstrips go over the trailing edge, but it keeps wanting to come off. It's very frustrating—rounds of sanding, gluing, sanding, gluing, etc. Finally, in desperation I switched to epoxy for the rib-to-trailing-edge joint. Gluing ribs took a bit more time, but total construction time was actually a good bit less since the trailing edge would stay in place until I got the capstrips on.
CyA is still my adhesive choice for attaching carbon-fiber capstrips. I have experienced some failures of the glue line despite careful cleaning and sanding of thin carbon before gluing. Matt Gewain, former World Champion F1A flier and carbon-fiber guru, suggested trying this method: cover the undercambered building jig with plastic wrap and apply a thin coat of slow epoxy to the bottom rib. (I could brush, but found a small sponge much faster—see the Duration column, September 1995, Model Aviation.) Position the capstrips with rib bottoms holding in place with a small piece of tape. Carefully position the wing panel in the jig, making sure the capstrips are properly aligned. Spread epoxy on the top rib, add capstrips, cover with plastic wrap, weigh with phone books, and allow to dry.
For an in-depth look at the advantages of carbon capstrips, see the June 1994 Duration column. Ready-cut carbon capstrips for Wakefields and other medium-sized models are available from Starline International, 6146 East Cactus Wren Rd, Scottsdale, AZ 85253. You can strip your own 0.002" carbon sheet; it's available from Composite Structures Technology, Box 642, Tehachapi, CA 93581-0642. Jim Bradley, Bradley Model Products, 1337 Pine Sap Ct, Orlando, FL 32825, recently sent a sample of a new unidirectional carbon sheet composed of individual strands 1/16" wide. It's very easy to split out straight unidirectional strips. Check with Jim about price and availability.
From the Year Book
The one thing that you will see in just about every true free-flighter's workshop, besides a multitude of balsa, is a set of Zaic Year Books.
Usually the distinctive orange covers are torn and dog-eared from years of use. The pages may be glue-stained, but the information in these volumes provides both a chronicle of free flight from the 1930s through the 1960s and an education in aerodynamics.
Many of the models shown in the Year Books make excellent subjects for today's Old-Timer and Nostalgia events. Even though small in size, the plans pack in all the critical information and dimensions you'll need to build a model.
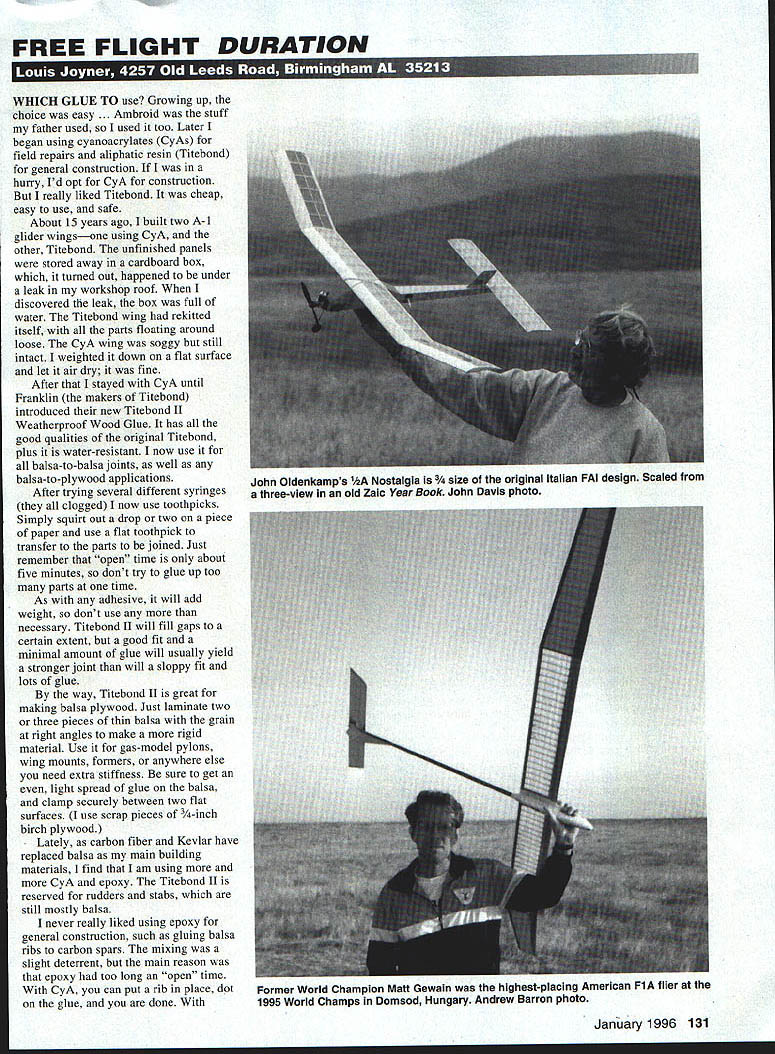
That's just what John Oldenkamp did with an Italian design from the 1955–56 Model Aeronautic Year Book. He scaled the Podda 1956 FAI model down to 75% of the original size (about 220 square inches) for 1/2A Nostalgia.
Free Flight: Duration
Covering is clear iron-on Mylar from MRL. Bright red Krylon paint on the nose and underside of the tip panels aids visibility. Power is a reed-valve Cox salvaged from a ready-to-fly control-line model. An eyedropper holds the fuel; a Texas Timer shuts it off. John says the model flies well, despite the small rudder.
The Zaic Year Books are still available from Frank Zaic, Box 135, Northridge, CA 91328. Be sure to include a stamped, self-addressed envelope when writing any of the sources listed in this column.
Texas Timers
For the last few years, Hank Nystrom's Texas Timers have been stopping engines of all sizes. The new Texas Max timers are available to handle both engine-run and DT duties.
Like other timers based on the Russian copy of the Leica camera self-timer, the Texas Max timers use a scroll and disc mounted on the same output shaft. (Select timers, on the other hand, use separate output shafts—a fast-turning one for the engine shutoff and a slower-turning one for DT.)
The Texas Max timers will be available in two versions: the Texas Max III is designed for Category II or III flying with either three-minute or two-minute maxes. The Texas Max I is designed for five-minute-max Category I flying. Both timers use a simple start lever reminiscent of the ones on the old Tatone timers; you could substitute one of the Wakefield-style start switches that allow a one-handed instant start.
The Texas Max timers have a lever-type release for the engine cutoff, so you will need to use a separate pinchoff or flooded device at the engine. The timer weighs about 19 grams. Price is $28 plus $2 postage per order. For more information, send an SASE to Texas Timers, 3317 Pine Timbers Dr., Johnson City, TN 37604.
BOM Part Two
A year or two back, we discussed the Builder of the Model (BOM) rule and its elimination for the FAI events. As I pointed out then, one very positive aspect of doing away with the rule is that more experienced modelers could give or sell their older models to beginners as an easy way to get them started flying.
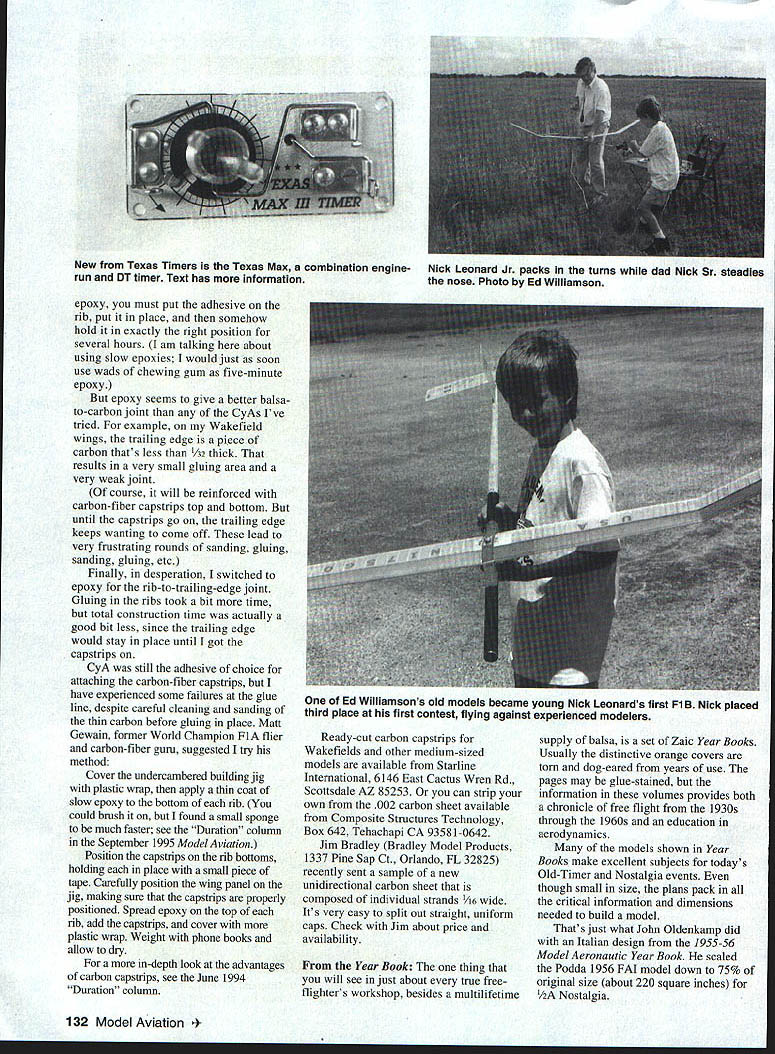
Well, that's exactly what Ed Williamson of San Antonio has done. Nick Leonard Jr. is the proud owner of a Wakefield that's almost as big as he is. With the help of dad Nick Sr. and Ed, Nick Jr. put in a credible performance at last year's Spring Cup contest at Seguin, Texas. Out of seven contestants, Nick Jr. placed third, just two seconds behind Jim O'Reilly.
What models do you have cluttering up the attic? Can you think of a better use for them than to get a beginner of any age out flying?
Transcribed from original scans by AI. Minor OCR errors may remain.

