
FREE FLIGHT: DURATION
Louis Joyner 4257 Old Leeds Road, Birmingham, AL 35213
JUNIOR TEAM
Four young free fliers will be representing the United States at the Junior World Championships in Poland. The contest will be held near Krakow, 17–23 August.
Team members:
- David Ellis — Guilford, Connecticut — F1A (Nordic) glider
- Allen Porter — Fresno, California — F1A (Nordic) glider
- Dorothy Fee — Oceanside, California — F1B (Wakefield)
- Tim Sessums — Simi Valley, California — F1B (Wakefield)
Team manager: George Batiuk.
In previous Junior World Championships the United States fielded full teams of three fliers in each event (F1A glider, F1B rubber, F1C power). Members were selected based on relative placings at semifinals held around the country. For this championship the Junior Team committee chose to identify and support juniors who are dedicated, capable free fliers, even though that meant not sending a full nine-person team. Sending fewer fliers will make team prizes unlikely, but the committee hopes the individual experience will encourage the four juniors to stay with free flight and encourage other juniors to participate in future selection processes.
#### Tim Sessums Age: 16. Tim will fly Wakefields with Ukrainian-made carbon-fiber wings and Polyspan-covered Starline front ends. He will use either Andriukov variable-pitch units or Montreal stop units made by Bob Piserchio, and carbon-fiber blades from Starline.
Preparation and contest experience:
- Isaacson Memorial (Lost Hills): maxed and made the flyoff; maxed the first five-minute flyoff round but broke two motors while winding and could not get a flight in the seven-minute round.
- San Valleys contest: maxed the first five flights, then suffered a midair in the sixth round.
Other interests: surfing, fishing, sailing, and scuba diving.
#### Dorothy Fee Age: 16. Veteran of the team — two years ago she placed eighth in F1B at the Junior World Championships in Kiev, Ukraine.
Model approach (paraphrased from Dorothy):
- Two of Dorothy's models are Fee family designs, influenced by Jim Quinn's Fantasy and the Tilka. Her father used added undercamber in the wing, a sharp leading edge, a straight trailing edge, conventional double dihedral, washin on the right inboard panel (learned from Bob White), and more-than-normal washout. Laminated props with abnormal undercamber produced slow-flying, poor-climbing models that sought thermals and had excellent glide.
- With today's seven- and nine-minute flyoffs, rapid ascent and high altitude are necessary, so Dorothy plans two VIT (Variable Incidence Tailplane) models for the trip:
- Model 1: Andriukov wing and tail feathers by George Batiuk; Dorothy is covering, trimming, and test-flying.
- Model 2: Wing acquired in Kiev (maker unknown), Ken Oliver motor tube and tailboom, miscellaneous parts from Sal Fruciano; still under assembly and testing.
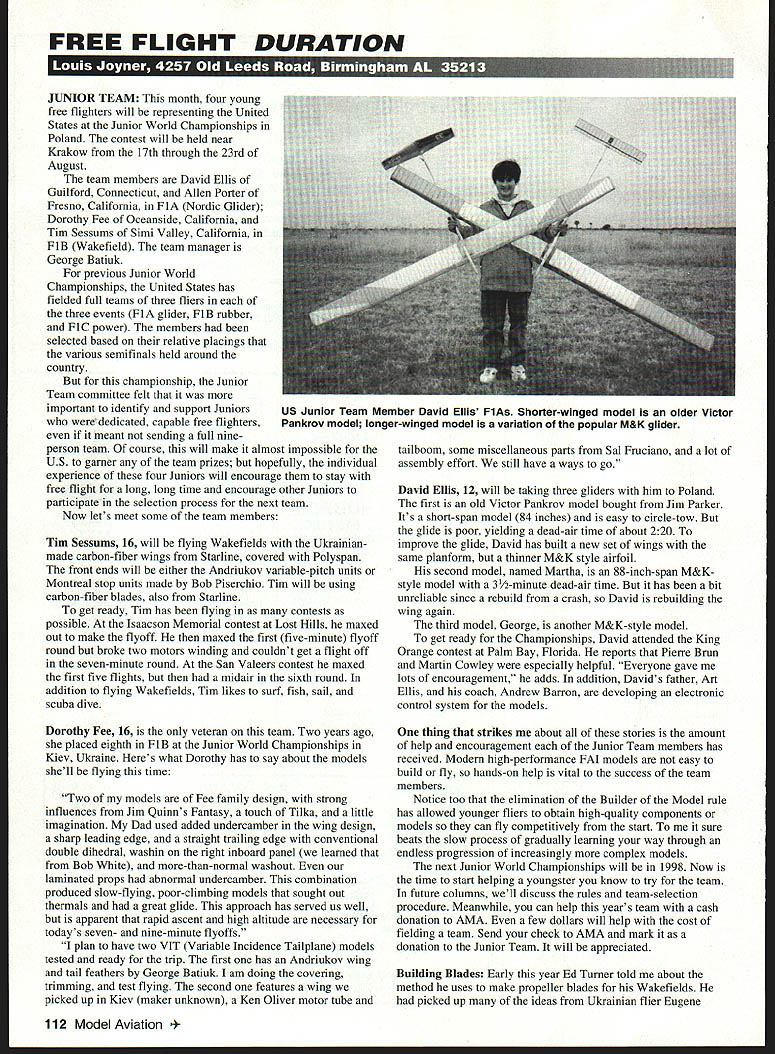
#### David Ellis Age: 12. David will take three gliders to Poland.
Models:
- An older Victor Pankrov model (bought from Jim Parker). Short-span (84 in), easy to circle-tow, but with poor dead-air performance (~2:20). David built a new set of wings with the same planform but a thinner M&K-style airfoil to improve glide.
- "Martha": an 88-inch-span M&K-style model with about 3½ minutes of dead-air time; currently being rebuilt after a crash.
- "George": another M&K-style model being readied.
Preparation and support:
- Attended the King Orange contest (Palm Bay, Florida); Pierre Brun and Martin Cowley were especially helpful.
- Father Art Ellis and coach Andrew Barron are developing electronic control systems for the models.
General notes on juniors and support: Modern high-performance FAI models are not easy to build or fly, so hands-on help is vital to the success of junior fliers. The elimination of the Builder Model rule has allowed younger fliers to obtain high-quality components or ready-built models so they can be competitive sooner—an improvement over the slow progression through ever more complex models.
The next Junior World Championships will be in 1998. Now is the time to start helping youngsters who want to try for the team. You can also help financially: even a few dollars will help defray the cost of fielding a team. Send checks to AMA, marked "Donation — Junior Team."
BUILDING BLADES
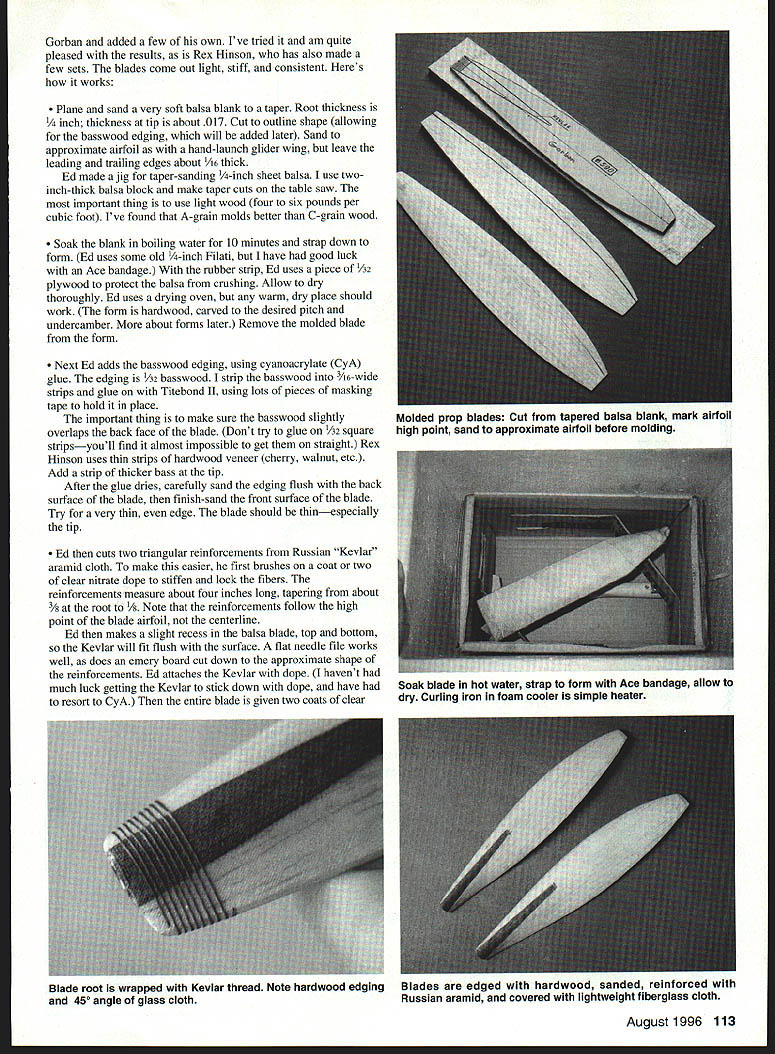
Early this year Ed Turner described his method for making propeller blades for Wakefields. He adapted ideas from Ukrainian flier Eugene Gorban and added his own refinements. The resulting blades are light, stiff, and consistent. The process:
- Prepare the balsa blank:
- Plane and sand a very soft balsa blank to a taper. Root thickness: 1/4 inch; tip thickness: about 0.017 inch.
- Cut to the outline shape (allow for basswood edging to be added later).
- Sand to an approximate airfoil (as you would for a hand-launched glider wing), but leave the leading and trailing edges about 1/16 inch thick.
- Use very light wood (4–6 lb/ft³). A-grain is preferable to C-grain.
- Form the blank:
- Soak the blank in boiling water for 10 minutes.
- Strap the blank down to the carved hardwood form (shaped to desired pitch and undercamber) and allow to dry thoroughly. Ed uses a 1/4-inch rubber strip; alternatively, an Ace bandage works. Use a thin plywood protector where the band could crush the balsa.
- Remove the molded blade when dry.
- Add basswood edging:
- Glue 1/32-inch basswood edging to the back face of the blade; strip the basswood into ~3/16-inch-wide strips and glue with Titebond II, holding in place with masking tape.
- Ensure the basswood slightly overlaps the back face. Do not try to glue on thick 1/2-square strips—thin strips are far easier to align.
- Add a thicker bass strip at the tip.
- After glue dries, sand the edging flush with the back surface and finish-sand the front. Aim for a very thin, even edge—especially at the tip.
- Add Kevlar reinforcements:
- Cut two triangular reinforcements from aramid (Russian "Kevlar") cloth, about 4 inches long, tapering from ~3/8 inch at the root to 1/8 inch at the tip. The reinforcements follow the high point of the blade airfoil, not the centerline.
- Stiffen the Kevlar with one or two coats of clear nitrate dope to lock the fibers before handling.
- Make slight recesses in the balsa top and bottom so the Kevlar fits flush. A flat needle file or a cut-down emery board works well.
- Attach the Kevlar with dope or, if necessary, a small amount of cyanoacrylate (CyA).
- Give the entire blade two coats of clear dope and sand.
- Glass and epoxy:
- Cover both faces of the blade with light fiberglass cloth, with the weave at 45°. Note: many light glass cloths are unbalanced, so keep the same orientation for both blades.
- To make the cloth easier to handle, lightly spray it with clear nitrate dope before cutting.
- Trim excess cloth after brushing the edges with clear dope and allowing it to dry.
- Brush the blade with epoxy laminating resin (a sponge works well to apply plenty of resin).
- Vacuum-bag the blade back on the form using a "sandwich" to wick away excess resin. The sandwich sequence Ed uses:
- Form
- Plastic film
- Three layers of paper towel
- Teflon-coated fiberglass cloth
- Blade
- Teflon-coated fiberglass cloth
- Three more layers of paper towel
- Plastic wrap
- Use masking tape to hold the sandwich together while inserting it into the bag.
- The Teflon-coated fiberglass and paper towels wick away excess resin, leaving only about the right amount (roughly 0.5 gram) on the blade.
- If you don't have a vacuum pump, bind the epoxy-coated sandwich to the form with rubber strip or an Ace bandage.
- Finish and root reinforcement:
- After the epoxy cures (about 24 hours), remove the blade, sand with 320-grit, and finish with two coats of dope.
- Use a Kevlar thread wrap to reinforce the root.
- Root connector:
- Rather than drilling a hole for an aluminum connector, use a piece of thick-walled aluminum tubing inserted into the balsa blade root, leaving a balsa plug inside the tube.
- Remove the tube, coat it with structural epoxy, reinsert it, and tap it for the prop hub fitting.
Materials note: Ed obtains Teflon-coated fiberglass cloth from Composite Structures Technology (Box 642, Tehachapi, CA 93581). The author uses West System laminating resin, but any thin, slow-setting laminating resin should work.
The finished blades typically vary only about 0.1 gram from blade to blade.
Transcribed from original scans by AI. Minor OCR errors may remain.

