
Free Flight: Duration
WINGLETS IN YOUR FUTURE?
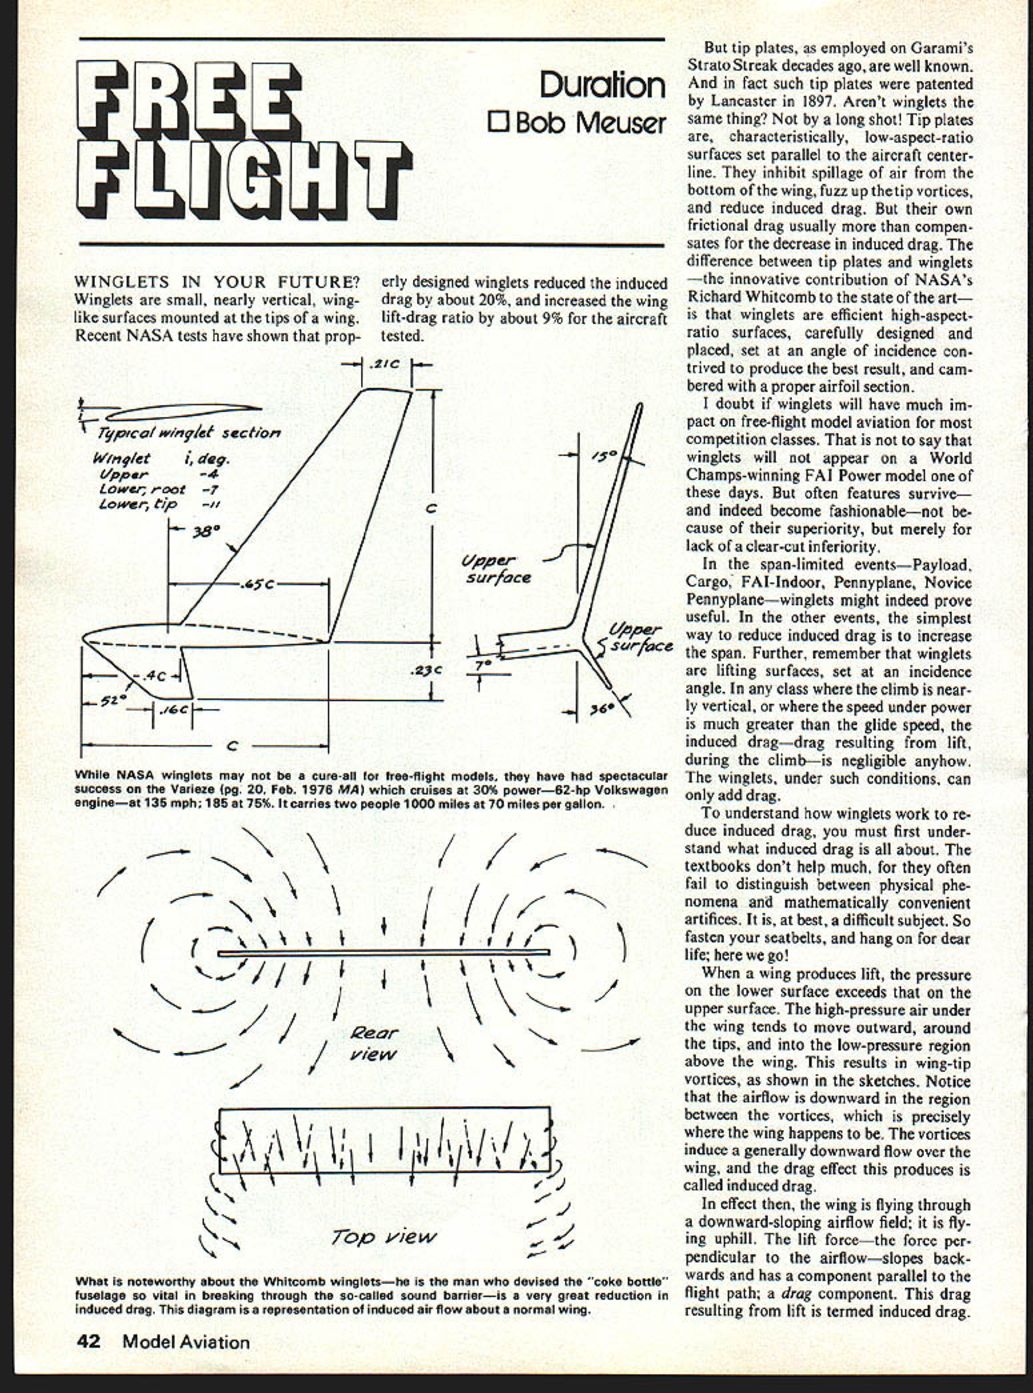
Winglets are small, nearly vertical, wing-like surfaces mounted at the tips of a wing. Recent NASA tests have shown that properly designed winglets reduced the induced drag by about 20%, and increased the wing lift-drag ratio by about 9% for the aircraft tested.
But tip plates, as employed on Garami's Strato Streak decades ago, are well known. And in fact such tip plates were patented by Lancaster in 1897. Aren't winglets the same thing? Not by a long shot! Tip plates are, characteristically, low-aspect-ratio surfaces set parallel to the aircraft centerline. They inhibit spillage of air from the bottom of the wing, fuzz up the tip vortices, and reduce induced drag. But their own frictional drag usually more than compensates for the decrease in induced drag. The difference between tip plates and winglets—the innovative contribution of NASA's Richard Whitcomb to the state of the art—is that winglets are efficient high-aspect-ratio surfaces, carefully designed and placed, set at an angle of incidence contrived to produce the best result, and cambered with a proper airfoil section.
I doubt if winglets will have much impact on free-flight model aviation for most competition classes. That is not to say that winglets will not appear on a World Champs-winning FAI Power model one of these days. But often features survive—and indeed become fashionable—not because of their superiority, but merely for lack of a clear-cut inferiority.
In the span-limited events—Payload, Cargo, FAI-Indoor, Pennyplane, Novice Pennyplane—winglets might indeed prove useful. In the other events, the simplest way to reduce induced drag is to increase the span. Further, remember that winglets are lifting surfaces, set at an incidence angle. In any class where the climb is nearly vertical, or where the speed under power is much greater than the glide speed, the induced drag—drag resulting from lift, during the climb—is negligible anyhow. The winglets, under such conditions, can only add drag.
To understand how winglets work to reduce induced drag, you must first understand what induced drag is all about. The textbooks don't help much, for they often fail to distinguish between physical phenomena and mathematically convenient artifices. It is, at best, a difficult subject. So fasten your seatbelts, and hang on for dear life: here we go!
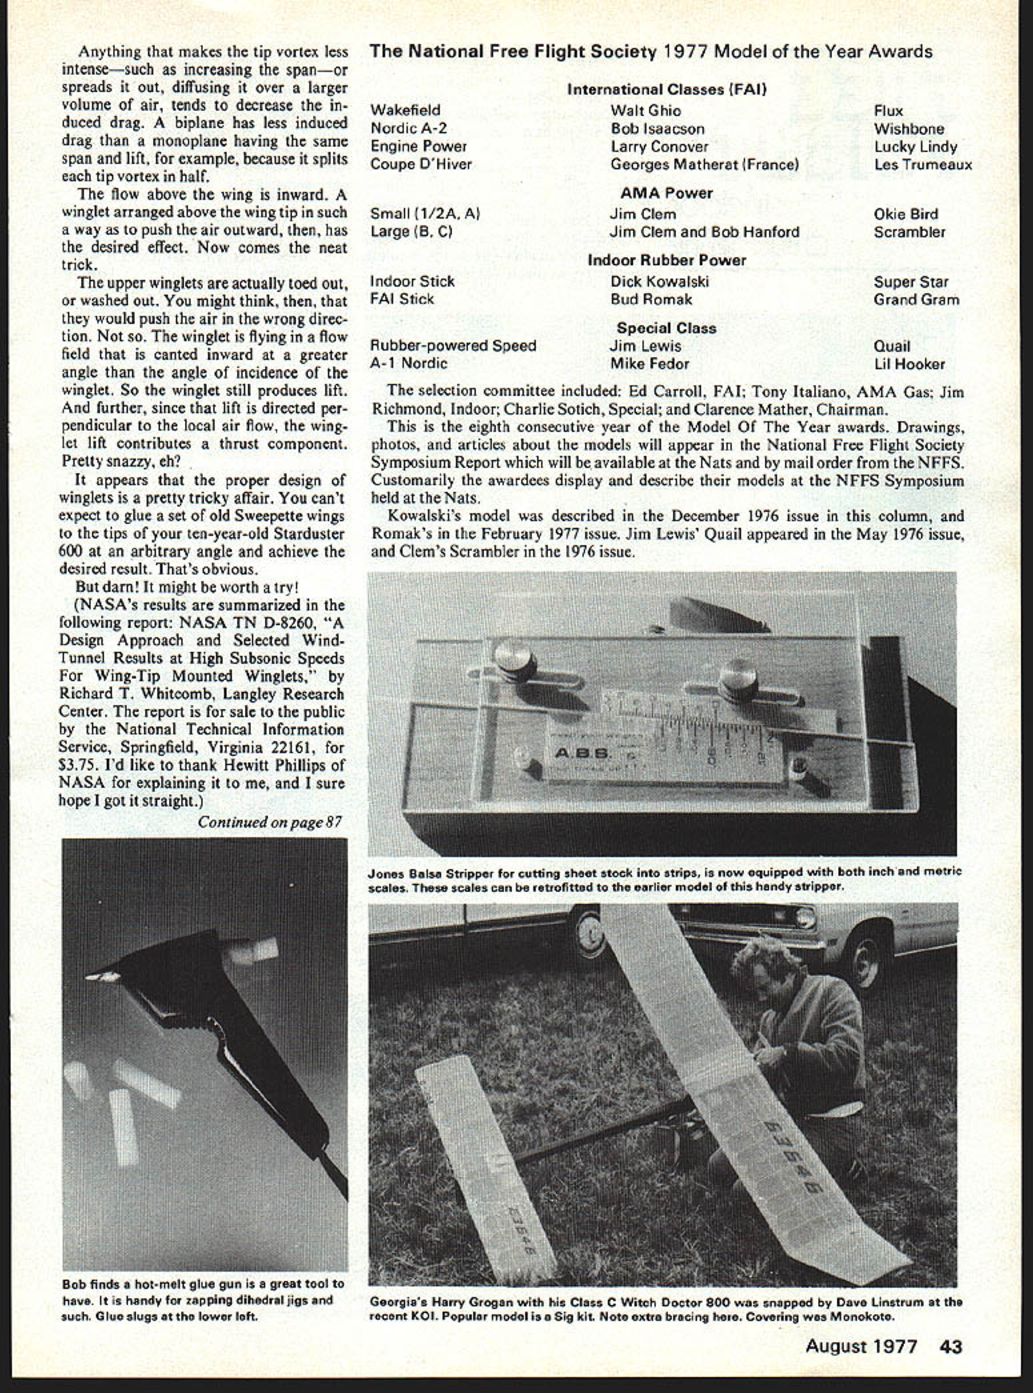
When a wing produces lift, the pressure on the lower surface exceeds that on the upper surface. The high-pressure air under the wing tends to move outward, around the tips, and into the low-pressure region above the wing. This results in wing-tip vortices, as shown in the sketches. Notice that the airflow is downward in the region between the vortices, which is precisely where the wing happens to be. The vortices induce a generally downward flow over the wing, and the drag effect this produces is called induced drag.
In effect then, the wing is flying through a downward-sloping airflow field; it is flying uphill. The lift force—the force perpendicular to the airflow—slopes backwards and has a component parallel to the flight path; a drag component. This drag resulting from lift is termed induced drag.
While NASA winglets may not be a cure-all for free-flight models, they have had spectacular success on the Varieze (pg. 20, Feb. 1976 MA) which cruises at 30% power—62-hp Volkswagen engine—at 135 mph; 185 at 75%. It carries two people 1000 miles at 70 miles per gallon.
What is noteworthy about the Whitcomb winglets—he is the man who devised the "coke bottle" fuselage so vital in breaking through the so-called sound barrier—is a very great reduction in induced drag. This diagram is a representation of induced air flow about a normal wing. Anything that makes the tip vortex less intense—such as increasing the span—or spreads it out, diffusing it over a larger volume of air, tends to decrease the induced drag. A biplane has less induced drag than a monoplane having the same span and lift, for example, because it splits each tip vortex in half.
The flow above the wing is inward. A winglet arranged above the wing tip in such a way as to push the air outward, then, has the desired effect. Now comes the neat trick.
The upper winglets are actually toed out, or washed out. You might think, then, that they would push the air in the wrong direction. Not so. The winglet is flying in a flow field that is canted inward at a greater angle than the angle of incidence of the winglet. So the winglet still produces lift. And further, since that lift is directed perpendicular to the local air flow, the winglet lift contributes a thrust component. Pretty snazzy, eh?
It appears that the proper design of winglets is a pretty tricky affair. You can't expect to glue a set of old Sweepette wings to the tips of your ten-year-old Starduster 600 at an arbitrary angle and achieve the desired result. That's obvious.
But darn! It might be worth a try!
(NASA's results are summarized in the following report: NASA TN D-8260, "A Design Approach and Selected Wind-Tunnel Results at High Subsonic Speeds For Wing-Tip Mounted Winglets," by Richard T. Whitcomb, Langley Research Center. The report is for sale to the public by the National Technical Information Service, Springfield, Virginia 22161, for $3.75. I'd like to thank Hewitt Phillips of NASA for explaining it to me, and I sure hope I got it straight.)
FF Duration/Meuser continued from page 43
Ruff Stuff: That's the trade name for some rather special sandpaper put out by Applied Design Corporation, and marketed through Sig. Basically it is plain old Norton Garnet Finishing Paper. What's so special about it is the backing. On the back is a coating of no-lickum stickum—self-adhesive coating, if you prefer—protected by a peel-off paper covering. Cut oversize, peel off the peel-off backing, stick it on the object of your choice, and trim the edges. The object of your choice might be a dowel of the proper size for the fillets on your favorite scale model, a gently arched stick for putting the undercamber into a Wakefield prop, or a flat surface large enough to accept a full-size sheet. The latter will be handier than you might think; for example, if you are sanding down an indoor glider wing, the sandpaper-coated surface prevents the wing from slipping around while you are sanding it with a second sandpaper-covered sheet of balsa. And, too, it will come in handy for truing up the end rib of a wing panel just prior to making the dihedral joint. For many modeling applications, it is better to have the sandpaper nailed down and move the model part back and forth over it than the more usual method of holding the part and sloshing sandpaper back and forth. Try it and see.
The sheets are standard 9 x 11 in. size. Sig's price for a package of 36 sheets—12 medium (100A), 12 fine (180A), and 12 super-fine (280A)—is $14, about 30% more than you would pay for plain garnet paper. Perhaps your dealer will sell it by the sheet, if you ask him nicely.
Jones' Balsa Stripper, Revisited: In last July's issue I mentioned the nifty balsa stripper available from Jim Jones ($10.80 postpaid, 36631 Ledgestone, Mt. Clemens, MI 48043). The newer ones are calibrated in increments of .005 inches or 0.1 mm. That's right, both inch and metric calibrations are provided.
If you already have one of the earlier non-calibrated models, Jim will send you a stick-on scale in return for a stamped self-addressed envelope. And if you have had difficulty finding double-edge razor blades that will "snap" properly to provide a sharp cutting point, send another $5 to Jim for a hundred, postpaid. You can shave with them if you like; Jim says he doesn't mind.
Glue Gun: Home craftsmen come in two varieties: (a) the true craftsman, who does a better job than most professionals, although it takes him three times as long, and (b) the tool freak, who owns every tool known to man, but doesn't know how to use them, and wouldn't have anything to use them for if he did know. I'm too humble to classify myself, but I do seem to have quite a collection of goofy tools, which come in two varieties: (a) those that I couldn't see how I could live without owning, but never used after I bought them, and (b) those I thought I would never have any use for, bought anyhow, and now use almost daily.
My seven-dollar hot-melt glue gun is one of the latter. Mine is a Thermogrip manufactured by the USM Corporation. Several brands are available, and they all work about the same. Plug the cord in the wall, wait two minutes, grasp the gun by the pistol grip, push a cylinder of glue into the head. With the application of a little pressure by the thumb, glue squirts out the nozzle. The glue is simply a thermo-plastic material; when it cools it hardens. That allows you about 15 seconds to position the parts you are gluing and press them together, and in about a minute you have a bond that is as strong as the wood itself. It can also be used to join metal, leather, rubber, plastics, and rigid foam materials.
You could probably build a whole airplane using one, but it would weigh a ton. I have used mine mostly for zapping together dihedral jigs, a jig for drilling holes at the proper angle in the blade of a folding prop, a partition across my model box, a goodie to hold the wing and fuselage of a scale model while I glued the struts in place, and such. I imagine I'll find use for it on the models themselves—perhaps for securing a firewall in place. I think it could be used for many things for which I presently use epoxy, but without as much fuss and mess, and without having to wait that interminable five minutes!
Try to avoid getting hot glue on your fingers; it smarts!
Heat-Shrink Tubing:
This is a plastic tubing available from electronics supply sources. Upon the application of heat, it shrinks to less than half of its original diameter, the wall thickens in the same proportion, and the length remains the same. The smallest size I have seen starts out in life with a 1/16" i.d. and a 0.0035" wall. When heated, it shrinks to an i.d. of a bit under 0.020", making a nice sliding fit over 15-mil wire, and makes neat hub reinforcements for the wheels used on light indoor models. Shrunk over the prop shaft and rear hook of a Pennylane, or similar model, made from 20-mil or larger wire, it helps prevent the thin wire from cutting the rubber, and adds negligible weight.
Want a piece of tubing having a precise inside diameter to substitute for those miserable rolled-tissue tubes used on indoor models, or for some part of a scale model? Shrink the tubing over a piece of music wire, or the shank of a twist drill. For a thin wall, start with the smallest size tubing that will just fit over the mandrel. For a thicker wall, use larger tubing. For a still thicker wall, shrink several pieces over each other.
The tubing is available in a wide variety of colors, diameters, wall thicknesses, and hardnesses, from electronics hobby stores.
Bob Meuser, 4200 Gregory St., Oakland, CA 94619.
Transcribed from original scans by AI. Minor OCR errors may remain.

