
Free Flight: Duration
Louis Joyner, 4221 Old Leeds Road, Birmingham, AL 35213
FREE FLIGHT FORUM 1997: Don't let the date mislead you—this is the latest edition of the British equivalent of our NFFS (National Free Flight Society) symposium. What the British do is have a formal presentation of each of the papers, usually in early January (1997 in this case). Then the papers are published, usually late in the same year.
The 1997 Forum, edited by Bryan Spooner and Martin Dilly, includes a broad range of papers—most with a practical (rather than theoretical) bent. Here's a rundown of the articles:
- Dave Clarkson, back flying Free Flight after a long turn at Team Racing, gives his personal thoughts on building and flying Slow Open Power. Known as SLOP in the United Kingdom, this is very similar to our Nostalgia Gas events, but without the requirements to use a pre-1955 design.
Basically, the SLOP rules call for a plain-bearing engine (3.5 cc maximum size), running on suction (no pressure or pacifier fuel systems). Gadgets such as auto surfaces or engine brakes are banned. This article should be of interest to anyone flying our Nostalgia events.
- Vintage Lightweight rubber models are those smaller, lighter rubber models of the 1930s and '40s that were a basic stepping stone from beginner models to the larger and heavier Wakefields of the era. (Wally Simmers' familiar Gollywock and Jabberwock models are typical lightweights.)
Andrew Longhurst explores the history of lightweight in Great Britain and includes detailed drawings for nine models. Most old-timers on this side of the pond will be familiar with Gordon Light's 1932 and 1935 Wakefield winners, which were designed for the old four-ounce-weight Wakefield rules.
Regular readers of Aeromodeller will recognize the Mick Farthing Lightweight, a popular model in the current lightweight class. There are several good possibilities here if you are interested in an Old-Timer rubber model that is a little unusual.
- "Testing Balsa Quality" by Bernard Hunt and John Taylor discusses a method for measuring the stiffness of balsa. If you pick balsa strictly on the basis of density and grain, this paper will be a real eye-opener. The basic premise is that some pieces of balsa are stiffer than others of the same density. This is a must-read for anyone who builds indoor models.
- Paper airplanes were the way many of us began our modeling careers. But most of us left them littering the school ground and moved on to "real" models of tissue and balsa.
What happens when British Aerospace decides to participate in an assault on the world paper airplane duration record? Using CAD (Computer Aided Design), a group of employees, including Chris Edge and Mike Fantham, systematically developed and refined the paper airplane, culminating with a world record of 209 seconds. Plans are included, so you can try folding your own.
- "Some Rambling Thoughts on Free Flight Aeromodelling Design Trends" aptly sums up Andrew Crisp's paper. It is a look at the aerodynamic, structural, and fashion changes over the years. He ends the paper with a quick look forward at new possibilities, including folding wings, one-bladed Wakefield props, flaps for F1A towline glider, and even an inflatable wing that changes airfoil section.
- For the international events, especially F1A glider, electronic timers are an increasingly popular alternative to mechanical clockwork timers. Chris Edge and Martin Gregorie examine the various available options. If you are interested in electronic timers, you need to read this.
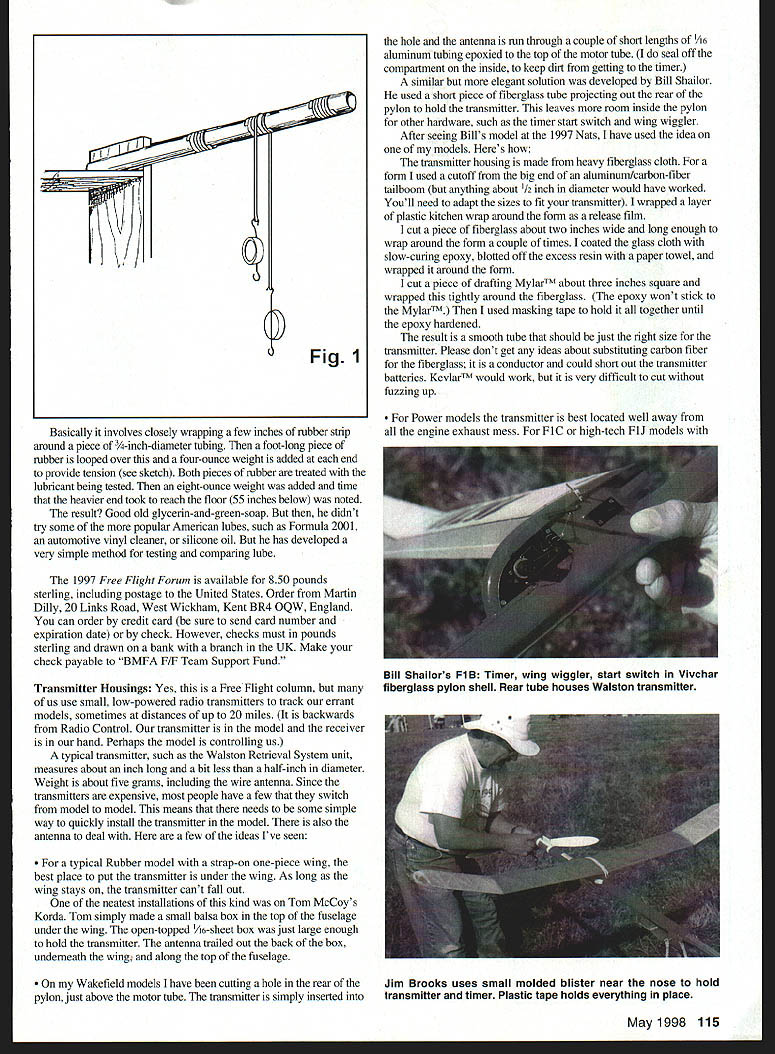
- Selecting the best lubricant for rubber motors is one of those things that is more voodoo art than science. John Barker describes a simple method he has developed to evaluate various rubber lubricants. Basically, it involves closely wrapping a few inches of rubber strip around a piece of 3/16-inch-diameter tubing. Then a foot-long piece of rubber is looped over this and a four-ounce weight is added at each end to provide tension (see sketch). Both pieces of rubber are treated with the lubricant being tested. Then an eight-ounce weight is added and the time that the heavier end takes to reach the floor (55 inches below) is noted.
The result? Good old glycerin-and-green-soap. He did not try some of the more popular American lubes, such as Formula 2001, an automotive vinyl cleaner, or silicone oil. Still, he has developed a very simple method for testing and comparing lube.
The 1997 Free Flight Forum is available for 8.50 pounds sterling, including postage to the United States. Order from Martin Dilly, 20 Links Road, West Wickham, Kent BR4 OQW, England. You can order by credit card (be sure to send card number and expiration date) or by check. However, checks must be in pounds sterling and drawn on a bank with a branch in the UK. Make your check payable to "BMFA F/F Team Support Fund."
Transmitter Housings
Yes, this is a Free Flight column, but many of us use small, low-powered radio transmitters to track our errant models, sometimes at distances of up to 20 miles. (It is backwards from Radio Control: our transmitter is in the model and the receiver is in our hand. Perhaps the model is controlling us.)
A typical transmitter, such as the Walston Retrieval System unit, measures about an inch long and a bit less than a half-inch in diameter. Weight is about five grams, including the wire antenna. Since the transmitters are expensive, most people have a few that they switch from model to model. This means there needs to be some simple way to quickly install the transmitter in the model. Here are a few of the ideas I've seen:
- For a typical rubber model with a strap-on one-piece wing, the best place to put the transmitter is under the wing. As long as the wing stays on, the transmitter can't fall out.
- One of the neatest installations of this kind was on Tom McCoy's Korda. Tom simply made a small balsa box in the top of the fuselage under the wing. The open-topped 7/16-sheet box was just large enough to hold the transmitter. The antenna trailed out the back of the box, underneath the wing, and along the top of the fuselage.
- On my Wakefield models I have been cutting a hole in the rear of the pylon, just above the motor tube. The transmitter is simply inserted into the hole and the antenna is run through a couple of short lengths of 1/16-inch aluminum tubing epoxied to the top of the motor tube. I do seal off the compartment on the inside to keep dirt from getting to the timer.
- A similar but more elegant solution was developed by Bill Shailor. He used a short piece of fiberglass tube projecting out the rear of the pylon to hold the transmitter. This leaves more room inside the pylon for other hardware, such as the timer start switch and wing wiggler.
- The transmitter housing I later made is from heavy fiberglass cloth. For a form I used a cutoff from the big end of an aluminum/carbon-fiber tailboom (but anything about 1/2 inch in diameter will work). Adapt the sizes to fit your transmitter. I wrapped a layer of plastic kitchen wrap around the form as a release film.
I cut a piece of fiberglass about two inches wide and long enough to wrap around the form a couple of times. I coated the glass cloth with slow-curing epoxy, blotted off the excess resin with a paper towel, and wrapped it around the form.
I cut a piece of drafting Mylar about three inches square and wrapped this tightly around the fiberglass (the epoxy won't stick to the Mylar). Then I used masking tape to hold it all together until the epoxy hardened.
The result is a smooth tube that should be just the right size for the transmitter. Please don't substitute carbon fiber for the fiberglass; it is a conductor and could short out the transmitter batteries. Kevlar would work, but it is very difficult to cut without fuzzing up.
- For power models the transmitter is best located well away from all the engine exhausts. For F1C or high-tech F1J models with two-piece plug-in wings, the transmitter is most often located in the top of the pylon, behind the wing wire. For AMA or Nostalgia gas models, the transmitter can be housed in a small blister on the side of the pylon or in a compartment in the top or side of the fuselage.
- If the wing is thick enough, the transmitter and antenna can be housed inside. For his larger Jays' Bird Nostalgia power models, Frank Parmenter makes a small compartment just to one side of the center rib and behind the main spar. A thin plastic tube extends out into the wing to accommodate the antenna. The hinged hatch cover is held in place by the wing hold-down rubber bands.
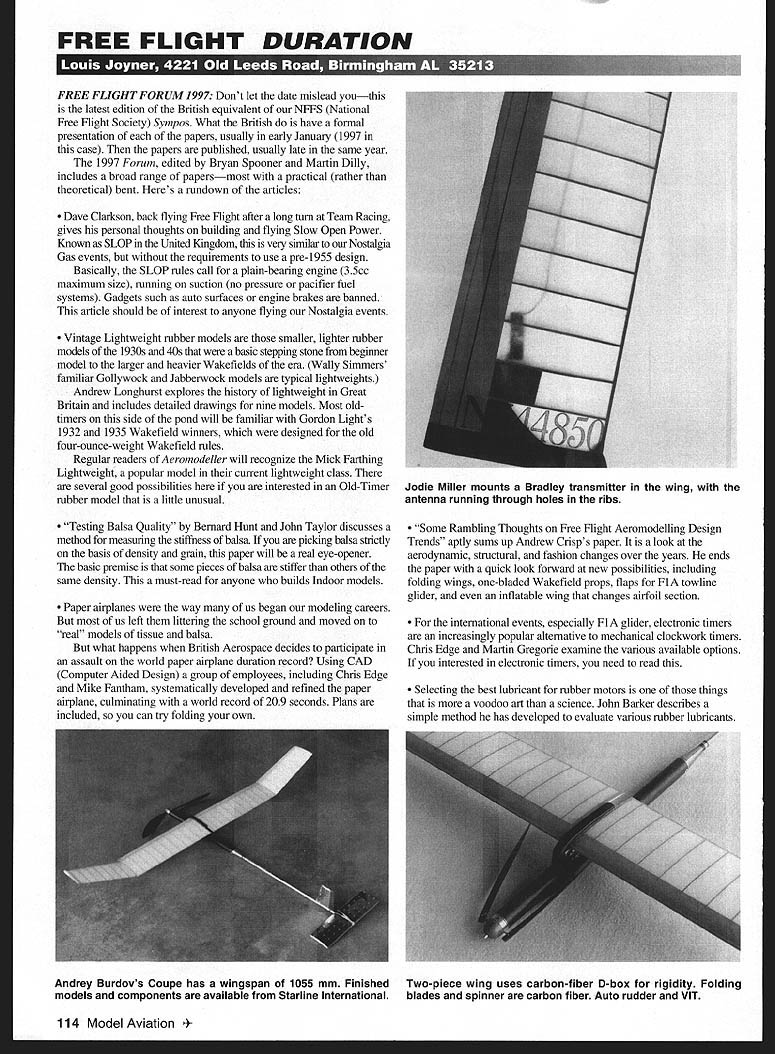
- Jody Miller uses a similar idea to house his Bradley transmitter in the wing of his F1A towline glider. However, Jody permanently installed the transmitter and has a hinged panel to install and remove batteries.
- A more usual position for towline gliders is the upper portion of the pod, behind the wing wire. With all of the mechanical and electrical gear crammed into a modern glider, it is about the only spot available. The braided wire antenna runs along the top of the tailboom. A rigid wire antenna, used in some systems, can stick straight up. The antenna should never run inside an aluminum or carbon-fiber tailboom or other structure, since this could block the signal.
- Although a location near the center of gravity is considered ideal, the transmitter can be positioned close to the front of the fuselage to reduce nose length. For his Mulvihill models, Canadian Jim Brooks uses a small molded fiberglass blister taped in place just behind the prop. The antenna runs along the top of the fuselage, passing through a small tube in the pylon.
Burdov Coupe
A few years back, I had the opportunity to watch Russian Wakefield flier Andrey Burdov demonstrate his Coupe. It looks like a scaled-down version of his own Wakefield models, complete with auto surfaces—and it climbed like a Wakefield, too. Now Sal Fruciano of Starline International is importing the Burdov Sweet G Coupe, as well as a wide range of its component parts.
The Coupe is relatively small, with a wing area of about 165 square inches. This is definitely a "get high or go home" type of model.
Following standard Wakefield practice, the Coupe makes extensive use of composites. The prop is molded carbon fiber. The motor tube and pylon are of brown Russian aramid; the tailboom is rolled of thin aluminum and unidirectional carbon fiber. Wing construction is the familiar carbon-fiber D-box, carbon-capped balsa ribs, and thin carbon trailing edge. Covering is polyester tissue.
Complete ready-to-fly Coupes are available from Starline. The cost is $410 plus shipping. Sample prices on some components are: front end with blades, $79; finished wing, $104; motor tube, $20; pylon with timer and start switch, $49. Contact Sal for a complete price list:
Starline International 6146 E. Cactus Wren Rd. Scottsdale, AZ 85253 Tel.: (602) 948-5798
Along with the information and photos of the Coupe, Sal included a brief biography of Andrey: at age 36, Andrey Burdov has already attained a high level of achievement in European aeromodelling. Andrey started aeromodelling in 1972. He made his first F1B in 1975 (at age 14). He has been Soviet champion, Russian champion, three-time team member, and most recently, vice champion at the 1997 World Aeromodelling Games in Turkey.
His aeronautical engineering degree at Kazan Aviation University led to a position as professor of aeromodelling and modeling at the university. He is married, with two children. He has been building and flying F1G models since 1992, and is pleased to say that his personal Sweet G will normally clock four-minute non-thermal flights.
Transcribed from original scans by AI. Minor OCR errors may remain.

