
FREE FLIGHT DURATION
Louis Joyner, 4221 Old Leeds Road, Birmingham AL 35213
Introduction
Back in the 1950s and 1960s, flying a rubber model was a two-person job: one to wind, and one to hold on for dear life. You could find out very quickly who your real friends were—the ones brave enough (or crazy enough) to hold while you packed in the turns on a three- or four-ounce rubber motor.
Now, of course, just about everyone uses a stooge—a non-complaining, always-ready mechanical stand that holds the model. Although there have been a few commercial units produced through the years, most people cobble up their own.
If you are new to rubber flying or simply want to update your current ground-support equipment, the following describes the basics of making your own stooge and shows proven practices and options.
What a stooge is
A stooge consists of:
- a bracket to hold the model,
- a pole extending down to the ground,
- guy wires, and
- pegs (stakes) to stabilize the stooge and anchor it to the ground.
Bracket (model holder)
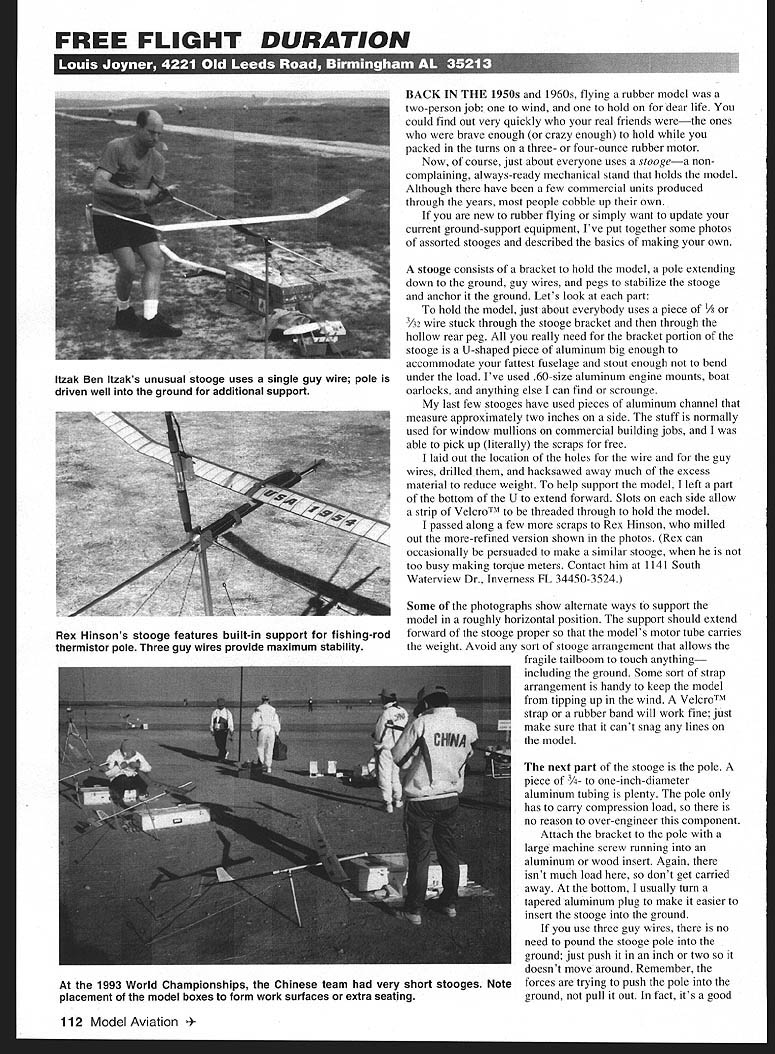
To hold the model, most people use a piece of 1/8" or 3/32" wire stuck through the stooge bracket and then through the hollow rear peg. All you really need for the bracket portion of the stooge is a U-shaped piece of aluminum big enough to accommodate your fattest fuselage and stout enough not to bend under load. I've used .60-size aluminum engine mounts, boat oarlocks, and anything else I could find or scrounge.
My last few stooges have used pieces of aluminum channel approximately two inches on a side. The material is normally used for window mullions on commercial building jobs, and I was able to pick up the scraps for free.
I laid out the location of the holes for the wire and for the guy wires, drilled them, and hacksawed away much of the excess material to reduce weight. To help support the model, I left part of the bottom of the U to extend forward. Slots on each side allow a strip of Velcro™ to be threaded through to hold the model.
I passed along a few more scraps to Rex Hinson, who milled a more refined version. (Rex can occasionally be persuaded to make a similar stooge when he is not too busy making torque meters. Contact him at 1141 South Waterview Dr., Inverness FL 34450-3524.)
Some photographs show alternate ways to support the model in a roughly horizontal position. The support should extend forward of the stooge proper so that the model's motor tube carries the weight. Avoid any arrangement that allows the fragile tailboom to touch anything—including the ground. A strap arrangement is handy to keep the model from tipping up in the wind. A Velcro™ strap or a rubber band will work fine; just make sure it can't snag any lines on the model.
Pole
A piece of 3/4" to 1" diameter aluminum tubing is plenty for the pole. The pole only has to carry compression load, so there is no reason to over-engineer it.
Attach the bracket to the pole with a large machine screw running into an aluminum or wood insert. Again, there isn't much load here, so don't get carried away. At the bottom, I usually turn a tapered aluminum plug to make it easier to insert the stooge into the ground.
If you use three guy wires, there is no need to pound the stooge pole into the ground; just push it in an inch or two so it doesn't move around. Remember, the forces are trying to push the pole into the ground, not pull it out. It's a good idea to mount a larger fender washer (available at the hardware store) a few inches from the end of the pole to keep it from being pushed too deeply into soft ground.
How high should the stooge be? Slightly below waist high seems to be the most popular choice. This results in a total stooge length of about 2-1/2 feet. This makes for a fairly compact stooge and keeps the guy wires from getting too long. For a more compact, portable stooge, either shorten the pole or make it in two parts; a simple slip joint is all that's needed.
Guy wires
To support the stooge, most people use three guy wires: two to the rear that carry the winding load, and one to the front that helps keep the stooge upright.
The front guy wire is important in the event of a blown motor. Without it, the stooge can fall over to the rear, breaking the stab or tailboom.
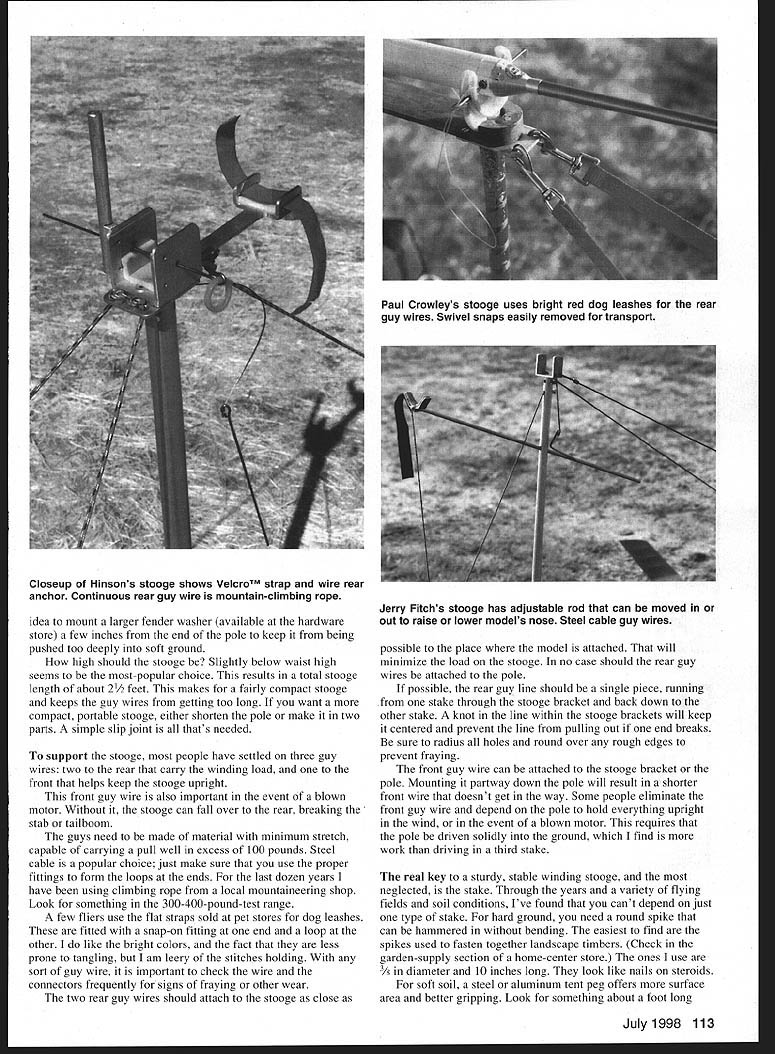
The guys need to be made of material with minimum stretch and capable of carrying a pull well in excess of 100 pounds. Steel cable is a popular choice; just make sure you use the proper fittings to form the loops at the ends. For the last dozen years I have been using climbing rope from a local mountaineering shop. Look for something in the 300–400 pound test range.
A few fliers use the flat straps sold at pet stores for dog leashes. These are fitted with a snap-on fitting at one end and a loop at the other. They are bright and less prone to tangling, but I am leery of the stitches holding. With any type of guy wire, check the wire and connectors frequently for signs of fraying or other wear.
The two rear guy wires should attach to the stooge as close as possible to the place where the model is attached; that will minimize the load on the stooge. In no case should the rear guy wires be attached to the pole.
If possible, the rear guy line should be a single piece, running from one stake through the stooge bracket and back down to the other stake. A knot in the line within the stooge brackets will keep it centered and prevent the line from pulling out if one end breaks. Be sure to radius all holes and round over any rough edges to prevent fraying.
The front guy wire can be attached to the stooge bracket or to the pole. Mounting it partway down the pole will result in a shorter front wire that doesn't get in the way. Some people eliminate the front guy wire and depend on the pole to hold everything upright in the wind or in the event of a blown motor. That requires driving the pole solidly into the ground, which is more work than driving a third stake.
Stakes (pegs)
The real key to a sturdy, stable winding stooge—and the most neglected part—is the stake. Through the years and a variety of flying fields and soil conditions, you can't depend on just one type of stake.
Types of stakes:
- Round spike: For hard ground, you need a round spike that can be hammered in without bending. The easiest to find are the spikes used to fasten landscape timbers (check the garden-supply section at the home-center store). The ones I use are 3/16" diameter and 10" long.
- Tent peg: For soft soil, a steel or aluminum tent peg offers more surface area and better grip. Look for something about a foot long with a V-shaped cross-section. Drive the peg in with the open part of the V facing toward the stooge. In damp soil these pegs can often be pushed into the ground yet still provide a firm grip. Don't try them in hard dirt; they will bend easily.
- Sand peg: For soft, sandy soil, use sand pegs—typically a steel triangle welded to a piece of rebar. They work even in loose sand but are impossible to hammer into regular soil.
Any stake should be driven into the ground roughly perpendicular to the guy wire.
Setting up the stooge
The easiest procedure I've found:
- Hammer in the two rear stakes approximately three feet apart.
- Pull hard on the stooge bracket and push the lower end of the pole into the ground.
- Drive in the front stake, pulling it tight.
If done right, there is no need to fool with line adjusters. Give the stooge a hard pull to make sure it is properly anchored before you put a model in it. If a peg shows signs of coming out, add a second peg running across the other one for extra support.
I like to set up the stooge so that the tail of the model points into the wind. This way I can watch upward for signs of lift while winding. Never set the stooge up so the wind is coming from the side; that's a sure way to break a wing.
Extras and tips
- Permanently attach the wire rear anchor to the stooge bracket with a short length of flexible wire cable to make setup easier.
- To avoid driving more stakes, add a bracket to hold a short streamer pole or thermistor on the stooge bracket. Make sure the pole doesn't interfere with the use of the stooge.
- Regularly inspect all fittings, lines, and staking hardware for wear and fraying. Replace anything showing signs of failure.
These simple design choices and precautions will give you a sturdy, reliable stooge that makes winding and flying your rubber models much easier and safer.
Transcribed from original scans by AI. Minor OCR errors may remain.

