

Free Flight Duration
Louis Joyner 4221 Old Leeds Rd., Birmingham, AL 35213
1999 Free Flight World Championships
The 1999 Free Flight World Championships will be held August 24–31 in Beer Sheba, Israel.
The United States team:
- F1A towline glider: Brian Van Nest, Jim Parker, Steve Spence
- F1B Wakefield rubber power: John Sessums, Bob Piserchio, Vladi Andriukov
- F1C power: Faust Parker, Ron McBurnett, Ed Keck
Team manager: George Batiuk Jr. Assistant manager: Blake Jensen
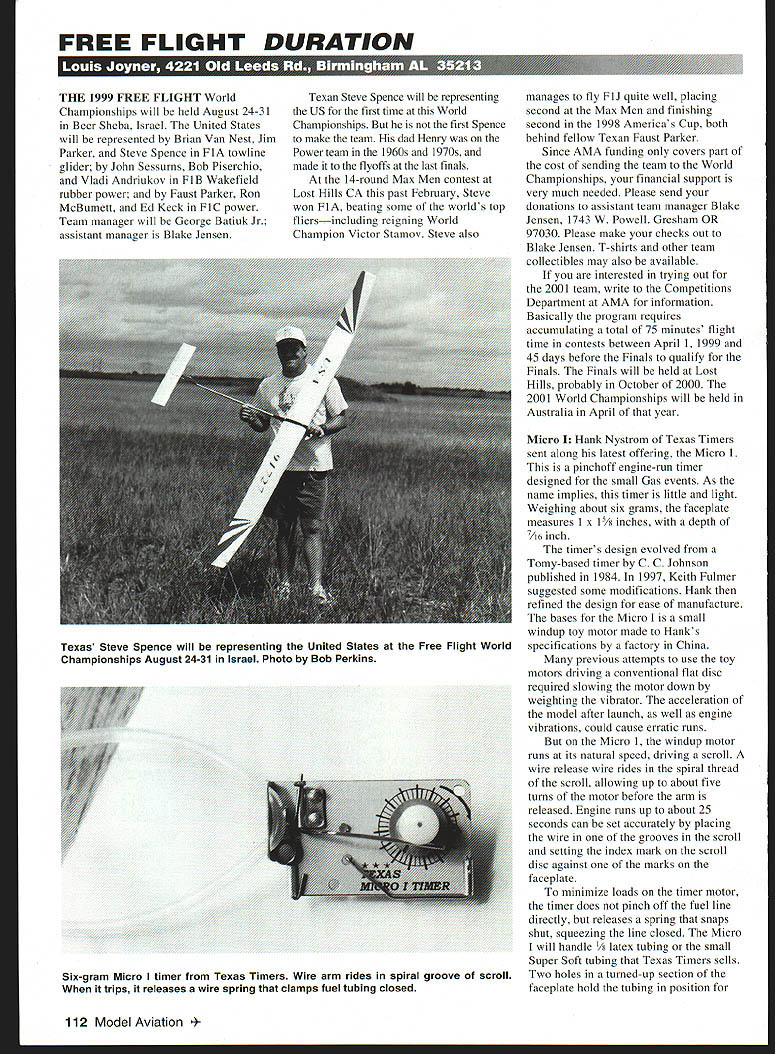
Texan Steve Spence will be representing the U.S. for the first time at this World Championships. He is not the first Spence to make a U.S. team: his dad Henry was on the Power team in the 1960s and 1970s and made the flyoffs at the last finals.
At the 14-round Max Men contest at Lost Hills, CA this past February, Steve won F1A, beating some of the world's top fliers — including reigning World Champion Victor Stamov. Steve also flies F1J well, placing second at Max Men and finishing second in the 1998 America's Cup, both behind fellow Texan Faust Parker.
Since AMA funding only covers part of the cost of sending the team to the World Championships, financial support is needed. Please send donations to assistant team manager Blake Jensen:
- Blake Jensen
1743 W. Powell Gresham, OR 97030
Make checks payable to Blake Jensen. T-shirts and other team collectibles may also be available.
If you are interested in trying out for the 2001 team, write to the Competitions Department at AMA for information. The program requires accumulating a total of 75 minutes' flight time in contests between April 1, 1999 and 45 days before the Finals to qualify for the Finals. The Finals will be held at Lost Hills, probably in October 2000. The 2001 World Championships will be held in Australia in April 2001.
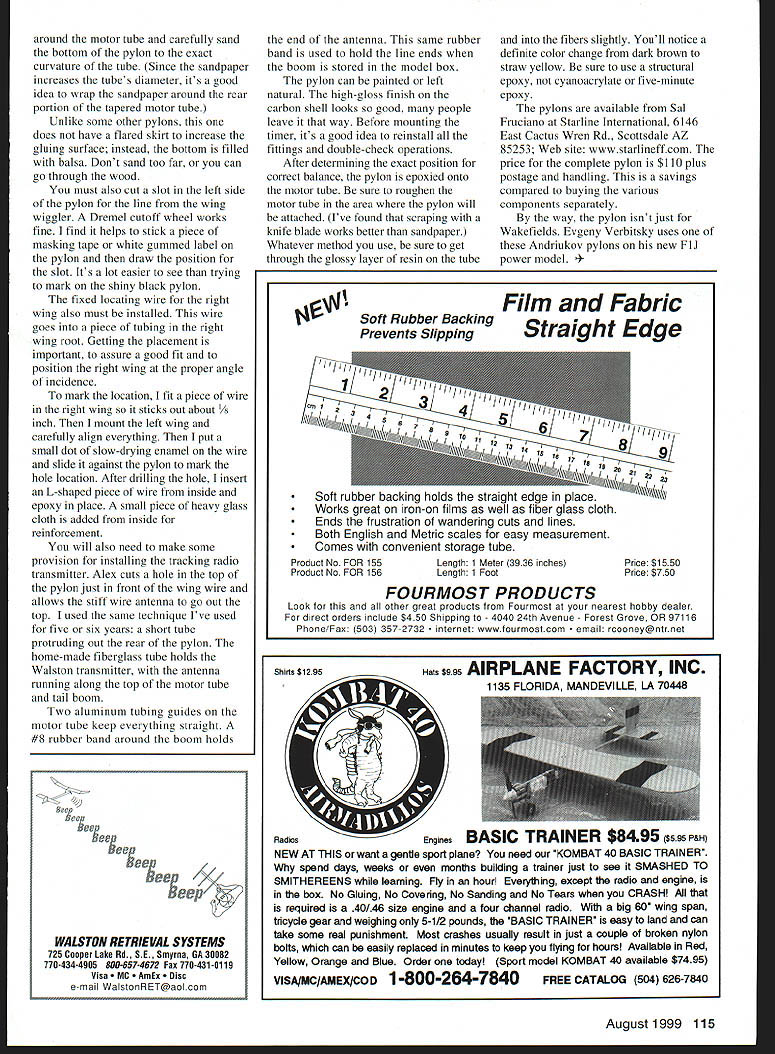
Micro I (Texas Timers)
Hank Nystrom of Texas Timers sent his latest offering, the Micro I. This is a pinch-off, engine-run timer designed for the small Gas events. As the name implies, the Micro I is small and light: it weighs about six grams, the faceplate measures 1 x 1-5/8 inches, with a depth of 7/16 inch.
Background and design:
- The design evolved from a Tomy-based timer by C. C. Johnson published in 1984. In 1997, Keith Fulmer suggested modifications and Hank refined the design for ease of manufacture.
- The basis for the Micro I is a small wind-up toy motor made to Hank's specifications by a factory in China.
- Previous attempts using toy motors driving a conventional flat disc required slowing the motor by weighting the vibrator; acceleration after launch and engine vibrations caused erratic runs. On the Micro I, the wind-up motor runs at its natural speed, driving a scroll.
- A wire release arm rides in the spiral thread of the scroll, allowing up to about five turns of the motor before the arm is released. Engine runs up to about 25 seconds can be set accurately by placing the wire in one of the scroll grooves and aligning the index mark on the scroll disc with a mark on the faceplate.
Features:
- To minimize loads on the timer motor, the Micro I does not pinch the fuel line directly; it releases a spring that snaps shut to squeeze the line closed.
- Accepts 1/8-inch latex tubing or the small "Super Soft" tubing sold by Texas Timers. Two holes in a turned-up section of the faceplate hold the tubing.
- The spring-clamp down-end start lever has a slight kink that provides a very positive lock stop position, reducing the chance of premature starts from engine vibration. The kink also keeps the start wire from bouncing back into the faceplate hole after launch.
Price and availability:
- Introductory price: $25 plus $2.50 postage and handling.
- Hank is also offering motors in lots of six for $22 postpaid (no instructions or warranties). Motors can be ordered from Texas Timers, 3317 Pine Timbers Dr., Johnson City, TN 37604. E-mail: txtimer@tricon.net.
Andriukov Pylon (F1B Wakefield)
Although available for several years, the F1B Wakefield pylon developed by three-time world champion Alexander Andriukov deserves a close look. It is a complete package including:
- carbon-fiber pylon shell
- timer (mounted in a weight-saving arrangement)
- timer start switch
- wing wiggler
Notable design features:
- The timer faceplate is eliminated to save weight. A circular cover on the right side of the pylon can be removed, allowing the timer to be pulled out through the hole; cleaning requires removing the timer scroll disc and takes only a few minutes. The four timer levers, which attach directly to the pylon, stay in place.
- Eliminating the faceplate saves a few grams and lets the timer be moved forward slightly in the pylon, giving more clearance for hooking up the lines.
- The molded carbon-fiber pylon measures approximately 14 mm wide, 35 mm high, and 155 mm long.
- Two small holes for the wing wire: the forward hole for the standard "short" wing; the rear hole for the narrower-chord "long" wing. If building your own wing, either hole can be used.
- The wing wiggler is a machined fitting recessed into the upper left side of the pylon. A 1 mm wire goes into the left wing panel. A line from the wiggler to the timer holds the left wing at a slight negative angle relative to the right wing during most of the climb, improving the power pattern and reducing the dip-and-turn to the right at the end of the power burst.
- An adjustable screw at the top of the wiggler sets the power position stop; a similar screw for the glide position is accessed by partially removing the wiggler mechanism.
- The start switch, located on the right side of the pylon, is a blade type that latches in the off position; pressing it releases the latch and arms the system so the timer starts when the model is thrown.
Assembly and installation notes:
- Although the pylon comes with fittings installed, remove and store them to protect from dust while you work.
- Wrap sandpaper around the motor tube and carefully sand the bottom of the pylon to match the tube curvature. Because sandpaper increases diameter, wrap it around the rear portion of the tapered motor tube when fitting.
- The bottom of the pylon is filled with balsa rather than having a flared skirt; don't sand too far or you will go through the wood.
- Cut a slot in the left side of the pylon for the line from the wing wiggler (a Dremel cutoff wheel works well). Masking tape or a white label helps mark the slot position on the shiny black shell.
- Install the fixed locating wire for the right wing into a piece of tubing in the right wing root. To mark the location, fit a wire in the right wing so it sticks out about 3/8 inch, mount the left wing, align everything, then put a small dot of slow-drying enamel on the wire and slide it against the pylon to mark the hole. Drill the hole, insert an L-shaped wire from inside, epoxy in place, and reinforce from inside with a small piece of heavy glass cloth.
- Provide for installing the tracking radio transmitter. One method is a short tube protruding from the rear of the pylon to hold the Wallston transmitter, with the antenna running along the top of the motor tube and tail boom. Two aluminum tubing guides on the motor tube keep everything straight. A #8 rubber band around the boom holds the antenna end and is also useful to hold line ends when the boom is stored.
- Before mounting the timer, reinstall all fittings and double-check operation. After determining the exact position for correct balance, epoxy the pylon onto the motor tube. Roughen the motor tube where the pylon will be attached (scraping with a knife blade often works better than sandpaper) to get through the glossy resin layer into the fibers slightly. Use a structural epoxy — not cyanoacrylate or five-minute epoxy.
Other notes:
- The high-gloss finish on the carbon shell looks good and many people leave it natural.
- The pylon is not just for Wakefields; Evgeny Verbitsky uses an Andriukov pylon on his F1J power model.
Availability and price:
- Pylons are available from Sal Frucianno at Starline International, 6146 East Cactus Wren Rd., Scottsdale, AZ 85253; Web: www.starlineint.com.
- Price for the complete pylon: $110 plus postage and handling. This is a savings compared to buying the components separately.
Transcribed from original scans by AI. Minor OCR errors may remain.

