
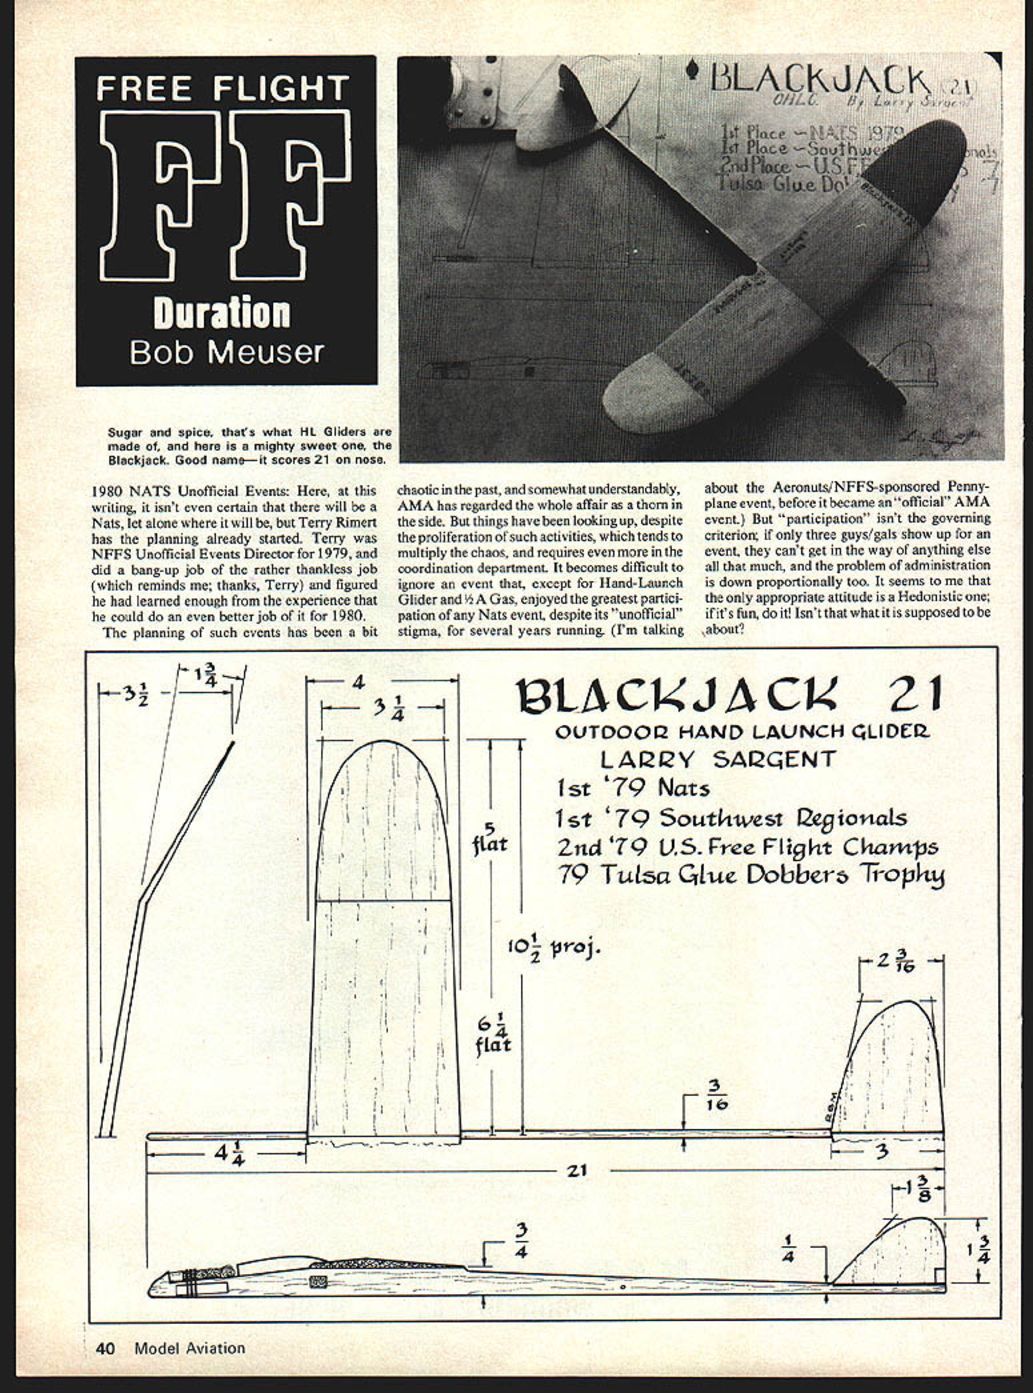

Free Flight: Duration
Bob Meuser
1980 NATS Unofficial Events
1980 NATS Unofficial Events: At the time of this writing, it isn't even certain that there will be a Nats, let alone where it will be, but Terry Rimert has the planning already started. Terry was NFFS Unofficial Events Director for 1979 and did a bang-up job of the rather thankless task (which reminds me—thanks, Terry) and figured he had learned enough from the experience that he could do an even better job for 1980.
The planning of such events has been a bit chaotic in the past, and, somewhat understandably, AMA has regarded the whole affair as a thorn in the side. But things have been looking up, despite the proliferation of such activities, which tends to multiply the chaos and requires even more coordination. It becomes difficult to ignore an event that, except for Hand-Launch Glider and 1/2A Gas, enjoyed the greatest participation of any Nats event despite its "unofficial" stigma for several years running. (I'm talking about the Aeronuts/NFFS-sponsored Pennyplane event, before it became an official AMA event.)
Participation isn't the governing criterion; if only three people show up for an event, they can't get in the way of anything else all that much, and the problem of administration is down proportionally too. It seems to me the only appropriate attitude is a hedonistic one: if it's fun, do it! Isn't that what it's supposed to be about?
The chaos becomes unnecessarily intensified when some club announces, some six weeks before the Nats, that it is going to sponsor an event. Chances are they knew they were going to sponsor it for some months, but the calendar just sort of slipped away. Then their announced time for the event conflicts with that of another unofficial event and several official ones. And it also turns out that another club was planning to sponsor the same event! No kidding — it happens.
Part of Terry's goal is to have competitions for all of the official AMA events that are not on the official Nats menu. In addition, of course, there will be some of the traditional unofficial events, such as Embryo Endurance and Rubber-Power Speed. (I wonder when AMA will get around to following its own rule about it being improper to have events that are not official AMA events on the official Nats menu; but I digress.)
With all that's going on at a Nats, conflict is inevitable. To minimize it requires coordination, and that's what Terry is trying to do. That takes not only effort but also time. So this squib is in effect part of Terry's "early warning system." Anyone wishing or willing to sponsor a Nats unofficial event should contact him as soon as possible. His address is:
367 Orange Ave. Baldwin, Florida 32234
I wonder if I should mention to Terry that the Milpitas "Twang-Hook Tweekers" are thinking about sponsoring an unofficial event for R.O.W. electric-power canard-biplane-ornithopters? Oh well, there's plenty of time.
Look, Ma — No Ribs!
Did you waste your youth whittling ribs when you could have wasted it on something far more important, such as gluing stick to stick? Waste no more time; the solution is at hand. We present here, for the first time anywhere in the universe, the Meuser Un‑Patented Ribless Construction Technique.
I don't consider a chunk of 1/16‑sq. a proper "rib," and insofar as outdoor free‑flight technology is concerned, indoor‑type sliced ribs also rank close to ground zero on the sophistication scale. So the term "ribless" seems appropriate.
If you believe that fancy tables of airfoil‑section coordinates tell the whole story about free‑flight model aviation, you'll have a little problem with what follows. After you've plotted a few dozen airfoil sections and built a few hundred wings, it might dawn on you (if you are sharp) that the covering between the ribs does whatever it wants, regardless of what the ribs on either side tell it to do.
A "solution" is carefully constructed sheet‑balsa covered surfaces. Wind‑tunnel tests and a half‑century of competition experience have shown those slick airfoils really aren't all that great. Multi‑spar construction will beat the suede‑shoe, slick‑surfaced lads in the field of battle, and super‑slick sheeted surfaces usually benefit from being crumpled up with turbulators.
The bottom surface determines the kind of stick required to replace the rib:
- If the bottom is flat, use square stock, or preferably rectangular stock on edge.
- If the bottom is undercambered, use indoor‑style sliced ribs.
After the size and shape of the non‑ribs have been determined, the spars—which simply sit on top of the non‑ribs—determine the shape of the top surface. For a simple straight wing or stab, standard‑size strips will usually be adequate. If there are to be more than two spars, or if the wing or stab is tapered, you might find it necessary to strip the spars from sheet stock.
Center sections, tips, and dihedral breaks present minor problems but are easily solved. At the tips, scarf on a piece of oversize sheet and sand it to shape. At center sections and dihedral breaks, fill in between spars with sheet‑balsa scraps. Let them stick up above the desired level; trim and sand them to the proper height afterward.
Sheeting the top surface is time‑consuming, but it yields the best appearance. Add balsa gun fairings and water‑shrink the entire covered plane. I like to "shrink in" my wing washout rather than build it in; I used about 1/64 inch of washout at each wing tip.
Neat DT
Some free‑flighters like to put their DT fuses at the aft end of the model; some like it closer to the nose and closer to the C.G. I won't bore you with a prejudiced list of pros and cons; try both ways and then decide.
If you decide on a forward‑mounted fuse, the following set‑up has paid off on a dozen or so models. Make up a half‑dozen at a crack—the installation onto a model then takes about a minute. Parts and basic method:
- Punch a hole in a bit of 1/64" ply (or 1/32" if you can stand the extra ~0.1 gram).
- Cut off a piece of 1/4" O.D. aluminum tubing about 1/2" long (roll it under a knife blade and cut).
- Cut two short lengths (about 1/8" each) of 9/32" O.D. tubing.
- Short lengths of tubing tend to distort when annealed; it helps to stick a piece of dowel or smaller tubing inside while cutting. If necessary, straighten them by pushing over a center punch or other tapered object.
- Bend a glass‑headed pin to the required shape.
When you go out to buy glass‑headed pins at the local department store, don't settle for plastic‑headed pins.
Finishing and Painting
Dope the plane with two coats of thinned dope, preferably nitrate, with an appropriate amount of plasticizer. The cowl section is not covered; fill it in with several coats of dope and talcum powder followed by careful sanding. Take your time here because the cowl must look like metal rather than "grainy" balsa if you want a nifty finish.
After clear doping, select your color scheme. I chose a "sand and spinach" effect with a yellow cowling and light‑gray undersurfaces. I used Floquil model railroad paints thinned with very thin nitrate dope and sprayed them with an airbrush. Add panel lines with a soft grey pencil and fix them with a coat of clear nitrate sprayed on.
My Fiat was built with the gear "up." I simulated the gear doors and wheels with hard paper glued in place with rubber cement. Numbers were cut from black or red tissue and doped on. Next, add a pilot carved from foam and machine guns made from balsa or aluminum tube stock.
Trimming and Flying
I used a 9/16" Peck‑Polymers plastic prop and a large Peck‑Polymers bearing with 5° of down thrust. The finished weight of my Fiat without rubber was about 70 grams (slightly over 2 oz.) and about 95 grams with rubber.
Motor and winding:
- I used 4 strands (2 loops) of FAI 3/16" rubber; total length of rubber was about 15–17 feet.
- Tie the rubber with a good knot, lube it with Dow 33 or Sig Rubber Lube, and braid the motor. Have a buddy hold the knotted end while you put in about 17 winder turns with a 16:1 winder. Then grab the knotted end from your buddy while still holding the other end, place both ends over your index finger, and pull out the now 4‑stranded motor several times until it looks nicely braided.
Install the motor in the plane and test‑glide over tall grass. When the glide is reasonable, try a few winds and launch the plane slightly nose‑down. If everything is still OK, try about 300 winder turns. My Fiat flies in a large left circle with a left glide.
When properly trimmed it will fly in a slightly nose‑up attitude and glide very well with the braided motor. I fly for fun with about 100 winder turns (1,600 total turns) and get 45 seconds or more duration. I go for broke with 130+ turns—except you can't get that many turns in with a 16:1 winder; the motor is too strong. My plane flew 1:53 (using a 5:1 winder to get over 2,000 total turns) to beat Mike Midkiff's superb Hellcat at the F.A.C. Nats. Good luck with yours! Now I think I'll try one of Bill Winter's Grumman bipes!
(Editor: The "old timer" thinks his Curtiss SOC‑3 biplane has the most potential for a bipe—also from MAN, gosh knows when.)
Transcribed from original scans by AI. Minor OCR errors may remain.

