
DURATION
By Bob Meuser
Rubber-Power Speed
Rubber-Power Speed (RPS) — essentially minimum-duration over a course — was popular in the late 1930s and was revived by the National Free Flight Society (NFFS) about eight years ago. The NFFS has flown the event unofficially at the Nationals and at four or five major contests per year since. It seems high time the AMA rule book include some form of RPS — Official, Supplemental, or Provisional — and to establish official AMA national records.
I have sent a tentative proposal to a number of rubber-speed fliers and solicited comments. From those responses I drafted a questionnaire covering every question that came up. Trouble is, I don't know everyone involved in the event and would like to get opinions from everyone. I also would like photos, drawings, and any accounts of rubber-speed contests from earlier times.
- Want to be on the mailing list and receive the questionnaire? Send your name and address and a stamp or two and I'll add you.
Nats Unofficial Events
Terry Rimert, NFFS Official "Unofficial-Events" Director, will send a complete list of rules for all Nats unofficial events if you send a stamped, self-addressed envelope. He suggests bringing floats for any planes — perhaps a puddle can be found or manufactured — and Perryman will run hydro events if any damp launching surface is available.
Planned or likely unofficial events include:
- Old-timer Rubber Scale
- Battle of Britain rubber scale (mass-launch, last-one-down sort of event; sponsored by the Cleveland Free Flight Society)
- Embryo Endurance (probable)
- Flying Aces Club Scale Nats (hosted by the Buzzing Buzzards on Aug. 9–10)
Write to:
- Terry Rimert, 367 Orange Ave., Baldwin, FL 32334.
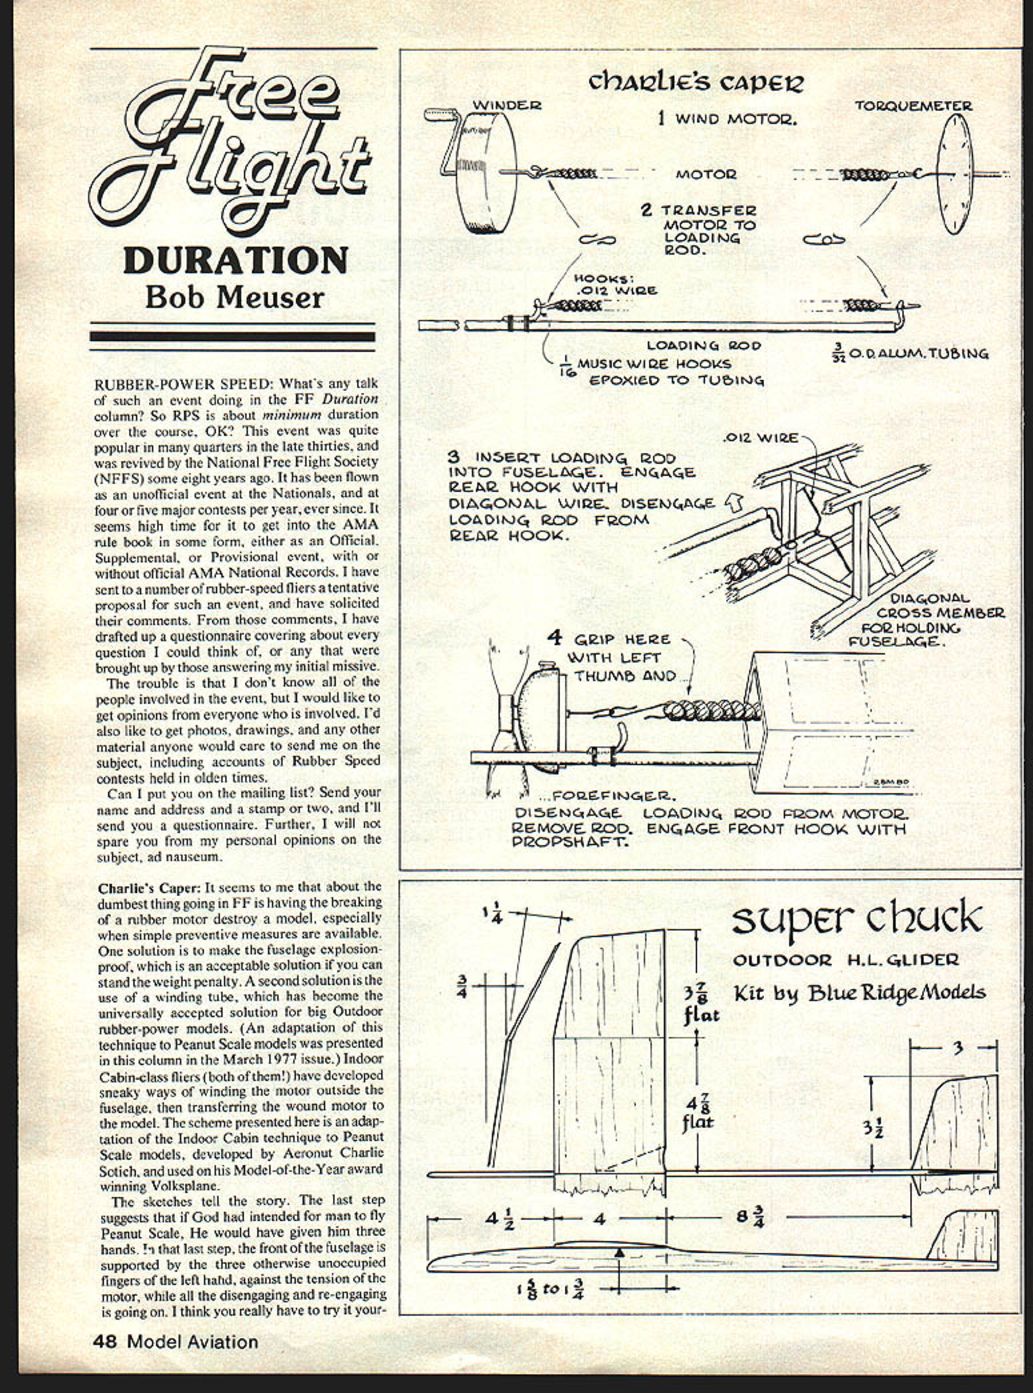
Charlie's Caper
Breaking a rubber motor and having it destroy a model is one of the dumbest things in FF, particularly because simple preventive measures exist.
Two basic solutions:
- Make the fuselage explosion‑proof — acceptable if you can tolerate the weight penalty.
- Use a winding tube — the universally accepted solution for big outdoor rubber‑power models.
Indoor Cabin-class fliers have developed ways to wind the motor outside the fuselage and transfer the wound motor into the model. Aeronut Charlie Sotich adapted an Indoor Cabin technique for Peanut Scale models and used it on his Model‑of‑the‑Year Volksplane. The method allows safe one‑man winding: the final step requires supporting the front of the fuselage with three otherwise unoccupied fingers of the left hand against the motor tension while disengaging and re‑engaging the motor — it really works, even if it looks like you need three hands.
Charlie’s caper makes winding Peanut Scale or small rubber‑power models a safe one‑man operation.
Case‑Hardened Balsa
Some plans call for solid balsa noseblocks, wing‑tip fairings, etc., that end up unnecessarily heavy. Rather than Dremeling parts half to death, try this:
- Use the softest balsa possible.
- Smear the outer surface with alpha‑cyanoacrylate adhesive (Hot Stuff type). The glue soaks in and cures, producing a case‑hardened surface.
- It soaks more into end grain (often the area most in need of hardening) than into grain‑parallel surfaces.
Cautions:
- Cyanoacrylate adds weight; test on a crude mock‑up and check on a gram scale before treating flight parts.
- You can still remove material with a Dremel afterward if needed for final shaping.
I thought I’d discovered this until I read the Super Chuck kit instructions; they explicitly recommend impregnating the leading edge with alpha‑cyanoacrylate as an acceptable substitute for spruce or basswood reinforcing strips.
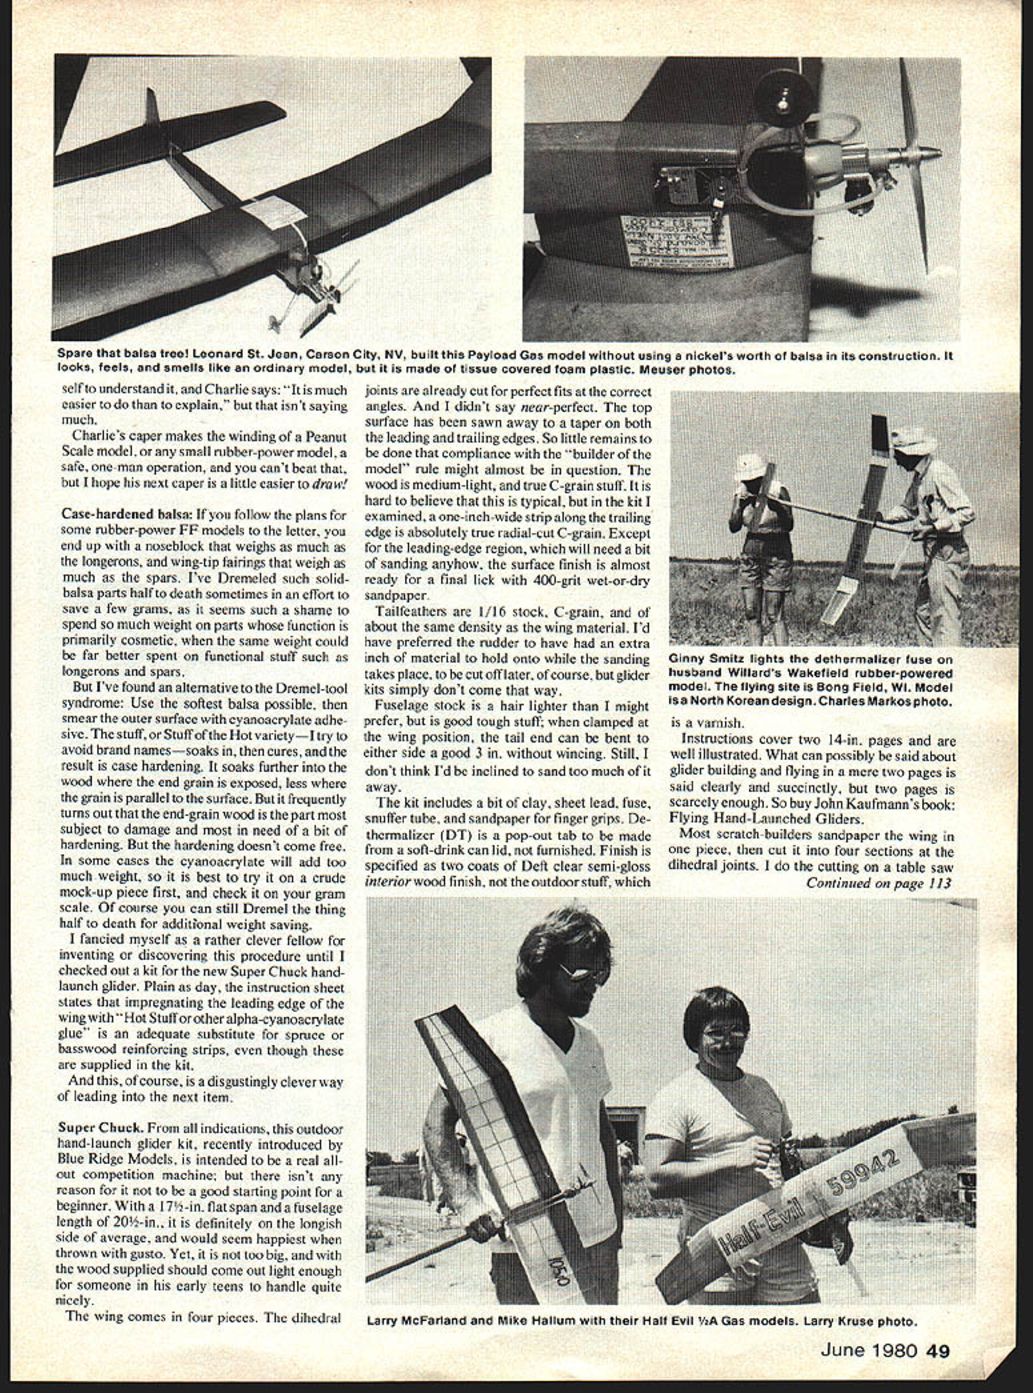
Super Chuck (hand‑launch glider kit)
From Blue Ridge Models, the Super Chuck is an outdoor hand‑launch competition kit that also makes a good beginner project.
Key features:
- Wingspan: 17½ in.
- Fuselage length: 20½ in.
- Wing in four pieces; dihedral joints are already cut for perfect fit and angle.
- Wing top surface pre‑tapered at leading and trailing edges; little sanding remains.
- Wood: medium‑light, true C‑grain; in the kit examined a one‑inch strip along the trailing edge was true radial‑cut C‑grain.
- Tailfeathers: 1/16" stock, C‑grain.
- Fuselage stock: light but tough; the tail can be bent about 3 in. each side when clamped at the wing station without damage.
- Kit includes: clay, sheet lead, fuse snuffer tube, and sandpaper for finger grips.
- De‑thermalizer (DT): pop‑out tab to be made from a soft‑drink can lid (not supplied).
- Finish: two coats of Deft clear semi‑gloss interior wood finish (specified, not outdoor varnish).
- Instructions: two well‑illustrated 14‑in. pages; for more on building and flying, buy John Kaufmann's Flying Hand‑Launched Gliders.
Wing‑sanding technique (for the four‑piece wing):
- Tape the four sections together at the joints on the lower surface with 1/2‑in. masking tape and sand the assembly as if it were one piece. This avoids over‑sanding at panel ends and helps match airfoils across the joints.
- With the tape still attached, apply a skim of glue to the mating surfaces, prop the panels to their proper dihedral angles, and smear the glue that oozes from the top of the joint into a fillet with your finger. Let cure. The bottom tape prevents excess glue from running.
- The masking‑tape trick also makes neat mitered joints and works well whether you sand panels together or separately.
Most scratch‑builders sand the wing in one piece, then cut it into four sections at the dihedral joints; I do the cutting on a table saw.
Contact
Bob Meuser 4200 Gregory Street Oakland, CA 94619
Transcribed from original scans by AI. Minor OCR errors may remain.

