
Free Flight: Duration
Bob Meuser
Controlled Warps
Warps can be good or bad — they can occur when you don't want them, or fail to occur when you do. Most Free Flight models employ tip washout: the wingtip panels are twisted so the tips are at a lower angle of incidence than the rest of the wing. Three degrees is a typical value. Some claim tip washout substitutes for dihedral on models that lack dihedral (as on some scale models). I have never been quite able to figure out why that should be true, and I don't accept the explanations I've seen. Still, it seems to work.
Another intentional warp is wash-in of the part (or all) of the wing on the inside of the turn. This poses a problem for models that fly right/left (right in the climb and left in the glide): the wing that is inside during the climb is outside during the glide. So it's not surprising that models that fly right/left or left/right seldom employ this kind of warp.
Rather extreme amounts of this "differential warp" are sometimes employed in models that fly right/right. Mild amounts are used in most towline gliders and almost always in indoor models (my own being an exception). It works because the inside wing travels slower than the outside wing, and therefore it must either have more area (differential chord or lateral offset, as on many indoor models) or fly at a higher angle of attack. That higher angle of attack can be supplied by warping the inside wing to a higher angle of incidence.
If that isn't done, and if the wing is symmetrical (no lateral offset or differential chord), the model will sideslip. The combined effect of dihedral and sideslip will make the angle of attack greater on the inside wing — the laws of equilibrium must be satisfied. At slow speeds, the increased angle of attack of the inside wing compensates for its slower speed, as intended. Also, the added drag helps haul the model around in the proper direction. At higher speeds, the inside wing contributes proportionally more lift and can prevent the model from spiral-diving into the ground, unless an offset rudder overcomes that tendency.
How to get the warps you want
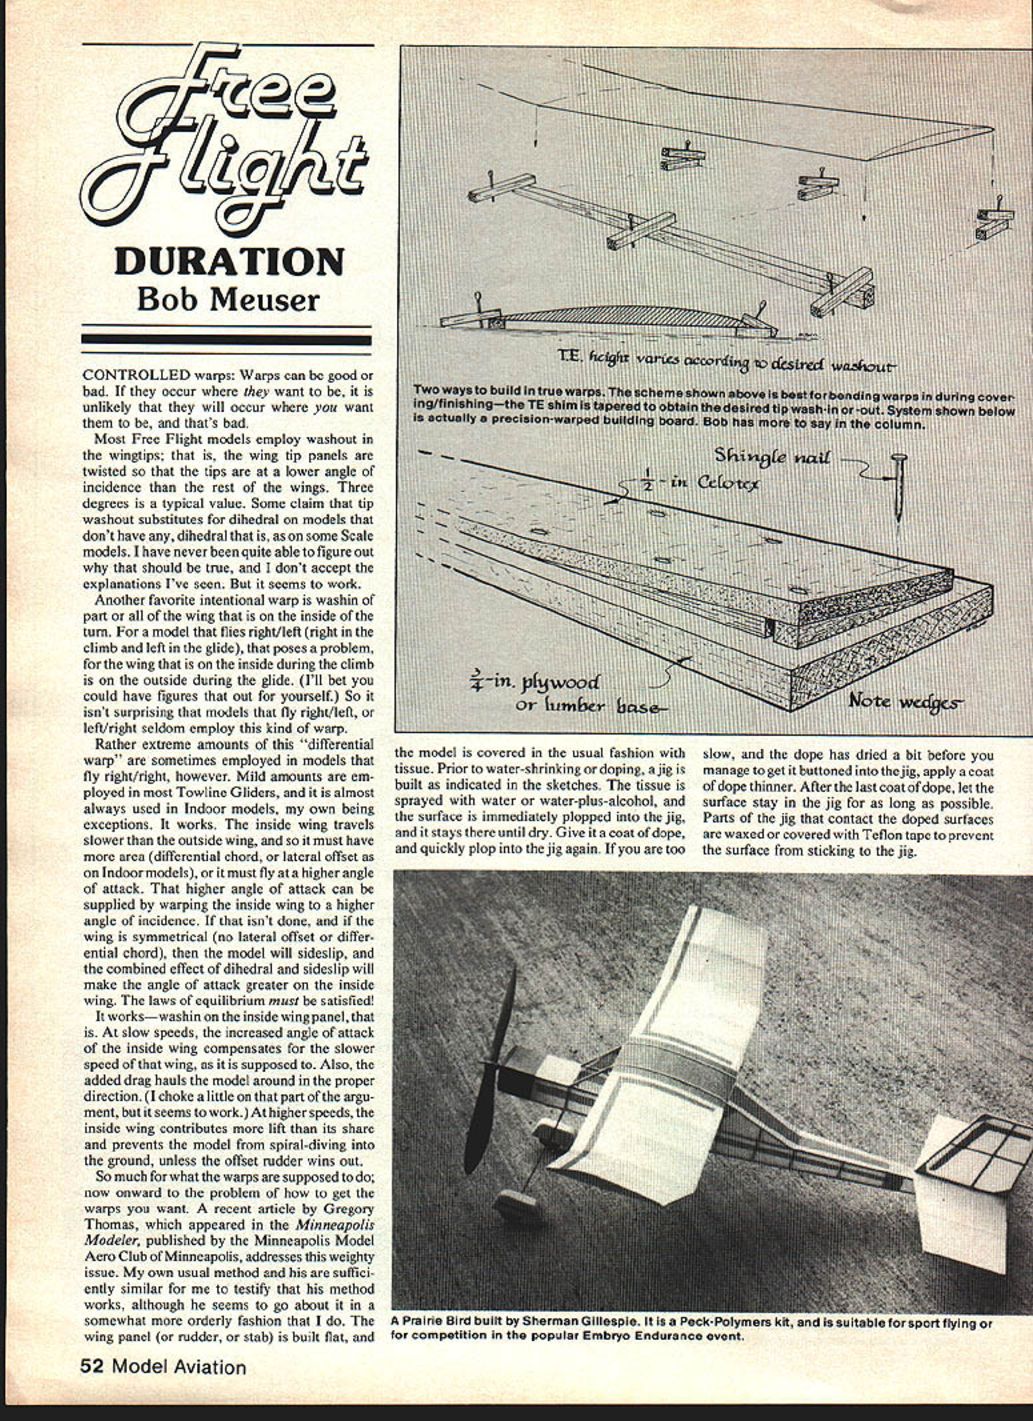
A recent article by Gregory Thomas in Minneapolis Modeler describes a practical method I vouch for from experience. Build the wing panel (or rudder or stabilizer) flat and cover it with tissue in the usual fashion. Prior to water-shrinking or doping, use a jig (as indicated in the sketches from the article):
- Spray the tissue with water or a water-plus-alcohol mixture.
- Immediately plop the surface into the jig and leave it until dry.
- Give it a coat of dope, then quickly plop it into the jig again.
- If the dope has dried a bit before you get it into the jig, apply a coat of dope thinner to re-wet it.
- After the last coat of dope, let the surface stay in the jig as long as possible.
- Wax or cover with Teflon tape any parts of the jig that contact the doped surface to prevent sticking.
Some structures have little torsional stiffness other than that supplied by the covering. Box-spar/diagonal-rib constructions common in kits are torsionally limp; warps must be built into the framework before covering. I think building warps into the structure has a slight edge over warping after covering.
Using Celotex as a building board
Celotex (insulation board) makes a handy building board. It comes in large panels, about 4 × 8 ft and 1/2 in thick (or 1/4 in in some varieties). It's soft — you can push a pin through it — which makes tacking easy. Small pieces stay flat; larger pieces can be tacked to plywood to avoid sagging.
My method:
- Start with a chunk several inches larger than the surface to be built.
- Nail it to a piece of plywood on a workbench or table.
- Insert shims before driving nails home to get the warps you want.
- Stick the plans to the Celotex, build the frame and incorporate the warps into the structure.
- After covering, use the same jig; when the tissue is water-shrunk and doped, nothing much moves.
A cautionary note: my dog loves to eat Celotex. The good part is it's cheaper than dog food.
Electronic timers
Since integrated circuits became available, modelers have tried to replace mechanical timers and fuses for engine cutoff and dethermalizer (DT) actuation with electronic timers. The electronics are generally fine; the problem has been the actuator. Small electric motors or electromagnets tend to be bulky, heavy, and power-hungry.
According to Bat Sheet (Strat-O-Bats, Washington; Steve Helmick, editor), Ken Bauer is producing electronic timers for Nordic towline gliders. Helmick's summary of Bauer's timer:
- A steel plate is fastened to the DT line and attached to an electromagnet made from a relay coil.
- An IC times the current flow to the coil and shuts it down when DT time comes.
- A row of tiny rocker switches sets the DT time; the switches are assigned times of 10, 40, 100, 160, and 640 seconds and automatically add together:
- e.g., 40 + 160 = 200 sec; 10 + 160 = 170 sec; punch them all for 850 sec.
- The rockers have a hole so a monofilament pin can lock selections in place.
- The first rocker is just on/off.
- A micro-switch placed in front of the towhook allows the timer to reset when you return to straight tow; when you go into circle tow the timer starts.
- If you drop the towline or the line breaks, the timer starts and the model comes down.
- If the battery goes dead, the model DTs.
- Ken recommends a 9 V transistor radio battery; reported weight with battery is about 1 1/4 oz.
- The timer itself is small and light; the nose pod may need tailoring to fit.
- Price reported: $25.
If interested, write to Ken Bauer, 627 E. Monroe, Orange, CA 92667.
Now that Tatorno no longer imports timers, there is a shortage. Seelig timers are available but expensive. Some English companies are having timers made in Hong Kong; availability in the U.S. is uncertain. Some in the Northwest use Tomy wind-up motors for engine cutoff, but running time is often too short for DT actuation. Aero Modeller reported that some English free flighters extended running time to two minutes by adding inertia to the escapement: heat the tip of a glass-head pin, push it into the plastic escapement and—presto—two minutes. That still doesn't solve the problem for Category I or II flying. Alternatives include homemade clockwork, rubber releases, or K‑Mart timers (preferred by some over Tatorno-type engines), but you usually must manufacture your own faceplate and release mechanism (see A.A. Lidberg's article in the August 1980 issue of Model Aviation). With many cameras now having built-in electronic timers, the mechanical-timer industry has declined and the days of add-on mechanical timers may be numbered.
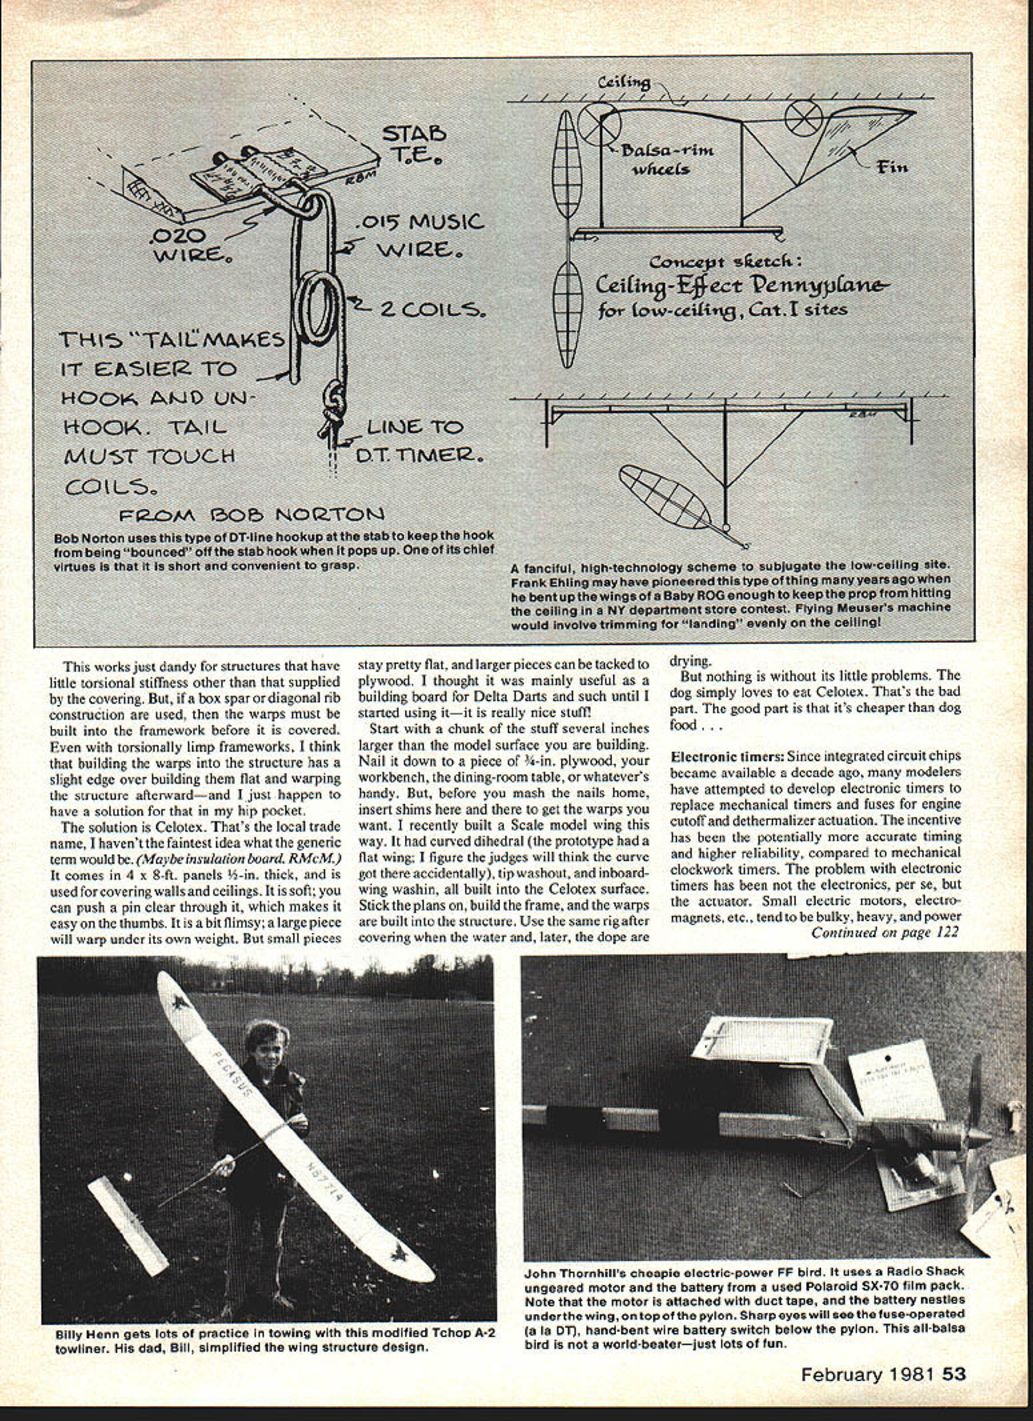
Towline glider (Billy Henn)
The towline glider in the photo was held by Billy Henn, a youngster active in rubber-power and scale models. His father Bill describes the model:
- It uses the same body, rudder, and stabilizer as Bill's two Tchop A-2s, and the same B-6356 airfoil.
- The wing was simplified to avoid expecting a 14-year-old to assemble 450 or so parts.
- The simpler structure uses a sheet top surface, is strong, torsionally rigid, and weighs 170 grams.
- It responds beautifully on the tow; Billy gets great zoom launches with no negative characteristics.
Billy hasn't had a lot of circle-tow practice at a field safe only for 20-sec flights, so the model is often brought down with the towline attached — but that practice is better than none.
Stab hold-down
A simple open hook on the end of the DT string can be problematic. When the DT actuates the snap pops up and can bounce off its limit stop, often right out of the hook. A solution is to make a closed bend in the hook so it snaps over the loop on the tab, but that requires a rather long hook to get enough spring. Bob Norton, Bakersfield, CA, gets the required spring by tweaking a couple of small loops into the hook using round-nose pliers.
How to beat the high cost of electric propulsion
Some readers recommend using the used batteries from the Polaroid SX-70 film packs for model propulsion. The battery is built into the film pack; when replacing the pack you can salvage the battery. It's not completely exhausted and can provide useful life. Because the battery is free and non-rechargeable, you save the cost of a set of ni-cad batteries and a charger.
As for motors, you don't necessarily need a special geared motor. A suitable motor can sometimes be obtained from Radio Shack for a dollar. Look for 6 V motors such as the cylindrical Mabuchi RE-14 (markings indicate backplate size only; specs vary). Some Radio Shack motors have sheet-metal brushes which may not last long under heavy use.
John Thornhill has had success pairing SX-70 batteries with Radio Shack motors. The battery can be wrapped around the front of the fuselage or slipped into a hollow pylon. Electric propulsion need not be sophisticated or expensive, and there are AMA national records for electric power models waiting to be broken.
Ceiling-effect Pennyplane
Ceiling effect is like ground effect, only upside down: the real wing is attracted to its image reflected on the ceiling. The tip vortices produced by the real and image wings partially cancel each other, reducing induced drag. The closer the wing to the ceiling, the better, so dihedral is undesirable. A large vertical fin between the wing struts or some "left" in the wing wheels may be required to prevent excessive skidding. The principle could be applied to most indoor classes (perhaps not ornithopters). A large, very flat ceiling is required.
Who will be the first to get a sanction for an official AMA meet held in his own living room?
Reminder
The National Free Flight Society is soliciting papers for the 1981 Symposium publication. Papers should cover some aspect of the science or art of free flight models. Send an abstract or your proposed paper immediately to Jim Bennett, 324 Helfenstein Ave., St. Louis, MO 63119.
Bob Meuser 4200 Gregory St. Oakland, CA 94619
Transcribed from original scans by AI. Minor OCR errors may remain.

