

Free Flight Duration
Harry Murphy
Greetings
GREETINGS. I feel I should make an initial comment or two in reference to Bob Meuser's name being displaced as the Contributing Editor for Free Flight Duration. First of all, Bob's many followers may rest their fears, because he will return to the same old stand in the next issue. However, since Bob has formally requested some relief in cranking out this column on a monthly basis, the boss has worked out a plan to accept his report on an "every-other-month" schedule and has subsequently lassoed this writer to attempt to fill the alternate monthly gaps.
The plan also affords the opportunity to inject a sprinkling of a little Midwest flavor into the column, which we hope will prove to be an interesting contrast to Bob's fine reports. If it doesn't work out, I'm certainly going to toss the blame back in Bob's direction, because I understand that he is the culprit who volunteered me for this chore in the first place. (Publisher's note: Not so! CRW.) Anyway, here goes...
Let's hear it for 1/4A!
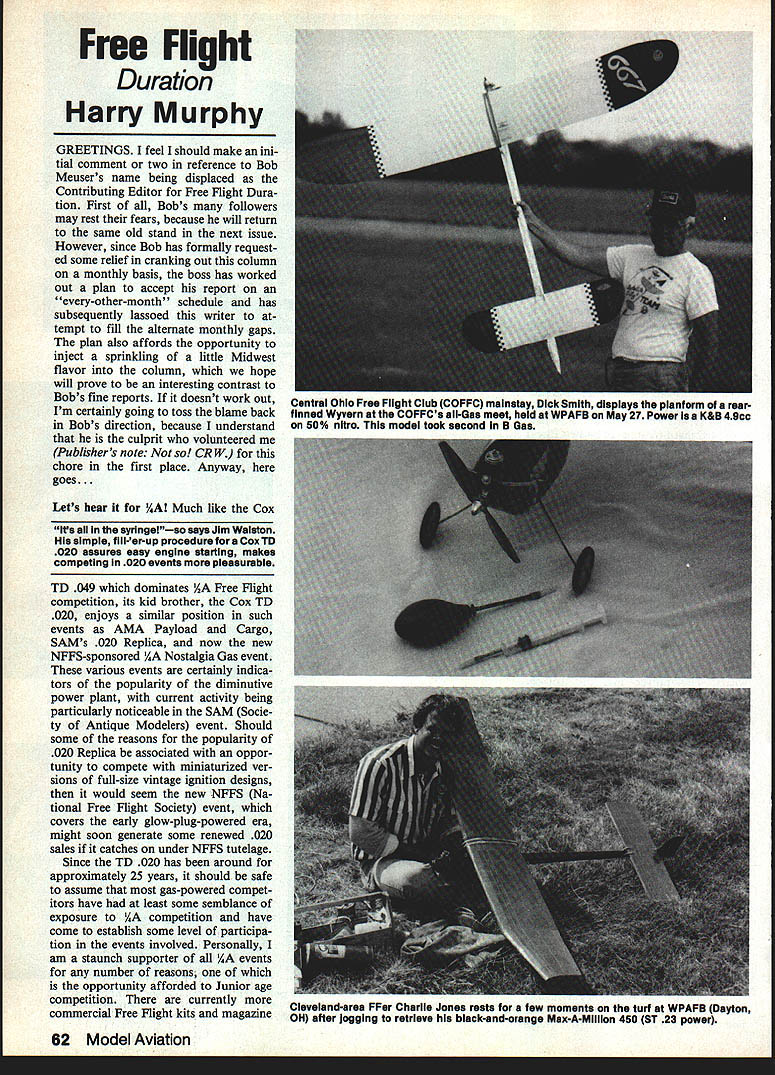
Much like the Cox TD .049, which dominates 1/2A Free Flight competition, its kid brother, the Cox TD .020, enjoys a similar position in such events as AMA Payload and Cargo, SAM's .020 Replica, and now the new NFFS-sponsored 1/4A Nostalgia Gas event. These various events are certainly indicators of the popularity of the diminutive power plant, with current activity being particularly noticeable in the SAM (Society of Antique Modelers) event. Should some of the reasons for the popularity of .020 Replica be associated with an opportunity to compete with miniaturized versions of full-size vintage ignition designs, then it would seem the new NFFS (National Free Flight Society) event, which covers the early glow-plug-powered era, might soon generate some renewed .020 sales if it catches on under NFFS tutelage.
Since the TD .020 has been around for approximately 25 years, it should be safe to assume that most gas-powered competitors have had at least some semblance of exposure to 1/4A competition and have come to establish some level of participation in the events involved. Personally, I am a staunch supporter of all 1/4A events for any number of reasons, one of which is the opportunity afforded to junior-age competition.
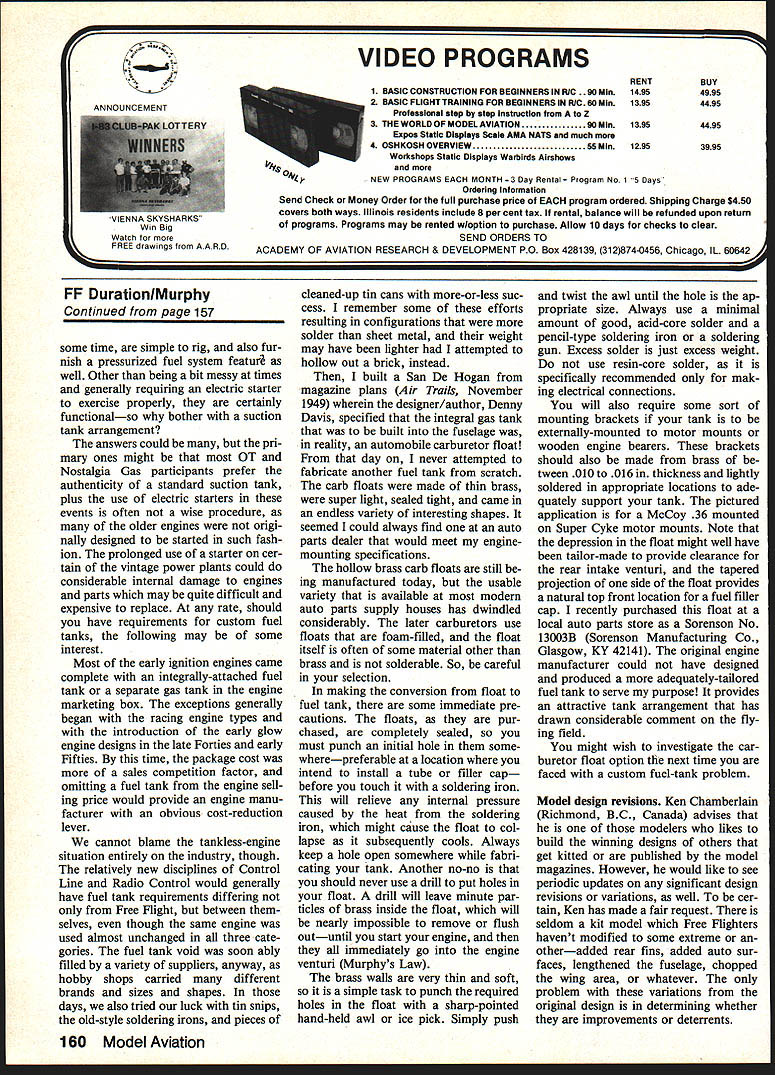
There are currently more commercial Free Flight kits and magazine plans available for the SAM .020 Replica event and other Free Flight Gas events combined. True youngsters who can't afford mechanical fuel shutoff can always use a simple eyedropper tank. Take a hammered, inexpensive Tomy toy robot; with a little ingenuity, utilize its innards and pinch off thin-wall surgical tubing as a means to control engine run. In addition, .020 should provide the safest competition gas engine category for youngsters as well as us old folks.
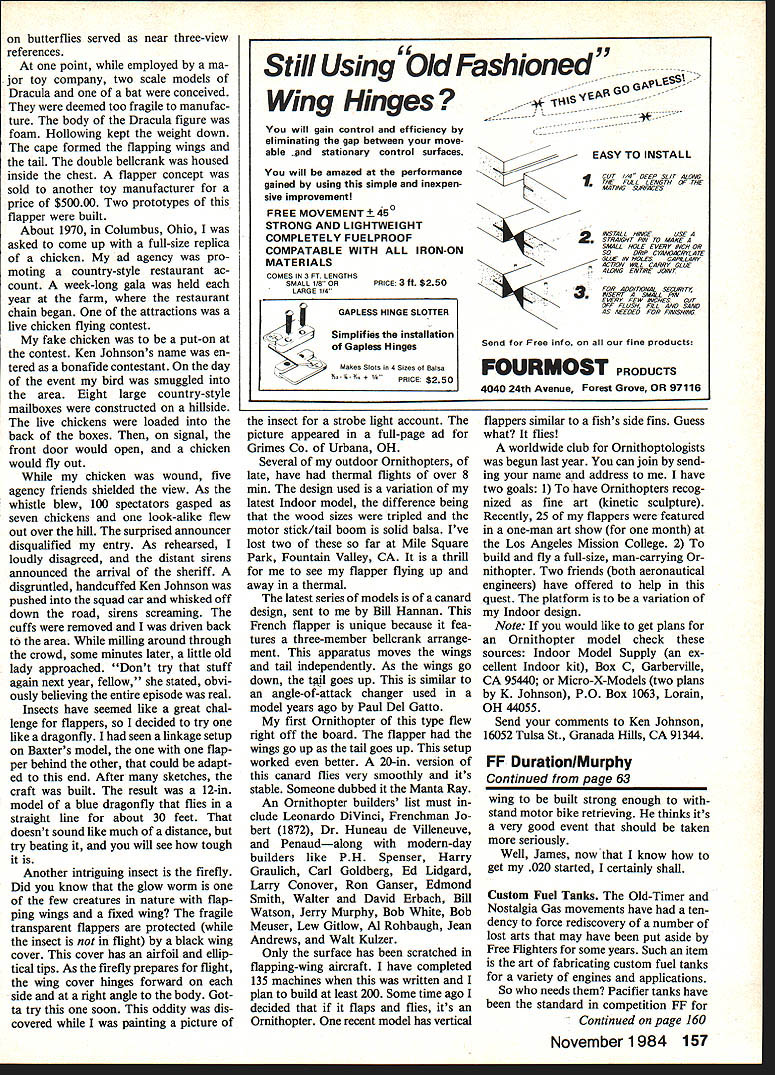
One criticism of the Cox TD .020, I think, might in some instances be somewhat contrary to fact. The normal reason cited — that the .020 does not draw fuel well because of small orifices and venturi getting clogged, particularly if the engine is not cleaned properly after a running session — can be overcome. Starting a Cox TD .020 has offered some difficulty in the past, and you might be interested in a simple preparation procedure recently caught my attention in Rick Pangell's newsletter Max-Out, publication of the Denver, CO-based Magnificent Mountain Men. However, the procedure is actually credited to Jim Walston, who resides at much lower altitudes in Smyrna, GA. Jim says he uses the following procedure on .020s before engine-running sessions with very positive results:
- Open the needle valve several turns. Disconnect the fuel line from the needle valve. Connect an empty syringe to the needle valve body with a short piece of tubing. Clear tiny jets and the venturi with half a dozen blasts of air from the syringe. Reconnect the fuel line and set the needle valve about two turns open.
- Fill the tank full. Keep the syringe connected to the tank filler tube and place your finger over the other tube. Carefully force fuel through the fuel line up to the needle valve. Don't flood the engine.
- Prime the exhaust with about two drops of fuel, connect the battery, and strike the prop vertically down (not horizontally) using an electric starter. If the starter's spring doesn't start the engine, or if you run out of prime after four strikes, put your ear to the exhaust port and listen; you can hear the plug crackling. Blow through the exhaust to clear excess fuel. The cylinder should start; if it runs out of prime and quits, open the needle valve another 1/4 turn and repeat the prime, etc.
Jim also recommends a light 50% nitro fuel for top performance. In addition, he claims that he has found pressurizing the fuel system to be unnecessary.
In reference to the .020 Replica event, he also advises keeping the model's flying weight at four ounces or less, and wing area in the 150- to 165-sq.-in. range, with the wing built strong enough to withstand motorbike retrieving. He thinks it's a very good concept that should be taken more seriously.
Well, James, now that I know how to get my .020 started, I certainly shall.
Custom Fuel Tanks
The Old-Timer and Nostalgia Gas movements have had a tendency to force rediscovery of a number of fuel tanks that may have been put aside by Free Fliers for some years. Such an item is the art of fabricating custom fuel tanks for a variety of ships and applications.
So who needs them? Pacifier tanks have been the standard in competition Free Flight for some time, are simple to rig, and also furnish a pressurized fuel system feature as well. Other than being a bit messy at times and generally requiring an electric starter to exercise properly, they are certainly functional—so why bother with a suction tank arrangement?
The answers could be many, but the primary ones might be that most Old-Timer and Nostalgia Gas participants prefer the authenticity of a standard suction tank, plus the use of electric starters in these events is often not a wise procedure, as many of the older engines were not originally designed to be started in such fashion. The prolonged use of a starter on certain of the vintage power plants could do considerable internal damage to engines and parts which may be quite difficult and expensive to replace. At any rate, should you have requirements for custom fuel tanks, the following may be of some interest.
Most early ignition engines came complete with an integrally attached fuel tank or a separate gas tank in the engine marketing box. The exceptions generally began with the racing engine types and with the introduction of the early glow engine designs in the late Forties and early Fifties. By this time, the package cost was more of a sales competition factor, and omitting a fuel tank from the engine selling price would provide an engine manufacturer with an obvious cost-reduction lever.
We cannot blame the tankless-engine situation entirely on the industry, though. The relatively new disciplines of Control Line and Radio Control would generally have fuel tank requirements differing not only from Free Flight, but between themselves, even though the same engine was used almost unchanged in all three categories. The fuel tank void was soon ably filled by a variety of suppliers, anyway, as hobby shops carried many different brands, sizes, and shapes. In those days, we also tried our luck with tin snips, the old-style soldering irons, and pieces of cleaned-up tin cans with more-or-less success. I remember some of these efforts resulting in configurations that were more solder than sheet metal, and their weight may have been lighter had I attempted to hollow out a brick instead.
Then, I built a San De Hogan from magazine plans (Air Trails, November 1949) wherein the designer/author, Denny Davis, specified that the integral gas tank that was to be built into the fuselage was, in reality, an automobile carburetor float! From that day on, I never attempted to fabricate another fuel tank from scratch. The carb floats were made of thin brass, were super light, sealed tight, and came in an endless variety of interesting shapes. It seemed I could always find one at an auto parts dealer that would meet my engine-mounting specifications.
The hollow brass carb floats are still being manufactured today, but the usable variety that is available at most modern auto parts supply houses has dwindled considerably. Later carburetors use foam-filled floats, and the float itself is often of some material other than brass and is not solderable. So, be careful in your selection.
In making the conversion from float to fuel tank, there are some immediate precautions. The floats, as purchased, are completely sealed, so you must punch an initial hole in them somewhere—preferably at a location where you intend to install a tube or filler cap—before you touch it with a soldering iron. This will relieve any internal pressure caused by the heat from the soldering iron, which might cause the float to collapse as it subsequently cools. Always keep a hole open somewhere while fabricating your tank. Another no-no is that you should never use a drill to put holes in your float. A drill will leave minute particles of brass inside the float, which will be nearly impossible to remove or flush out—until you start your engine, and then they all immediately go into the engine venturi (Murphy's Law).
The brass walls are very thin and soft, so it is a simple task to punch the required holes in the float with a sharp-pointed hand-held awl or ice pick. Simply push and twist the awl until the hole is the appropriate size. Always use as minimal an amount of good, acid-core solder as possible and a pencil-type soldering iron or a soldering gun. Excess solder is just excess weight. Do not use resin-core solder, as it is specifically recommended only for making electrical connections.
You will also require some sort of mounting brackets if your tank is to be externally mounted to motor mounts or wooden engine bearers. These brackets should be made from brass of .010 to .016-in. thickness and lightly soldered in appropriate locations to adequately support your tank. The pictured application in my example is for a McCoy .36 mounted on Super Cyle motor mounts. Note that the depression in the float might well have been tailor-made to provide clearance for the rear intake venturi, and the tapered projection on one side of the float provides a natural top-front location for a fuel filler cap. I recently purchased this float at a local auto parts store as a Sorenson No. 13003B (Sorenson Manufacturing Co., Glasgow, KY 42141). The original engine manufacturer could not have designed and produced a more adequately tailored fuel tank to serve my purpose! It provides an attractive tank arrangement that has drawn considerable comment on the flying field.
You might wish to investigate the carburetor-float option the next time you are faced with a custom fuel-tank problem.
Model design revisions
Ken Chamberlain (Richmond, B.C., Canada) advises that he is one of those modelers who likes to build the winning designs of others that get kitted or are published by the modeling magazines. However, he would like to see periodic updates on any significant design revisions or variations, as well. To be certain, Ken has made a fair request. There is seldom a kit model which Free Flighters haven't modified to some extreme or another—added reed fans, added auto starters, altered fins, lengthened the fuselage, chopped wing area, or whatever. The only problem with these variations from the original design is in determining whether they are improvements or deterrents.
Perhaps a letter section in the magazines listing "hot" modifications and why they were made would be a useful service. I, for one, would welcome letters or notes from readers on improvements they have made to published designs. If sufficient interest is shown, I will compile these items and feature them in a future column.
What works at Taft, CA under Category I, dead-calm conditions (for instance) may not hold true in the often comparatively windy contests of the Southwest or Midwest. Those big, over-40% stabilizers on West Coast gas jobs are a good example, as oversized stabs sometimes tend to present stability problems under more windy conditions. On the other hand, windy flying conditions are often offset considerably with the incorporation of a rear fin and smaller stabs, as they tend to better stabilize most power designs on the climbout. Therefore, although the locale in which a design originates often dictates some basic design trends, modelers from other parts of the country sooner or later may attempt various design changes to the original in tailoring the design to their individual, local situations.
In keeping with Ken's request, this might be a good spot to mention a probable design improvement to my 372-sq.-in. Nit Wit design, which was published in the May issue of this magazine. The problem sort of sneaked up on me, so if I mention it here, maybe it will make me a few more friends later.
The original wing incorporated 1/16 x 1/4-in. diagonal bracing back from the main spar to the front of the trailing edge. Covered with silkspan and adequately doped, the wing skin was quite taut. My next immediate venture was a larger, 535-sq.-in. version, which I labeled the Dim Wit, which copied a Nats win and subsequently the Category III Class D Open AMA Record. This quite-successful model was one of the first in our area to be covered with the then-new Micafilum by Coverite. The wing construction was similar to the smaller model, but the diagonals were full-depth, 1/8-inch "sheet" partial ribs.
About the time I was putting the article together for the magazine, I decided to strip the silkspan from the Nit Wit wing, as it was getting rather fuel-soaked. I was quite impressed with the performance of the Micafilum on the larger model, so I did the obvious and used it as my choice for the second covering of the smaller model. However, the wing now flexed just enough to cause the model to go "over the top" under power as it reached a certain velocity. I quickly built a new wing with full-depth diagonals (a la the larger Dim Wit), and the problem went away.
I guess we could say that if you intend to build a Nit Wit at some time or other, you should incorporate full-depth diagonal ribs when using plastic film coverings, but the stated 1/16 x 1/4 diagonals would be okay for silk, tissue, or silkspan. For those who might have already made it to the flight line with a completed model—plastic film covering and all—I would be interested to know if you have had similar problems. We could at least cry together on the same towel.
Doc Anderson expires
Noted engine rework expert "Doc" Anderson (Toledo, OH) died unexpectedly at his home this past spring. Doc's son, Rod, was a 1983 FAI Power Team member, and they had made the trip together to Australia the previous September. Doc was particularly faithful for many years in his support of the U.S. FAI Power teams in supplying engine reworks for all who requested his services.
It was ironic that I received a reworked ST .23 from this quiet and unassuming gentleman on the same day that I was advised of his death. He was the finest of engine craftsmen and will be sorely missed by all of us who appreciated his love for making model engines go faster.
Smile, you're on Candid Video!
How about a human-interest story to wind up this month's report? Picture the waning minutes of the Bluegrass Free Flight Champs (Lexington, KY) on July 8th: normal meet-closing activities are taking place, such as modelers packing their gear in preparation for the trip home and CD Bill Barr scurrying to make ready for his impending presentation of trophies. However, since gorgeous flying weather had prevailed the whole day, Indiana modeler Moe Whittemore had selected this time slot to break out his newly constructed Wakefield kit job and was proceeding to prepare it for its maiden test flight.
At this moment, a mobile TV crew swooped in to catch the contest action. They had planned to arrive earlier, but had gotten sidetracked to cover a local fire. Since the only movement on a newsman's line of direction was Moe's, the camera, crew, and the man-with-the-mike converged. Moe continued to ready his model while attempting to respond with answers to the typical staccato of man-on-the-street one-liners: "Where do you buy these things?" "How much do they cost?" "Why do grown men drive 300 miles just to fly a toy airplane?" "What's that little piece of rope for that's stuck in the tail?" "What does your wife think of all this?" "What's that gooey stuff that you're smearing on the rudderbar?" "When are you going to be ready to fly it?" And on and on.
Meanwhile, a fellow modeler was bending the other ear of our media-beleaguered Moe, attempting to enlighten him on his personal all-day struggle to get the hiccups out of his identical kit job. By the time that our TV star performer had the model wound to 3/4 turns for the test hop, he was thoroughly convinced that he was soon to be the innocent victim of self-humiliation on the evening's 10 o'clock news. The model would surely crash to the ground in a few short seconds, much to the hilarity of 100,000 viewers.
However, immediately upon launch, the model spiraled up in a perfect pattern, caught some altitude, found late-afternoon lift, and continued to rise gracefully as the prop folded perfectly on cue.
As Moe puffed downwind in pursuit of his off-the-board miracle model, he was inwardly relieved when a glance over his shoulder indicated that the inquisitive newsman had given up the chase. He had rather enjoyed the event, but he didn't really wish to explain why he had forgotten to light a match to the little piece of rope that was stuck in the tail.
Harry Murphy 3824 Oakwood Blvd., Anderson, IN 46011.
Transcribed from original scans by AI. Minor OCR errors may remain.

