

Free Flight: Indoor
Bud Tenny
RUBBER winding techniques. Over the years, the methods we use to wind rubber motors have changed. In the early years, it was a distinct advantage to have an old-timer like Bill Tyler or Carl Goldberg to help wind up, especially if they turned the crank! These guys had developed a "feel" for the motors and an acute instinct for how many turns the motor would take before it broke. Not only that, if they flew with you often enough, they could almost predict just how many turns it would take to make this flight a winner.
Hold it tight!
With a pro winding your motor, it was up to you to anchor your motor and "cover up" so that a broken motor would be caught by your hands instead of smashing the model. The basic strategy here is to cup the left thumb and forefinger around the prop (but not touching) and grasp the prop hook at the motor and hold as tightly as possible. The right hand is then cupped over the fingers of the left hand, and the model is allowed to roll back out of the way. (If a double thrust bearing was used, the prop was unhooked from the rear guide.) Now, if the motor broke and you didn't flinch, the cupped hand would catch the motor pieces and save the model.
I can remember when I flew at the '62 Nats and got Tom Finch to wind for me. He simply said "Hold on!" and started cranking. I had little indoor experience, and really didn't know what to expect. I did get a hint that it would be rough, so I held as tightly as I could. Before Tom was finished, I had a cramp in my arm that took hours to go away! I got the model off OK, but I really worried for a while.
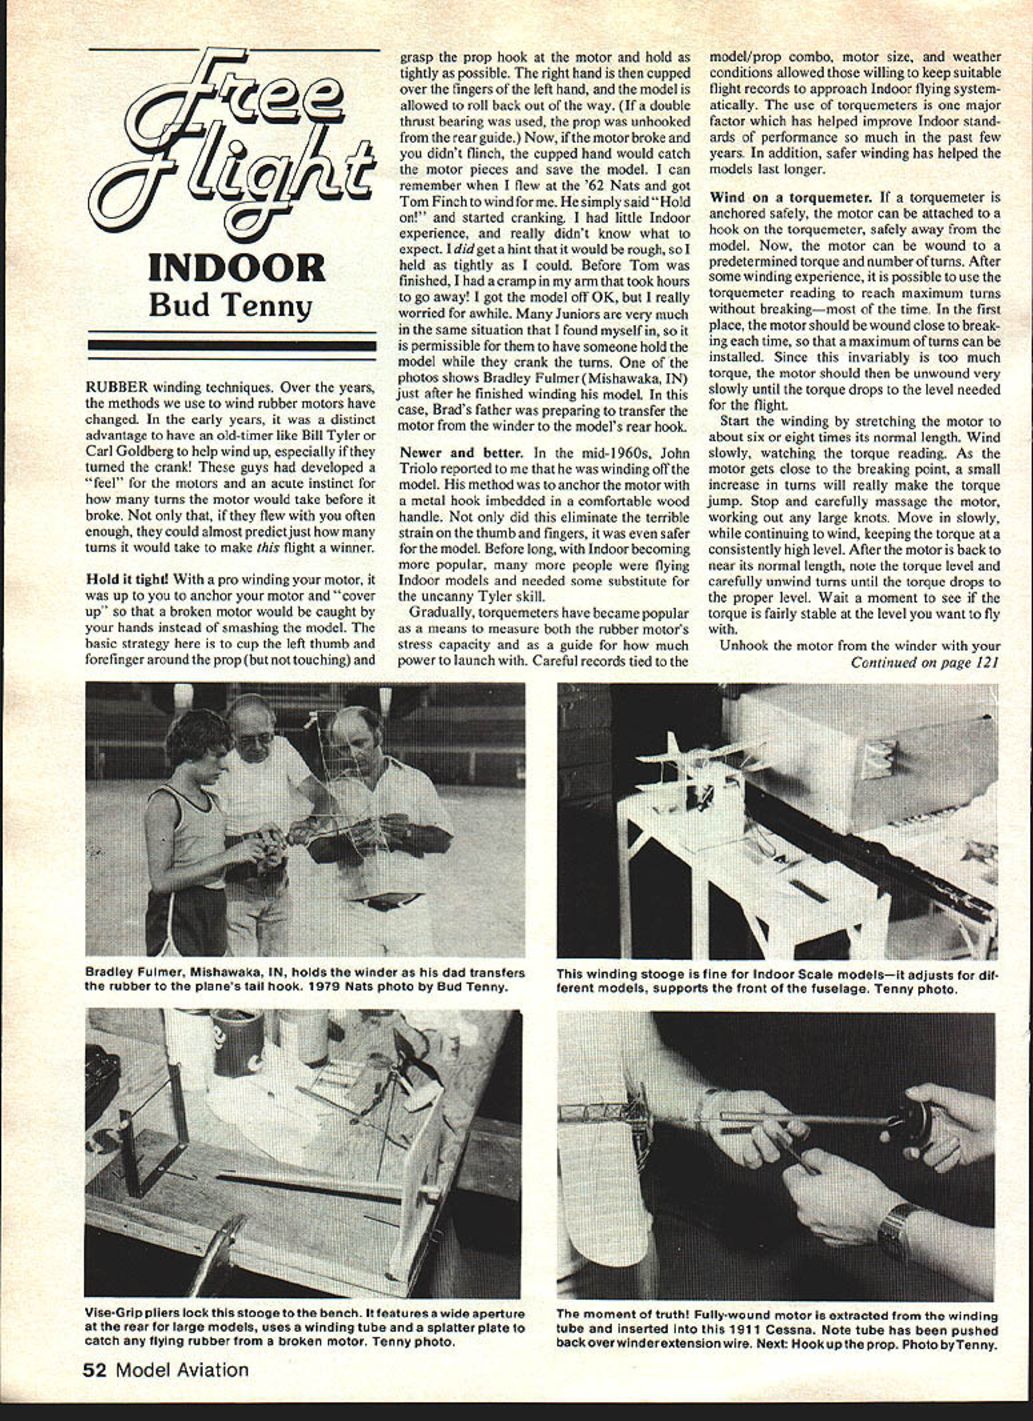
Many juniors are very much in the same situation that I found myself in, so it is permissible for them to have someone hold the model while they crank the turns. One of the photos shows Bradley Fulmer (Mishawaka, IN) just after he finished winding his model. In this case, Brad's father was preparing to transfer the motor from the winder to the model's rear hook.
Newer and better.
In the mid-1960s, John Triolo reported to me that he was winding off the model. His method was to anchor the motor with a metal hook embedded in a comfortable wood handle. Not only did this eliminate the terrible strain on the thumb and fingers, it was even safer for the model. Before long, with indoor flying becoming more popular, many more people were flying indoor models and needed some substitute for the uncanny Tyler skill.
Gradually, torquemeters have become popular as a means to measure both the rubber motor's stress capacity and as a guide for how much power to launch with. Careful records tied to the model/prop combo, motor size, and weather conditions allowed those willing to keep suitable flight records to approach indoor flying systematically. The use of torquemeters is one major factor which has helped improve indoor standards of performance so much in the past few years. In addition, safer winding has helped the models last longer.
Wind on a torquemeter.
If a torquemeter is anchored safely, the motor can be attached to a hook on the torquemeter, safely away from the model. Now, the motor can be wound to a predetermined torque and number of turns. After some winding experience, it is possible to use the torquemeter reading to reach maximum turns without breaking—most of the time. In the first place, the motor should be wound close to breaking each time, so that a maximum of turns can be installed. Since this invariably is too much torque, the motor should then be unwound very slowly until the torque drops to the level needed for the flight.
- Start the winding by stretching the motor to about six to eight times its normal length. Wind slowly, watching the torque reading.
- As the motor gets close to the breaking point, a small increase in turns will make the torque jump. Stop and carefully massage the motor, working out any large knots.
- Move in slowly while continuing to wind, keeping the torque at a consistently high level.
- After the motor is back to near its normal length, note the torque level and carefully unwind turns until the torque drops to the desired flying level. Wait a moment to see if the torque is stable at that level.
- Unhook the motor from the winder with your right hand and pick up the model with your left. Grasp the prop shaft next to the hook, hook the motor to the prop shaft, and check that the shaft is properly seated in the thrust bearing.
- Grasp the motor and prop hook firmly, align the model's fuselage with the motor, position the motor to its normal length on the model, and check the torque reading.
- Unhook the motor from the torquemeter and hook it to the model. Carefully adjust the tail surfaces and test the model by hand-launching. The model should fly on about three-quarters power and should not stall.
- If everything looks OK, place the model on the ground and make a test launch. If the model turns toward the left, add right thrust in 1/2-degree increments and retest until it flies straight. If the model turns right, add left thrust in 1/4-degree increments.
Carefully check for knots which might rub the fuselage, and make sure the motor is correctly aligned on the prop hook. Make a last check of the model's prop shaft and thrust bearing to be sure everything is hooked up correctly. Be sure you aren't under someone's model, then launch.
Keep good records. Immediately after the launch, record the turns, launch torque, model/prop combination, date, and anything else which will help you decide how many turns to use on the next launch or at the next contest. After the model lands, unwind and count the remaining turns in the motor and record that number with the other data. If many turns remain after a flight that reached the ceiling with no unusual problems, the motor can probably be shortened somewhat.
Remember, when you pick up your trophy, you did it all yourself and you don't have to share the glory with any ace winding mechanic. On the other hand, if the flight bombed, it is all your fault!
Winding stooges.
Many indoor scale fliers have developed fixtures to hold their models during winding. This makes it much easier to load these models for flight and often saves a model besides. One photo shows a biplane in a rather complete fixture on a portable table. The table is a comfortable height for stand-up winding, has an adjustable plate at the rear to allow other models to be held, and has a support for the front of the fuselage.
Another photo shows a fixture with a removable wire pin which goes through a hollow rear motor peg (small aluminum tubing makes a light and strong rear peg). The front of this fixture has a splatter board to catch a broken motor/tube, and a winding tube is available also. Very few indoor scale modelers will trust their luck on breaking motors, so the winding tube is very common. Note that the winding tube has a slot for the rear peg so that the motor is entirely enclosed during winding. If the motor should break in the tube, it will be entirely contained. The splatter plate in front flares slightly up from the loose end of the motor, so the model will rarely be damaged.
Hand-held winding.
Some scale modelers prefer to have the model held while winding. Note that the winding tube is complete, and the helper has moved the winding tube off the fuselage and pushed it over the long winder extension wire which must be used with a winding tube. The flier must then grasp the motor, unhook it from the winder, and attach the prop (held in his left hand). He will then take the model, seat the thrust block in the front of the model, and launch.
When using a winding tube, the instant just after the motor is unhooked from the winder is the time of most danger. A skilled and steady helper makes a big difference to the safety of the model, and the extra trouble is well worth it.
Bud Tenny, P.O. Box 545, Richardson, TX 75080.
Transcribed from original scans by AI. Minor OCR errors may remain.

