
Free Flight: Indoor
Bud Tenny
Make Ready Now!
By the time you read this, the indoor season will be underway in most parts of the country, so it is time to pull out the models and check them over. If you are like me, you patched them enough to get through the last contest and promised yourself you would do it right as soon as you got home. Oh well — better late than never!
Things to check
- Assemble each model ready for flight and visually check alignment.
- "Wave" the model gently up and down, lightly stressing the flying surfaces, and watch for parts to sag out of line.
- Closely inspect the thrust bearing and tail-hook areas for stress cracks and other minor damage that can let loose without warning.
- Be sure the wing posts fit their sockets properly, with enough friction to withstand flight stress without pulling out.
- Examine the covering (microfilm especially) for patches or repairs needed.
- Inspect the box mounting hardware to ensure the model will be held safely during travel.
- Make sure there are no loose parts in the bottom of the box which can drift around during travel and poke unwanted holes.
Prop preflight
Look very closely at each prop, checking for:
- ribs cracked loose,
- minor holes in the covering,
- dings in the blade outline,
- a solid glue joint at the wire-hook junction.
The most important thing to check is whether the blade angles are equal on the two blades. Some people can visually see whether the blade angles match (note: I said alike, not necessarily correct). If the two blades have the same pitch, the prop will run smoothly and work reasonably well even if the absolute pitch is not perfect. Prop wobble is embarrassing at least, and almost surely detrimental to flight duration.
If you can't tell by eye whether the blades match:
- Return the prop to the prop block or fixture used to build it — provided the spars haven't curved so much that the blades won't lay flat on the block anymore. If the blade fits on the block without forcing and the hook is properly aligned with either blade on the block, you're in Fat City.
- If the blades look OK but you suspect pitch is off, measure the angle.
Measure the angle
One way to check blade angles is to set up a protractor and measure the blade angle at the same radius on each blade. If the angles are equal, all is well (assuming neither blade is warped).
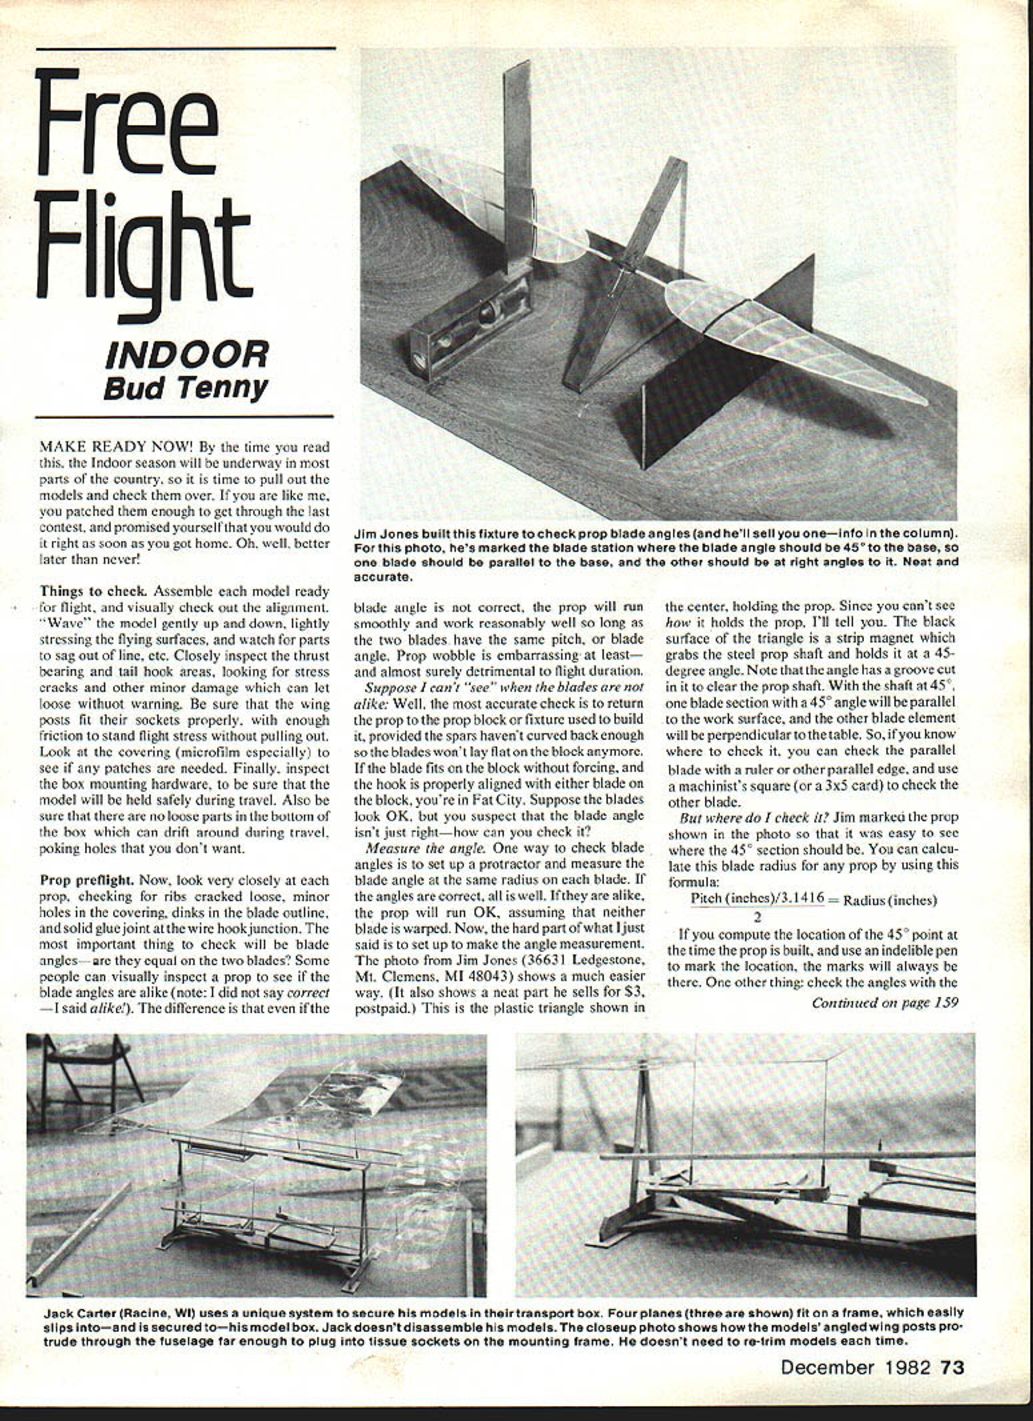
A simpler method shown in a photo from Jim Jones (36631 Ledgestone, Mt. Clemens, MI 48043) uses a plastic triangle tool (about $3, postpaid). The black surface of the triangle is a strip magnet that grabs the steel prop shaft and holds it at a 45° angle. The triangle has a groove cut clear of the prop shaft so the 45° blade section will lie parallel to the work surface while the other blade element is perpendicular to the table. You can then check the parallel blade with a ruler or other straight edge and use a machinist's square (or a 3x5 card) to check the other blade.
To know where to check on the blade, mark the prop when it's built. You can calculate the radius at which the blade is at 45° using this formula:
Pitch (inches) / 3.1416 = Radius (inches) / 2
If you compute the location of the 45° point when the prop is built and mark it with an indelible pen, the mark will always be there. Check the angles with the prop turned first one way and then the other; minor alignment errors will show up clearly that way.
FF Indoor/Tenny
Model boxes
How well we do at contests often depends on how well our model boxes protect the models while en route. This is even more important if travel includes planes, trains, or other situations where you may not be able to handle your model boxes yourself. The box must hold the model well and help protect it from rough handling.
How to pack:
- Disassemble the model, using separate holders for the wing, fuselage/tail group, and props.
- Each mounting point should hold a model part firmly without crushing it.
- When the model parts are correctly installed, they should be aligned so they don't touch each other or any part of the box.
- Firmly anchor mount fixtures to the box so parts cannot rotate into one another or into the box. If they can, one part may wreck another or a permanent warp may be set where a part leans on the box.
A different box?
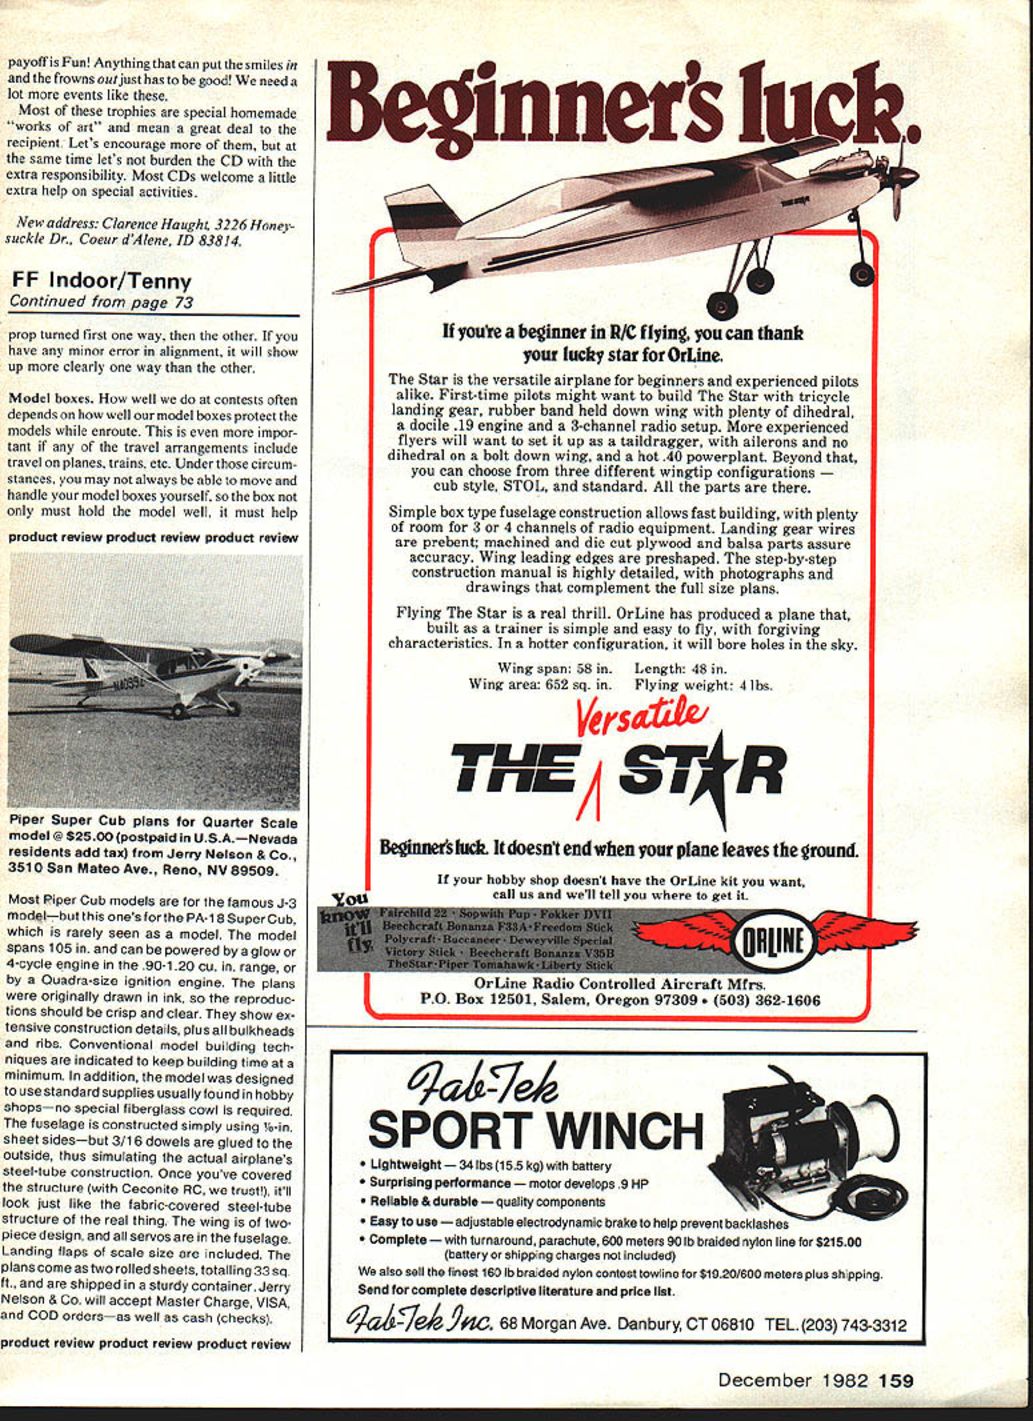
Rather than disassemble for every trip, Jack Carter (Racine, WI) uses a different philosophy: "Once you get the model adjusted, why take it apart?" His box uses a sliding tray that holds up to four models assembled except for the prop. Each model mounts to a central frame and can be preflighted and launched in record time.
Details of his system:
- Models use slanting wing posts to provide wing offset; the posts extend completely through the motor stick.
- The wing-post extensions plug into tissue sockets on the mounting frame; to remove the model, simply unplug the posts.
- If the model was correctly adjusted the last time out, it will be ready to go after hooking up the prop and winding the rubber motor.
- The stacked models interleave so each has adequate room all around, so the box is full of models but still mostly empty space-wise — providing protection.
Indoor sessions in Kansas City
Roger Schroeder, 4111 West 98 St., Overland Park, KS 66207, has been organizing indoor activity in the Kansas City (KS/MO) area and has announced Fun Fly sessions at the Westport-Roanoke Community Center (3601 Roanoke Rd., Kansas City, MO). These sessions run from 3 p.m. to 5 p.m. on:
- October 16, 1982
- November 13, 1982
- December 11, 1982
- January 29, 1983
He also has plans for contests later in the season. If you live nearby, drop in for a visit — they are nice people!
Bud Tenny P.O. Box 545, Richardson, TX 75080.
Transcribed from original scans by AI. Minor OCR errors may remain.

