
Free Flight: Indoor
Bud Tenny
Getting Started: One of the questions most often asked about indoor flying is how to get started. There is no magic or easy way, and many different approaches work well. The basic ingredients of any successful "beginner course" are: the area; group, flying regularly, with mild competition. It is difficult to maintain interest when flying by yourself, and regular exposure to the ideas and concepts of others in the group spurs each flier's imagination and creativity. The type of model involved at the start really doesn't matter; what matters is that the models evolve and improve. The regular sessions help by reinforcing the lessons learned and helping to improve handling skills and judgement. The major difficulty with the advanced, more delicate models is in losing the touch, once it is learned.
Where To Fly? One of the chronic problems faced by indoor groups is site availability, yet beginning groups often make the job harder than it needs to be. The common mistake made by starting groups is to look for a big site, but these are scarce and hard to get permission to use. A gymnasium or auditorium, even a room with 15-ft. ceiling, is a good choice, particularly if it is easily and frequently available. The advantages of frequent, low-pressure sessions greatly offset the apparent advantages of the "super" site that is available only once or twice a year.
What About The Fine Points? Just as members of a local flying group learn from one another, each flier can learn by visiting other groups. It helps a tremendous amount to see techniques developed by other fliers, sort of a cross-fertilization of ideas. Even if you don't enter contests, it is often well worth the time and trouble to attend contests and flying sessions in other areas when you have the chance.
Try These Sessions: In Glastonbury, Ct., regular sessions spark the interest and activity, with sessions on Feb. 8, Mar. 6, Mar. 14, Apr. 13, May 2, May 11 and June 8, 1976. Contact George Armstead, 89 Harvest Lane, Glastonbury, CT 06033 for time and place if you plan to be in the area. Also in the Northeast: sessions at DuPont Gymnasium, Vassar St. at Mass. Ave., Cambridge, Mass., Feb. 14, Mar. 20, Apr. 17, May 8, 1976. Ray Harlan, 15 Happy Hollow Rd., Wayland, MA 01778 is the contact man. In New Jersey the Union Model Airplane Club sponsors activity at the Livingston School Gym & Bud Tenny Auditorium, Livingston, N.J., Feb. 12, Mar. 11, Apr. 8 and May 13, 1976. Contact Dan Domina, 4701 Fox Run Dr., Plainsboro, NJ 08356.
All Balsa Props:
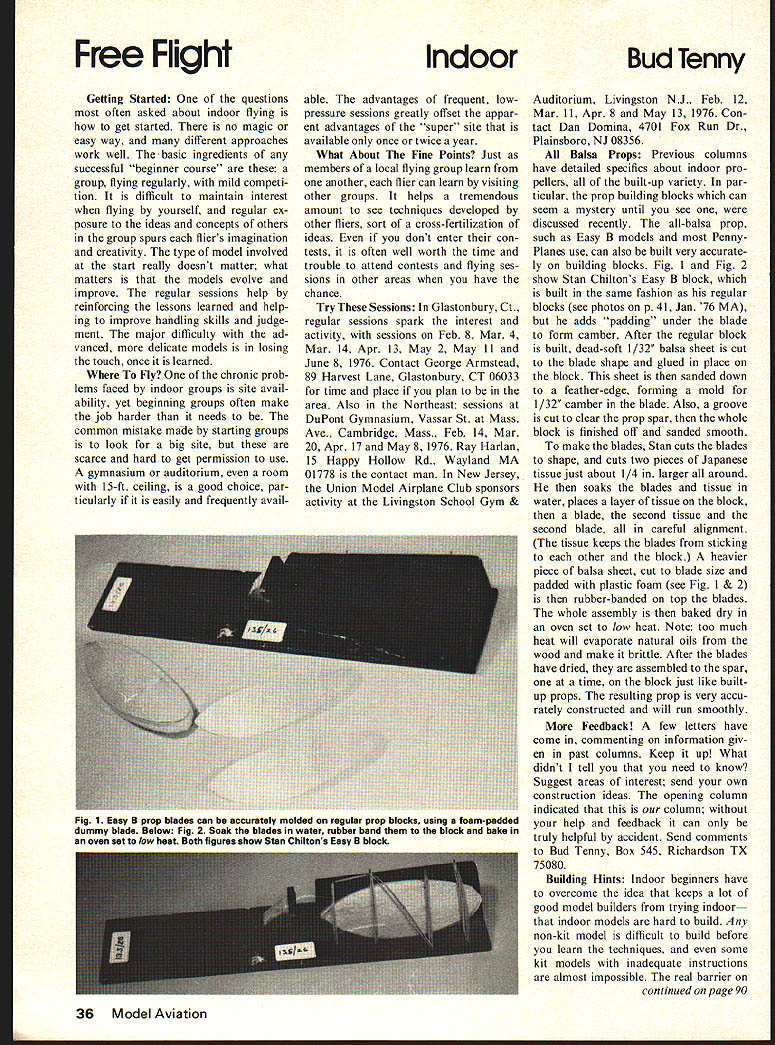
Previous columns have detailed specifics about indoor propellers, all of the built-up variety. In particular, the prop building blocks which can seem a mystery until one sees them discussed recently; the all-balsa prop, such as Easy B models and most Penny-Planes use, can also be built very accurately by building blocks. Fig. 1 and Fig. 2 show Stan Chilton's Easy B block, which is built in the same fashion as his regular blocks (see photos on p. 41, Jan. '76 MA), but he adds "padding" under the blade to form camber. After the regular block is built, dead-soft 1/32" balsa sheet is cut to the blade shape and glued in place on the block. This sheet is then sanded down to a feather-edge, forming a mold for 1/32" camber in the blade. Also a groove is cut to clear the prop spar, then the whole block is finished off and sanded smooth. To make the blades, Stan cuts the blades to shape, and cuts two pieces of Japanese tissue just about 1/4" larger around, soaks blades and tissue in water, places a layer of tissue on the block over the blade, then the second tissue and the second blade, all in careful alignment. The tissue keeps the blades from sticking to each other and the block. A heavier piece of balsa sheet, cut to blade size and padded with plastic foam (see Fig. 1 & 2) is then rubber-banded on top of the blades. The whole assembly is then baked dry in an oven set to low heat. Note: too much heat will evaporate natural oils from the wood and make it brittle. After the blades have dried, they are assembled to the spar, one at a time, on the block just like built-up props. The resulting prop is very accurately constructed and will run smoothly.
More Feedback!
A few letters have come in, commenting on information given in past columns. Keep it up! What didn't I tell you that you need to know? Suggest areas of interest; send your own construction ideas. The opening column indicated that this is our column; without your help and feedback it can only be truly helpful by accident. Send comments to Bud Tenny, Box 545, Richardson, TX 75080.
Building Hints:
Indoor beginners have to overcome the idea that keeps a lot of good model builders from trying indoor — that indoor models are hard to build. Any non-kit model is difficult to build before you learn the techniques, and even some kit models with inadequate instructions are almost impossible. The real barrier on indoor models comes from lack of available instructions. The small wood sizes, not available from hobby shops, inspire awe before construction methods are made known.
Spars And Outlines:
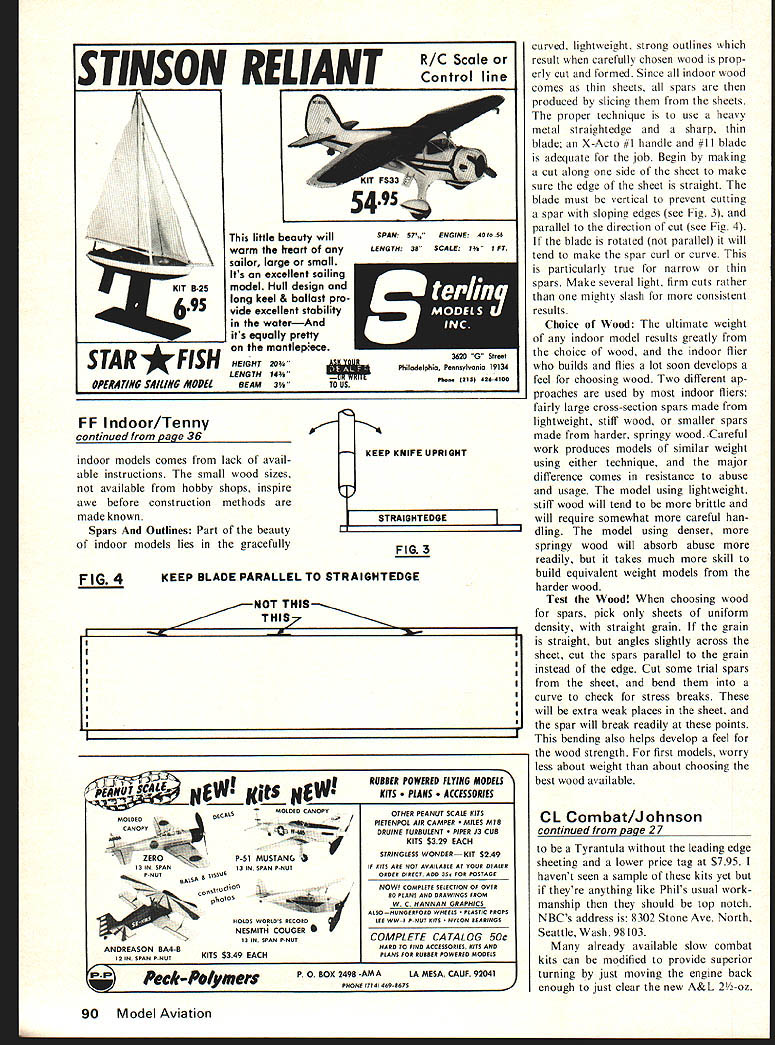
Part of the beauty of indoor models lies in the gracefully curved, lightweight, strong outlines which result when carefully chosen wood is properly cut and formed. Since all indoor wood comes as thin sheets, all spars are then produced by slicing them from the sheets. The proper technique is to use a heavy metal straightedge and a sharp, thin blade; an X-Acto #1 handle and #11 blade is adequate for the job. Begin by making a cut along one side of the sheet to make sure the edge of the sheet is straight. The blade must be vertical to prevent cutting a spar with sloping edges (see Fig. 3), and parallel to the direction of cut (see Fig. 4). If the blade is rotated (not parallel) it will tend to make the spar curl or curve. This is particularly true for narrow or thin spars. Make several light, firm cuts rather than one mighty slash for more consistent results.
Choice of Wood:
The ultimate weight of any indoor model results greatly from the choice of wood, and the indoor flier who builds and flies a lot soon develops a feel for choosing wood. Two different approaches are used by most indoor fliers: fairly large cross-section spars made from lightweight, stiff wood, or smaller spars made from heavier, springy wood. Careful work produces models of similar weight using either technique, and the major difference comes in resistance to abuse and usage. The model using lightweight, stiff wood will tend to be more brittle and will require somewhat more careful handling. The model using denser, more springy wood will absorb abuse more readily, but it takes much more skill to build equivalent weight models from the harder wood.
Test the Wood!
When choosing wood for spars, pick only sheets of uniform density, with straight grain. If the grain is straight, but angles slightly across the sheet, cut the spars parallel to the grain instead of the edge. Cut some trial spars from the sheet, and bend them into a curve to check for stress breaks. These will be extra weak places in the sheet, and the spar will break readily at these points. This bending also helps develop a feel for the wood strength. For first models, worry less about weight than about choosing the best wood available.
Transcribed from original scans by AI. Minor OCR errors may remain.

