
Free Flight: Indoor
Bud Tenny
More gloom and doom
The previous column (March 1984) carried glad tidings of business as usual at West Baden. We had to publish a disclaimer on that in the April 1984 "Competition Newsletter," since the traditional type of Indoor Week will no longer be possible at the Atrium. I'm sorry about this release of bad information, but we all just knew that the site would be available again!
Unfortunately, the new owner of the Atrium is remarkably insensitive to the needs of indoor fliers. The process of renovation to produce a new resort hotel out of the building may include a swimming pool and other amenities. The Atrium is incompatible with indoor flying. So passes a marvelous site which holds happy memories for many of us.
United States Indoor Championship
Now for the good news. There will be an NFFS/NIMAS-sponsored United States Indoor Championship this year. Depending on which site is chosen, the event will be in either June or early July. NFFS honcho Tony Italiano is still pursuing some options; he has one site locked up. If you want the latest info when it becomes available, send Tony a business-size SASE to:
Tony Italiano 1655 Revere Dr. Brookfield, WI 53005
Indoor pioneer dies
It was very sad news to hear that Bill Tyler died last November. Bill had been active in indoor flying for many years and was art director for Air Trails magazine for years. I counted it a privilege to meet him and enjoyed visiting with him one year at West Baden.
A lesson learned?
Last fall, the New York City fliers were moaning over the loss of access to the Low Library Rotunda at Columbia University. Before access to this fine site was restored, a concerted effort was mounted to find other sites. Ed Whitten is trying to follow up on that effort and see that any possible sites are tried out.
Maybe fliers in every part of the country can learn from this! Those of us who have regular access to a suitable site tend to grow complacent—and that may be a mistake. How many of you have all your flying activity concentrated in a single site? John Martin's MIAMA group keeps at least two sites active most of the time, and when problems arise at one site, they can still fly. Think about it!
International Ornithopter postal contest
A year ago, Dave Erbach announced an international postal meet for ornithopters. The contest is finished, with the top 10 distributed this way:
- Japan — 1st, 2nd, 4th, 5th and 6th
- Australia — 3rd place
- U.S.A. — 7th, 8th and 10th
- Canada — 9th
The top four times were all greater than five minutes, ranging from a 6:30 flight by Masahiro Yamanshi (Japan) to 5:14 by Noburu Omata (Japan). Second place was 6:22 by Kazumasa Kihara (Japan) and the third place time of 5:36 was posted by Philip Watson (Australia). Dave reports being surprised that a flight of 4:00 wasn't good enough for the top five.
He can also be proud of his effort—the "state of the art" for ornithopter models was greatly advanced by this contest. A personal surprise for me was that many very light models—around one gram or less—were flown, with the second-place model being one of the lightweights. It just always seemed that a mechanism which takes such a beating must be relatively heavy! I hope to be able to report some details of the winning models later.
More on rubber strippers
Last time, we were talking about rubber strippers and viewed photos of various rotary rubber-cutting devices. All the presently available rotary stripper models are expensive and produce acceptably accurate strips from rubber with consistent width. The newer models are easy to set up for a particular strip width and are fairly easy to work with. But how about us "po' folks"?
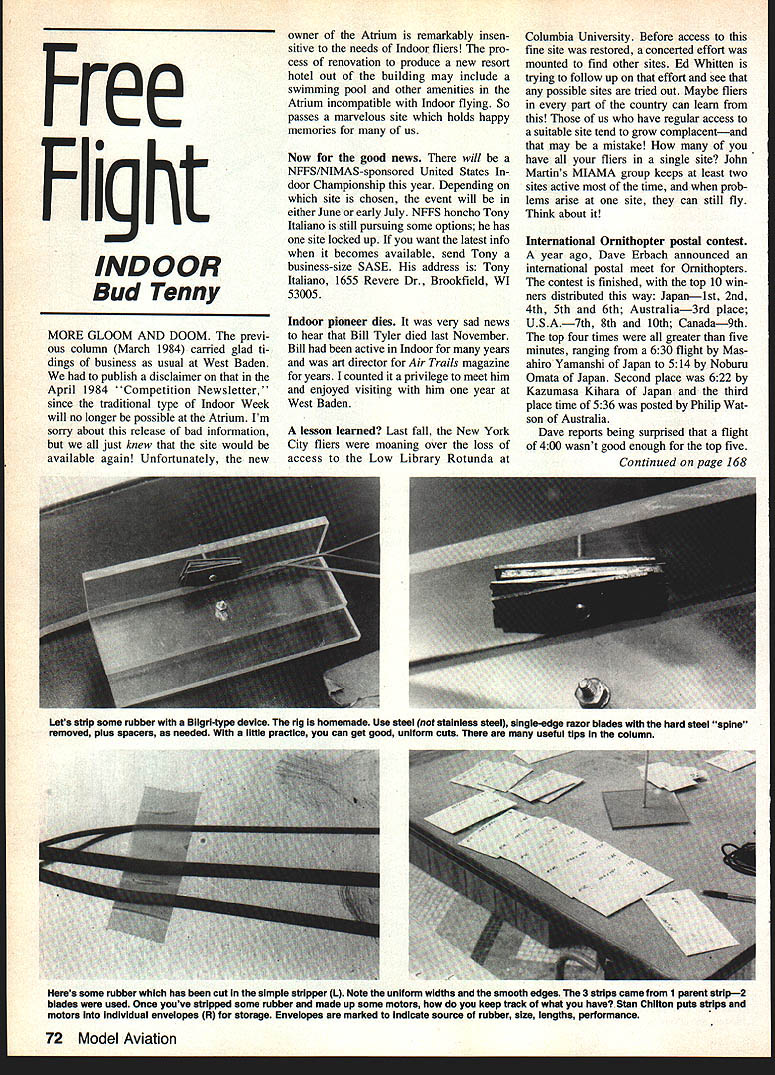
One photo shows a modified Bilgri-style stripper cutting three strips in one pass from 1/2-in. flat Pirelli. The latter was a scrap of balsa which was wedged between the movable guide and the vertical upright on the rubber input side. It keeps the rubber flat as it enters the cutting area. The basic Bilgri-style stripper is constructed from 1/4-in. Plexiglas, which is smooth and reasonably slick. The original idea was to use a single blade located to produce two strips of approximately equal width from whatever size rubber you had to start with.
Another photo shows a close-up of the blades on the improved version. In this particular setup, two steel (not stainless) single-edge razor blades are spaced by and clamped between stacks of variable-thickness shims. For multiple blades to be used this way, the thick reinforcing back must be removed from the blades.
In order to produce predictable results, you must allow for the thickness of the blades in computing strip width. Although this example used only two blades, three blades can be used to make four strips in one pass. By using the right technique, this low-cost stripper will produce excellent uniformity, even starting with a strip of non-uniform width. After a little practice, you can get whatever width of strip your supply of shims can produce. When the parent strip is of non-uniform width, the outer strips are scrap. Or, if you have some used Wakefield motors, use this technique to salvage the good inner strip while rejecting the nicked outer edges!
Stripper setup
The actual width of strip produced by a two-blade setup is equal to the thickness of one blade plus the total thickness of the material placed between the two blades. The shims must be perfectly flat so that the blades are parallel to each other and so that the clamp screw will not distort the blades when you tighten it. The same holds true for a third blade; if you use three blades, you should plan on the two center strips being about the same width. Similarly, the two outer strips (edges of the parent strip) should be close to the same width.
The reason for keeping strips close to the same width is that when you pull the rubber through the blades, a big difference in strip widths causes the narrow strip to have greater stress. The uneven stress tries to equalize, and the two strips gradually become more nearly the same width.
Technique for pulling
As with many other processes, certain techniques give better results. Once the blades are properly mounted with shims in place, pass the parent strip under the blades with about a foot of excess sticking out. Push the cutting corners of the blades through the rubber and wedge them into the Plexiglas. Slide the stripper's movable guide over your supply against the rubber and lock it down. Wedge a piece of balsa between the stripper guide and back plane to keep the rubber flat as it enters the cutting area. Anchor the stripper solidly in a location which gives you about six feet of room.
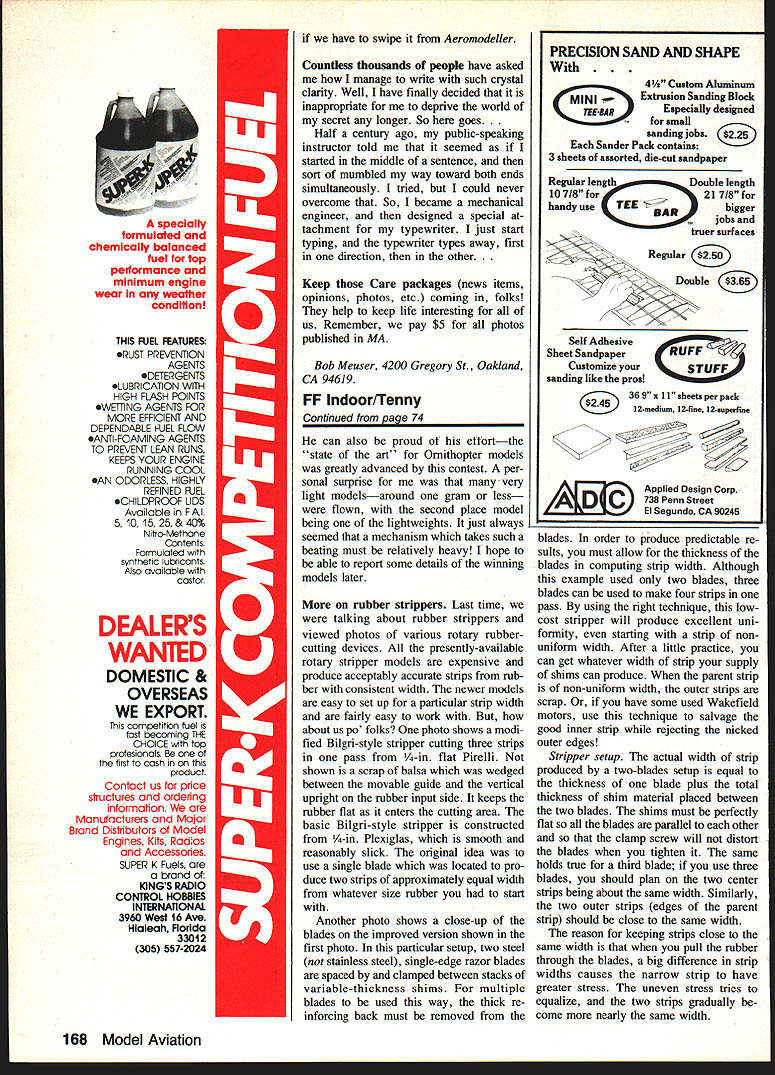
Pull slowly and steadily on the rubber, backing away from the stripper until the rubber is stretched at least four feet. After that, reel it in, hand-over-hand, still using a uniform pull. As the rubber cuts, it should move smoothly through the blades. Make a preliminary cut about two feet long, then measure the strips to be sure you have a setting you like. After that, you can probably cut about 50 feet of rubber before changing blades. The edges should be smooth with no major width changes.
Keep good records!
Once you have a supply of rubber cut, you will probably make up some motors. Be sure to label the storage containers for both the long strips and each motor, giving size, source (vintage?) of the rubber, and any other factor you need to help decide which piece to use. Stan Chilton's storage method shows individual envelopes marked with rubber size, weight and length, and a rating number from testing each motor. The really top fliers can come close to reproducing good flights time after time by keeping good records and using the information to set up prop/rubber combinations for each new contest.
Bud Tenny P.O. Box 545 Richardson, TX 75080
Transcribed from original scans by AI. Minor OCR errors may remain.

