
Free Flight: Indoor
Bud Tenny
Secrets (?) of Indoor Trim: Some indoor fliers who haven't been flying a long time simply assume that there are secrets of adjustment which make the winning models fly so much better than their own. In a limited context, this might be true: there are several model adjustments which improve the model's flight characteristics. However, three of the most important model adjustments literally are no secret, since they are clearly visible on the model, either in flight or at rest.
What's the Biggest Flight Problem? Probably the most persistent problem with indoor models is making them handle full power at launch. Marginal models stall, spiral down, fly straight under high power, and do several combinations of weird and distressing things. Most of the time, the owner catches the model, re-launches it only to find that it now behaves pretty well. The key is that the high-torque part of the power burst was popped off by cutting diodes, and by the time it has been launched again, the power is at a level the model can handle.
Three Fixes: All three of the adjustments can be made at the workbench—wing twist, stab tilt and left thrust. Normally, indoor model designs have the inboard wing a little longer to help control torque. It also is important to have wash-in (trailing edge low) in at least the inboard center panel, and a slight amount of wash-out (trailing edge high) in the outer center panel. Next, the stabilizer should be tilted to assist the turn (tilted toward the left, as viewed from the front, if the model has a normal left turn). Finally, a little bit of left thrust may either be necessary or helpful.
Inspect it! The very first pre-flight routine for any indoor model, either new or years old, is to assemble the complete model except for the prop, and hold it at arm's length by the nose. View it from head-on, checking each wing panel and the stab for proper twist and tilt. Fig. 1 shows what you should see, assuming your model has tip dihedral or polyhedral, except that the drawing is exaggerated a bit. The inboard center panel leading edge should be high, the outboard center panel leading edge slightly low, and the stab tilt should be clearly visible. If the wing tips are twisted, it should be only a tiny bit, and in the same direction as the adjacent panel. Otherwise, if the tip is not twisted, the effect is about the same as washed-out tips on a straight wing: that is, it tends to minimize tip stall. Excessive wash-in in the inboard tip causes high drag during the power burst, and may also make the tip stall at a crucial time. Literally, if the wing is weak and the inboard tip stalls, torque might wrap the wing around the fuselage! Excess wash-out in the outboard tip may cause the model to lame-duck around the circle, outboard wing dragging low like a wounded bird.
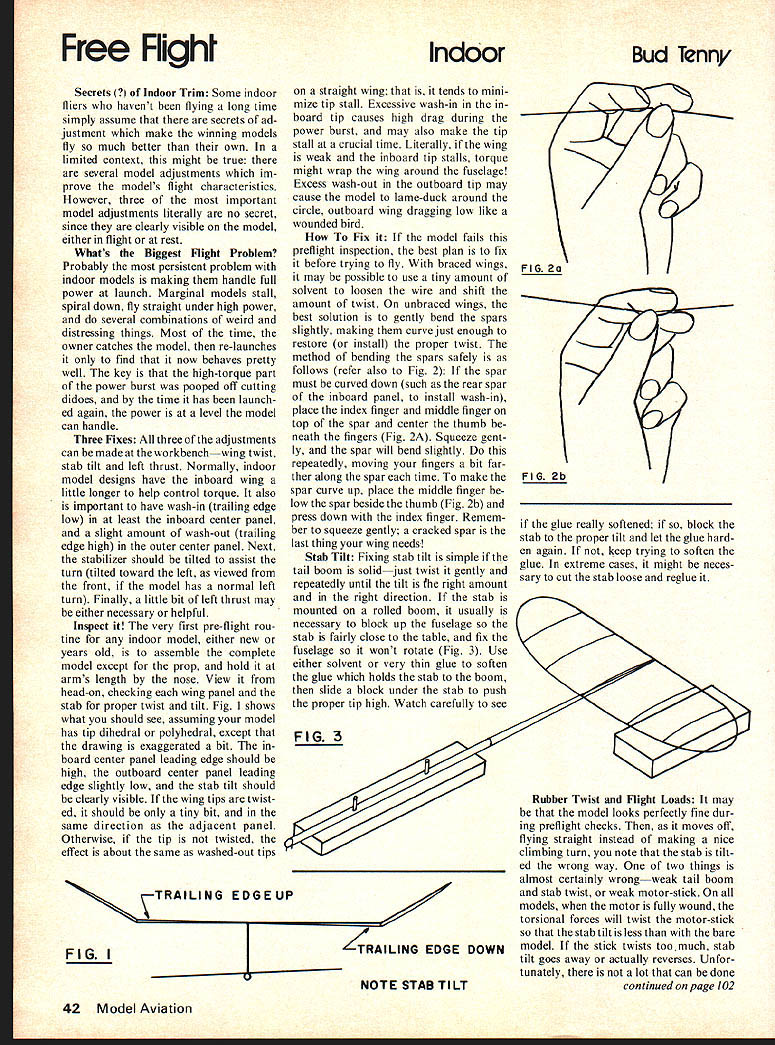
How To Fix it: If the model fails this preflight inspection, the best plan is to fix it before trying to fly. With braced wings, it may be possible to use a tiny amount of solvent to loosen the wire and shift the amount of twist. On unbraced wings, the best solution is to gently bend the spars slightly, making them curve just enough to restore (or install) the proper twist. The method of bending the spars safely is as follows (refer also to Fig. 2): If the spar must be curved down (such as the rear spar of the inboard panel, to install wash-in), place the index finger and middle finger on top of the spar and center the thumb beneath the fingers (Fig. 2A). Squeeze gently, and the spar will bend slightly. Do this repeatedly, moving your fingers a bit farther along the spar each time. To make the spar curve up, place the middle finger below the spar beside the thumb (Fig. 2B) and press down with the index finger. Remember to squeeze gently; a cracked spar is the last thing the wing needs!
Stab Tilt: Fixing stab tilt is simple if the tail boom is solid—just twist it gently and repeatedly until the tilt is the right amount and in the right direction. If the stab is mounted on a rolled boom, it usually is necessary to block up the fuselage so the stab is fairly close to the table, and fix the fuselage so it won't rotate (Fig. 3). Use either solvent or very thin glue to soften the glue which holds the stab to the boom, then slide a block under the stab to push the proper tip high. Watch carefully to see if the glue really softened; if so, block the stab to the proper tilt and let the glue harden again. If not, keep trying to soften the glue. In extreme cases, it might be necessary to cut the stab loose and reglue it.
Rubber Twist and Flight Loads: It may be that the model looks perfectly fine during preflight checks. Then, as it moves off, flying straight instead of making a nice climbing turn, you note that the stab is tilted the wrong way. One of the things almost certainly wrong—weak tail boom and stab twist, or weak motor-stick. On all models, when the motor is fully wound, the torsional forces will twist the motor-stick so that the stab tilt is less than with the bare model. If the stick twists too much, stab tilt goes away or actually reverses. Unfortunately, there is not a lot that can be done
continued on page 102 on the field—the motor-stick must be replaced or strengthened. If the tail boom is too weak, the stab may "wander" into reverse tilt, or if the stab is slightly twisted, it may "fly" into reverse tilt. Either way, if the stab is twisted so that flight loads tend to increase tilt in the proper direction, the model may be usable. Try warping or bending the stab spars to produce the proper twist.
Left-Thrust
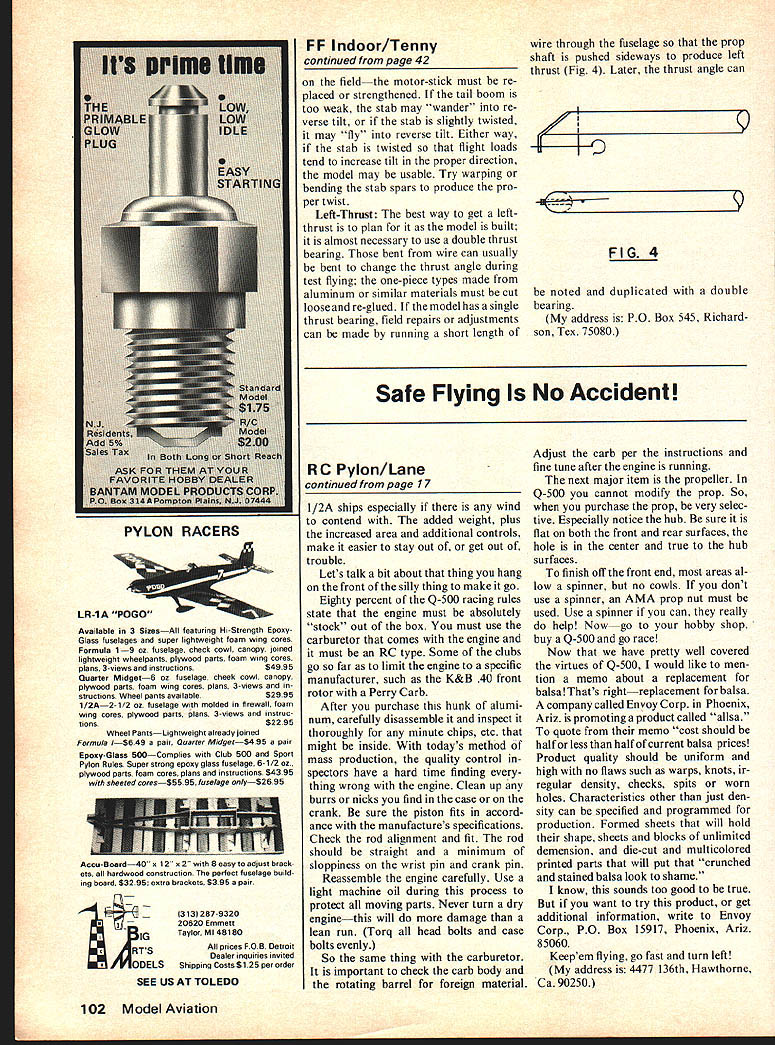
The best way to get a left-thrust is to plan for it as the model is built; it is almost necessary to use a double thrust bearing. Those bent from wire can usually be bent to change the thrust angle during test flying; the one-piece types made from aluminum or similar materials must be cut loose and re-glued. If the model has a single thrust bearing, field repairs or adjustments can be made by running a short length of wire through the fuselage so that the prop shaft is pushed sideways to produce left thrust (Fig. 4). Later, the thrust angle can be noted and duplicated with a double bearing.
(My address is: P.O. Box 545, Richardson, Tex. 75080.)
Transcribed from original scans by AI. Minor OCR errors may remain.

