
Free Flight: Indoor
Bud Tenny
Be prepared!
Now that the indoor season is winding down, you may only have the Nats and the U.S. Indoor Championships to look forward to. If you have new or freshly repaired models, you need to get them trimmed for the big meets to come.
Flight test profiles
If you are really serious about getting the most out of your indoor models, you need to check several things. The simplest in-flight data you can take is average propeller rpm; a much more meaningful measurement is a plot of rpm vs. time. Once you know the normal cruise rpm, you have a quick check on the model's condition. I once lost a contest because I failed to check the trim of a model after noting an increase in cruise rpm. I failed to recognize the importance of what I saw.
Nit-picking tests
Almost any kind of model testing can be done in low-ceiling sites by using the right techniques. Average rpm and rpm vs. time measurements can be made on any flight. Level flight torque can be measured in any site with room for the model to circle undisturbed.
Special precautions
Whenever you start a testing program, be sure the model's CG (center of gravity) doesn't change during the tests. If you're testing different props, all props must weigh the same, even if you have to ballast the lighter props. Always use the same weight of rubber you will fly with. There are two reasons for this:
- Changing rubber weight changes the wing loading.
- If the model's CG isn't midway between the rubber hooks, changing rubber weight changes the model's balance.
A final precaution: learn a repeatable winding technique, using a torquemeter.
Winding techniques
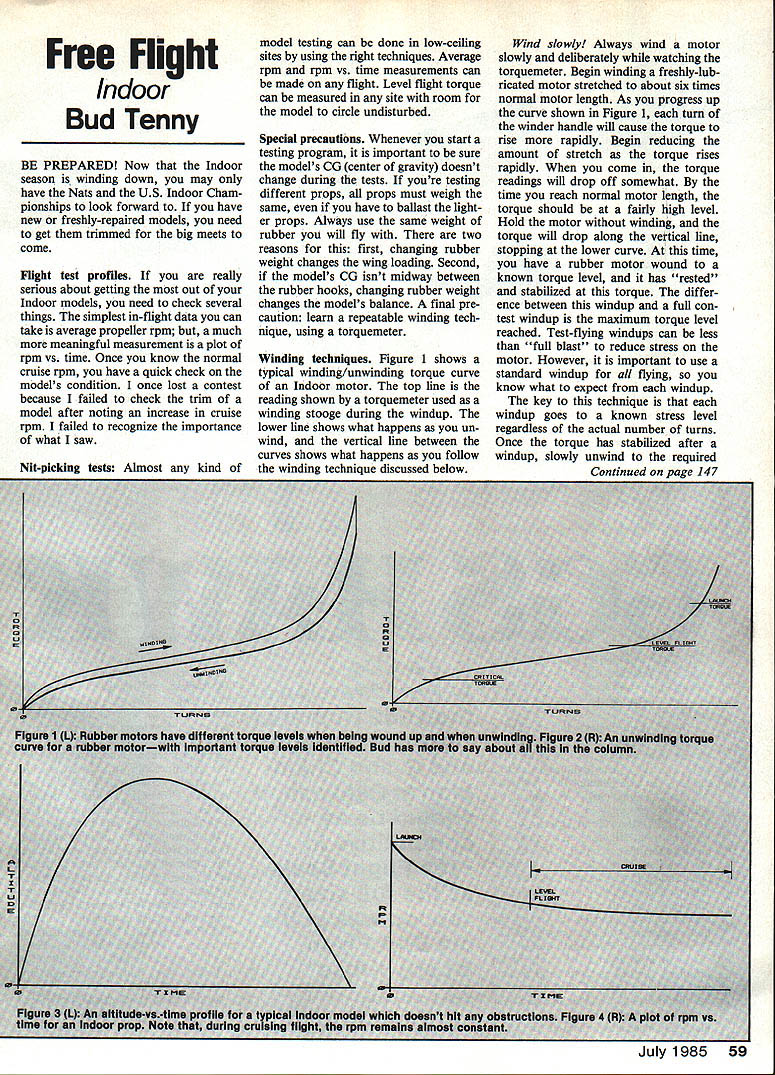
Figure 1 shows a typical winding/unwinding torque curve of an indoor motor. The top line is the reading shown by a torquemeter used as a winding stooge during the windup. The lower line shows what happens as you unwind, and the vertical line between the curves shows what happens as you follow the winding technique discussed below.
Wind slowly! Always wind a motor slowly and deliberately while watching the torquemeter. Begin winding a freshly lubricated motor stretched to about six times normal motor length. As you progress up the curve shown in Figure 1, each turn of the winder handle will cause the torque to rise more rapidly. Begin reducing the amount of stretch as the torque rises rapidly. When you come in, the torque readings will drop off somewhat. By the time you reach normal motor length, the torque should be at a fairly high level. Hold the motor without winding, and the torque will drop along the vertical line, stopping at the lower curve. At this time you have a rubber motor wound to a known torque level, and it has "rested" and stabilized at this torque.
The difference between this test-flying windup and a full contest windup is the maximum torque level reached. Test-flying windups can be less than "full blast" to reduce stress on the motor. However, it is important to use a standard windup for all flying, so you know what to expect from each windup.
The key to this technique is that each windup goes to a known stress level regardless of the actual number of turns. Once the torque has stabilized after a windup, slowly unwind to the required launch torque, allowing the torque to settle as you go.
Test profiles
Figure 2 shows a typical unwinding torque curve with three values marked. (This curve is a copy of the lower part of Figure 1.)
- Launch torque is the actual torque developed by the motor at launch. This is a very critical number if you're flying in a ceiling that isn't safe for ceiling-scrubbing or rafter-banging. In a given situation, the same model/prop/rubber combination will climb almost exactly the same distance each time if you use the same launch torque and a standard windup.
- Level flight torque is the torque at which the model maintains the same altitude.
- Stall torque and critical torque: critical torque is that torque level at which the model will pitch down. When critical torque is reached, a properly trimmed model pitches down into an underpowered glide. Since the motor can't keep the rpm up, the model "pushes" the prop and loses altitude rapidly.
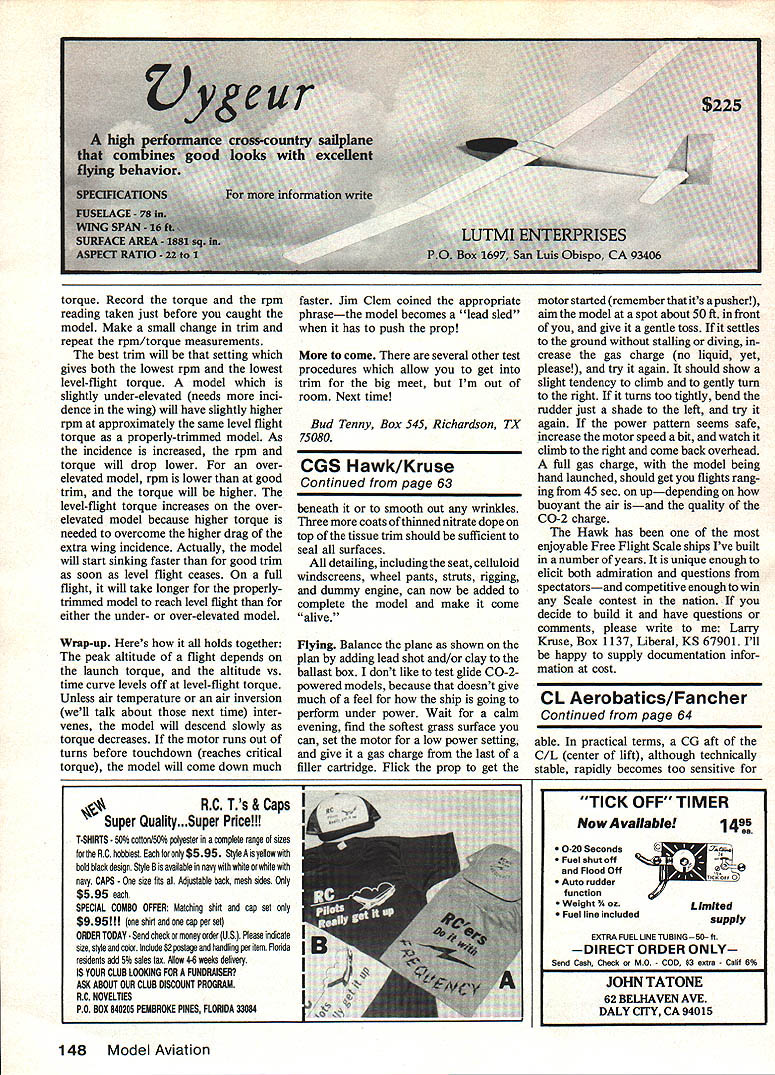
Figure 3 shows the flight profile (altitude vs. time) for a model that doesn't touch the ceiling or walls. Figure 4 shows a typical rpm/time plot. Note that the rpm reaches a normal constant value and doesn't change unless critical torque is reached. Once critical torque is reached, the rpm will change; how much it changes is meaningless, since the flight is essentially finished.
What do I do?
A new model built to an existing, proven design will probably have the CG in a good location, and you should have a good idea about the rubber size required. Really, all that is left is to fine-tune the trim. To get this right, the site must be free of major drift and turbulence. Without calm air, it is almost impossible to make good measurements.
You will want to measure level flight torque and cruise rpm, both at the same time. Suggested procedure:
- Make some short test hops at low launch torque, trying to locate a torque which makes the model climb slightly, then level out.
- On real test flights, launch the model about knee height, with launch torque which makes it climb no higher than you can reach.
- Be careful to avoid generating turbulence as you move out of the flight circle after the launch.
- When the model levels out, catch it and measure the cruise rpm. Repeat the test until you obtain consistent rpm readings.
If the rpm is higher than normal, add small amounts of nose weight; if it is lower, remove nose weight. If the model climbs too steeply, move the CG slightly aft. Once the model is set so it climbs and levels out, do some full flights to check duration and stability and make any necessary minor trim adjustments. Record the torque and the rpm reading taken just before you caught the model. Make a small change in trim and repeat the rpm/torque measurements.
The best trim will be that setting which gives both the lowest rpm and the lowest level-flight torque. Notes on incidence and trim:
- A model that is slightly under-elevated (needs more wing incidence) will have slightly higher rpm at approximately the same level-flight torque as a properly trimmed model. As the incidence is increased, the rpm and torque will drop.
- For an over-elevated model, rpm is lower than at good trim, and the torque will be higher. Level-flight torque increases on the over-elevated model because higher torque is needed to overcome the higher drag of the extra wing incidence. The model will start sinking faster than for good trim as soon as level flight ceases. On a full flight, it will take longer for the properly trimmed model to reach level flight than for either the under- or over-elevated model.
Wrap-up
Here's how it all holds together: the peak altitude of a flight depends on the launch torque, and the altitude vs. time curve levels off at level-flight torque. Unless air temperature or an air inversion intervenes, the model will descend slowly as torque decreases. If the motor runs out of turns before touchdown (reaches critical torque), the model will come down much faster. Jim Clem coined the appropriate phrase—the model becomes a "lead sled" when it has to push the prop!
More to come
There are several other test procedures which allow you to get into trim for the big meet, but I'm out of room. Next time!
Bud Tenny, Box 545, Richardson, TX 75080
Transcribed from original scans by AI. Minor OCR errors may remain.

