
Free Flight: Indoor
Bud Tenny
Explanations
I used a concept—"push the prop"—in the last column. That comment may require an explanation. Before a rubber motor reaches "critical torque" during the cruise, the model is in a delicate balance, trimmed for minimum sink (minimum power expended). When the torque drops too low, the model slows up slightly, reducing the lift from the wing. Lower lift makes the nose drop, and the model picks up speed. Since the torque is too low to maintain an rpm to match the speed, the prop slows down. The energy to speed up the prop comes from the model's shallow dive, as it pushes the prop to keep the rpm up.
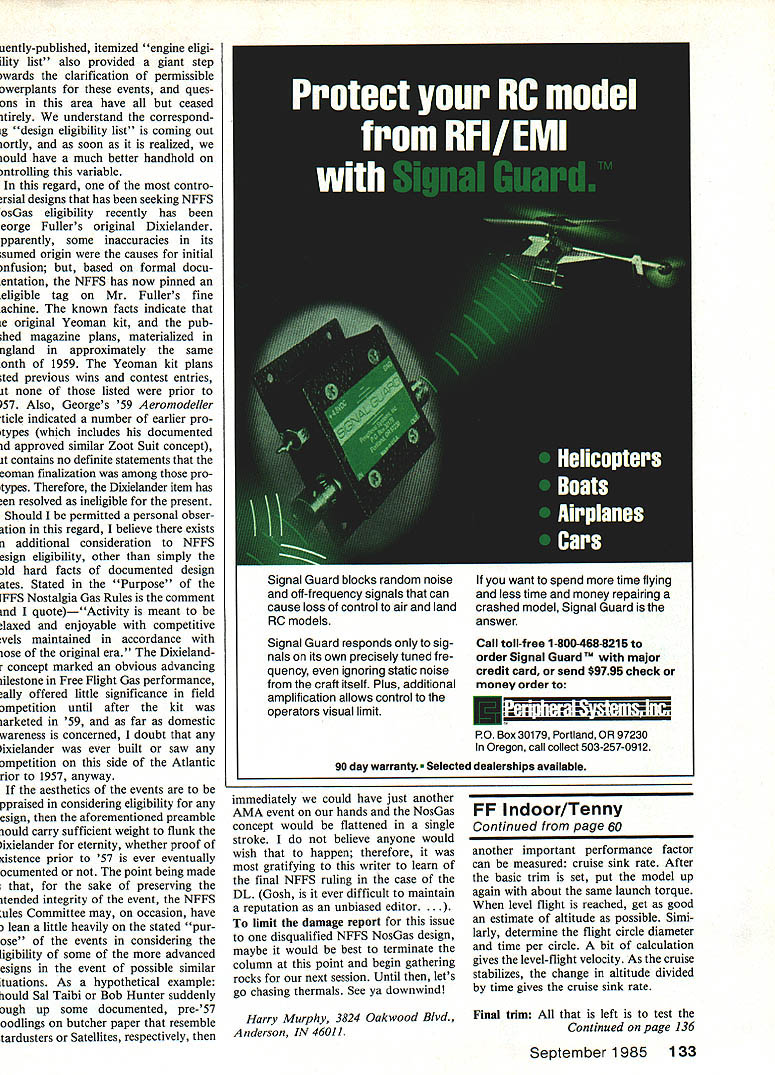
Air temperature and air inversions were also mentioned as affecting the flight profile of altitude vs. time. Let's take temperature first. Rubber has a definite response to temperature change which must be allowed for. Many materials expand with an increase in temperature, but rubber shrinks. This means that a motor contracts when it gets warmer. The torque increases with increased tension, with Figure 1 showing the effect on the flight profile if a model flies into warmer air. What happens is that the increased torque stretches the level flight portion of the flight. This boost from warm air could increase the rate of climb if the warm air layer is entered sooner, perhaps causing the model to climb too high if it is slightly over-wound.
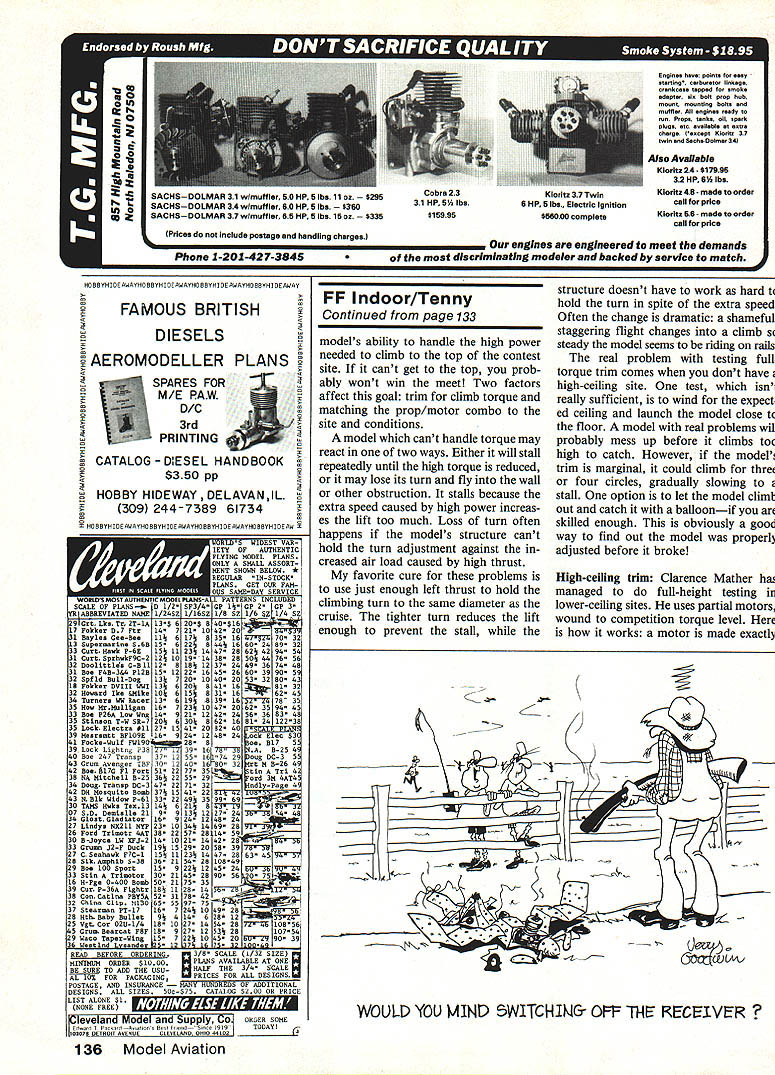
If the model drifts into warm air during the cruise, the increased torque can reduce the rate of descent as shown in Figure 2. Cold air can have the reverse effect as shown in Figure 3. Here, the cold air causes the motor to relax (expand, giving lower torque) so that the model sinks faster.
Temperature inversions also affect flight performance. The air in a building normally warms up beginning at the top. Inversions are formed when the lower air warms up first. No matter if warm or cold air is on top, an abrupt transition of temperatures often creates turbulence. This boundary between the air layers is often difficult for the model to penetrate, preventing the model from getting as high as it otherwise might have. If the model breaks through into cold air, the rubber will cool down, possibly reducing climb and hastening the start of the cruise.
More on testing
Last time, we left the test session with two things accomplished:
- You have trimmed the model for minimum level flight torque.
- You have documented two flight-performance factors: level flight rpm and level flight torque.
If you have at least one other helper, another important performance factor can be measured: cruise sink rate. After the basic trim is set, put the model up again with about the same launch torque. When level flight is reached, get as good an estimate of altitude as possible. Similarly, determine the flight circle diameter and time per circle. A bit of calculation gives the level-flight velocity. As the cruise stabilizes, the change in altitude divided by time gives the cruise sink rate.
Final trim
All that is left is to test the model's ability to handle the high power needed to climb to the top of the contest site. If it can't get to the top, you probably won't win the meet. Two factors affect this goal: trim for climb torque and matching the prop/motor combo to the site and conditions.
A model which can't handle torque may react in one of two ways. Either it will stall repeatedly until the high torque is reduced, or it may lose its turn and fly into the wall or other obstruction. It stalls because the extra speed caused by high power increases the lift too much. Loss of turn often happens if the model's structure can't hold the turn adjustment against the increased aero-load caused by high torque.
My favorite cure for these problems is to use just enough left thrust to hold the climbing turn to the same diameter as the cruise. The tighter turn reduces the lift enough to prevent the stall, while the extra altitude doesn't have to work as hard to hold the turn in spite of the extra speed. Often the problem is dramatic: a shameful, staggering flight changes into a climb so steady the model seems to be riding on rails.
The real problem with testing full-up torque trim comes when you don't have a high-ceiling site. One test, which isn't really sufficient, is to wind for the expected ceiling and launch the model close to the floor. A model with real problems will probably mess up before it climbs too high to catch. However, if the model's trim is marginal, it could climb for three or four circles, gradually slowing into a stall. One option is to let the model climb out and catch it with a balloon—if you are skilled enough. This is obviously a good plan, provided the model was properly adjusted before it broke.
High-ceiling trim
Clarence Mather has managed to do full-height testing in lower-ceiling sites. He uses partial motors wound to competition torque level. Here is how it works: a motor is made exactly one-half as long (half the weight) using the same rubber as for a full motor. The rest of the "motor" is a spacer with a hook at each end, weighing exactly half as much as a full motor. This technique requires very careful measurements, since the effect of an error is doubled. A plot of flight profiles taken with full and half motors theoretically would be like Figure 4.
Because many things can affect the results, this test is useful mostly to prove that trim is correct. Flight test measurements will be harder to take because each phase of the flight lasts only half as long. It is also possible to use one-third motors, given adequate care to reduce errors. Of course, the spacer needs to weigh two-thirds as much as a full motor.
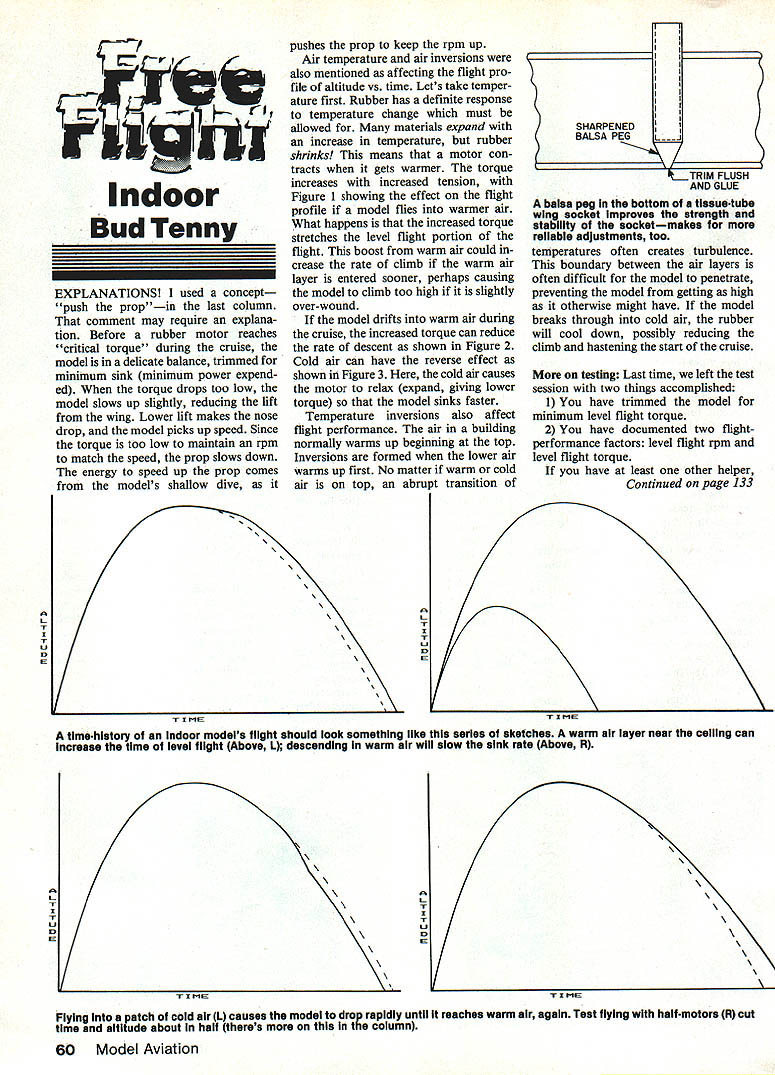
Hold the trim
Once the model has been adjusted, you must be able to get the same trim setup every time. Many models adjust by setting the wing posts. You can make more reliable adjustments if the proper adjustment has the posts bottomed in the sockets. Figure 5 shows how to install sockets for maximum reliability. A balsa plug in the bottom of the socket is sharpened, stuck through the bottom of the motor stick, and glued. The point is then sanded flush to avoid interfering with the motor. The socket has now been firmly anchored, and the plug gives a good base to bottom the wing post against.
Bud Tenny, Box 545, Richardson, TX 75080.
Transcribed from original scans by AI. Minor OCR errors may remain.

