
Free Flight: Indoor
Bud Tenny
PROP STRUCTURE BASICS
Prop wobble caused by structural variations is the hardest problem to spot and fix. Previously we covered geometry problems — blade angle, twist, and shaft alignment — and repairs to keep working props wobble-free. Here I describe how to get a wobble-free prop to begin with. The lighter you want the prop, the harder it is to make it wobble-free.
A Pennyplane (P/P) prop is usually sturdy enough to handle the high power required to drive a three-gram model. However, a world-class FAI Stick model typically has much higher relative stress on the prop structure. For example: a typical P/P prop may weigh 0.021 oz and be driven by 0.066 oz of rubber (a ratio > 3:1). An FAI prop may weigh 0.0065 oz with 0.036 oz of rubber — a 5.5:1 ratio. If both rubber loops are similar in length, the P/P launch torque could be twice as high as the FAI in an unlimited-ceiling site.
Prop flare
A typical P/P prop, with sheet-balsa blades on a spar, will probably not deflect noticeably under full torque. An FAI prop built up from lighter, thinner components will distort much more under full torque. If the structural geometry of each blade in a P/P prop is matched, it should run properly. After careful repairs, even a damaged prop can continue to work well.
Weight imbalance vs. geometry
Contrary to some beliefs, a weight imbalance between blades on an indoor prop usually has a small effect compared to differences in blade angle, twist, or shaft misalignment.
Easy B props — blade matching
Competition-grade Easy B props must be all balsa and are very light and delicate. They require unusual care in construction: spars must be matched exactly and blades must be closely matched. Good blade-matching for Easy B requires these steps:
- Select a sheet of wood with maximum uniformity in thickness and density across the entire sheet. Measure thickness with calipers at several places on both sides.
- Balance the sheet to check density uniformity. The balance point should be at the center if density is uniform.
- Inspect the grain using a light table. If unavailable, hold the balsa against a window in daylight to view grain uniformity.
- If the grain isn't parallel to the blade centerline, align the blade templates so the grain is parallel to the blade centerline.
- After cutting the blades, weigh each blade to ensure matching. As you sand and taper to final shape, monitor both thickness and weight. Use very fine sandpaper and work slowly to avoid removing too much wood.
- Use non-shrinking glue and an assembly fixture (prop block) to build the prop. Non-shrinking glue prevents warping as it dries; the fixture assures correct alignment. Form blades simultaneously on the block, then assemble to the shaft/spar one blade at a time. If the prop needs repair later, use the block to assure correct alignment.
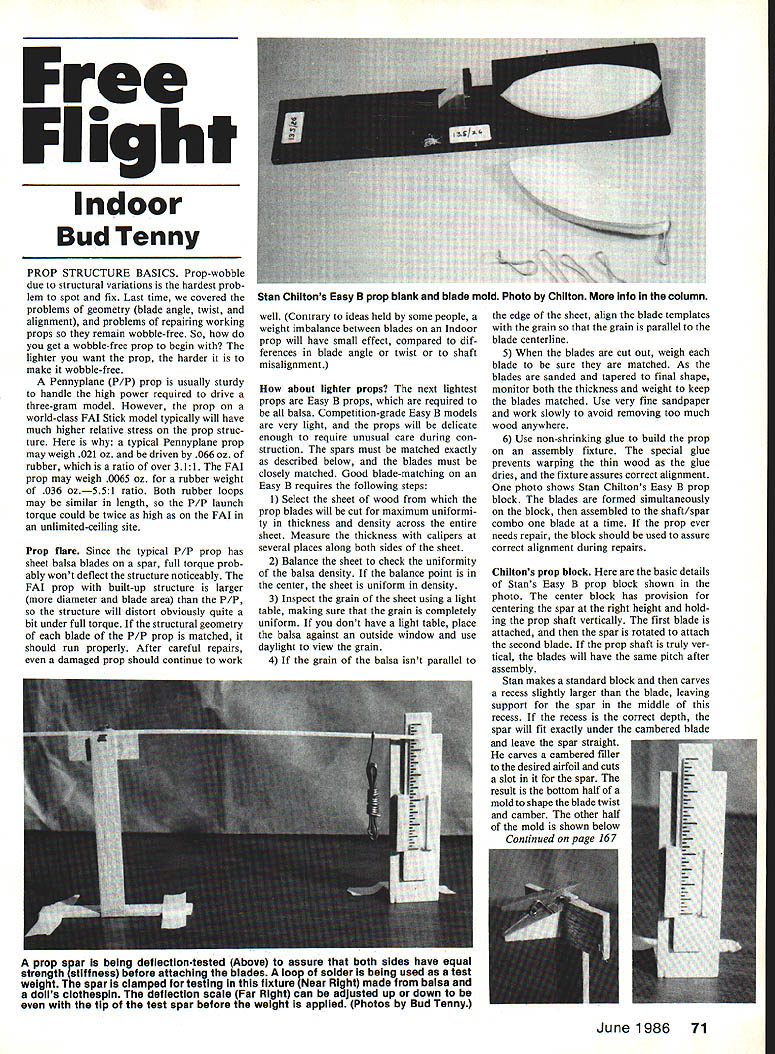
CHILTON'S PROP BLOCK
Block design and molding
Stan Chilton's Easy B prop block (described here) centers the spar at the correct height and holds the prop shaft vertically. The first blade is attached, the spar is rotated, and the second blade is attached so the two blades have the same pitch after assembly.
Stan carves a recess slightly larger than the blade, leaving support for the spar in the middle of the recess. If the recess is the correct depth, the spar fits exactly under a cambered blade and remains straight. He carves a cambered filler to the desired airfoil and cuts a slot for the spar; the two halves form a mold that shapes blade twist and camber.
The prop block uses a 1/16-in. rubber foam insert exactly blade-shaped and epoxied to a dummy blade (made of 1/2-in. balsa) that has the required twist and camber. Both new blade blanks are clamped inside the mold to form twist and camber.
PROP ASSEMBLY
After sanding and painting the blade blanks, Stan soaks them in warm water for about 30 minutes. Three pieces of Japanese tissue are cut 1/2 in. larger than the blades. The tissue layering and molding procedure is:
- Place the first tissue on the bottom half of the mold.
- Lay the first blade on the tissue and cover it with the second tissue.
- Lay the second blade on top and cover it with the third tissue.
- Put the top half of the mold (with foam rubber next to the tissue/blade “sandwich”) in place, strap with rubber bands, and bake in an oven at about 175°F.
The tissue and clamping prevent raised grain caused by water-soaking and produce a finished prop with smooth surface. Use care when removing blades from the mold; a wire inserted in the spar slot can help separate the blades from the block.
Stan prepares a slow-drying glue by filling lacquer with retarder and thinning to brush-consistency. He glues the spar to either the tip or root of the blade first, then applies glue to the top edge of the spar and clamps the blade in place with the top of the mold until the glue is dry.
PROP SPARS
The spar must absorb most of the rubber energy, so each side must have the same stiffness to keep the prop in correct alignment. A weak or damaged spar will change blade geometry under load and cause wobble. Spar halves must match in both thickness and density.
For those splicing two half-spars, cut spar halves in pairs (side-by-side) from the same sheet of balsa so the raw halves start with the same cross section. Stan uses a tapered guide and sanding block to taper spars to identical cross sections at measured locations along the blade. After sanding to an exact match, splice the spars and attach the prop shaft.
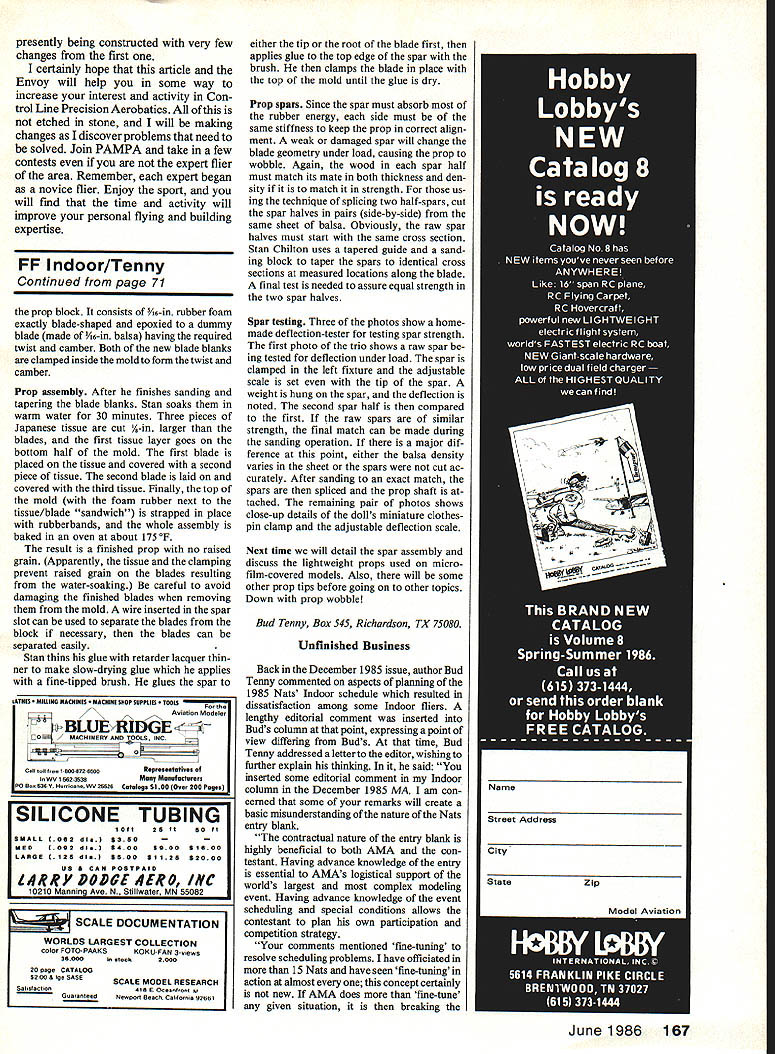
SPAR TESTING
Stan uses a simple deflection tester to check spar strength. The test clamps the spar at the root, applies a known weight at the tip, and measures deflection on an adjustable scale. Test one spar half, then compare the second half. If spars differ, final matching can be done during sanding. If differences are large, the balsa density may vary in the sheet or the spars were not cut accurately.
Photographs show the raw spar in the tester, the adjustable deflection scale, a weight hung on the spar, a close-up of a miniature clothespin clamp, and the adjustable scale detail.
NEXT TIME
Next time: details of spar assembly, discussion of the very light props used on micro-CL models, and additional prop tips before moving on to other topics. Down with prop wobble!
Bud Tenny Box 545, Richardson, TX 75080
Transcribed from original scans by AI. Minor OCR errors may remain.

